Braddon81 Posted January 5, 2018 Share Posted January 5, 2018 That's looking absolutely glorious ☺ I'd be tempted to possibly get some magnetic signage made up so you can pull it off and however your mood takes?Have you considered putting up a painting with a rattle can thread tutorial? Your results with the paintwork are quite superb and I'm quite sure a lot of us would benefit from a few tips. ☺ alf892, Brodders, uk_senator and 4 others 7 Link to comment Share on other sites More sharing options...
trigger Posted January 5, 2018 Author Share Posted January 5, 2018 Thank you! I have thought about writing a thread but people always nit pick and say they would do things differently so I'd sooner just get on with the job, realistically though it's all in the prep, take your time to get that correct and the rest will follow. Craig the Princess, oldcars, Carlosfandango and 2 others 5 Link to comment Share on other sites More sharing options...
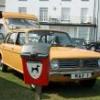
dollywobbler Posted January 5, 2018 Share Posted January 5, 2018 Great stuff. I'm afraid I vote no to livery too. It's great as it is! I would like to see a BT replica, but only if it had the correct ladders and wonky rear bumpers and fog lights as per the photo. Mr_Bo11ox, HillmanImp and trigger 3 Link to comment Share on other sites More sharing options...
Mr_Bo11ox Posted January 5, 2018 Share Posted January 5, 2018 Looks super tidy Trigsbury trigger and oldcars 2 Link to comment Share on other sites More sharing options...
busmansholiday Posted January 5, 2018 Share Posted January 5, 2018 Looks great that Trigger. As I said in a previous post on this, we spent a lot of time at work with ours getting company logos off with the jet washer. Leave it as it is, it's spot on. trigger 1 Link to comment Share on other sites More sharing options...
Zelandeth Posted January 6, 2018 Share Posted January 6, 2018 My vote: small complimentary coloured coach line, no livery. Lovely depth to that paint, hard to believe it's not been done in a spray booth. trigger 1 Link to comment Share on other sites More sharing options...
oldcars Posted January 6, 2018 Share Posted January 6, 2018 It looks spot on. Massive want. trigger 1 Link to comment Share on other sites More sharing options...
Ben_O Posted January 6, 2018 Share Posted January 6, 2018 This is a real labour of love and a real credit to you. It looks fantastic. My Granddad had one back in the day although his was white with red coach lines trigger 1 Link to comment Share on other sites More sharing options...
trigger Posted January 15, 2018 Author Share Posted January 15, 2018 Who would like a update with decent photos for once?. No?. Well tough, in between changing nappies and being knuckle deep in shit I've been chipping away with little jobs on the van, mechanically i've gone right through it now and replaced most things, most recent jobs was the coolant, oil change and ignition bits, it starts and runs well but tick over is all over the place and it's running very rich, I've had a play with the carb but I'm out of my depth and don't want to make it worse so I'll leave that job to someone who knows what they are doing. The next job was to fit the USB stereo inside the glovebox, stealth like, this caused me a few headaches as the vans never had a radio fitted before, I found a ignition 12v and live 12v behind the glovebox wired the radio up and it kept switching on and off even though i had a good feed?. Dad came over and had a look, after about a hour of head scratching we found a new 12v feed and that worked perfectly so god know what happened there. I done the same set up before in the Dolomite and i think it works well as it gives modern sounds without having a ugly modern stereo in the dash, these mechless stereos have a much shorter body as they don't have a CD player inside meaning they fit nicely inside the glovebox, £37 for the stereo of Amazon and £5 for the surround of ebay, cheap as chips. I plan on doing the same on the SD1 although the glovebox in that slopes. I've fitted a speaker inside the dash where they would be in a car and I plan on fitting a pair of round 200w speakers I've got in the back once I've ply lined it. So back to the photos, which I've just discovered is mega annoying uploading now from the PC as it's only allowing me to upload one at a time?! anyway i digress... I still need to polish it and clean it properly. This side still needs welding and painting, the carrier bag was to protect my filler in the wet!, I'm just waiting on a mate to finish welding this for me. The engine bay looks a lot better now, though i managed to spill a load of oil all over it earlier... The back will be ply lined I've fitted a Chinese £5 LED light of ebay in the back, it's surprising good for the money. The interior is a bit cleaner now too, if a bit basic! And all the underside is now undersealed, waxoyled and treated, better than it was when new! so there the current progress, It's come along way in 2 months! Welding and then MOT next! wuvvum, Arthur Foxhake, Coprolalia and 44 others 47 Link to comment Share on other sites More sharing options...
beko1987 Posted January 15, 2018 Share Posted January 15, 2018 Yum! Link to comment Share on other sites More sharing options...
plasticvandan Posted January 15, 2018 Share Posted January 15, 2018 very simple way to get the carb set up, raise the tickover a bit,unscrew the jet nut (richer) until it runs lumpy,then screw back in till it starts to race away evenly,then drop the tickover.obviously check for vac advance hose leaks/dashpot etc purplebargeken and trigger 2 Link to comment Share on other sites More sharing options...
vulgalour Posted January 15, 2018 Share Posted January 15, 2018 That's turned into a nice smart old van. Less is more, for sure. trigger 1 Link to comment Share on other sites More sharing options...
trigger Posted January 15, 2018 Author Share Posted January 15, 2018 Thank you, I'm pleased with it so far, I'll probably fit the roof rack and the old wooden ladder but i won't bother with sign writing now. purplebargeken, Skizzer and Ghosty 3 Link to comment Share on other sites More sharing options...
320touring Posted January 15, 2018 Share Posted January 15, 2018 Excellent stuff triggersons! Should make Aberdeenshire no bother come June;) Supernaut 1 Link to comment Share on other sites More sharing options...
HMC Posted January 15, 2018 Share Posted January 15, 2018 That looks brilliant, the paint you've let in matches up a treat! Link to comment Share on other sites More sharing options...
trigger Posted January 15, 2018 Author Share Posted January 15, 2018 That looks brilliant, the paint you've let in matches up a treat! The camera lies a bit, it's a tad darker but I'm not going to worry over a 34 year old van! alf892 and DeeJay 2 Link to comment Share on other sites More sharing options...
Parky Posted January 15, 2018 Share Posted January 15, 2018 That's quality that is, great work! What's the deal with the door trims? They aren't standard BL are they? Link to comment Share on other sites More sharing options...
vulgalour Posted January 15, 2018 Share Posted January 15, 2018 I'm sure those are standard for the commercial versions, it was only the cars that got the fancier vinyl trims. Shouldn't be too difficult to put fancy ones in if you wanted to. Didn't the vans sometimes have mats made of interlocking rubber blocks instead of the rubber mat this one has? Link to comment Share on other sites More sharing options...
trigger Posted January 15, 2018 Author Share Posted January 15, 2018 What's the deal with the door trims? They aren't standard BL are they? They sure are!, it's all about the painted MDF board! Parky 1 Link to comment Share on other sites More sharing options...
mk2_craig Posted January 15, 2018 Share Posted January 15, 2018 Great progress Trigger! trigger 1 Link to comment Share on other sites More sharing options...
Shep Shepherd Posted January 15, 2018 Share Posted January 15, 2018 A Streetvan Named Desire Tadhg Tiogar 1 Link to comment Share on other sites More sharing options...
Guest Hooli Posted January 15, 2018 Share Posted January 15, 2018 A Shitevan Named Desire EFAS Tadhg Tiogar, trigger, Saabnut and 2 others 5 Link to comment Share on other sites More sharing options...
timolloyd Posted January 15, 2018 Share Posted January 15, 2018 What a belter. Full of respect for what you've achieved with a baby in tow. RobT, binhoker668 and trigger 3 Link to comment Share on other sites More sharing options...
junkyarddog Posted January 15, 2018 Share Posted January 15, 2018 34 year old van!It looks about 2 years old now,you are doing a fine job of it. trigger 1 Link to comment Share on other sites More sharing options...
mat_the_cat Posted January 15, 2018 Share Posted January 15, 2018 I've fitted a Chinese £5 LED light of ebay in the back, it's surprising good for the money. Nooooo, you have to keep the dim glow from an old fashioned bulb in it! Or at least a warm white LED Link to comment Share on other sites More sharing options...
trigger Posted January 15, 2018 Author Share Posted January 15, 2018 What a belter. Full of respect for what you've achieved with a baby in tow.The respect belongs to Mrs Trigger who's been kind enough to allow me outside! Doing shift work and nursery has helped too! The old rear light was a Unipart reversing light but it was pretty rubbish! Sent from my SM-G900F using Tapatalk Link to comment Share on other sites More sharing options...
Noel Tidybeard Posted January 15, 2018 Share Posted January 15, 2018 They sure are!, it's all about the painted MDF board! that'll be painted hardboard they hadn't invented mdf back then! Link to comment Share on other sites More sharing options...
trigger Posted January 15, 2018 Author Share Posted January 15, 2018 Oh yes, silly me, you are quite correct. Link to comment Share on other sites More sharing options...
mat_the_cat Posted January 15, 2018 Share Posted January 15, 2018 The old rear light was a Unipart reversing light but it was pretty rubbish! If it takes a normal reversing light bayonet cap bulb, I have a warm white LED you can have - that's if it bothers you of course! I fully admit I am a little bit sad in these matters, but at least it's not as bad as fitting a set of purple HIDs... trigger 1 Link to comment Share on other sites More sharing options...
Noel Tidybeard Posted January 15, 2018 Share Posted January 15, 2018 what it needs of coures is a 12v caravan fluorescent light for maximum giffer/shitter/80's modification correctness mat_the_cat 1 Link to comment Share on other sites More sharing options...

Recommended Posts
Create an account or sign in to comment
You need to be a member in order to leave a comment
Create an account
Sign up for a new account in our community. It's easy!
Register a new accountSign in
Already have an account? Sign in here.
Sign In Now