Jump to content

1981 Austin Princess - [expletives removed]


Recommended Posts

Posted

And thinking a little harder, I'm pretty sure the ozzies experimented with a V8 Landcrab too! There was a V8 Austin 3 litre built at the factory but that is wrong wheel drive and therefore should be ignored from my ramblings.

Posted

Fit a hayabusa unit on a space frame like they do with Minis!

Posted

I've just spent another full day on this car today. I'll update with progress when I'm less knackered.

Posted

If you were following Twitter you'd know why an MoT hasn't yet happened.  Princesses, they're all the same really.

Posted

Well then chaps, it seems about time I got this up to date - although I could do with updating the threads for the Lancia and Supra more as there has been months of work on those unreported.


Saturday I set out to fix the blow on the exhaust, fit the check straps and give everything a check over to make sure it was ready for the MOT which is booked for Tuesday. I got it jacked up at the back having found that the exhaust blow was in pretty much the middle of the car, just ahead of the front box. I thought the check straps would be easier to fit with the back end up in the air, foolishly forgetting that the rear axle would droop down below where the check straps would reach.


Anyway the exhaust was professionally* fixed using a can that once contained TESCO KIDNEY BEANS, an old jubilee clip and a tube of exhaust paste. I would have welded it up but it looked a bit awkward and I’m pretty sure that if I’d started trying to clean up the metal ready for welding I would end up grinding it all the way back to the exhaust tip and the manifold as none of it looks to be made of anything other than particularly solid rust.


pIZywRA.jpg


While doing this, decently sized rust bleb on the passenger sill which with a poke became a hole, but one that was easily sorted. Once the exhaust was done I had a bit more of a poke around underneath and initially just found a couple of more small rust holes on the passenger sill and one on the drivers sill but then I made a big mistake. I spotted a small piece of pealing underseal in the rear corner of the passenger side floor pan, I then picked at it and found some crusty brown rot above which was then poked with a screwdriver and while it didn’t make a hole it didn’t seem awfully solid.


I pulled the back seat (also known as bed) out and this is what it looked like from the other side. Not great.


gJrm4h6.jpg


I didn’t much care for this at all and decided to get rid of this rot in the floor pan as there was part of the rear sub frame quite clearly attached to it. The grinder was pulled out of the garage and the quiet Saturday morning my neighbours were enjoying was shattered – and also before long the floor pan had a massive hole in it, and the sub frame mount wasn’t looking too special either.


h6jckmd.jpg


I carefully chopped out rotten bit of floor and then the sub frame mount and made up a new one, welding it into place a little later. While cutting out the floor I noticed another problem, one which I thought only afflicted the Peugoet 405 1.6 Style, especially if it has a dent in the bootlid and seats like new.


A 20p in the hand brake mechanism!


IYppESD.jpg


By mid-afternoon I had also welded in the bit of floor pan which had taken longer than I had initially expected as is usually the way with welding. However with that corner welded up and the holes on the passenger side sill sorted I was still on schedule. Then I thought I really should check the same spot on the other side before the MOT tester did it for me – it was almost as bad as the side I had just sorted.


WKaZHnZ.jpg


No pictures of the drivers side at this point as I was pushed for time apart from this one of it looking suitably shonky in front of a selection of other rammel. Half way through the gas bottle ran out on the welder to a dash to Halfords in the Y10 (with the fuel light on) for an emergency bottle used up some more time I didn’t really have. In between these events I painted the inside of the Supras rear arches which I had finished welding up on Thursday so I now have red oxide and Hammerite all over my arms and in my hair.


oS5JZLu.jpg


By the time I had finished welding it was about half seven and the was going to start get dimpsy so I packed up and called it a day so I could have a shower and try and remove some of the paint.


Today I was up bright and early to finish off what I didn’t manage to sort on Saturday on both the Princess and the Supra. I lobbed the Supras bumper back on, making up a couple of bumper brackets to hold it in place. I then made another manic dash to Halfords for some underseal – lucky I have a trade card - and once I arrived home I set to undersealing the repairs.


The Supra also needed its brakes bleeding and brake pads changing having boiled its brake fluid a couple of weeks ago and the pads being pretty low. I did this while the Princess dried before I applied paint to protect the metal and dropped it back onto its wheels.


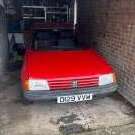
From working on these two cars in quick succession there is a simply vast difference between them in almost every possible way. You would never believe that they were built only 8 years apart as the whole driving experience, feel and look of the exterior and all the interior and general quality is light years ahead on the Supra. It’s amazing that BL had any customers at all as the quality is simply appalling, or appealing depending on which way you are looking at it.


J7VDGUV.jpg


I finished off today by fitting the check straps, and going for a test run before the rain set in. It went really well and feels as healthy as it did before the head gasket asploded. It is still back firing sometimes when you let off the accelerator and this seems to be impossible to resolve with mucking around the with timing, so I think the carb might be out of tune. There was one particularly big back fire which I think may have partially obliterated my exhaust repair but at least the fumes aren’t making their way into the cabin via the split gear lever gator any more. Does anyone have a better idea what this backfire might be caused by? There is also a slight stuttering and hesitation when running at a constant speed (about 50 in 4th will do it) but it is fine under acceleration, even just slightly.

Posted

I kind of imagine the backfires look as cool as this from the outside but suspect I would be exceedingly disappointed that they actually produce nothing but noise.


subaru+impreza+wrx+sti+backfire.jpg

tumblr_mjag1f7vxd1qht14oo1_1280.jpg?w=62

Posted

You never really hear a back firing car these days your neighbours probably think they're under grenade attack.

Posted

You never really hear a back firing car these days your neighbours probably think they're under grenade attack.


I'm wondering how eventful it will be when I have to slow down for horse riders. It's bound to happen sooner or later.

Posted

I will bet £1 that if the engine is otherwise running mint but backfiring when you take your foot off the accelerator, the mixture is just a gnat's too weak. Give the mixture screw 1/2 turn and see if the problem vanishes. You can always turn it back again if it doesnt. ONE WHOLE POUND!

Posted

I feel confident this car went to the right person.  I don't know what you did in a former life to deserve, but you're welcome!  I'd go with Mr B's suggestion too as Paul from the Princess Forum did lean the mixture off when he pumped it up and we were trying to get it to run better, it had been cranked all the way to maximum fuel when I got the car.

Posted

Could also be the condenser breaking down. My Somerset starting backfiring terribly (including one particularly loud one which I am reliably informed by the person following me, resulted in actual flames) just before the condenser died.

Posted

Sounds like lean mixture with a hint of air leak.


Try spraying wd40 on joints/throttle spindles to see if rpm changes

Posted

Well Bo11, it would appear that you owe me £1 as fucking about with the mixture screw made no difference what so ever. I have also adjusted the timing to make it retarded, advanced and everywhere in between and it still back fires, even when i have adjusted both the mixture and timing into loads of different combinations.

Next stop is dicky's suggestion of the condenser.


Sadly this will have to wait as yet again it's not charging! It's like this fucking car doesn't want to be saved. I'm going to lob the known good alternator from my Fiesta on it and see if it fancys some electricity from that instead.

  • Like 2
Posted

It's like this fucking car doesn't want to be saved.


Am I imagining things, or is this exactly what Vulgalour said ages ago?


Nil desperandum and all that, it'll thank you one day.  Plus you've just won a pound.

Posted

Keep at it, chum. Condensers are prone to faults, especially cheapo ones.

Posted

Am I imagining things, or is this exactly what Vulgalour said ages ago?


You remember quite correctly.

Posted

I think for the moment I won't concentrate on the misfire and will instead focus my attention on why this brand spanking new alternator is now kicking out less than a volt. Is there any way a car can kill an alternator, or could it just be bad luck and this one has failed really early?

Posted

Prob missed it in an earlier post but is the exiter circuit getting 12v? Bulb ok? Is the alternator bolted to the block or rubber mounted . Rubber mounted ones need a seperate earth strap.

Posted

Bolted straight to the block and I can't get the charge light bulb to do anything at all, along with the oil light and hazards light. There would seem to be a problem with the bottom row of tell tails on the dash. Is that likely to affect it?

Posted

A known good alternator off the Fiesta is also only kicking out .8 of a volt when bolted to the Princess. It seems like the lack of tell tales is the cause of this kerfuffle then. While all the bulbs look ok, looking at the circuits on the back of the dials it looks like the power to all of them is somehow routed through the interior clock. If all this is simply because the clock doesn't work then I will be rather cross.

Posted

I do have a spare clock... I don't know if it works.

Posted

Deffo need the charge light . to test the alternator rig a wire from the positive terminal of the battery to the small terminal on the alternator via a 5w sidelight bulb and test it then

Posted

I rigged up a charge light as above and it worked as it should, so that narrows it down to being the light at fault (or the circuit to it) so that's a step forward.


It's just odd that when the new alternator was bought and fitted it started charging for a while (it was showing almost 14v at one point) despite the light seemingly never working.

Posted

SHIT, i'm smarting over this quid, me and my big mouth

on the lane tonight then

Create an account or sign in to comment

You need to be a member in order to leave a comment

Create an account

Sign up for a new account in our community. It's easy!

Register a new account

Sign in

Already have an account? Sign in here.

Sign In Now
×
×
  • Create New...