Jump to content

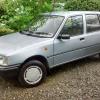
Lancia Y10 1.3 GTIe - Why will it not start?


Recommended Posts

Posted

I spent all day on this again today.

All I managed was to cut out a piece of lightly rotten metal with another piece of very rotten metal behind.

The reason this took so long was that it was in a very clearly visible but awkward place, just ahead of the boot lip, but behind the rear arch at the base of the C-Pillar. Without removing any significant pieces of intact structure, it was impossible to get any form of cutting implement in there, whether that be a grinder, tin snips or a hacksaw.

I ended up cutting it out with half an inch on the end of a hacksaw blade as that was all the space behind this bit of metal. It took fucking ages and was very boring and frustrating as the blade kept getting snagged.

Oh well at least it is done now, and it's not like I have to do the exact same on the other side. Oh no, wait that not right. I do have to do the exact fucking same on the other side. :(

Posted

Frying pan is better for your health than an asbestos sheet, and some pretty clever thinking I'd say. Just be sure to be seen outside by the neighbours at least once weilding a rake, shouting at the sky and wearing a tin foil tuxedo, you don't want them thinking you're too sane because then they'll think they can borrow your stuff.

Posted

^^ :lol::lol::lol:


I made a rudimentary fire proof hat out of an old frying pan. I must have looked clinically insane wearing a frying pan, ear defenders and goggles and brandishing a grinder


Pics or it didn't happen!


I love this thread. You are a welding god. 8)

Posted

A small amount of progress happened yesterday. No actual welding though, just the usual poking a small hole and an entire panel slowly crumbling away the more I poked.

Here are some indistinct and out of focus pictures of the rust that I thought was minimal and turned out to be fecking huge in the rear wheel arch…

img0249de.jpg

img0250mi.jpg

img0251ou.jpg

img0252ouk.jpg

img0264moe.jpg

img0265wq.jpg

img0266adk.jpg

Sorting it out internally won’t be a problem, as I have now cut out all the effected metal, bar some straggling twisted corrosion sat spot welded to a lip at the back. It will just be a case of making up the relevant patches, which may turn out to be a little awkward as there are some complex shapes back there.

The only bit that I have trepidations about is when it comes to welding in the patches on the outside edge of the arch that will be clearly visible. I have none of the relevant tools other than a welder and a pot of Isopon and I really don’t want it to look a complete lumpy mess.

Is there anyone local with a bit of body work knowledge that would be able to give me a few pointers before I wade in a make a complete Horlicks of it?

In other related news I didn’t get as much as I would have liked done to the Lancia as I was helping my Dad get the scruffiest Toyota MR2 in the world ready for an MOT today.

img0253yn.jpg

img0255eb.jpg

img0262xs.jpg

img0256mb.jpg

img0258rr.jpg

It passed with no advisories. Apparently when he went to go pick it up they told him that they had bets placed on it not passing and how badly it would fail. Can I also just point out that this is not forced ‘rat look’ it has just kind of happened.

And a group shot of all the old rammel currently residing outside. The neighbours love us.

img0268zt.jpg

Posted

Shitting nora you'd never have though that Lancia would have been so rotten when you got it. It must be almost completely hollow inside. A+

Posted

I was just looking through this thread and this made me smile:

I hope you'll be bringing the Y10 to Shitefest on 14 July??? Lots of other Lancias there to keep it company......

It should be, although I do have a choice. This, mk1 Fiesta or Cressdia? (If I find a way to insure it by then) hmmm.


I actually took none of the above. At this point no-one could have predicted that I would turn up in a beige Hyundai Pony Excel 1.3 Sonnet Tropicana.

  • 1 month later...
Posted

So it looks as if I have forgotten to update this for over a month.

Well do not fret, the Y10 has not been picked up by the pikey flatbed of destiny and sent over the bridge of fate.

It actually has a fair amount more metal now than it did in the last post.

First to be sorted about 2 weeks ago was a large section of the inner rear arch, which has a surprising amount of awkward curves and angles, so the patch took me the best part of a day to make, for it to fit in even vaguely the right way.

img0270nb.jpg

img0271td.jpg

All welded in

img0311yb.jpg

Followed by this smaller patch which was much easier to do last weekend on the one day it wasn’t raining.

img0315gb.jpg

I am still yet to decide how to proceed on the out arches where these holes have appeared. The temptation is to just slap some wob on them against the back of the inner arch, but I know really I should cut this metal out and tack weld in new as it will come back through after a year or so if I filler on top, even if the metal is seemingly clean now, just lightly pitted.

img0314ri.jpg

img0313ky.jpg

To finish off last weekend I began reconstructing the rear corner/lower C pillar/ bumper mount area. Starting with welding on that bracket I made a couple of months back.

img0316cv.jpg

I then made up a repair panel for the lower mid-inner C pillar which ends on the bumper mount attached to the above bracket. It’s a massively over complicated piece of design, but hasn’t been too bad so far to recreate. This is a rough start on this panel and I spent an hour or so tidying and strengthening it today after I had got over my hangover.

Now to hope for vaguely decent weather tomorrow to get this welded in.

Posted

This is quite an extensive set of repairs to say the least - very impressive!


Did you sell the Hyundai in the end?

Posted

You realise with all that metal you are skillfully replacing,the fuel consumption will shoot up and the 0-60 will drop like a sack of spuds ! Well done for putting in the time and effort though,but I'm guessing that old Sierra is having a chuckle to itself for being replaced by a slimmer model !

Posted
Did you sell the Hyundai in the end?


Yes I did, for £575 including a few months tax to the first person who came to view it. I was a very happy man to have that heap of utter misery removed from my possession. I know on this site miserable cars are meant to be a good thing, and often they are but that Hyundai was on a completely different level


You realise with all that metal you are skillfully replacing,the fuel consumption will shoot up and the 0-60 will drop like a sack of spuds ! Well done for putting in the time and effort though,but I'm guessing that old Sierra is having a chuckle to itself for being replaced by a slimmer model !


I'm hoping that the amount of cruddy under seal that has been removed will compensate for the weight of all the new metal. Well the Alfa Romeo (which is currently sat with an empty fuel tank about miles away from home) will be insured come the 17th October so that should hopefully keep working in roughly the correct manner until this is finished.


Now onto the latest progress. After a miserable weekend of what I originally thought was a hangover until it got steadily worse and ended up being a hideous throat infection I took the day off work today and as my limbs were mostly working I decided to spend a couple of hours on the Lancia. I must explain now that I am in no fit state to work and the amount of progress I made in 2 hours should show this. In all I managed to weld on one panel that I had already made and fitted into place with clamps. I also Hammerited the inner arch and the areas of exposed newly welded metal in the car. That was all.


Now for two amazing photos!


img0323do.jpg

img0324fx.jpg

Posted

This weekend = good progress and the rear corner is now finished.

Here's what it looked like at the end of Saturday:

img0325nl.jpg


And by almost the end of today, before filling in the small hole and seam sealing:

img0328ac.jpg

img0329nb.jpg


And from the other side:

img0330wa.jpg


It may not look that impressive but this is some serious progress with this stupidly complicated section now completed. All there is to do on this side now is the sill (inner and outer ) and then I'm done - apart from the passenger side, which may actually be worse. Still I am very cheerful now.

  • 2 weeks later...
Posted

More welding, todays concentrating on the edge of the floor pan and one of the central cross members.

The edge of the floor pan and the first welds to the cross member as of about 3 this afternoon:

img0338pv.jpg

The corss member will get a grind back and another higher power splattering of weld, oddly even on low settings it was difficult to stop it burning through. And now from above:

img0339gg.jpg

And finally what it looked like at half 6 as it started going dark and I ran out of gas for my welder.

This is obviously not finished but shows what it will look like.

img0340wp.jpg

All that needs doing now on this side is the same as above, just a little further along, the area behind the rear bottom corner of the front wing, a final patch in the rear arch/rear sill area and the outer sill.

It is the making the outer sill that I am dreading most, as I have none of the relevant tools and a poor ability at fabricating panels at best. I just really don’t want to end up with a lumpy, ugly mess after making so much effort on the rest of the car.

A couple of websites show the sills as available panels but when called they say that they don’t have them, even eBay Italy has not bought any up, so it looks like attempting to make a pair is my only option.

Posted

This is some seriously impressive dedication to the shite cause or a slight mental affliction, not sure which! A+++++++++++

  • 2 weeks later...
Posted

This weeks proceedings on the Lancia were as follows:

I got not one but two sets of wheels for it:

img0345zr.jpg

These are 13†at 5.5J, they are really pretty but do require spacers and obviously tyres. I like these an awful lot.

img0346eg.jpg

These are 14†at 6J, they are properly different, in fact I don’t think I have ever seen another set. They do not require spacers and fit almost perfectly but do require new lower profile tyres and a thorough refurb. I like these and awful lot.

As you can see it is going to be an awful tough decision.

img0348vf.jpg

RARRRR I AM A MONSTER TRUCK

Anyway…

As has become the norm I spent Saturday mostly welding.

img0350pl.jpg

img0351tv.jpg

Here is the inside of the middle part of the sill. I am pleased with this and apart from flattening the messy pool welds on the edge I will leave this be.

img0354bf.jpg

This is the floor pan, which despite being solid is unsightly so will be ground back and gone over again to tiny it up and make sure it is completely solid. With a bit of luck the weather will hold out and I will be able to do this next weekend.

The driver side wing also came off earlier today, to make access to a visibly crusty area at the front of the sill easier and to check the front wheel arch.

img0356g.jpg

In typical Lancia style it was both bolted and glued on, just to make it that little bit more awkward. Happily when it did finally become detached I was met with the pleasing sight of good metal. A first for this car.

img0357pf.jpg

On the inside of the wing, still stuck to the arch liner was the despatch note for the liner. How unusal.

img0358pt.jpg

Sadly the area I have uncovered is more complicated that I first thought and is going to require some serious thought on how to tackle. Ho-hum…

To be honest, despite this small setback I am now feeling more upbeat about this car. All that is required on this side now is the last third of the inner sill, the outer sill, and the front and back of the sill to finish off the structure, followed by the door bottom and the rear arch skin repair to finish off the cosmetics. Compared to when I started, this side is now damn near done; even this stage seemed like a pipe-dream a few months back.

Hopefully the other side will be better, and at-least I know how it all goes together which should make it easier.

Posted

Bloody hell Phil, it's a mess. Keep up the efforts!


I had those Alfa star alloys on my watch list for the Samara, but when the price neared half of what I paid for the car, I backed off. They'll look ace on the Y10 when they're cleaned up.

Did they come from KevFromWales?

Posted

My twopenn'orth on the wheels: The top ones ([anorak] Cromodora Turbinas off a chrome bumper Alfasud Sprint, I reckon [/anorak]) are just gorgeous, but the five spokes are probably more the right era for the YBother.


Maybe you can have winter tyres on one set - wait for OMG SNOKAOS and fill the arches up with salty slush, then you can do all the welding again next year hahahahahaha :twisted::twisted::twisted:. (Sorry, not sure what came over me there.)


I do hope you're right about the other side being better.

Posted
Did you sell the Hyundai in the end?


Yes I did, for £575 including a few months tax to the first person who came to view it. I was a very happy man to have that heap of utter misery removed from my possession. I know on this site miserable cars are meant to be a good thing, and often they are but that Hyundai was on a completely different level


Ouch - I didn't find mine that bad really, then again it was the range topping 1.5L GLS :roll:


The window winders were made out of chocolate and the plastics had an unusual aroma that will bring back a flood of memories, next time I smell one, I'm sure.

  • 2 weeks later...
Posted

A quick update:

I spent some time today cutting out the old metal at the front end of the sill, starting off with some good stuff on the outside which will be welded back on once the inside has been sorted:

img0391an.jpg

Then I got cleaning and cutting out the bad metal, A little more than I thought, but nothing catastrophic

img0394nt.jpg

It was drizzling all day today so welding was not an option so I spent some time making up the little panels for this area and the large one at the back of the sill ready to weld in tomorrow which is meant to be better weather.

Posted

Good effort Phil, looks like this little nipper is providing as much of a fight as my brother's Samara.


Keep it up, and make sure you keep your balls well covered if welding cross legged!

Posted

@Will: My Samara didn't give me a fraction of the pain this Y10 is giving Phil. He really is up to his nuts here!


Good luck on the salvage raid tomorrow Phil.

Posted

I had to do the same bit in my Panda, it is awkward to do, I ended up cutting up into the wing (after trying to do it at sill level) to give me proper access to the inner sections. Managed to weld it sufficiently flat to not need any filler when I`d finished:


5643197707_4af27bced2_z.jpg


5643198423_0789a45b91_z.jpg


5643211923_f2a45dcc49_z.jpg


5643779832_f68a4dd14e_z.jpg


5643780436_3e66f1b9d8_z.jpg

  • 2 weeks later...
Posted

Seems we are overdue an update;

Firstly the latest batch of welding, I’m sure you’re all thrilled by the sight of yet more…

First welding up the front of the inner sill/a-pillar as shown in the gaping hole left after the cutting out of rust in the last post:

Stage 1, welded up jacking point and inner a-pillar:

img0400e.jpg

Stage 2, weld on the lower curved section of whatever the hell rust trap inner panel this is:

img0401at.jpg

Stage 3 of weld the outer sill on is yet to be started.

Then weld in the last patch inside the rear arch, connecting into the rear of the sill.

img0398ge.jpg

And here is hopefully the last hole to be cut in the driver’s side floor pan, which is the next job in line to be welded up:

img0410xm.jpg

And now for some more interesting news, if you weren't already aware from the other thread...


The Friday before last I received a message from kevfromwales that there was a Y10 sat in a scrappy in Wrexham, looking a little scruffy but bodywork wise not too bad.


Bright and early on the Saturday morning I gave the yard owner a call to find out how much he wanted for the sills, a door and a few odd interior bits. He gave me the news that the car was due to be cubed on the Monday, just 2 days away, but he was open Sunday 9-1.

Bother.


So the next morning, bright and early at 4am I found myself in the Alfa heading up the M5 to reach Wrexham for 9. This I managed, finding this little Y10 sat there. Oddly it was horrifically rusty in all the places mine wasn’t and not too bad where mine is good.


I set to work stripping the car apart; with just 4 hours before the yard had to shut I had to rip as much off this little car as possible.


fiataa.jpg

I set to work stripping the car apart; with just 4 hours before the yard had to shut I had to rip as much off this little car as possible, soon Kev turned up and gave a hand, then, after a brief appearance in the morning where he delivered a petrol generator with no petrol in it, Billy turned up again and broke the dashboard in half. Overall a good way to spend a day.


About 3.5 hours later this is how it looked, as I cut the sills off. Most interior trim and easily removable body panels were now sat in my Alfa Romeo.


fiatscrapa.jpg

It’s amazing how much Lancia Y10 you can fit in an Alfa Romeo 156 when you really try.

img0404l.jpg

img0405nl.jpg

img0406rsp.jpg

Driving back was fun, squashed in the driver’s seat for 5 hours in the pouring rain on the M5 wearing a piece of boot trim as a partial hat as that is the only place it would fit.

Now all the parts have been unloaded, and then loaded into the Rover. The house is already full of car parts.


Thank you Billy for letting me steal your photos without your permission.


Also notice the third 'hat' of this thread. First the plastic tarp car hat, followed by the fire-proof frying pan hat and now the boot trim partial hat. I should start a fashion label.

Posted

No problem, but on a technicality I'd like to suggest it was KFW who broke the dashboard completely. I just helped a bit more.


Did he get the last bitss off pre-gyppo the next day?

Posted
No problem, but on a technicality I'd like to suggest it was KFW who broke the dashboard completely. I just helped a bit more.


Did he get the last bitss off pre-gyppo the next day?


He did, luckily. Just a shame that the sills are now sat in North Wales, got to try and work out a way to get them back down to Devon. I was planning on getting them when I go see family in Lancashire but that has been pushed on a bit and I may need the sills sooner than that to finish off this side of the car and stop it folding when the sill on the other side is sliced off.

  • 4 weeks later...
Posted

Progress has been disappointingly slow of late on the Lancia. This is mostly due to the rain which has either been drizzle or torrential and not ideal for welding as I am not a fan of being electrocuted to death. When it hasn't been raining I have been ill with what ever horrific sickness bugs have been going around which is odd for me, usually I am Captain Healthy.

One more panel has been added to the inner sill area and it just requires one more which has been made and is just awaiting a dry day to blat on and the inner sill in finished.


With this in mind I have begun cleaning up, repairing and measuring up the panels that were nabbed from the scrap one.

img0415qu.jpg

Many thanks to Kev for storing these sills and a couple of other bits for me, Hairnet for moving them down country, and Mystery Machine for storing them at Area 52 for me to collect them.

img0414pu.jpg

The door has a couple of small dings but is basically really sound. This I am very pleased with and was worth the drive up to Wrexham alone.

I have also begun cleaning out the sills and cutting them to the shape needed.

img0427up.jpg

About 50% of the way there now. Not too long before this is back tearing up the tarmac.

Posted

Looking good Phil - keep up the good work, you know it'll all be worth it! 8)

Create an account or sign in to comment

You need to be a member in order to leave a comment

Create an account

Sign up for a new account in our community. It's easy!

Register a new account

Sign in

Already have an account? Sign in here.

Sign In Now
×
×
  • Create New...