Bfg
-
Posts
3,035 -
Joined
-
Last visited
3 Followers


Recent Profile Visitors
3,844 profile views


Bfg's Achievements
Rank: Renault 16 (7/12)
7.9k
Reputation
-
 Bfg reacted to a post in a topic:
Eye-catching black and whites
Bfg reacted to a post in a topic:
Eye-catching black and whites
-
Bfg reacted to a post in a topic:
Eye-catching black and whites
-
Bfg reacted to a post in a topic:
Eye-catching black and whites
-
Bfg reacted to a post in a topic:
Eye-catching black and whites
-
^ car being publicly humped by a portable toilet ? ..design by a man on the run
-
Bfg reacted to a post in a topic:
One (shite) picture per post.
-
adw1977 reacted to a post in a topic:
One (shite) picture per post.
-
 sheffcortinacentre reacted to a post in a topic:
One (shite) picture per post.
sheffcortinacentre reacted to a post in a topic:
One (shite) picture per post.
-
Shite Ron reacted to a post in a topic:
One (shite) picture per post.
-
I never see such pride in a garage forecourt nowadays.
-
not from my future !
-
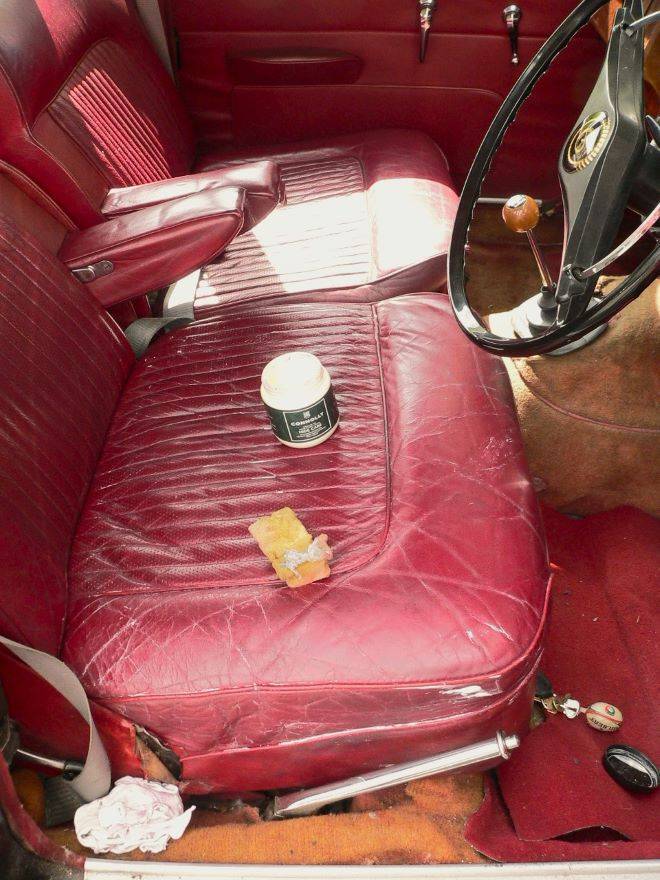
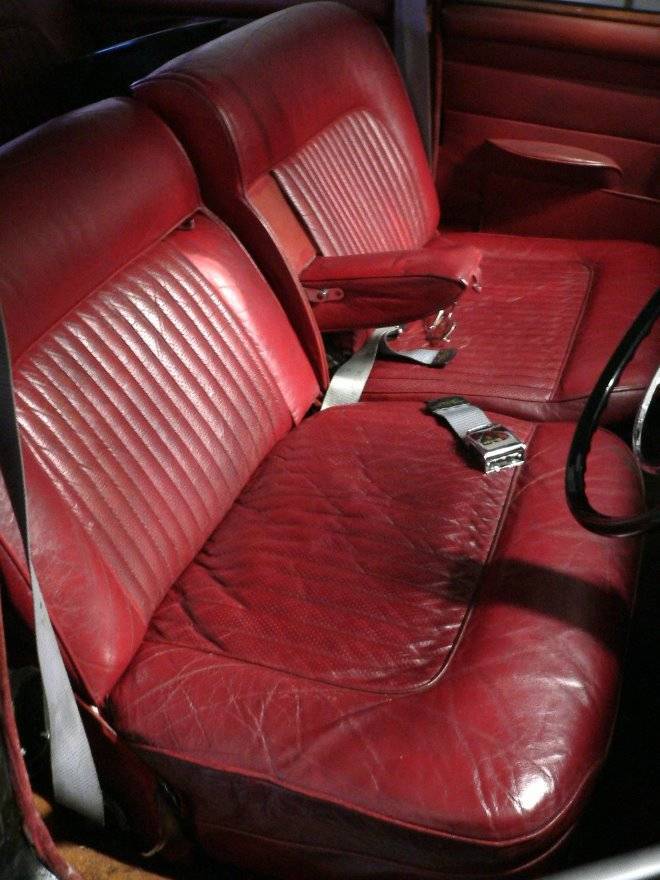
new purchase . . . ^ mostly from Classic Car LED's ..but for the four indicator bulbs on the left hand side, which were much cheaper on ebay. I thought I'd give them a try as they offered a saving of £25. The top left bulb is a high power (equivalent of 50w headlamp bulb) reversing light bulb. It was expensive but CC LED's were out of that type and I wanted a very bright light to see what I might otherwise be reversing into. The two bulb holders on the right I'll fit into the headlamp bowls, same as I did with my TR4, because although the wing-top side lights are bright enough with LED's they are so tiny that they are difficult for others to judge the distance of. Headlamps are much more familiar to contemporary drivers. - - - Otherwise, I've been feeding the seat's leather with Connelly Hide Care. . . The pot says to apply it sparingly, whereas I put it on liberally with a sponge and then shoe-brush it in to the creases and stitches, and the seat squab's perforations. I used half a pot for the first application. It looks very dull because I've put it on and not polished it off yet. I'll leave the car parked in the sun to allow it time to soak in. Then I'll repeat it. Only then will I polish it off and use an old towel to cover the seats for the next couple of weeks of driving. Pete

-
I'm pretty sure that building on the right is the Lord Leycester Hospital. I used to work just around the corner from it c.1980. "The Lord Leycester Hospital started life as just the Chapel of St James the Great, which was built over the West Gate of Warwick in 1126 by Roger de Newburgh, 2nd Norman Earl of Warwick. The site of the hospital's main building and gardens was donated by the Earl of Warwick in the 14th century, to the United Guild of the Holy Trinity and St George, under license to the young King Richard II (son of Edward - The Black Prince - Prince of Wales). After the dissolution of the guild in the 1540's (..by Henry VIII) the site was transferred to the Corporation of Warwick which used the buildings as a Burgh Hall and grammar school. In 1571, the Corporation presented the property to Robert Dudley, Earl of Leycester, who wished to found an almshouse / hospital for aged &/or injured soldiers and their wives, under royal charter from Queen Elizabeth I. It was run by 12 resident brethren (originally soldiers) under the charge of a Master. In 1617 its Great Hall was used to entertain King James I on his visit to Warwick. The town was in debt for 10 years as a result ! In 1694, a great fire spread through the streets of Warwick. Started at the Friends Meeting House, just across the High Street from the Lord Leycester Hospital, the fire was driven up the street's timber buildings by a strong south-westerly wind. It consumed virtually all buildings in its path. Thus, the original medieval timber-framed houses were destroyed and, in due course, replaced by the handsome stone and brick built buildings that you see today. Of the ancient buildings, only the Lord Leycester Hospital and its near neighbours survived. The hospital continued to serve its purpose. More of it's historical significance < here > The almshouse, known after its founder as the Lord Leycester Hospital, continues in existence up to the present day. In 1966 the accommodation and facilities had been modernised, and the restored hospital was (re-)opened by Queen Elizabeth - the Queen Mother. Today the hospital is still run by a Master, a retired officer of the armed forces. Eight ex-servicemen and their wives are provided with flats in return for their past services. They serve as guides for visitors to the Grade 1 listed building. A stone urn in the Master's garden is 2,000 years old. It was originally part of an Egyptian nilometer. what's one of those ? see < here > https://www.lordleycester.com ... just thought you might like to know
-
^ makes me wonder who has the registration 2 FAR on their car ?
-
Quintali - I didn't know that ! .... "The quintal or centner is a historical unit of mass in many countries which is usually defined as 100 base units of either pounds or kilograms. It is commonly used for grain prices in wholesale markets in India, where 1 quintal = 100 kg." ..every day is school day.
-
Potential bargain to be had ... BIN @ £3500 ono .. like my own this is one of only 700 build with manual + overdrive. Body panels / door shuts look straighter than mine which suggests the sills are original and it's unmolested. Need recommissioning and frayed edges sorted but you can have that with a car costing three-times as much. https://www.ebay.co.uk/itm/276414789371?itmmeta=01HTW4KBGYN6J2E88J4XAJW9WQ&hash=item405b9af6fb:g:W3gAAOSweoFmEab~&itmprp=enc%3AAQAJAAAAwFFUwr5i1sARc%2B3kxbjjA5GxNR%2BRh3LwMiA6WZAROu2MlIvVSTBA6NkC8TfiUXWBPewsUVuFcRxFj6EUxd1g%2BEROc4u4lT2HEGlEPufX%2FQaUoSIiegL9dnMT28KnNH5EMBI%2FVDQYM71A%2Fa2V5otGZhvcqoYwWq5FJGGRT3Fo5KjoYSQlO2umvs2%2BGLnZfnSYUNGmzocVvLpHaEOe64J6USTfVke4enx9T3%2Fj1mZGl%2B%2FcvZXLhEoA7FDdw2Dm5vFEkg%3D%3D|tkp%3ABk9SR8i4zYTXYw
-
I should have thought that to be aerodynamically unstable at high speed.
-
-
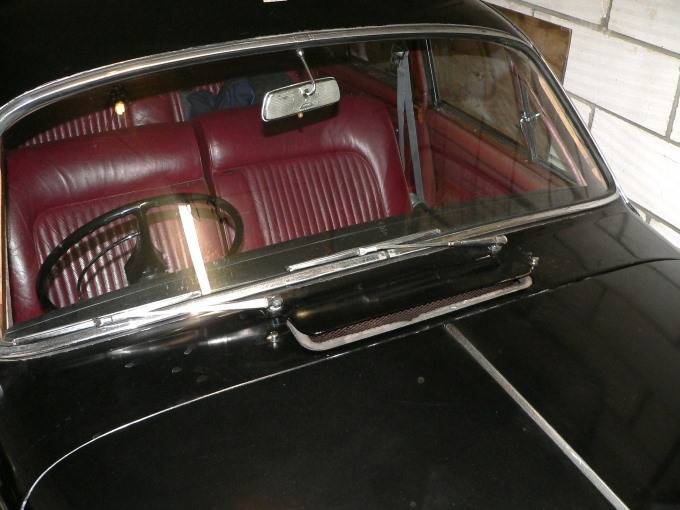
Quick conclusion to recommissioning the Daimler's ventilation . . . ^ Silly little-too-short screws and 3/8" square nuts hold the baffle plate in place. In the first photo you can see the scuttle vent cover's brackets are not evenly adjusted (height or angle). They are bolted to the recirculating-air / bulkhead flap and needed adjustment for the lid to close level. I managed that (with a hammer !) which slide the RH bracket down a bit. next time i do it I'll know to adjust those more precisely before I put the baffle plate on. I'll also find some longer screws. ^ Looks like it was meant to be like this ! ^ all the screws were reassembled with CopaSlip and the right washers. I've slotted the mesh so that when the screws are just loosened - the mesh can be dropped down for easier access to the cover's nuts. The vent now works as it should, open or closes with a clunk. and the recirculating flap closes against its seal when the scuttle vent is opened. Yeah (..delighted by the prospect that this car's ventilation might now actually work !) Well almost . . . ^ with the heater's control cover removed, you can see the hot/cold control cable tightly bent routing ..and why it wasn't working very well. There's also a plain washer missing where the end of the cable connector joins to the lever. Without that the cable's pivot doesn't work very well. Part of the issue was the bowden cable's routing, and part of its problem was that the back end of the radio wasn't supported, so everything was being twisted more than it should have been. ^ It's amazing that it actually worked at all. I made a bracket to support the back end of the radio, an inch higher, and dropped the bowden cable out from under the trim to ease its tight curvature. after straightening the inner wire, I liberally oiled it so it now works. ^ The other side (footwell or screen demist control cable) had lost its nut, so the lever wasn't connected to the cable. And odd size and very tiny nut took me ages to search for and find. I tried to clean the leather of the monstrously big and heavy cover, but to no avail. The black is staining that wouldn't wash off. ^ definitely in need of restoration, but that'll wait. The live feed to the radio was just dangling, just waiting to short out, but with power to the radio - it did hum ...but nothing more. I've now put it back together, and took the car to the shops and then around the block to warm its engine. Hey ho, the heater works. The heater (hot/cold) control works. the heat to car / to screen demist works well too ! Who knows perhaps this car will both be warm in winter, cool in summer, and demist when it's needed ! ? All very useful rectifications. I still need to replace the squirrel fan for one which isn't bent and out of balance. but we're very close to.. Job done. ^ Of course for all that effort ; an onlooker, or even a buyer would notice nothing but the scruffy interior. Indeed even as I drive the car ..now the weather has suddenly turned warmer, I have the heater control set to cold ! . . . yes, the speaker grille is original. It's big and bold, but there's only one.. for mono Radio 1 of the 1960's. I do look forward to a thoroughly good clean of the leather and trim, to re-lacquer the timber, and to replacing the carpets. but that'll happen after the car's resprayed. Bidding you all a good weekend, with sunshine and happy pottering around. Pete
-
I guess it comes down to one's mindset and approach to the task. If you think of it as a job (unpaid and for an unappreciative boss - a grumpy yourself ! ) then it's a chore. Even more so when you see the bodges of prior owners and the 'mechanics' as x_ _ _s. But.... if you like old cars and you 'just potter around' for an hour or two, ..as n' when you choose to (mostly in the afternoons for me) without an impending deadline, ..and you take some sort of satisfaction out of loving / improving the old girl, ..and you look on those bodges as quite funny reflections on humanity and our culture - then the tasks become a hobby. Every part of the car becomes a little wonderment. Fk me this part is 56 years old and I'm cleaning it and putting it back on.! Lucas, Smiths, Lockhead, Girling, GKN, Triplex Dunlop, and every other sub-contractor's component takes on its own life. Whether mechanical, electrical, a piece of wood, leather or fabric trim ..whatever can be be saved and reused becomes a thank-you to motor industry men and women whose names have long since been forgotten. Once done, most of these rectifications last for decades and don't need repeating. With one task after another done n' dusted - in time the car become useable, reliable and a pleasure ...all for minimal running costs. After major structural and major-mechancal and paint., with no road tax and cheap classic car insurance - it does, in the long-term, become inexpensive. Personally I hate being in the limelight, so I don't tidy up the car to be admired. I do it because I feel these old girls deserve a bit of loving care and attention ..after years of abuse, neglect and making do.. When I go somewhere ; I park the car and walk away. She's the centre of attention. I can do that because I'm a sentimental old sod who loves her ..even her shortcomings. I wouldn't want to swap her creaks & wrinkles for a soulless manikin or an electric car. I like my cars to be decent autoshiter drivers rather than a polished restorations, so originality is less important to me than function. Then, driving the 'maintained' rather than 'precious' car becomes a nostalgic pleasure ..as if I'm driving a ten-year-old car back in the 1970's. And any other old fart who happens to see you driving down the road also derives pleasure from seeing her still being used. Not at necessarily to shows ..but just around around town and to the shops. I'm not interested in bodging the car to sell and make a profit. Indeed I'm of an age where I know that anything i have will be dispersed within a month or two of my passing. However if I can get each car into a useable and reliable condition before I go, then I'll be gifting them to best friends. For those friends to own and enjoy a nice TR4, or a Daimler 250, or a sailing boat ..even if just for a year or two (before they sell them on) then that's more a lovely gift than its monetary value. The other half of my hobby is to share what I've been doing. It's a therapy for me to see that I'm achieving something. That I'm not yet on the scrap pile. And through these forum blobs - I very much hope inspires and helps others. win + win + win whichever way I look at this hobby. Pete
- 180 replies
-
- 11
-
-
-

-
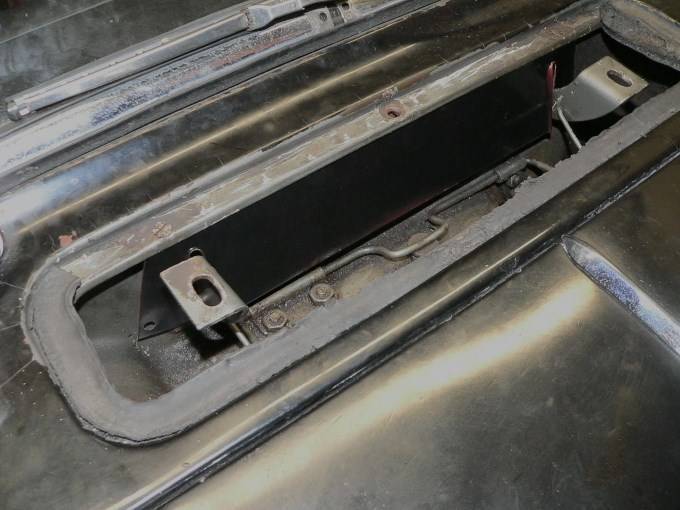
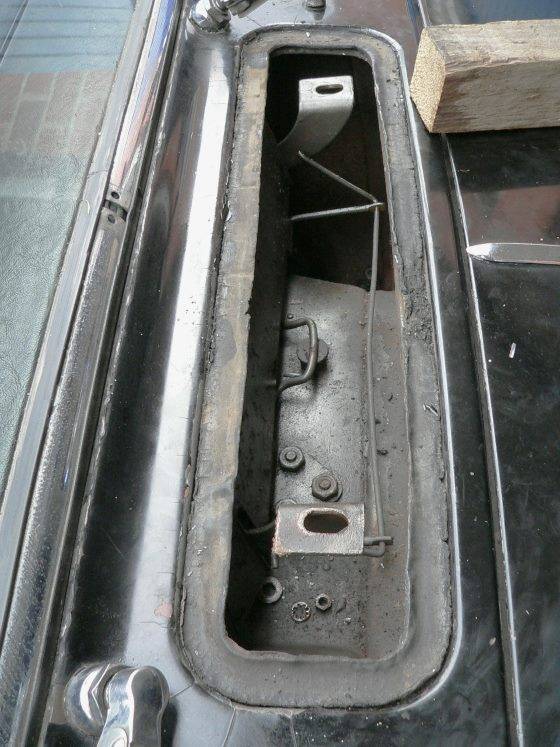
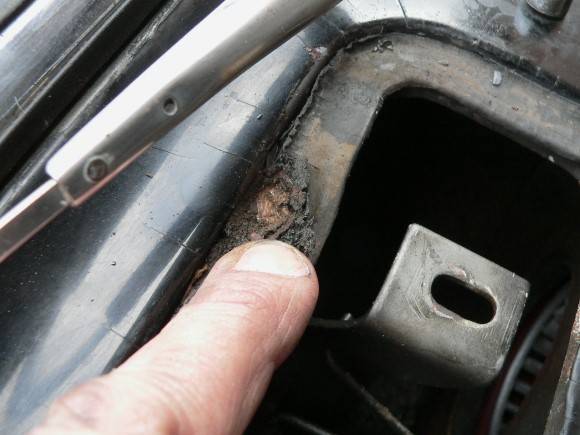
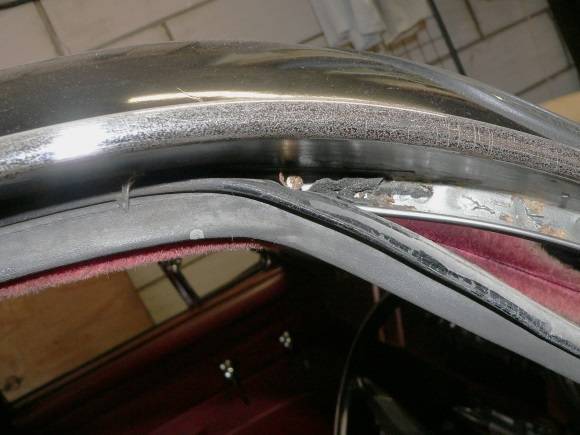
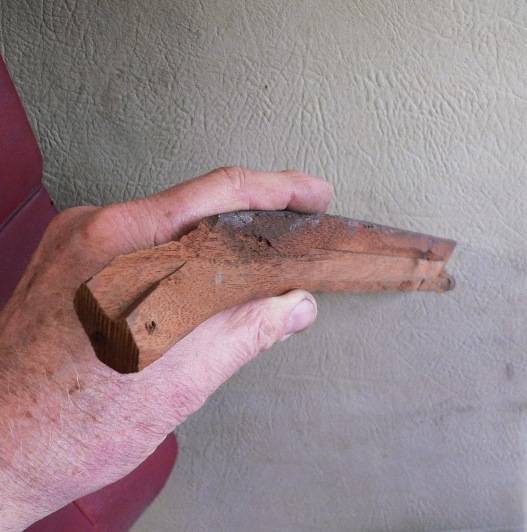
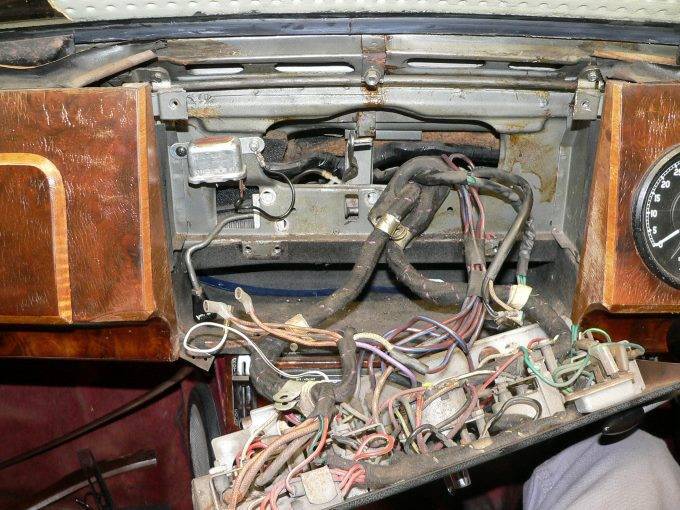
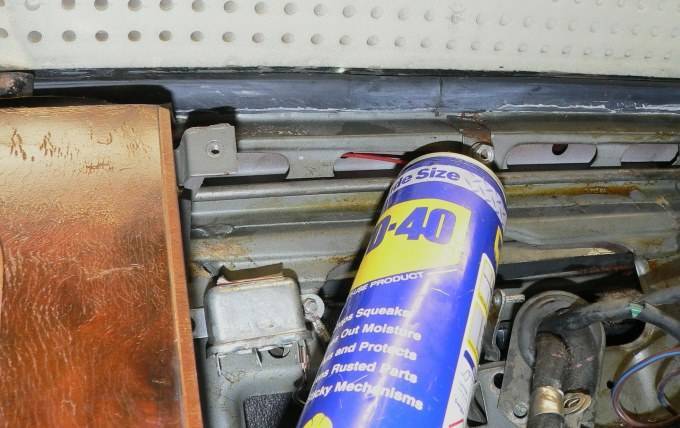
Okay here we go.. a task which proves that cars were built for lack of maintenance 50+ years ago, and like modern cars were built where one thing needs to be dismantled to get to another. . . ^ the scuttle vent, under the windscreen on quite a few cars of the era, took outside (supposedly fresh !) air into the car either directly (cool) or via the heater matrix (heated by engine coolant). There's a lever under the dashboard which manually operates it. And a spring under the vent which toggles to hold it either open or closed. Never half way.! Unbeknown to many.., there's another metal flap connected to this one, at approximately 135-degrees downward. That one opens, or closes-off, a hole through (the vertical face of) the bulkhead. When the scuttle vent is closed, the flap across the bulkhead is open. That's for when the fan is used. Then air is drawn from the car's interior (from behind the central console) and ducted through the (closed) chamber below the scuttle vent flap, to the heater matrix, before being ducted back into the car. This is the recirculating air flow circuit. Conversely when the lever is operated - whereby the scuttle vent opens ; then the recirculating air flap is closed ..and outside air is used for fresh-air ventilation or heating, depending on separate heater controls. What is important is that one flap is closed when the other is opened, and vice-versa. Simple in't it. As it was (this car) ; the lever inside didn't work the flap, and my physically wrenching the scuttle vent up from the outside only ever got it half open. And because the two flaps are bolted together - the scuttle vent being half open meant the bulkhead's recirculating-air flap was similarly half open. With them both half open.. half of the (cold) outside being air taken in, via the scuttle vent, doesn't go down to the heater matrix ..but rather takes a short-cut straight into the car. That's not so very cosy ! Nor is it good in the rain ..for example when trying to demist the screen., because rain and road spray is taken directly into the back of the central console ...with its array of switches, electrical connectors, and minor gauges. There is a baffle plate to stop driving rain getting straight in there, but with a coarse wire mesh on the underside of the vent.. driven rain gets 'meshed' into a fine spray. So, what is the problem when the bloody thing don't open or close fully ? Well, it could be the operating mechanism, something fouling, or perhaps the flaps hinge seized. Note ; plural flaps, single hinge. I was to discover on this particular car, which sat around unused for donkeys years - it was the operating mechanism almost seized, the toggle spring almost seized, and the flap hinges a little bit more than almost seized. The good news was ..well there wasn't much good news.., save the fact that I'm now retired and can spend two days sorting the darn thing out. ^ With any car that sat around for 5+ decades, there's always going to be some screws and nuts and bolts that are seized. It's just something you've got to deal with. I forced the vent open and stuffed a block of wood in there to hold it open. Starting off with cross-head set-screw holding the mesh in place. However careful I was to get exactly the right size bit, a huge amount of force to hold that bit in its slot, without and then with penetrating oil ..it wouldn't shift. There's x3 such screws holding the mesh in place and the other two gave in to my persuasiveness. This allowed me to tilt the mesh down so that I might get a spanner on the nut which holds the top scuttle cover in place. The stubborn little thing* fought me to the last thread. . . ^ even with the scuttle vent lid removed, only my best vice-grips managed to get that screw to move. ^^ not much to see but the wire spring, and the hinge brackets. The black hole to the left side of the car (top of photo) is the trunking down to the fan and heater matrix. 58 minutes between the first and last of these four photos. ^ The centre console hinges down for easy access to wiring connections. The feature is a carry-over from the Jaguar big saloons and XK models ..which also housed the fuse-box behind their console. ^ with no sign of the scuttle vent's hinges, from either inside the car (behind the centre console) or from through the scuttle vent, I reckoned the baffle plate needed to be removed. Seized nuts again.. A full hour of battle between these two photos. And then.. still no sign of the vent's hinges. ^ I unclipped the spring-wire from the vent's (supposedly hinging) brackets, and found that it too was almost seized. 'Almost' meaning that I could force it to move but it needed several douses of lubrication and much working back n' forth before it moved as freely as it should. That's where I stopped work, to go out in the car ..with no scuttle vent fitted, on Tuesday evening. 4-3/4 hours into this five minute job. Moving on to this afternoon . . . ^ Having ascertained the flaps were seized at their hinge, but unable to find that.. I needed to dig deeper. I opted out of removing the glove box and main-gauge instrument panels in favour of seeing what I might find if I just removed the dashboard top. There's just two nuts to undo, noting the shims which level its height. But then to actually remove the panel I needed to also remove the timber capping up the A-post. I reckoned with care I could about get away with just removing the driver's side. At its bottom of it is a simple screw from under the dashboard lid (first photo) ^^ The top of the timber though is screw fastened behind the (glued-on) door's weather seal (2nd photo). ^ It's an oddly shaped piece of timber. I cannot imagine how Jaguar productionised it left and right handed. Removing the dashboard's vinyl-covered lid would have been much easier if its sides were parallel ..so it could be slid straight back, without taking A-post timber off. But.., it's ends are shaped around the A-post at the sides, wider towards the screen. It cannot be slid straight out, nor lifted up. Even with the A-post timber removed - the lid needed to be tilted and pulled down ..being careful to not scratch the dashboard with its fastening studs. It's tight.. but it does come out (and later goes back in again !). I think the later cars ..the XJ6 used skinny vinyl trim up the A-post. ^ And still not sign of those flap's (top) hinges. In the first photo you cannot see the scuttle vent's operating lever, because it's down below the centre console. It seemed to move freely but., I wondered if it was moving freely for the full range ..which it couldn't yet do because the flaps were still seized. I opted to remove the console's hinges - to drop it out of the way and to give me clear access to that operating-lever arm's hinges. Various electrical connections were released to give the console more travel, so that I could better see what i was doing. ^ On the left hand side a bent metal bar. That's the flaps operating arm, and it's supposed to be bent like that. I've released the bolts to its hinges so it can tilt, so I could see to lubricate them. But for just a little free movement - they were seized. With penetrating oil and then 25w-50 and a fair amount of wiggling back n' forth the operating now move freely throughout its range. The flap though, now disconnected both from the inside and outside was still seized ..and its hinge was still nowhere to be seen. I think only by pulling the whole dashboard out might I discover how it was built ? ^ Still unable to see those hinges - I played a long ball. There are two holes into the windscreen frame which I sprayed with WD-40 using its extension pipe, and then using another brand of penetrating oil (with considerably more squirt) I flooded up either side of the bulkhead flap. I did the same from the scuttle vent side, until it was literally dripping with the stuff. Forcefully man handling the flap back n' forth dozens of times - I finally got it to move, and then some more, and then some more again. ^ Finally... the flap opens and closes as it should. 2 hours today to get to this stage. Here looking down into the scuttle vent trunking., you can see (because the baffle is still removed) the bulkhead's air-recirculation flap closed against its bulkhead seals. The scuttle vent's brackets / arms, bolted to that inner flap, bend from forward to upwards ..for its lid to be open by 45-degrees. It works.. Now I just needed to put it all back together again. . . ^ Work in progress.. ^^ Dashboard top is back in place, as is the centre console, but presently the switch label plate is yet to be refitted, also the A-post timber. The splash baffle and scuttle vent's lid I hope to get back on tomorrow. That's all for now. Pete.
- 180 replies
-
- 12
-
-
'tis a bodge, in any other language but Autoshite !
-
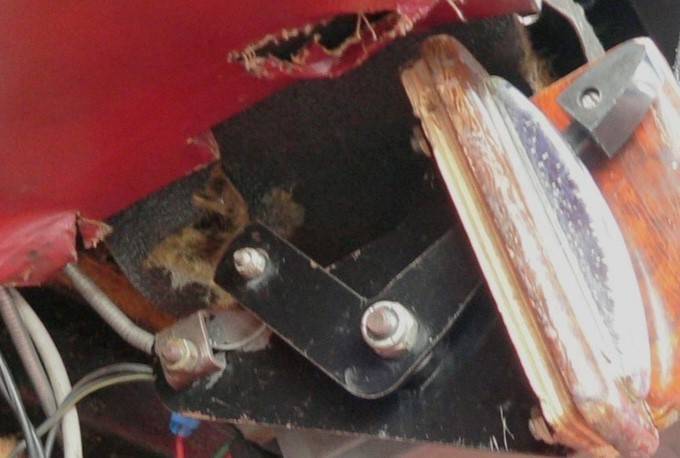
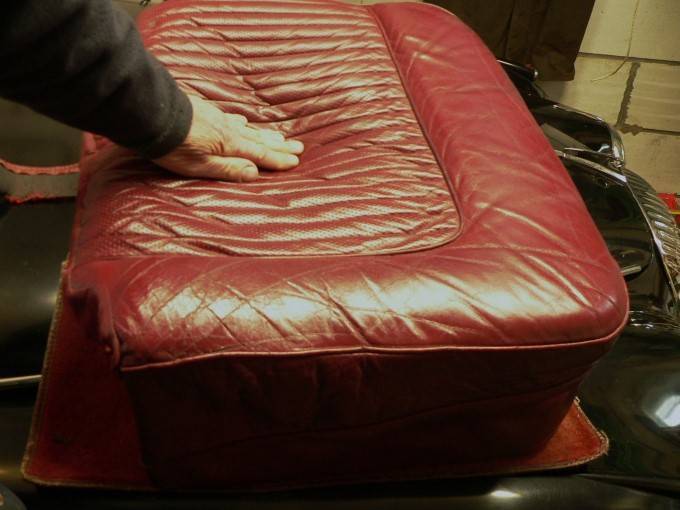
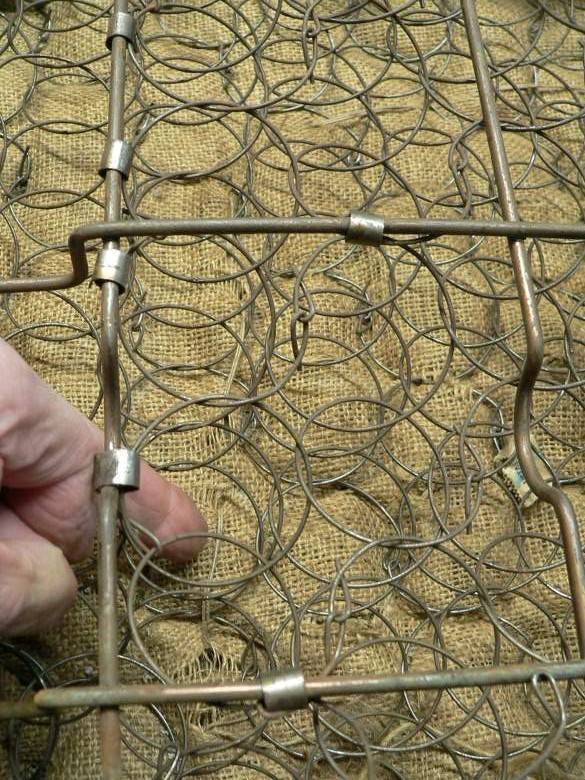
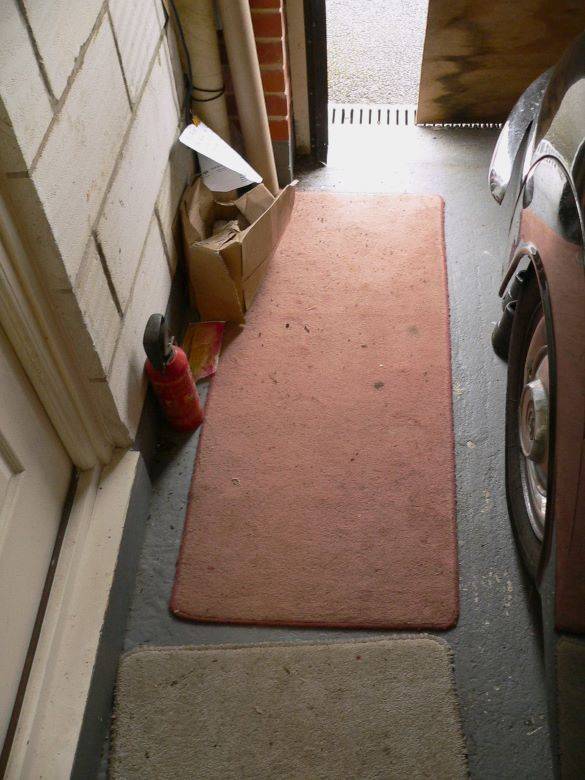
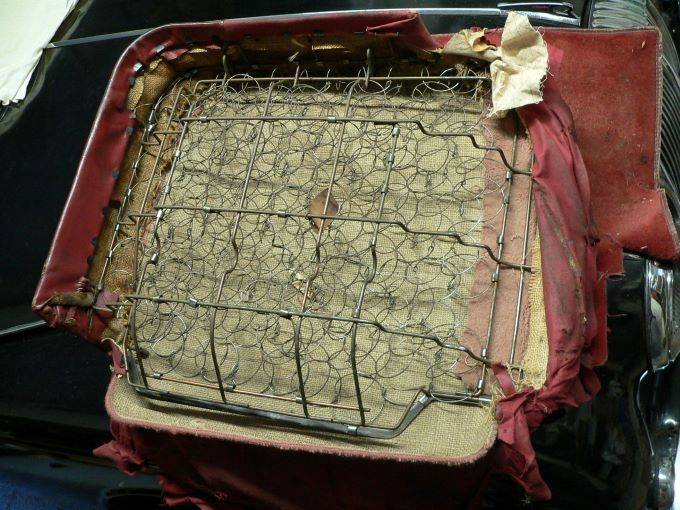
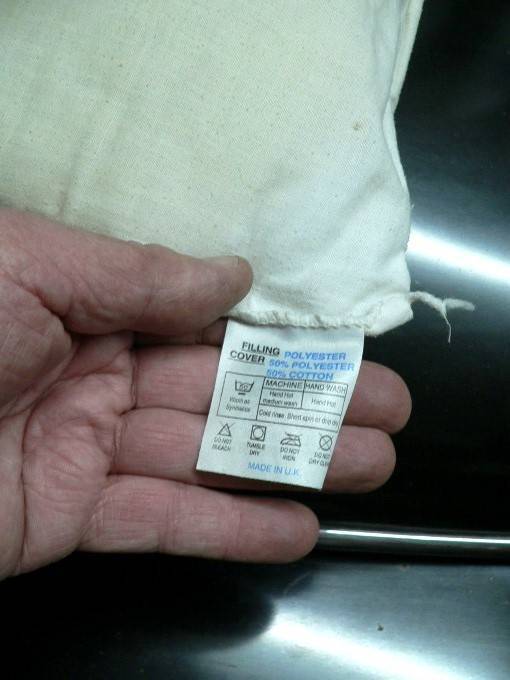
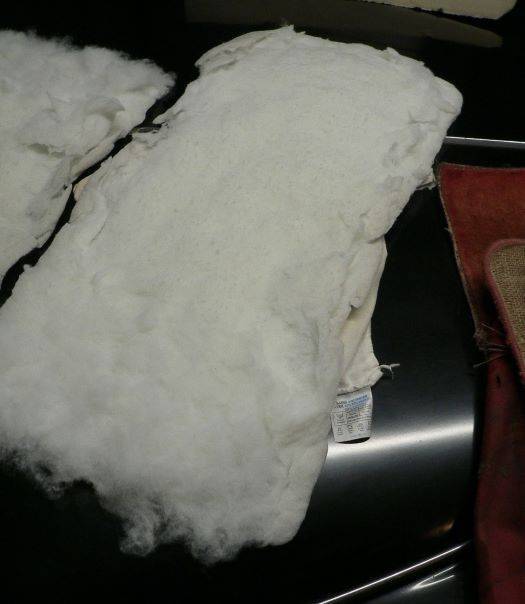
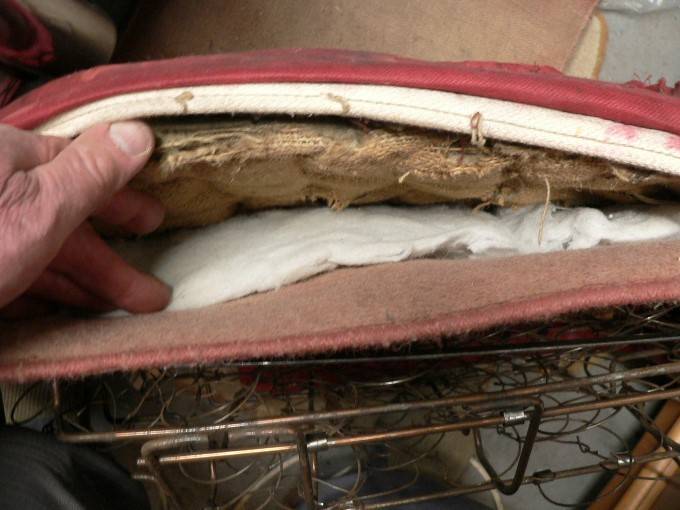
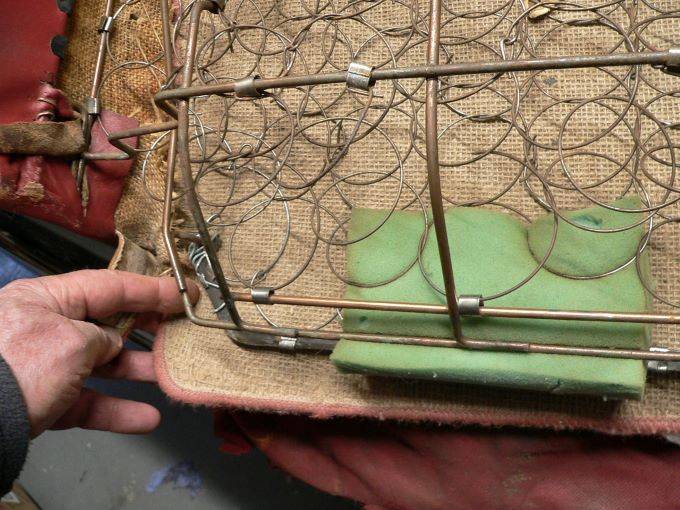
Yesterday afternoon I tackled the Daimler's scuttle vent which is all but seized solid. However then a friend called me as i had everything in bits, and asked I was going to drop in and see him before we went on to the Triumph Sports Six Club meeting at the Sorrel Horse. Bottom line I didn't get that job done (i'll report on that anon). So today I was going to tackle that again. The issue I'm facing is how to get to the hinges of that inner flap, And to get to those I fear I'll need to pull some of the dashboard out. .. And to pull part of the dashboard out means I've got to jump around inside the car on the driver's seat. .... But the driver's seat is sagging, and I fear my gymnastics would do more damage. ....... So instead of getting on with the scuttle flap (which is the air intake for fresh air and for the heater) I decided instead to tackle the driver's seat. . . ^ the squabs just lift out. Dead easy. Even just with a hand pressure you can see how giving the seat was. I guessed what was happening.. The leather seats are wire-coli sprung, and inbetween those springs and the leather is a diaphragm and then latex foam rubber. When the diaphragm fails - the wire springs cut into the foam rubber and that's a costly and troublesome business to repair. In short, the diaphragm needed replacing before I used the car any more, or even just jumped around inside it when pulling the dashboard out. It's always better to avoid damage than having to fix it . . . ^ Inverted and looking from the back, the seat looked pretty good for 56 years old, but yes the diaphragm (which despite it being a Daimler is only sackcloth) had failed in many places. Just right of centre in the first photo you can just make out where the foam rubber was being cut into by the wire springs. A couple of those springs were also broken. ^^ I decided to tackle the diaphragm from the back and from the propshaft tunnel side (to the right in these photos), because I did not want to disturb the leather around the more visible front and outside faces of the seat. There were three types of clip holding the springs, the fabric, and the torn sackcloth diaphragm to the wire frame. I guess I must have removed forty or fifty of them in total, as carefully as I could, so as to minimise damage to the fabric. ^ Aside from wire staples, the diaphragm was also stitched to the wire springs. It took an hour and half before I could get my hand inbetween them. Again in the second photo you can see the torn sackcloth. In places, the wire springs had cut right through the foam to the cloth facing on its other side. Had that been cut through the underside of the leather would have been damaged. ^ the steel batten which follows around the back of the seat was snapped. It is there to stop the back edge of the squab from pushing down, away from the backrest, which it does ..resulting in a cold draught to the small of my back. ^ this is a mat on the floor of the garage next to my car. It's there to wipe my wet feet on. However what is not so very clear to see is a replacement diaphragm about to happen ! ^ that floor mat measured and cut in half has a hessian underside face to it (visually quite similar to sackcloth). Rather* awkward to get it into place mind you, between the wire springs and the damaged sackcloth. ^ Even when there's little in the way of skill, I can always count on my stubbornness 1hr-7 minutes between these last two photographs ! That's the diaphragm replaced. Next up is a little more padding, to compensate for the wire springs having cut through the original latex foam, and 56 years / 89,000 miles of 'settling'. ^ Always one to blow the budget to impress. An old pillow with polyester filling, is no longer a pillow (..for under my head ) ^ polyester filling, slipped inbetween the old and the 'additional' diaphragm. ^ Far left of the photo, you can see I've wired the broken rear batten in place. That's because my welder is a 20-mile round trip away. Wire springs being reconnected to it. And I've used a foam sponge as spring to help hold that batten up ..in place. Crude, but it actually works. . . ^ job done. I'm not claiming to have restored it ..it's just a fix to keep it going ..and as importantly to prevent further damage from those wire springs to the leather seat covers. I must say though - the hessian backed rug does look the part. I wonder if it will last another 56 years ? ^ Feels much better, and doesn't look over stuffed. Of course the proof of the pudding lies in how one's bottom feels about it a day later ! Bidding you, one and all, a good evening, Pete