Rocket88 Posted April 28, 2023 Posted April 28, 2023 If you live in a fairly rural area, might be worth enquiring at a couple of farms, there’s usually someone there who’s handy with a welder
Dyslexic Viking Posted April 28, 2023 Author Posted April 28, 2023 4 minutes ago, Rocket88 said: If you live in a fairly rural area, might be worth enquiring at a couple of farms, there’s usually someone there who’s handy with a welder Yes, it is possible, but I doubt a farmer who is used to welding agricultural implements and simlar is any better than me. Welding on a tractor bucket with a stick welder and good car bodywork welding are slightly different things.
Talbot Posted April 28, 2023 Posted April 28, 2023 46 minutes ago, Dyslexic Viking said: my welder is a gasless cheap Mig with gassless 0.8 wire, Very similar to how I started. It took me patching up and keeping tatty old rotten cars on the road for about 5 years before I was actually any good at fabricating bits of cars and then getting a decent welded repair. keep at it. Jim Bell, Dyslexic Viking and mk2_craig 3
danthecapriman Posted April 28, 2023 Posted April 28, 2023 2 hours ago, Dyslexic Viking said: I have only used Mig welding. And my welder is a gasless cheap Mig with gassless 0.8 wire, also bought gasless 0.6 wire recommended by @juular last year but not used yet. And I think I can easily learn to make good welds, but the fabrication part is what's worse, making and adapting parts and making it happen and being good is what I really struggle with and will never master. And I've really tried to learn this by working on various cars over the years but it's not in me. I can make repairs to get a car through MOT but it won't be pretty or good. I have expanded the search for someone who can carry out work on this and is the same no one wants to do this. Even body shops will not take this on. I'll try a little more before I give up. If it’s any consolation, I tried a reasonable brand gas less mig welder a few years ago and absolutely hated it! I just couldn’t get any sort of good or consistent welds out of it no matter what. Some people seem to rate them but I definitely don’t like them. A decent mig set with gas bottle and 0.6 wire is the ideal set up imho. Dyslexic Viking and Scruffy Bodger 2
Dyslexic Viking Posted April 28, 2023 Author Posted April 28, 2023 The package from Autodoc arrived just now. So then I can get some maintenance done on this one. I also think that the Kroon oil was good price for a specialist oil. 320touring, Jim Bell, danthecapriman and 8 others 11
Rocket88 Posted April 28, 2023 Posted April 28, 2023 5 hours ago, Dyslexic Viking said: Yes, it is possible, but I doubt a farmer who is used to welding agricultural implements and simlar is any better than me. Welding on a tractor bucket with a stick welder and good car bodywork welding are slightly different things. Agreed, but for your seat belt mounts it won’t be seen anyway ! Dyslexic Viking 1
Dyslexic Viking Posted April 28, 2023 Author Posted April 28, 2023 On 27/04/2023 at 08:38, Talbot said: The type of anchor you have shown there doesn't go under the carpet.. you drill a hole in the floor/body/wherever and then that plate gets welded onto the back of the panel you've drilled, with the seatbelt coming through from "the other side". So it will be visible. Of all the parts you should get done by a competent welder, this is the one. I've been thinking a bit and have come up with some ideas on this. And want to hear what you or others think. There are 2 fasteners for the seat belt on each seat that need to be made, in the middle, this plate is placed on the back of the transmission tunnel, i.e. the outside with a hole drilled through for the bolt. Transmission tunnel is thick and good steel so is the attachment plate less dependent on good welding then and I can do it myself? Outermost attachment point at the bottom of the b post. If I move this attachment point from the bottom of the b pillar down to the inner sill instead, marked with a red dot in the picture, then I could have cut an access hole in the inner sill (the square in the picture) and through it pushed forward the attachment plate for the seat belt where the bolt is screwed into it through a hole in the inner sill. The only thing then is how to attach the attachment plate solidly to the car, I could have drilled small holes through the sill and spot welded the plate in place or drilled holes and attached it with bolts. And after all this, the access hole plate is welded back and is tight and closed. Can add the inner sill is solid unwelded and thick steel. Is this crazy or something that might work? And I can't imagine other solutions for the attachment at the bottom of the b post / inner sill. The floor is thinner steel and is an old repair so I don't trust it. Jim Bell 1
Asimo Posted April 29, 2023 Posted April 29, 2023 https://www.facebook.com/marketplace/item/867626817845806 lisbon_road and Dyslexic Viking 2
Dyslexic Viking Posted April 29, 2023 Author Posted April 29, 2023 14 minutes ago, Asimo said: https://www.facebook.com/marketplace/item/867626817845806 It looks rough and probably has a lot of rust, but is probably salvageable for someone who can do the welding work themselves. This is also a 1966 model, so it is a 200D and it has front disc brakes, which is nice. Can someone here please buy it?
Dyslexic Viking Posted April 29, 2023 Author Posted April 29, 2023 I have gone through everyone I have contacted yesterday about welding work on this and with a new google search I found a company that I have not contacted so I wrote an email to them and got a reply today. They are willing to take on work on this one, the only thing they warned me about is that they are expensive. They are a professional body shop and have very good google reviews and I can't find anything bad about them. So that's promising. But I always have some trust issues and especially on a car like this. They have to see the car to give a price, which is in itself a problem getting it there, but the bigger problem is being able to afford this. So, my head may be thinking a little strangely but this is what I'm thinking now, this is now 60 years old and I'm basically not the owner of this but just a caretaker for now before the next one takes over as in my mind this is a historical object that should be preserved for posterity. So I feel an obligation to make sure work on this is done right. So even though I can't afford this with everything happening in the next year, I have to do it. So I thinking a lot now. Yoss, Wibble, Shite Ron and 8 others 11
Matty Posted April 29, 2023 Posted April 29, 2023 If you want to learn, start on big lumps. To build confidence just in the hand skills involved you need to be working with something forgiving that can absorb excess heat when you dwel for too long. To begin to learn on something as thin as car panels could well be soul destroying when your blowing holes and warping the shite out of everything you touch. Get a length of 5mm flat bar, cut it into short lengths and practice. There's a good reason that's how you start off at college! Dyslexic Viking 1
Mally Posted April 29, 2023 Posted April 29, 2023 On 4/28/2023 at 5:08 PM, Dyslexic Viking said: I've been thinking a bit and have come up with some ideas on this. And want to hear what you or others think. There are 2 fasteners for the seat belt on each seat that need to be made, in the middle, this plate is placed on the back of the transmission tunnel, i.e. the outside with a hole drilled through for the bolt. Transmission tunnel is thick and good steel so is the attachment plate less dependent on good welding then and I can do it myself? Outermost attachment point at the bottom of the b post. If I move this attachment point from the bottom of the b pillar down to the inner sill instead, marked with a red dot in the picture, then I could have cut an access hole in the inner sill (the square in the picture) and through it pushed forward the attachment plate for the seat belt where the bolt is screwed into it through a hole in the inner sill. The only thing then is how to attach the attachment plate solidly to the car, I could have drilled small holes through the sill and spot welded the plate in place or drilled holes and attached it with bolts. And after all this, the access hole plate is welded back and is tight and closed. Can add the inner sill is solid unwelded and thick steel. Is this crazy or something that might work? And I can't imagine other solutions for the attachment at the bottom of the b post / inner sill. The floor is thinner steel and is an old repair so I don't trust it. I like your thinking. On the tunnel, mark the required position for the bolt hole(s) one each belt. Transfer this position roughly to underneath, where presumably the propshaft runs. Make sure there are no brake pipes or wires in the locality. Drill a small pilot hole and check. Don't know what size your bracket threads are but presume M10 fine? I'd drill a hole same size as the bolt, hold the plate with the nut under where the prop is, bolt through the belt, and tighten things up. You will need Octopus arms though. In my eyes that's good enough but I may add a bigger spreader plate to be sure. I don't see it needs welding for safety, but if it needs inspecting then possibly. Now the dot, I'd consider drawing the 'square' directly over the dot, and right up to the edge. On the top side. I'd make a plate 30mm? wide, length equal to the depth of the slot inside the box section top to bottom. thickness. 12 mm. I'd leave it long for a start. Make the square so the 30xdepthx 12mm plate just drops through, no gaps. Pilot the dot, drop the plate in, spot the plate through the hole. Drill and tap the plate to suit seat belt bolt thread. Open the spot to bolt size. Drop the plate in, fit the seat belt bolt, trim the top of the plate level. It's then easy to weld round the top of the thick plate. If you bias into the thick stuff it will blend into the thin stuff and being on a top surface is easy to blend in anyway. Then remove bolt and fit belt. If you drill a hole under the spot, you can spot weld the bottom of the plate too. It's long winded writing and probably difficult to understand me but in my mind it's easily possible to achieve a solid mount. Matty, loserone and Dyslexic Viking 2 1
Dyslexic Viking Posted April 29, 2023 Author Posted April 29, 2023 10 minutes ago, Mally said: I like your thinking. On the tunnel, mark the required position for the bolt hole(s) one each belt. Transfer this position roughly to underneath, where presumably the propshaft runs. Make sure there are no brake pipes or wires in the locality. Drill a small pilot hole and check. Don't know what size your bracket threads are but presume M10 fine? I'd drill a hole same size as the bolt, hold the plate with the nut under where the prop is, bolt through the belt, and tighten things up. You will need Octopus arms though. In my eyes that's good enough but I may add a bigger spreader plate to be sure. I don't see it needs welding for safety, but if it needs inspecting then possibly. Now the dot, I'd consider drawing the 'square' directly over the dot, and right up to the edge. On the top side. I'd make a plate 30mm? wide, length equal to the depth of the slot inside the box section top to bottom. thickness. 12 mm. I'd leave it long for a start. Make the square so the 30xdepthx 12mm plate just drops through, no gaps. Pilot the dot, drop the plate in, spot the plate through the hole. Drill and tap the plate to suit seat belt bolt thread. Open the spot to bolt size. Drop the plate in, fit the seat belt bolt, trim the top of the plate level. It's then easy to weld round the top of the thick plate. If you bias into the thick stuff it will blend into the thin stuff and being on a top surface is easy to blend in anyway. Then remove bolt and fit belt. If you drill a hole under the spot, you can spot weld the bottom of the plate too. It's long winded writing and probably difficult to understand me but in my mind it's easily possible to achieve a solid mount. Thank you for taking the time. And I completely understand this. So this is useful and helpful if I have to do this myself. So again thank you.
Matty Posted April 29, 2023 Posted April 29, 2023 42 minutes ago, Mally said: I like your thinking. On the tunnel, mark the required position for the bolt hole(s) one each belt. Transfer this position roughly to underneath, where presumably the propshaft runs. Make sure there are no brake pipes or wires in the locality. Drill a small pilot hole and check. Don't know what size your bracket threads are but presume M10 fine? I'd drill a hole same size as the bolt, hold the plate with the nut under where the prop is, bolt through the belt, and tighten things up. You will need Octopus arms though. In my eyes that's good enough but I may add a bigger spreader plate to be sure. I don't see it needs welding for safety, but if it needs inspecting then possibly. Now the dot, I'd consider drawing the 'square' directly over the dot, and right up to the edge. On the top side. I'd make a plate 30mm? wide, length equal to the depth of the slot inside the box section top to bottom. thickness. 12 mm. I'd leave it long for a start. Make the square so the 30xdepthx 12mm plate just drops through, no gaps. Pilot the dot, drop the plate in, spot the plate through the hole. Drill and tap the plate to suit seat belt bolt thread. Open the spot to bolt size. Drop the plate in, fit the seat belt bolt, trim the top of the plate level. It's then easy to weld round the top of the thick plate. If you bias into the thick stuff it will blend into the thin stuff and being on a top surface is easy to blend in anyway. Then remove bolt and fit belt. If you drill a hole under the spot, you can spot weld the bottom of the plate too. It's long winded writing and probably difficult to understand me but in my mind it's easily possible to achieve a solid mount. Up for a trip to Norway? 😄
Mally Posted April 29, 2023 Posted April 29, 2023 30 minutes ago, Matty said: Up for a trip to Norway? 😄 Most sensible people from Norway were in Spain with me last week. I'd love a drive in the car though. Matty 1
Dyslexic Viking Posted May 3, 2023 Author Posted May 3, 2023 This is now booked for welding at the end of the month. The challenge now is seat belts. The place in the UK that I was told about here does not ship to Norway, had ordered from a Norwegian supplier but they have canceled the order. So I have found some seat belts in Sweden, hope they arrive. The other challenge is that 3 point seat belts seem to be difficult to get hold of now. 4 point is now more common, another stupid EU requirement? The third challenge is welding fasteners for the seat belts, few sell these, so I may have to go to ebay but I don't know the bolt size until I get some seat belts. I have a month to figure this out and I'm a bit stressed. When it comes to the service work, it is a bit postponed as the garage is blocked by a Yaris in need of work. This should cover everything happening now. Jim Bell, Justwatching, Saabnut and 6 others 9
Sunny Jim Posted May 3, 2023 Posted May 3, 2023 Keep on keeping on, I'm sure you'll find a way through it all. Dyslexic Viking 1
Mr Pastry Posted May 3, 2023 Posted May 3, 2023 55 minutes ago, Dyslexic Viking said: The third challenge is welding fasteners for the seat belts, few sell these, so I may have to go to ebay but I don't know the bolt size until I get some seat belts. Seat belt mountings are to a universal standard, 7/16" UNF. Even in Europe and on current vehicles. cobblers, Dyslexic Viking and Rust Collector 2 1
Dyslexic Viking Posted May 3, 2023 Author Posted May 3, 2023 3 minutes ago, Mr Pastry said: Seat belt mountings are to a universal standard, 7/16" UNF. Even in Europe and on current vehicles. Thanks, this is very helpful, I now know what to buy.
Mr Pastry Posted May 3, 2023 Posted May 3, 2023 9 minutes ago, Dyslexic Viking said: Thanks, this is very helpful, I now know what to buy. www.ebay.co.uk/itm/362782773889? Dyslexic Viking 1
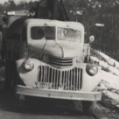
Dyslexic Viking Posted May 7, 2023 Author Posted May 7, 2023 I should get the gearbox and differential oil changed before I drive this too much but the weather is very nice today and I want to drive it so I took a drive anyway. The battery was completely dead, but I got it started, so I headed up to Tovdal, a side valley where the road stops at the top and there is little traffic. This was a 60 km trip that went without problems. But I didn't dare to switch off the engine and it turned out to be correct as the battery was flat when I get home so I have something to investigate there. And this drives very well, the biggest problem now is the lack of noise dampening and carpets inside the car so the noise level is almost unbearable. Popsicle, Sunny Jim, cobblers and 24 others 26 1
RayMK Posted May 7, 2023 Posted May 7, 2023 A wonderful car in superb scenery, and even better as it did not try your patience. A touch of welding, soundproofing and carpets, maybe seat belts as well, will give you your autoshite paradise. LightBulbFun and Dyslexic Viking 2
danthecapriman Posted May 7, 2023 Posted May 7, 2023 If you played around with those pics they could have been taken when that car was new, or at least much younger. The old girl looks right at home in that beautiful scenery too. Dyslexic Viking 1
Dyslexic Viking Posted May 7, 2023 Author Posted May 7, 2023 During the oil change on the engine last autumn, the pre-filter, which is before the oil filter, was quite clogged with goo, so since it has now done 100km and a lot of idling since the last oil and filter change, I did carry out a short oil / filter change now. And I'm glad I did, the oil was very black as expected but the oil pre-filter really showed it was a good thing I did this now. I cleaned this completely in the autumn and then you could see through it, something that was no longer possible now. And I really struggled to get this cleaned this time, next time I'll have to buy an ultra sonic cleaner if I can afford it as it's the only thing I can think of that can work as this filter is in 2 layers and is almost impossible to get cleaned in the middle. So this was the best I could do. The next thing was a cleaning of the oil filter housing and then a new oil filter. Then this was put back on the engine. And this oil filter is the most terrible oil filter I've had to change so far, it's under / behind the diesel pump in a very inaccessible place and it's a challenge not to lose the pre-filter. The angle of the filter and the challenge of getting it in and in place mean that it is not possible to fill it with oil either, which I don't like, as it takes a few seconds before it is filled with oil and then the is engine runnig dry, but what can a do. I'm going to do another short oil change and filter, don't know when, but hope it can take a little longer than 100 km. danthecapriman, Popsicle, dome and 8 others 11
Dyslexic Viking Posted May 7, 2023 Author Posted May 7, 2023 Today I also had a look at the battery problems I have now. And after the drive the battery was flat so I checked and the alternator produces over 14 volts but none of it gets to the battery. So need a little help here, what I'm thinking is that either the charging relay is faulty or there are some problems with the wiring? The charging worked in the autumn. Alternator This is what I believe is the charge relay. But some of the wires in the area don't look quite healthy and there are some cut wires too. So where do you guys think I should start troubleshooting this? Or should I just replace the relay? As this is the first time I have had such a problem. And I can add that I'm bad at wiring diagrams.
RayMK Posted May 7, 2023 Posted May 7, 2023 When you drove it, the lights and electrical systems were presumably functioning? Try to work methodically i.e. one task at a time, then check for an improvement before attacking the next task. Avoid pulling or waggling ancient wiring but I'd first of all make sure that all connections are good, including the battery terminals. If it all looks ok after cleaning connections which looked corroded or tightened and cleaned any that were loose, maybe look at those bundled/taped wiring lumps to ensure they are still making good contact. Also check the starter motor connections and earth cables between engine and body. Check that the battery can hold a charge by charging it overnight and then trying to start the car. Only then would I look at replacing the relay. Others with more experience of electrics may advise a better approach - but that's how I chase down problems with my old cars. Dyslexic Viking 1
Mr Pastry Posted May 7, 2023 Posted May 7, 2023 Where are you measuring the output voltage? With engine running at 2000 rpm, and lights and heater fan on, measure between the battery terminals. A good reading is between about 13.5 and 15 volts. Higher than 15volts, possibly a bad regulator, Lower than 13 volts, possibly a bad battery. I would suspect the battery first. coachie, Dyslexic Viking and RayMK 2 1
Dyslexic Viking Posted May 7, 2023 Author Posted May 7, 2023 On the drive, I didn't use anything other than turn signals and I think they worked, and since this is an old diesel, it doesn't need electricity when started and running. I measured directly on the alternator and there I got over 14 volts, on the battery I then had 12.7 volts. It's possible I've measured something wrong, but this is always how I've measured it and it's worked. And I have always before received charging voltage on the battery during my measurements and that at idle.
RayMK Posted May 7, 2023 Posted May 7, 2023 16 minutes ago, Dyslexic Viking said: On the drive, I didn't use anything other than turn signals and I think they worked, and since this is an old diesel, it doesn't need electricity when started and running. I measured directly on the alternator and there I got over 14 volts, on the battery I then had 12.7 volts. It's possible I've measured something wrong, but this is always how I've measured it and it's worked. And I have always before received charging voltage on the battery during my measurements and that at idle. 12.7V is a bit low at the battery with the engine running. 14-15V would be the typical voltage to expect. It's worth checking that the battery terminals are free of corrosion. If the terminals are a bit crusty, they may not be able to transmit the required starting current and all you will get is a slight click when operating the starter. Dyslexic Viking 1
Mr Pastry Posted May 7, 2023 Posted May 7, 2023 The test I suggested is a standard test for alternators, it is not just something I dreamed up, so it would be interesting to try it for comparison. If you measure at idling speed that can be misleading as you may just be seeing the voltage of the battery, not the charging voltage. Dyslexic Viking 1


Recommended Posts
Create an account or sign in to comment
You need to be a member in order to leave a comment
Create an account
Sign up for a new account in our community. It's easy!
Register a new accountSign in
Already have an account? Sign in here.
Sign In Now