Jump to content

Recommended Posts

Posted

Staaaaaacklight spotted today white so might be galaxie or Pontiac up noo yoik state area

Was in car sadly and didn't spot much else

More walking about needed but didn't do that this time

Posted
7 hours ago, hairnet said:

Staaaaaacklight spotted today white so might be galaxie or Pontiac up noo yoik state area

Was in car sadly and didn't spot much else

More walking about needed but didn't do that this time

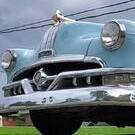
Most likely a Pontiac, those are the most common stacklight.

13549_p40_l.thumb.jpg.14d0840df6a1d8b5984432ce45b2280a.jpg

People loved the Bonneville series. 


Phil

Posted

A little cooler today which was pleasant respite. So I cut the repair off and beat a better profile into it.

20230910_171306.thumb.jpg.a9968e8dac17d7047270e09f1bd4a074.jpg

The arch was too straight and the lower return was too angular. Altered that to be better.

20230910_183758.thumb.jpg.1989068219f839c80eb2f3a9fb7b22f1.jpg

Ignoring the big triangular hole, the overall shape is better, and kneeling down behind the car now looks even.

20230910_184111.thumb.jpg.5509041bd5f95b0952e63ec2bad1afc6.jpg

Looks good in three-quarter too, so I'm happy with that. I'll cut an infill patch and zip that in when I can.


Phil

Posted

Warped the panel a shade more than I would've liked but eh. 

20230911_184204.thumb.jpg.24324f2a3d9081765a40426f3e9cf8bd.jpg

I'll get the curve back when I weld up the arch lip, and the rest will beat out and Bondo smooth.

Phil

  • Like 8
Posted
On 9/10/2023 at 12:26 PM, PhilA said:

Most likely a Pontiac, those are the most common stacklight.

13549_p40_l.thumb.jpg.14d0840df6a1d8b5984432ce45b2280a.jpg

People loved the Bonneville series. 


Phil

like the white one i spotted in GA MS wherever it was only it was a hardtop

i like them too

Posted

Some plank decided to DA sand then paint over the lower trim.

20230912_095231.thumb.jpg.023d9c58255fa88729017d72618c1795.jpg

Put a bit of paint stripper on it and it looked like craters on the moon. They've gone through the chrome sadly so I might have to just clear coat the aluminum.

I'll have to pull the rest off and strip it back. I'm still on the hunt for the rest of the front trim too. Trouble is it is freakishly expensive when it does pop up for sale.

Posted

Started getting the carburetor set up.

20230915_094358.thumb.jpg.3f6183d9c8c7710fb15ee747f40d240b.jpg

Two sets of everything. Complicated.

20230915_161244.thumb.jpg.adf950a77e55eb62ddb08fab85700364.jpg

Got it mostly right but it started getting a bit hot so shut it down and left the battery to charge.


Phil

  • 2 weeks later...
Posted

Checked back round and took five minutes in the rain after a refresher break from the car.

20230925_185040.thumb.jpg.8f31e89bd2e2fb2667456eafd52650e3.jpg

Popped the worst of the kink out of the front edge, it's approaching the correct profile now.

Phil

Posted

IMG_20230925_222635_291.thumb.jpg.d9c568ebbaef6d47c8b289e6e6823087.jpg

20230926_074744.thumb.jpg.133c1a1a693f3108f7fb62d2cae8eb5a.jpg

Forgot just how much panel beating I had done on this side. Same-angle comparison from when I had just removed the filler.


Phil

  • 4 weeks later...
Posted

Hmmm. Where were we? 


No. I dunno either.

20231025_161217.thumb.jpg.d38996635b94639cd4cec653c66e3600.jpg

Took the diff yoke off. It's completely trashed, having been run without bearing caps on the UJ and with a snapped bolt and a hole drilled at a jaunty angle.

New ones are available.  I shall purchase, at some point. For now I've cleaned it and fixed it up so it works.


Phil

Posted

It's good seeing this come together. Been watching a load of Roadkill and RK Garage lately and they make it look easy with a production company budget - they also rarely touch bodywork and I know how painfully slow that can be, especially making your own repair panels. How much do you need to do before you can at least take it for a burble around the neighbourhood? 

Posted
6 hours ago, bunglebus said:

It's good seeing this come together. Been watching a load of Roadkill and RK Garage lately and they make it look easy with a production company budget - they also rarely touch bodywork and I know how painfully slow that can be, especially making your own repair panels. How much do you need to do before you can at least take it for a burble around the neighbourhood? 

Yeah, the rust repair usually happens off camera elsewhere, then they resume fixing the vehicle doing more interesting stuff, leaving bodywork to other shows (which is always truncated also).

In order to burble I would need an exhaust. Right now it's loud. It's also misfiring quite badly. I think the idle circuit on the carb is blocked again.

But, in order to go for a very short drive.. gas pedal needs to be hooked up, somewhere to sit put in. 

Parking brake latch is missing the return handle spring so can be operated much like holding the button down on a handbrake.

Phil

Posted

Milk crate and a choke cable for a hand throttle. 😁

Posted
22 hours ago, PhilA said:

Hmmm. Where were we? 


No. I dunno either.

20231025_161217.thumb.jpg.d38996635b94639cd4cec653c66e3600.jpg

Took the diff yoke off. It's completely trashed, having been run without bearing caps on the UJ and with a snapped bolt and a hole drilled at a jaunty angle.

New ones are available.  I shall purchase, at some point. For now I've cleaned it and fixed it up so it works.


Phil

Thank you for reminding me that greasing the propshaft joints on the P6 really needs to be pushed to the top of my to do list.

Posted

Tonight, the weather was pleasant and I had the inclination to work on the car a bit.

20231102_174708.thumb.jpg.edc9de151c367900322dbe645ffa0e90.jpg

A flat piece of offcut. Marked up.

20231102_180507.thumb.jpg.6b27d4cf5e33cf19936ffe31b75839b3.jpg

The indent beaten in, and marked to be drilled.

20231102_181207.thumb.jpg.b029e18037859789c1c6decfb47c4672.jpg

A test fit and the gas pedal sits about right. It is meant to sit above the carpet, the metal section should have a rubber outer section but it's long gone.

20231102_182331.thumb.jpg.5a186073bf89c5295037aa597e0cd7fc.jpg

Trimmed and profiled, it'll be welded in another day.


Phil

Posted

Zort, crackle.

20231103_170938.thumb.jpg.07a0cfe469308ea5e54b5c3b4a426bcf.jpg

Bolted down.

20231103_174001.thumb.jpg.192cf8cb951612ee1882a9420548eec3.jpg

Need to sort the linkage out because I undid it, but forgot it needs to be done up before clamped in place.


Phil

Posted

Put the car back, cleaned out the carburetor and got it adjusted up.

Better than it was, I had to play church organ pedals to stop it from stalling when moving it.


Phil

Posted

I get reminders off Google photos about stuff I've done - today was this

The others ones are for @Conan they'll be in his thread :D

Screenshot_2023-11-11-11-16-19-187_com.google.android.apps.photos.jpg

Screenshot_2023-11-11-11-16-13-708_com.google.android.apps.photos.jpg

Screenshot_2023-11-11-11-15-44-261_com.google.android.apps.photos.jpg

Screenshot_2023-11-11-11-15-39-791_com.google.android.apps.photos.jpg

Screenshot_2023-11-11-11-15-26-119_com.google.android.apps.photos.jpg

Posted

Funny, photos of vehicles I mostly don't own any more.

Still haven't managed to make it back to that little car show yet. Meant to this year and remembered the day after it was on. Go figure.


Phil

Posted
2 minutes ago, PhilA said:

Meant to this year and remembered the day after it was on. Go figure.


Phil

i do exactly the same :D

Posted

A box of pieces arrived.

20231113_134828.thumb.jpg.36a50f238828ef232c8fbf73791ab174.jpg

Carburetor insulator, heat wrap for the exhaust and some manifold to downpipe pieces.

20231114_115919.thumb.jpg.347aa4c230813be57b00e09b6c4f72d7.jpg

Started by pulling the carburetor off, doesn't look too bad inside still.

20231114_120748.thumb.jpg.b9a3a9ff9b926423cb57cf6df84bb495.jpg

Added the new longer studs that are needed now.

20231114_120931.thumb.jpg.fcfd61f6d1d7896b6c751dffb75a0caf.jpg

Then, slot the spacer and gaskets on.

20231114_124907.thumb.jpg.545d3bfe1776c8d4d5ee78c843853456.jpg

Clearanced the manifold a touch with bfh. Ended up using a bbfh because that one wasn't b enough.

20231114_145134.thumb.jpg.33f535185887198846dbb0b42d56f391.jpg

Wrapped the tubes down. Makes a surprising difference to the heat felt there. Hopefully that should make the steering last a little longer.

More boxes have arrived in the interim.

Phil

Posted

This afternoon I created a wiggly pipe.

20231118_155454.thumb.jpg.63226b2e2d34bb2781c1be36f16ab73a.jpg

It weaves its way around the torsion bar on the passenger side. Lines up with the notch in the subframe.

20231118_160235.thumb.jpg.a6d96173d33645728ed7a8e6172d0c40.jpg

Looks tidy enough.

With a length of straight pipe stuffed in the end it has a nice deep note already. Next up working out where it's going to go from there.

Phil

Posted

20231119_152643.thumb.jpg.34a3e24047705a145be28f279f106453.jpg

Driver's side downpipe. This one was simpler, there's less in the way.

20231119_135428.thumb.jpg.d130b06df385cb344cd45e9f9502297d.jpg

Built up the passenger side section that gets to where the muffler will be. Soon, I shall have to buy some.


Phil

Create an account or sign in to comment

You need to be a member in order to leave a comment

Create an account

Sign up for a new account in our community. It's easy!

Register a new account

Sign in

Already have an account? Sign in here.

Sign In Now
×
×
  • Create New...