Peter C
-
Posts
3,222 -
Joined
-
Last visited
-
Days Won
7
Content Type
Profiles
Forums
Events
Everything posted by Peter C
-
Just a small update today. I have rubbed down and sprayed primer to: The two windscreen posts. The bottom of the front door. And the bottom of the rear door. I will apply the top coat tomorrow.

- 952 replies
-
- 20
-

-
Good news x2. Neat paraffin removes overspray from plastics. I have cleaned up the front wheel arch liners that someone forgot to cover when respraying the Sierra. Remember this? I cleaned up the air filter housing cover and made a cardboard template of the area that needed covering up. I then cut the lid off an Isopon P38 tin, the only black flexible plastic thing I had in the garage, into shape, fixed it into place with three self-tappers and, hey presto, job done. The scratches were already there, presumably occurred during the previous repair. Once re-installed where it belongs, nobody will ever know. I think I'm winning.
- 952 replies
-
- 51
-
-
@lisbon_road Thank you for the gifts, top bloke, I owe you a cuppa. Your tool works great, I can now fit the water pump etc in the vice and the pulley doesn't budge. However, my fat adjustable spanner will no longer fit in the available space between the locking tool and the clutch. I've made up a cardboard template, the locking nut is definitely 32mm. As @Rightnider advised, this is the right tool for the job. A tenner from Amazon, should be with me next week. More soon.
- 952 replies
-
- 10
-
-
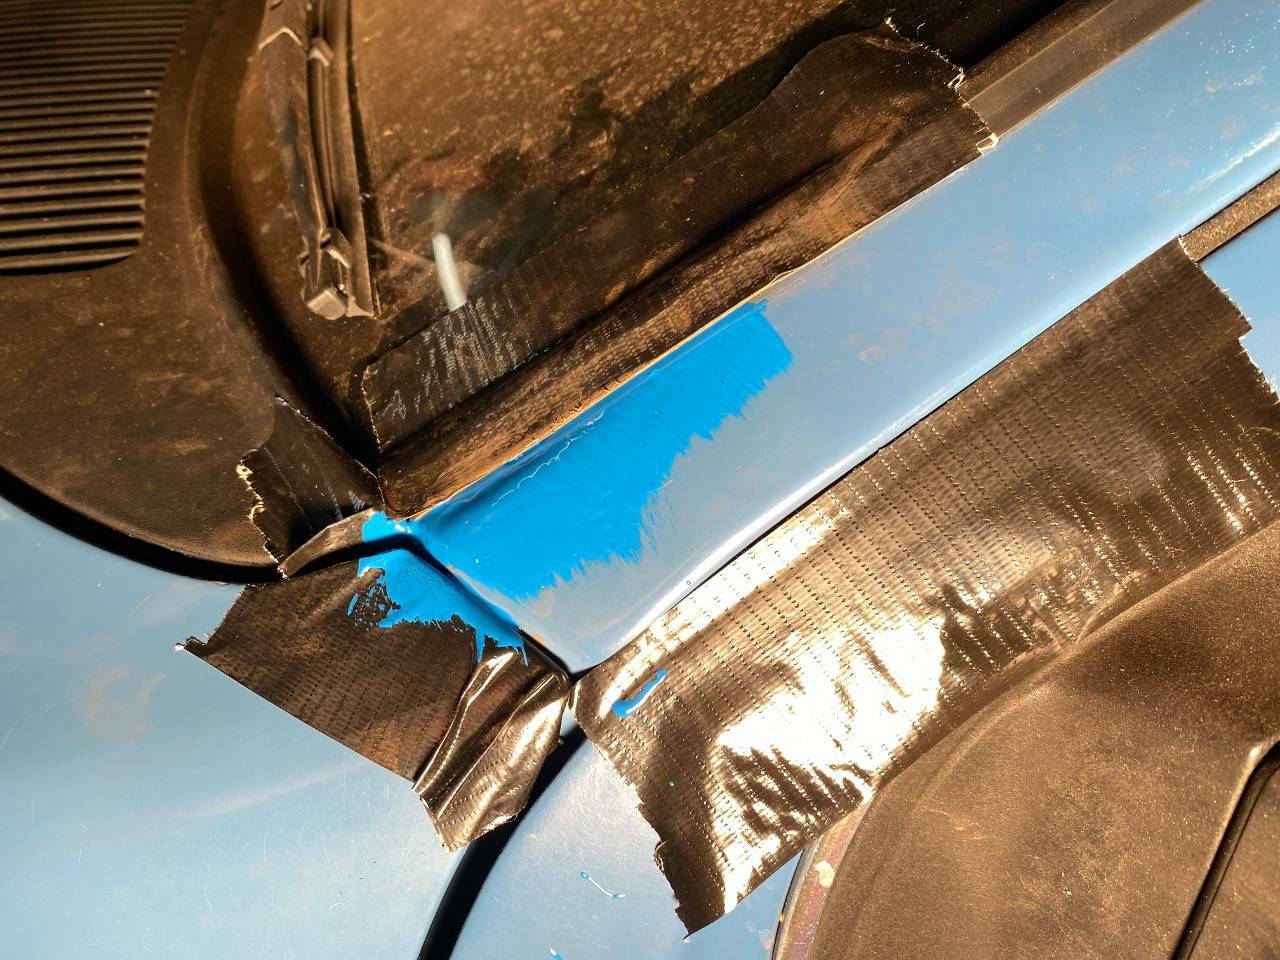
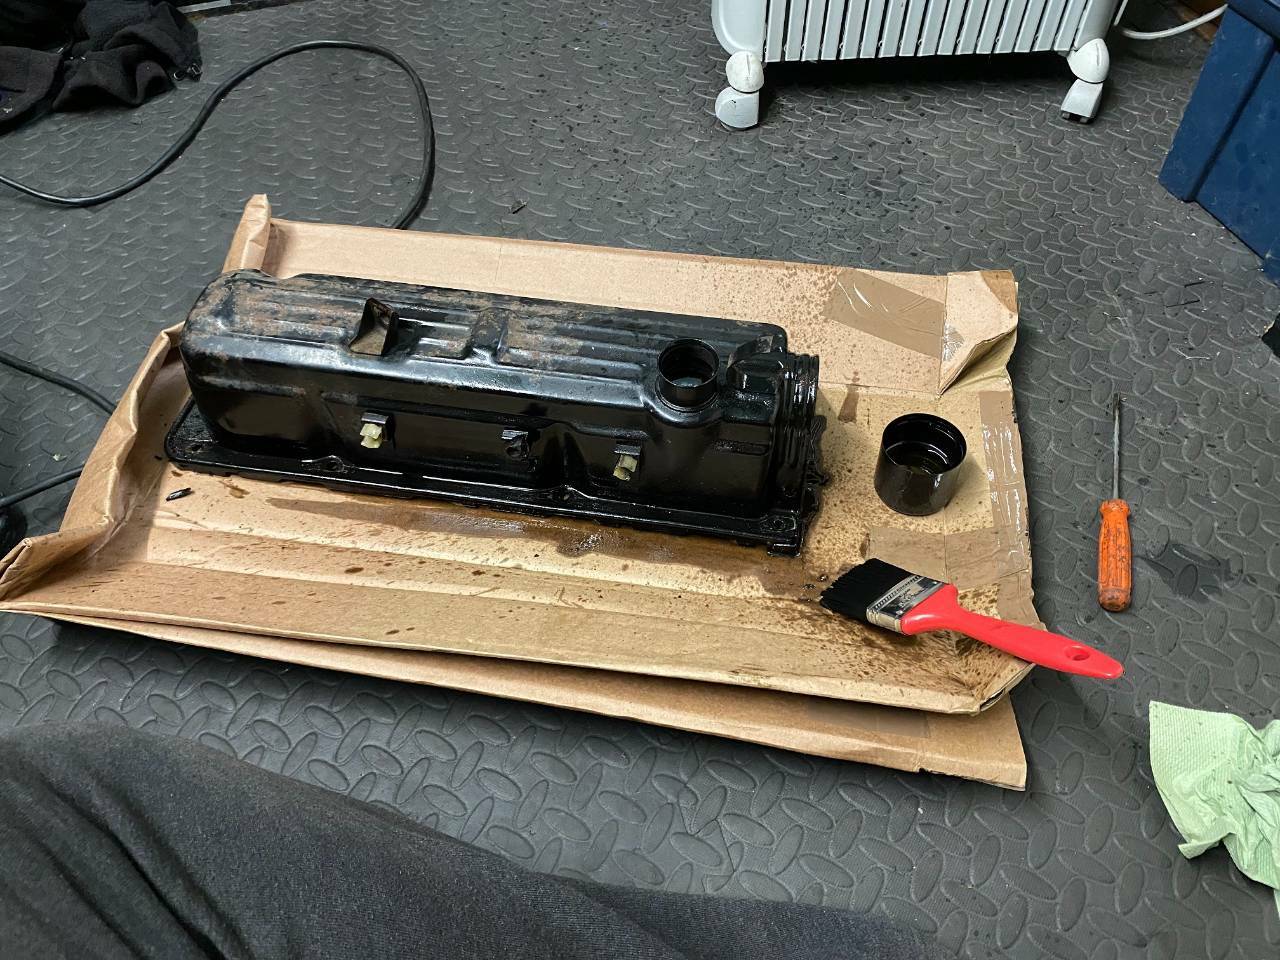
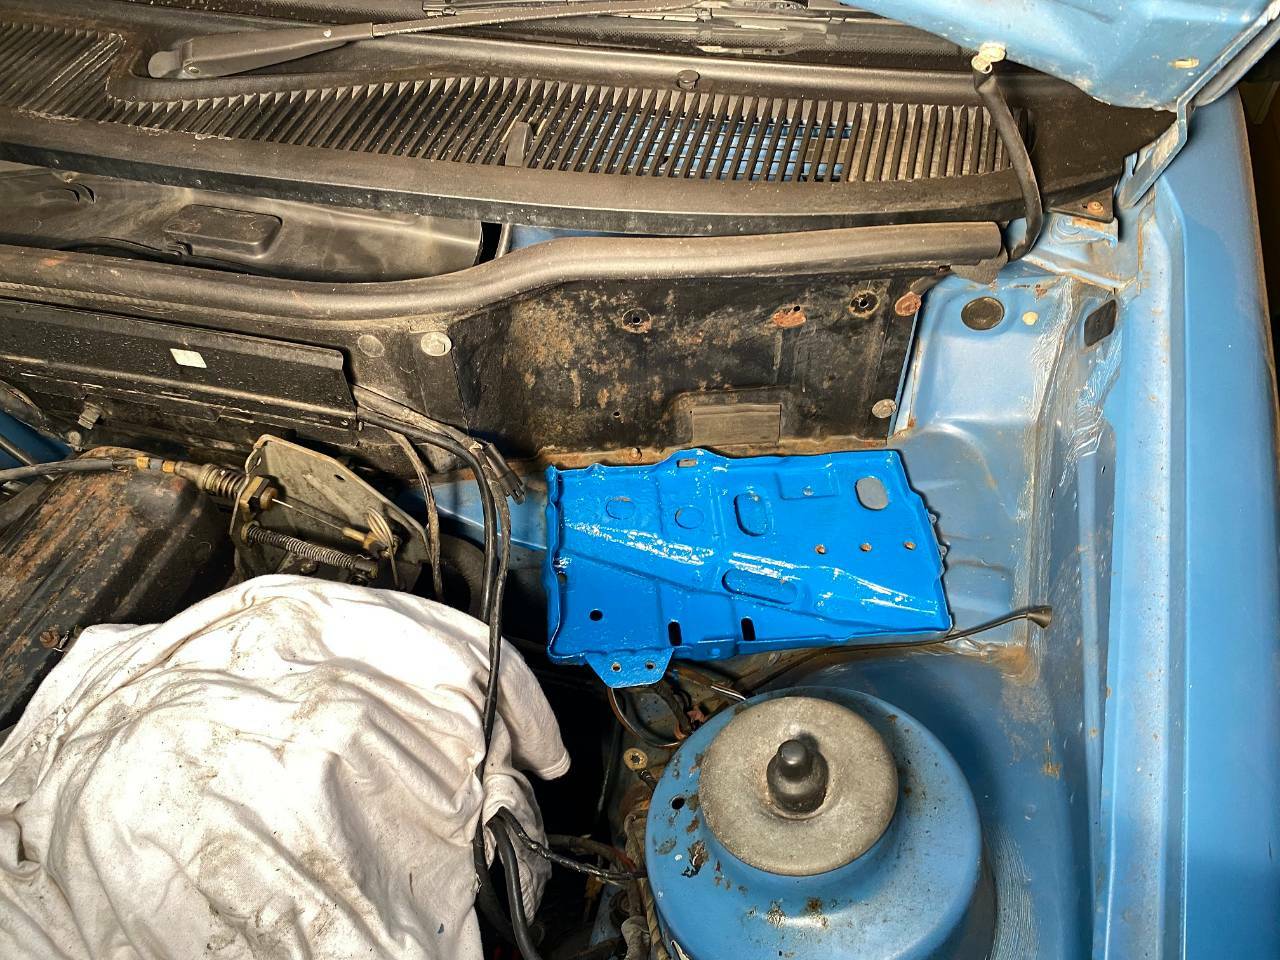
Another day spent in the garage but I am making good progress. I started by coating the exposed areas along the nearside front and rear arches and along the sill. I gave the spare wheel well and the fuel tank a lick of paint where surface corrosion had taken hold. The windscreen posts looked nasty but turns out there was nothing to worry about. Offside first, I scraped off the plebs to find completely solid metal underneath. I lifted the windscreen seal with the plastic mixer that comes with P38 Isopon, which is ironic as the repair didn't need any filler. I will sort out the cosmetics once the paint has fully dried. Exactly the same situation on the other side. I prepared and sprayed the black bulkhead panel that will soon be almost completely concealed by the battery. Before removing the cam cover, I marked up the ignition leads. It took 30 seconds and could prevent an embarrassing situation come reassembly. The cam and valve-gear look very clean. Nothing to see here, certainly no sludge. I degreased the cam cover with paraffin. And painted the rusty bits with a high temp black gloss paint. Shame most of the cam cover will be covered up by the air filter housing. Speaking of which, the air filter housing lid looks awful with this repair. So I ripped it off. The repair patch was hiding a nasty hole. Does anyone have one of these? I put the paint and spray cans down and spent a bit of time tidying up the engine bay, specifically the inner wings and slam panel. The engine bay is remarkably free from rust. The more I look at this car, the more I believe that the mileage is genuine. Take a look at the front wing to slam panel seams, they are factory fresh. I don't think this car has even been involved in a significant accident. I've ordered more aerosol blue paint and a king size bottle of T-Cut. You know what's coming next. More next week.
- 952 replies
-
- 45
-
-
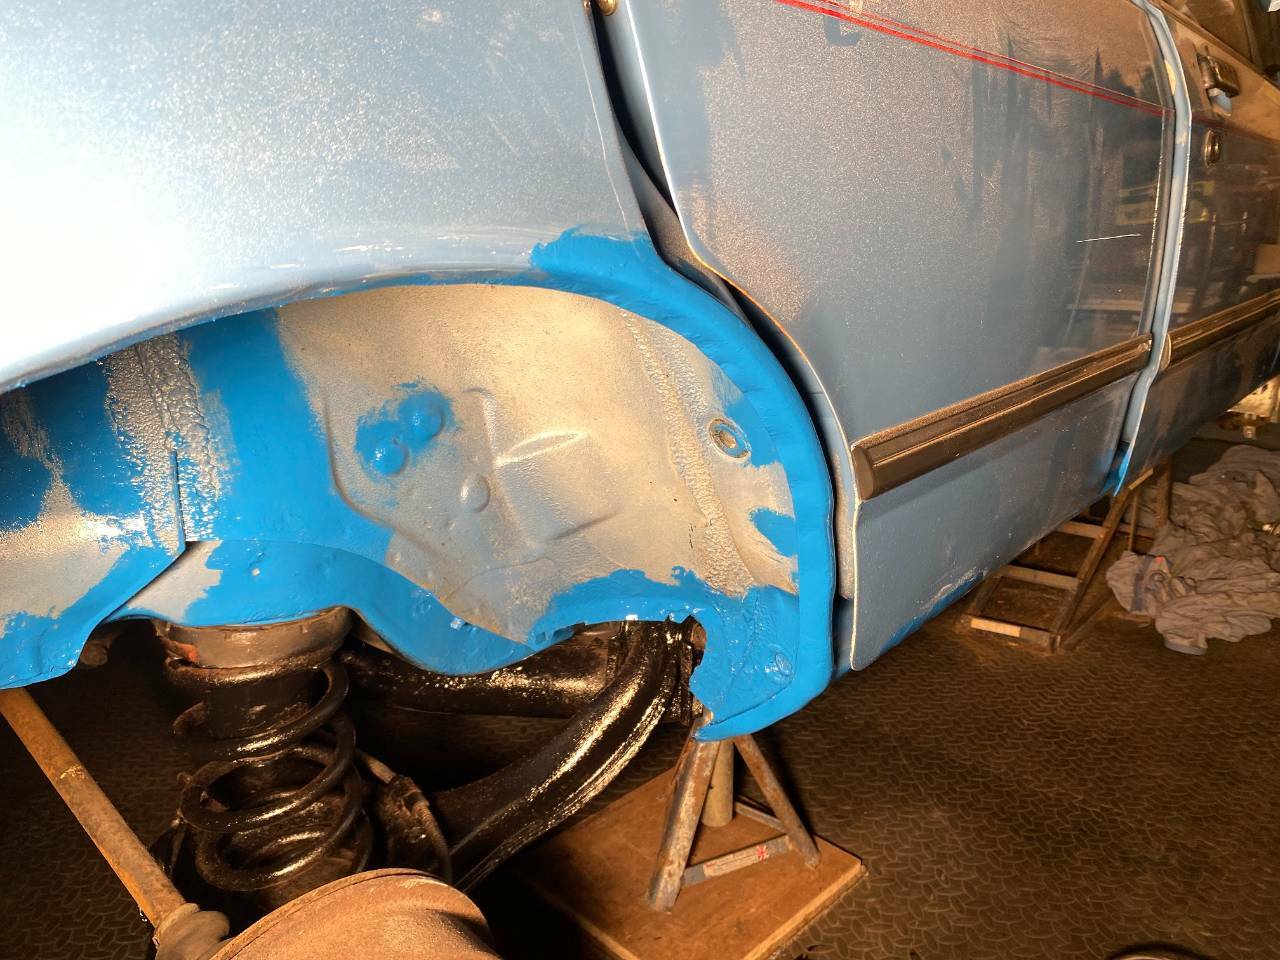
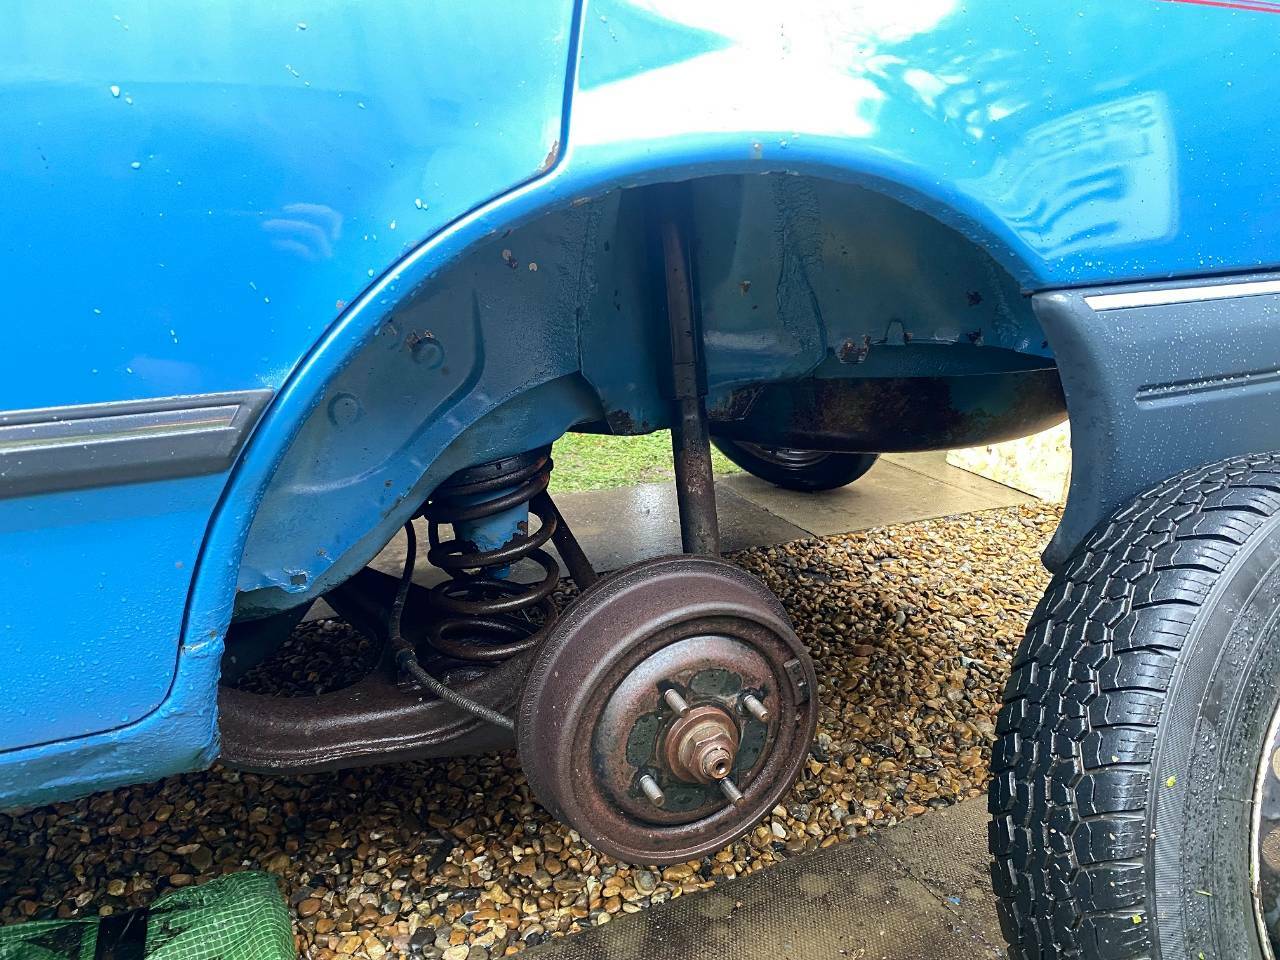
I had another go at removing the fan clutch. I've wrapped an old fan belt around the pulley, secured it with cable ties, squashed it in a vice to stop it from turning and with three of the four bolts that secure the pulley removed (one is enough to keep the pulley in place) I can comfortably get an adjustable spanner on the lock nut. I'm still not sure which way to turn to get the lock nut off but by applying plenty of force on the spanner, the fan belt snaps before the nut shifts. @lisbon_road - can please have your locking tool? I have made progress with the rust treatment. I brushed down remaining dust and debris from the underside and coated the exposed metal on the floor pan and the rear suspension components with a Rust-Oleum spray on black wax. It has sealed the sill seams very nicely. I've coated exposed metal in the offside rear arch. I used filler to make good the end of the offside sill. Rust plebs on the rear arch were probably caused by scratches (impact damage, which is partially visible towards the rear of the arch) as the inner side of the arch is solid. I pained the offside sill. I painted the exposed metal in the offside front arch. I painted the underside of the front and rear offside doors. I painted a section of the offside upper side of the chassis leg, where water has been pooling and caused surface corrosion. And finally I gave the battery tray a lick of paint too. The paint match looks horrendous in the photos. It's not perfect but it looks better in real life than in the photos because I had a massive spot lamp shining on the areas that I photographed and iPhone cameras are not the best. For some reason, my phone's camera has made the original paint look very pale, which it isn't. Also, bear in mind that the new paint is shiny and the original paint is flat. I expect the paints will match better once I have cut and polished the original paint. The arch liners will conceal most of the exposed metal so I am not fussed about the patchy finish. The plan is to over spray all painted repairs above sill level with the aerosol can that I know is a good paint match. I am confident that the Sierra will look ok once it's finished. Ideally, it would need a complete respray but that is not going to happen under my watch.
- 952 replies
-
- 37
-
-
It seems there are currently no alternatives. If your offer stands, I would be pleased to receive another gift from you but on this occasion please let me contribute to p&p costs.
-
Don’t post it, pop over for a brew.
-
If @lisbon_road doesn’t find his tool, could I borrow yours please?
-
My point precisely! Left hand thread = turn clockwise to undo?
-
And if I don’t succeed in getting the clutch bolt off, I might end up with a knackered water pump!
-
Tell me more. if you find it and can post it to me, I will pay p@p and post it back to you once I’m done with it.
-
The gap between the back of the clutch and the pulley is quite narrow. I used an adjustable spanner as I don’t have the correct size one. I don’t even know what size it is.
-
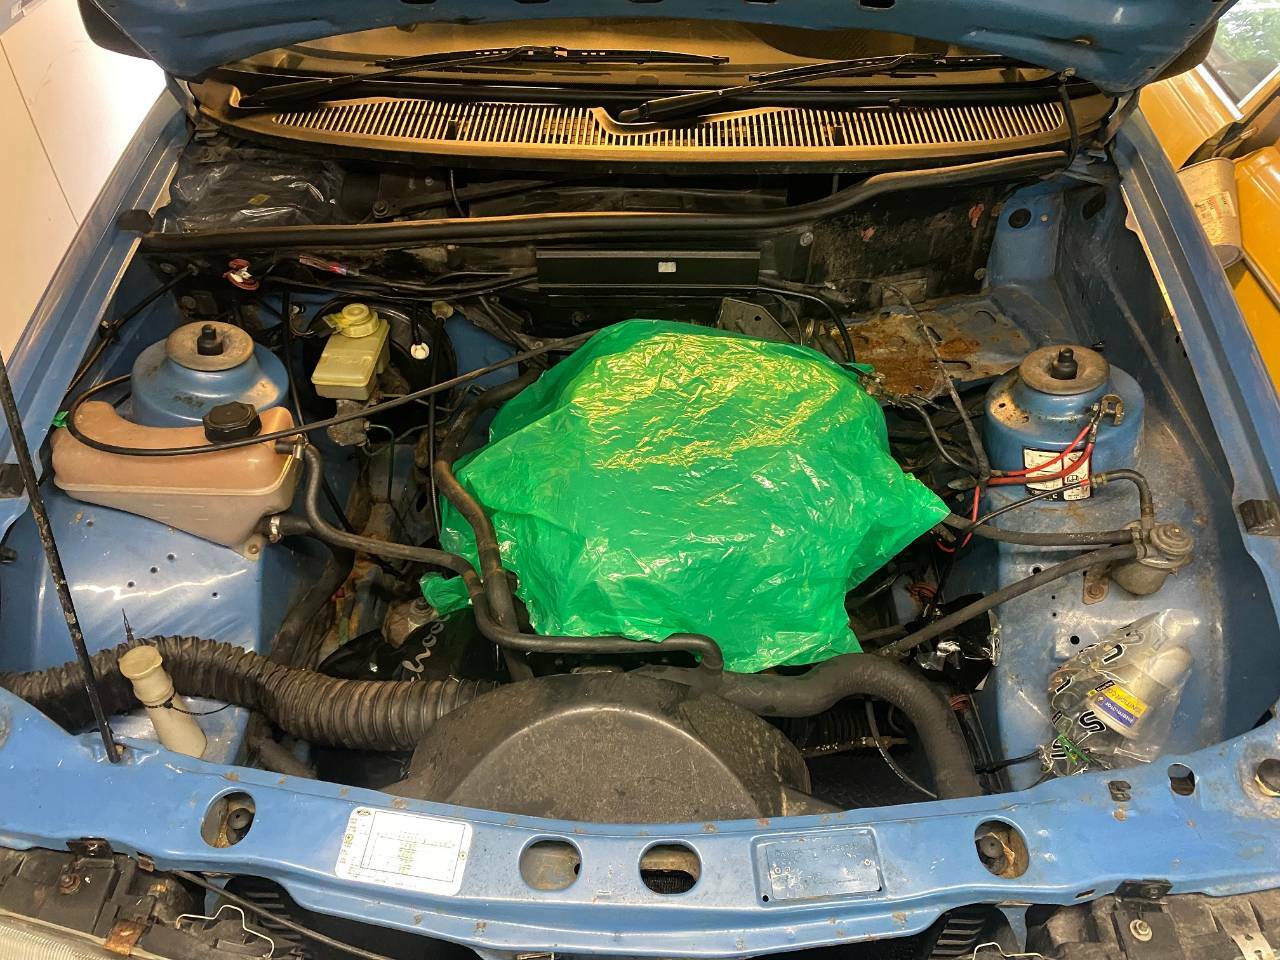
Now that I have the bodywork situation under control, I wanted to spend a bit of special mid-week time in the garage and take a look at the engine side of things. I removed the fan shroud, fan, thermostat and housing and water pump. All very easy, as you can imagine. I want to replace the thermostat and water pump, mostly because the coolant that I drained today is old and smelly. I don't know what condition they are in but I figured that if I am doing the cam belt, I might as well do the other bits. One problem. I can't separate the fan clutch from the water pump shaft. I've locked the pulley in a vice, by wrapping an old fan belt around the pulley and squeezing it tight in the vice but no matter how much effort I put in, I can't get the locking nut to budge. I don't even know which way it should turn to undo. I'm now in two minds whether to put the water pump back in as it is, with a new gasket and hope for the best. Any ideas how to loosen the nut?
-
Agreed. This was just a localised trial area and I wanted the old and new paints side by side for comparison purposes.
-
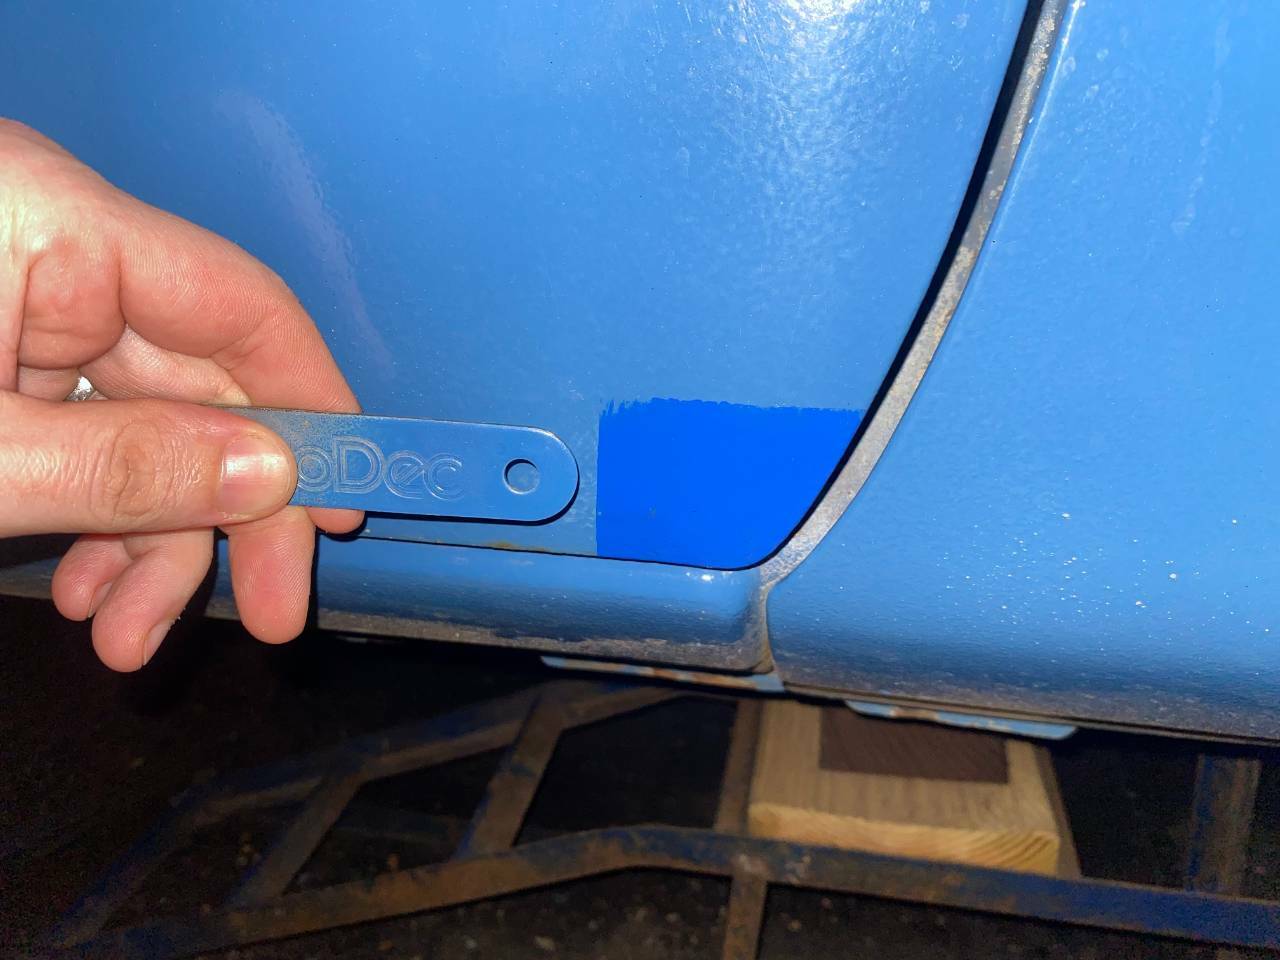
I spent half my Sunday (yesterday) stripping flaking paint and underseal and preparing surface corrosion for undersealing and painting. I used a circular wire brush attachment fixed to the end of a drill, which made the process a lot easier and a LOT more messy. Good news is that I did not uncover anything nasty. I didn't take any photographs as you have all seen the affected areas before. The idea was to paint over the underside and low level exposed areas with the matched blue Rust-Oleum paint. I painted a bottom corner of a door and this morning, once the paint had dried, I found it to be a completely different shade of blue. I then sprayed over the same patch with the matched aerosol and... Just about a perfect match. Not bad for a colour that is a bitch to match. I popped back to the paint shop today, showed the man who mixed the paint for me the above photos and he added some grey and yellow to the mix, to make the colour brighter. When I got home, I applied some of the newly mixed paint and it looks a better match but I won't know how much better until the paint dries. The plan is to use the brush on stuff for the areas that aren't so visible and use the aerosol to repair the damaged paint higher up along the flanks, then cut and polish the lot. In other news, I received a switch blanking plate from @wesacosa (thank you!) to replace the front fog light switch that has no right to exist in an L spec Sierra. More soon.
- 952 replies
-
- 32
-
-
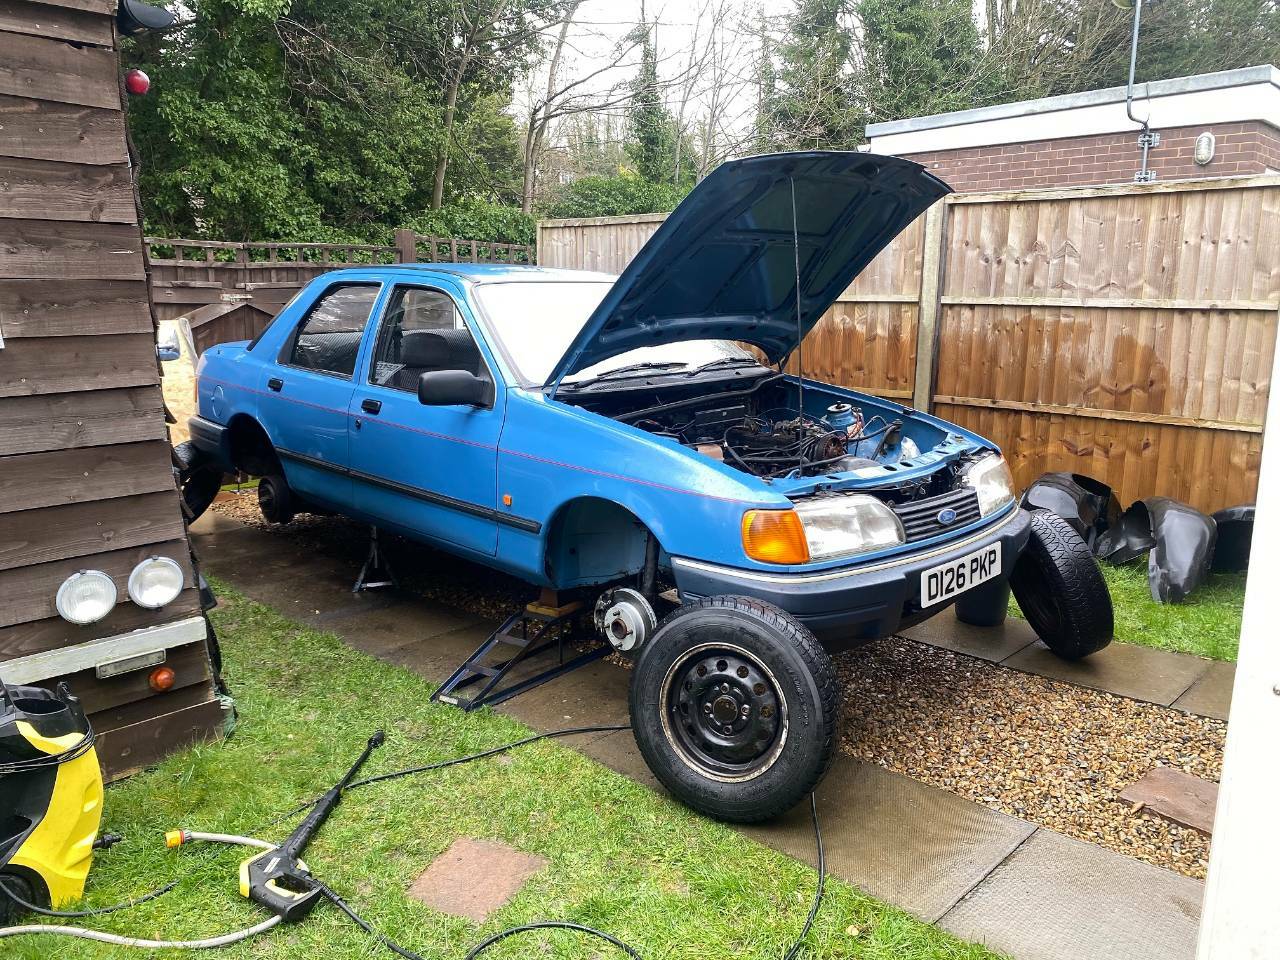
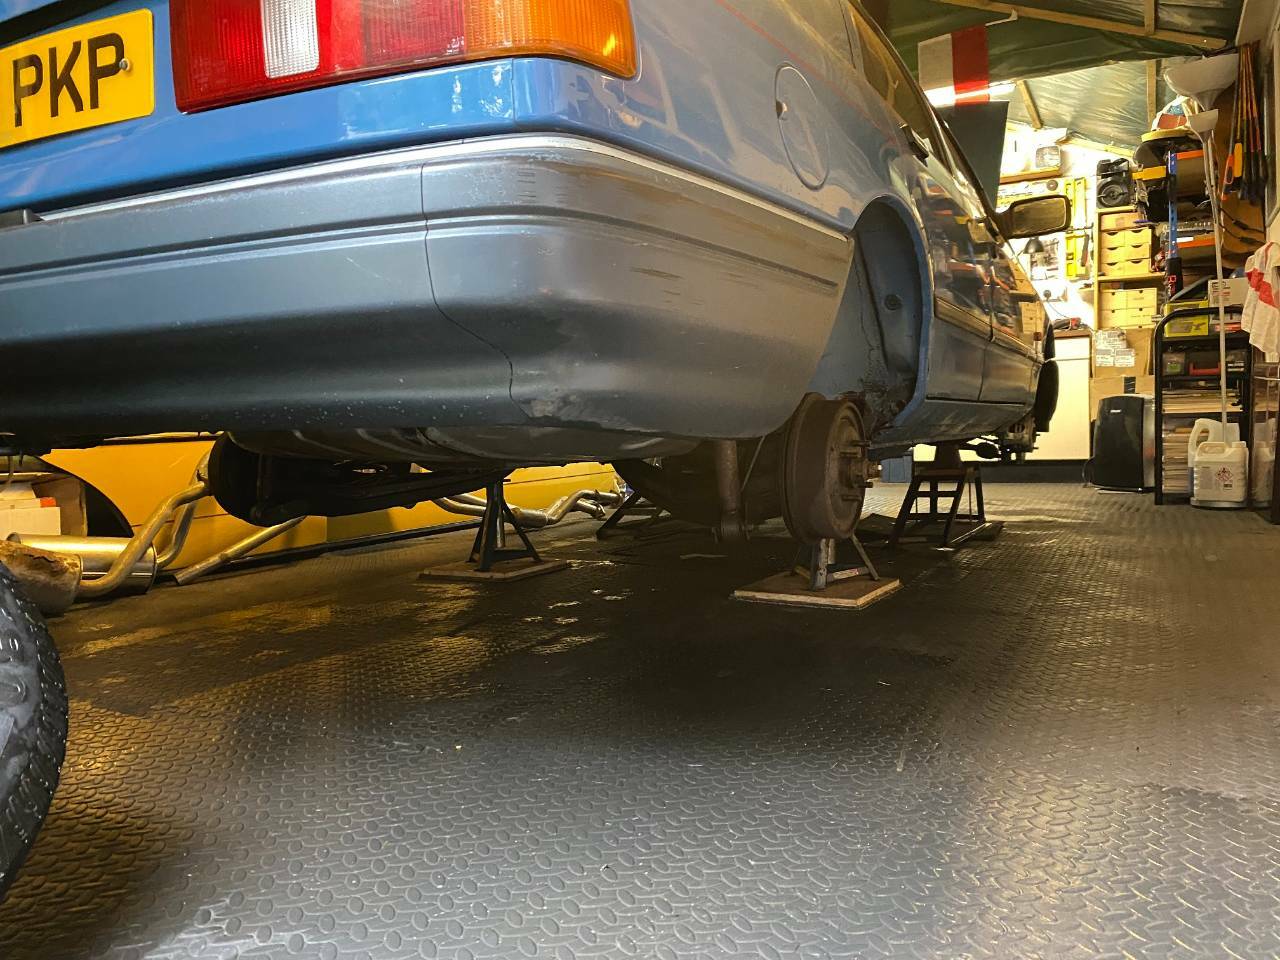
Now that my big birthday celebrations are behind me, I can focus on fixing up the Sierra. The plan was to pressure wash the underside and arches before doing any remedial work to the bodywork. I started by removing the battery and covering up the complicated* electronics and the carburettor. I put the wheels back on, dropped and pushed the car out onto the driveway. Once there, I jacked it up again and took the wheels off. All five wheels and the arch mouldings were also due a good scrub. An hour later, the underside was clean. Surprisingly little crud came off, the underside was cleaner than I expected and much cleaner compared with all the other cars that I treated to the same process in the past. Bits of flaky paint came off but what is left now is not just solid but also clean. The plastics responded well to the pressure cleaning and a fair bit of the blue overspray also came off in the process. The road wheels will need a lick of paint, however the spare looks great. It's also fitted with an unused Good Year tyre. I let the underside dry for a while before I put the wheels back on again. I pushed the car back into the garage, where I jacked it up AGAIN and took the wheels off AGAIN! I didn't have time for a proper inspection but first impressions are good, everything looks a lot cleaner. Time permitting, I might start on the bodywork repairs tomorrow. In other news, I wrote to the previous registered owner over a week ago and had nothing back. Never mind. I received a period Sierra badge from @Six-cylinder and a set of four coasters from @Pat Earrings. Thank you both. More soon.
- 952 replies
-
- 44
-
-

Project Memoirs from the Hard Shoulder: bASeman's Spot of the Year award.
Peter C replied to BorniteIdentity's topic in AutoShite
@wesacosa Bingo! This is the one I need. Please let me know how much you would like for it, including p@p.
-
Project Memoirs from the Hard Shoulder: bASeman's Spot of the Year award.
Peter C replied to BorniteIdentity's topic in AutoShite
Near side rear tail lamp cluster. A dashboard blanking plate. And a rear door ashtray.
-
Project Memoirs from the Hard Shoulder: bASeman's Spot of the Year award.
Peter C replied to BorniteIdentity's topic in AutoShite
Shame it’s not a Sapphire, I could do with a couple of bits. -
Externally, they look the same.
-
@sierraman Am I right that the Mk2 tail lights are the same on the saloons and hatchbacks?
-
My most recent W124 had a lovely blue MB-Tex interior.
-
You guys could be right, there’s a sticker on the inside of the fuel filler flap that states that the engine has been adjusted to run on unleaded fuel.