Peter C
-
Posts
3,190 -
Joined
-
Last visited
-
Days Won
7
Content Type
Profiles
Forums
Events
Everything posted by Peter C
-
I’m on a low carb diet and we don’t have any cereal in the house.
-
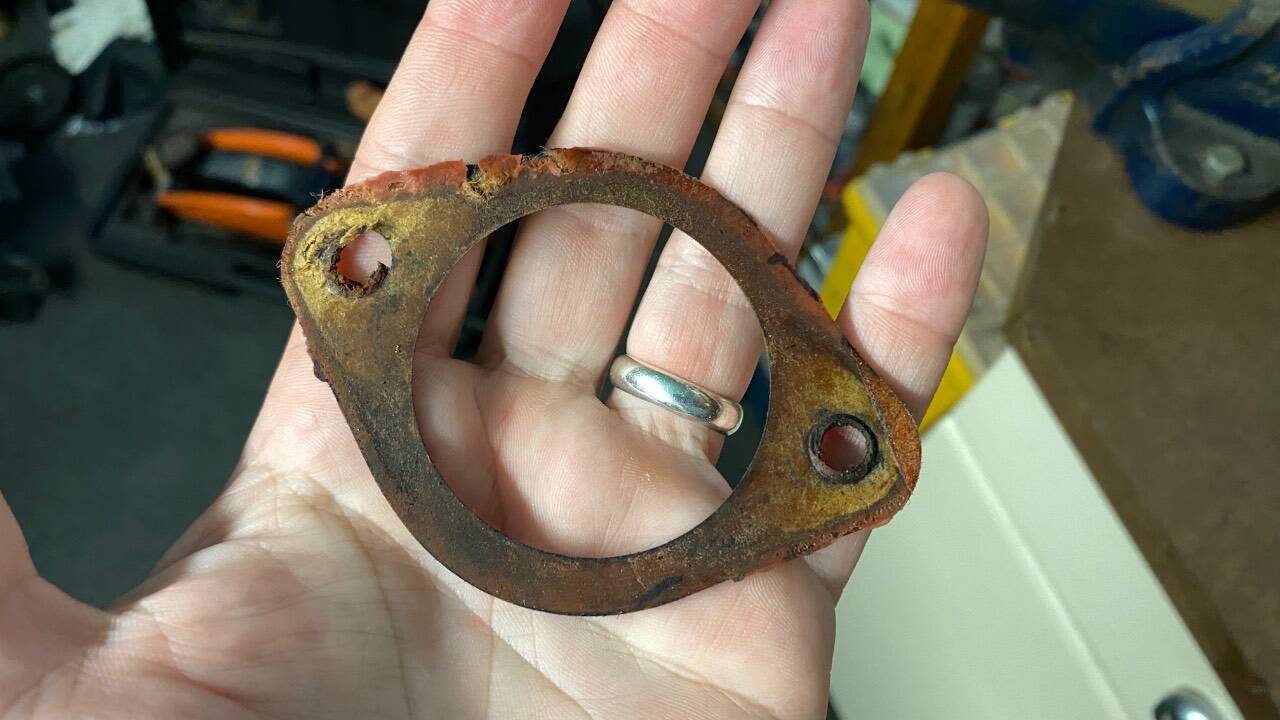
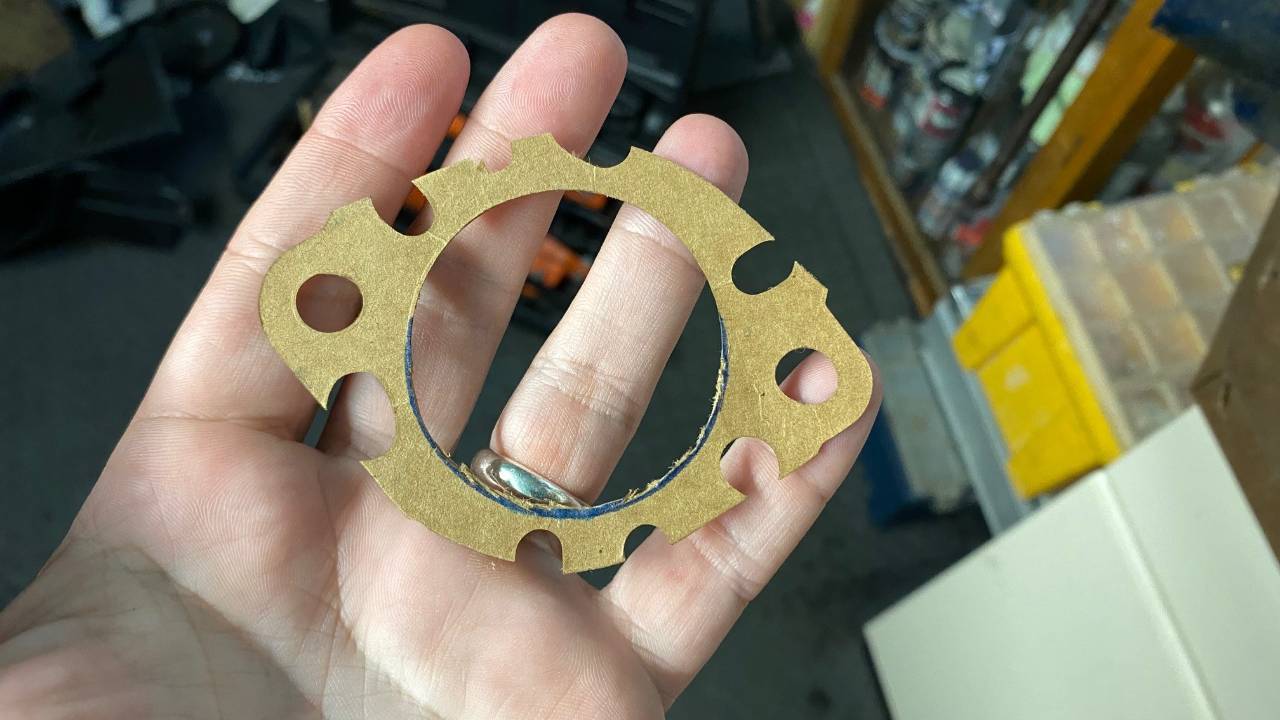
Does the surface of this gasket look like it has been damaged by the silicone sealant? It’s only been on the car for a couple of months and to me it looks unhappy.

-
The Sierra has been parked up in my workshop since I removed the brake master cylinder. A couple of days ago, I noticed a small pool of coolant on the workshop floor, beneath the front of the engine. I placed an arrangement of paper towels beneath the thermostat housing and the water pump and today I discovered that the towel placed beneath the thermostat housing was soaking wet. Off came the cam belt cover, top hose and thermostat housing. Front of the cylinder head looks ok to me. As does the old gasket. I applied some of that red coloured gasket sealer to both sides of the gasket before fitting it. Did I put on too much? Or not enough? I had a spare multi-fit gasket that came with the thermostat but once cut to shape, I decided against fitting it, for obvious reasons. I've bought a new Victor Reinz gasket from MAR Motorsport for £3.59 inc p&p, should be here by the end of the week. When I fit the new gasket, should I be applying gasket sealer?
-

I’ve just bought two deceased OAP cars for a grand.
Peter C replied to Angrydicky's topic in AutoShite
Both absolutely superb, well done that man. Looking forward to more updates. -
Cars you didn't know existed until very recently.
Peter C replied to philibusmo's topic in AutoShite
-
@High Jetter @lisbon_road @riek All noted, however I would rather spend the extra money and have the work done by someone who fixes brake master cylinders for living. I am sure that replacing seals and cleaning a Ford Sierra brake master cylinder is not rocket science, however one false move could cause a lot of bother. As it happens, I have a fair bit on over the next couple of weeks so I'm not going to have much time for driving or tinkering with the Sierra.
-
Bigg Red have only just refurbished a caliper for my W123. They did a cracking job but having spoken with them on the phone, they don't dabble with much else other than fixing calipers.
-
I’ve spoken with Past Parts, they can refurbish the cylinder and post it back to me, all for £160. That’s a lot more than a £19 seal kit from eBay but as I’ve never stripped a brake master cylinder before, I would rather pay someone who knows what they’re doing to fix it. As their turnaround is 10-14 days, the Sierra will be stuck in the workshop for the foreseeable future.
-
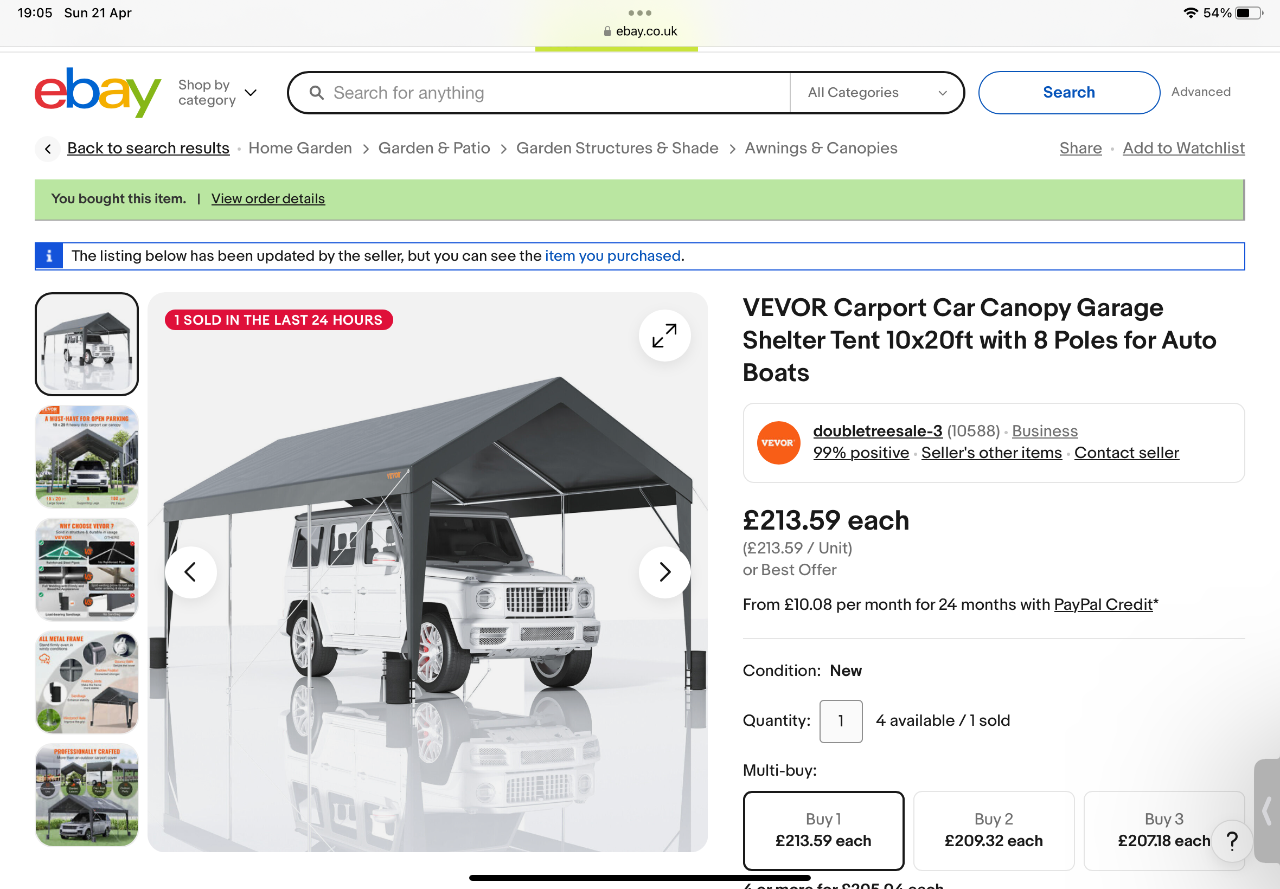
https://www.ebay.co.uk/itm/143893693240?itmmeta=01HWJH7ZSBZCHQS19SJW6ZYFK6&hash=item2180bb8338:g:LMcAAOSw9TRf4QO1&itmprp=enc%3AAQAJAAAAwJLPcv8Nlng3F%2F64JR2rzTJwBP6332FmwFU8dToaVcoaWYE2xKT3MaOpE89zUoeJ%2BAYJdDr2y8GFUi1QV32iIMFN9Y6MABRkR%2BmXhbPbtEd70NZH8jOfSAQD7CRHJKdW3knSGLzEmaeBwVaI0F9kJ2ISHrHf%2BbcQKNc6y2YR9hkOyQpCWVPkUzmeuWcMDYewTEOj6pkIz1oKfqfKyTloPbXLfy2NRyTFE%2FN0%2FNJAO00uDt2cYD1%2F5ES0wjEhVgn85A%3D%3D|tkp%3ABk9SR9r8n9HkYw Useful info: Here's a new Brake Master Cylinder Repair Seals Kit (22.2mm) (7/8") for the following models from Ford - FORD Ford Sierra (**1982- 88 Only**) (1300cc, 1600cc, 1800cc, 2000cc, 2300cc & 2300d) (Not for any Sierras with an engine larger than 2.3) (**Girlng Only - Not Bendix**) Most of these Master Cylinder will be on Kit Cars by now so Read the Following - To help you identify, this kit does all the following Master Cylinders as long as the Casting Number AND Plastic Tag are BOTH correct. The Tag denotes the Bore. If it's missing then measure it - Should be (22.2mm) (0.875"). Master Cylinder - 74660862 Tag - 66315 OR 66336 Both these numbers must be exactly right, don't buy this if only one of the numbers is right and then try to fit it to something else - It won't fit. To Help you identify further - The early Sierra up to 1988 used x4 internal flared seals which are all the same. Later Sierra of 1988- 93 used x2 flared seals and x2 seals that look like bottle tops. (Note - The Early and Late Sierra Master cylinders are both 7/8").
-
Just found this: This info relates to the Master Cyl. fitted to 1260 and 1271. Lucas/Girling Part No. 74066315 Ford Part No. 6118138 It has a 7/8" or 22mm bore with 3 outlets The No. 74660862 is the casting No. on the side of the body This Master Cyl. is fitted to various Ford Sierra models from 1982 to 1986 The Lucas/Girling service kit No. is SP 7704
-
Ok, from the part numbers, I know the part is made by Girling and these guys sell repair parts: https://www.powertrackbrakes.co.uk/
-
All agreed. I am proposing to have a couple of ratchet straps in place over the ridge beam (beneath the canvas), which, when the wind gets too much, I will hook onto two anchor points, one at each end, that I will fix into the ground with concrete.
-
Ok, I've had a look at the old cylinder. The part number on the side of the cylinder is 74660862 The part number on the black plastic tag is 66315 04 38 / 62 09JW Unfortunately, neither of these codes result in any helpful Google links.
-
Considering how manky the brake fluid was, I doubt that a fresh set of seals would solve the problem. The cylinder needs a proper repair.
-
According to the eBay database, the cylinders are all the same for all Sierras but clearly that is not the case. I am now looking into having mine refurbished.
-
From AutoDoc: Not good news.
-
@egg Thank you! Looks like I need part number 6597017. Do you agree?
-
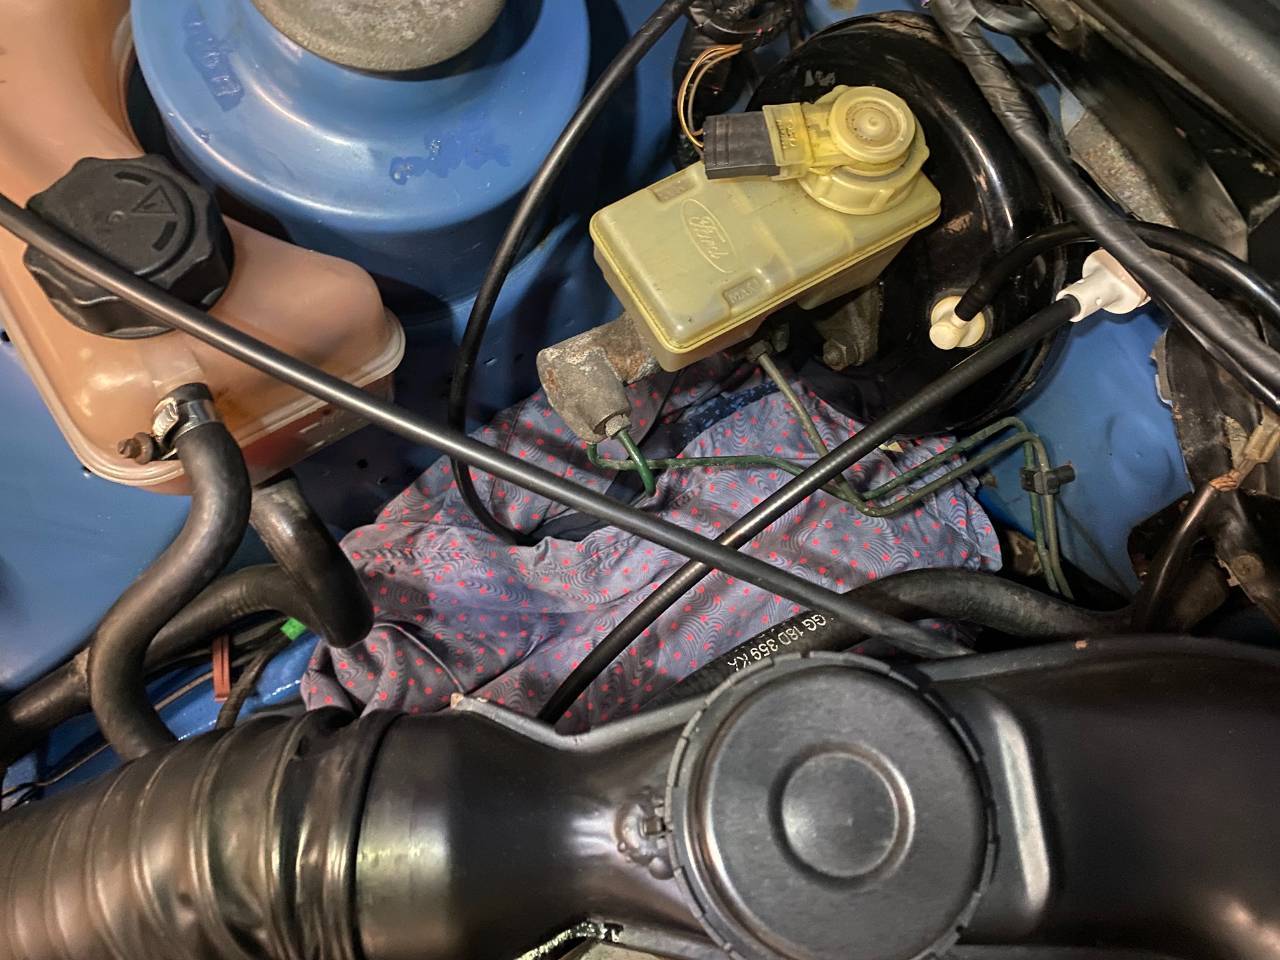
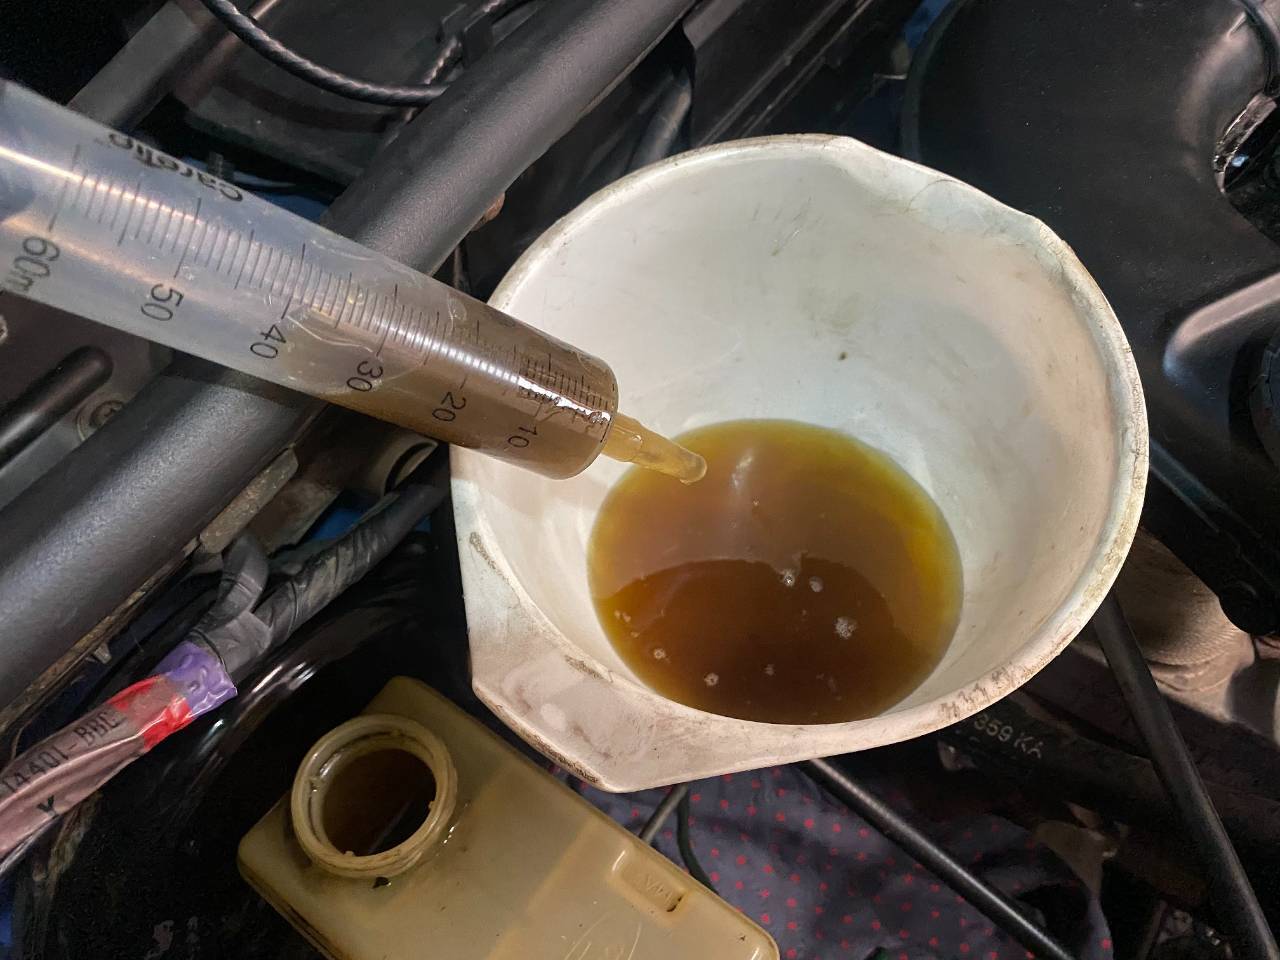
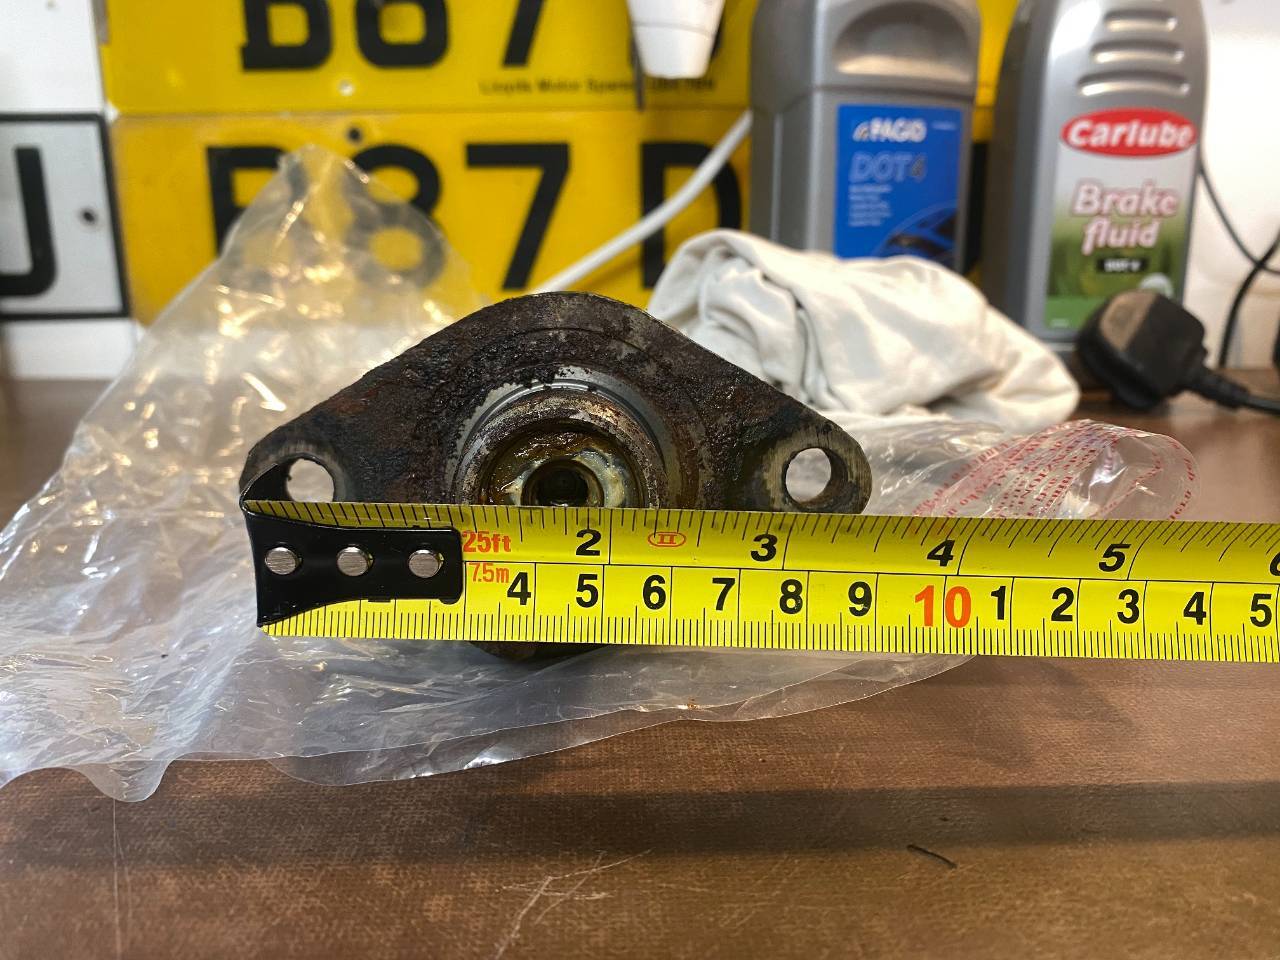
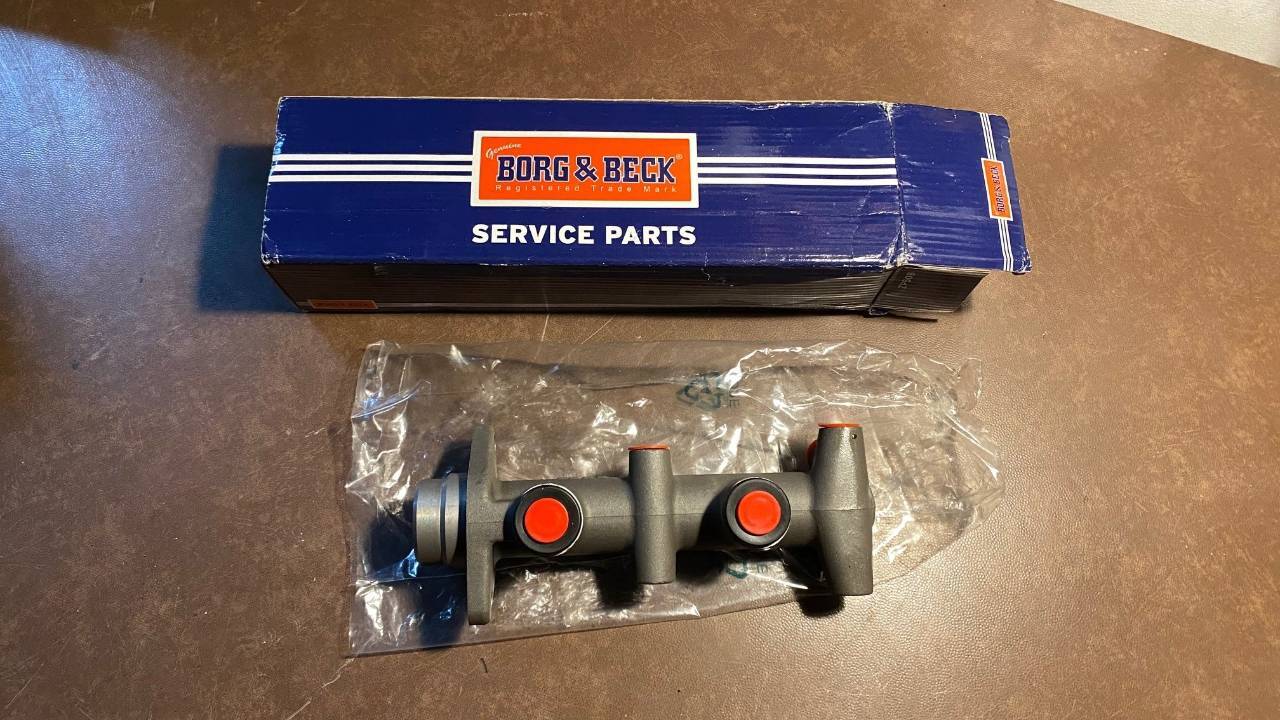
Right, back to the car. I was planning on replacing the brake master cylinder today. Access around the cylinder couldn't be any better. I stuffed lots of rags under the cylinder, including an old pair of pyjamas, in case of spillages. I used a syringe to remove as much brake fluid from the reservoir as possible. What came out was shocking. Some of the fluid looked more like mud. I removed the three pipe fixings and the two nuts that secure the cylinder to the servo, all nice and easy. The cylinder is in shocking condition. At this point I found out that the replacement cylinder is not the same as the old one. The distance between the fixing holes on the old cylinder is 90mm and about 70mm on the replacement part. Every eBay / AutoDoc / Google search points me in the direction of part number BBM 4068, which is the same as the replacement cylinder. From the listings, it appears that all Sierras, regardless of spec and age use the same cylinder. Apart from mine. I can't find any alternatives online. What do I do?
-
I’ve dismantled the internal plasterboard linings, fitted timber boards and battens to strengthen the structure and fitted four straps to the car port posts. I’ve also added a couple of extra straps to the gate post connections. The car port is now very securely fixed at all four corners, job done. For less than £250, which includes the straps and associated fixings, the car port offers very good value for money. I recommend getting one but on the condition that you have structures around it to make the essential rigid connections.
-
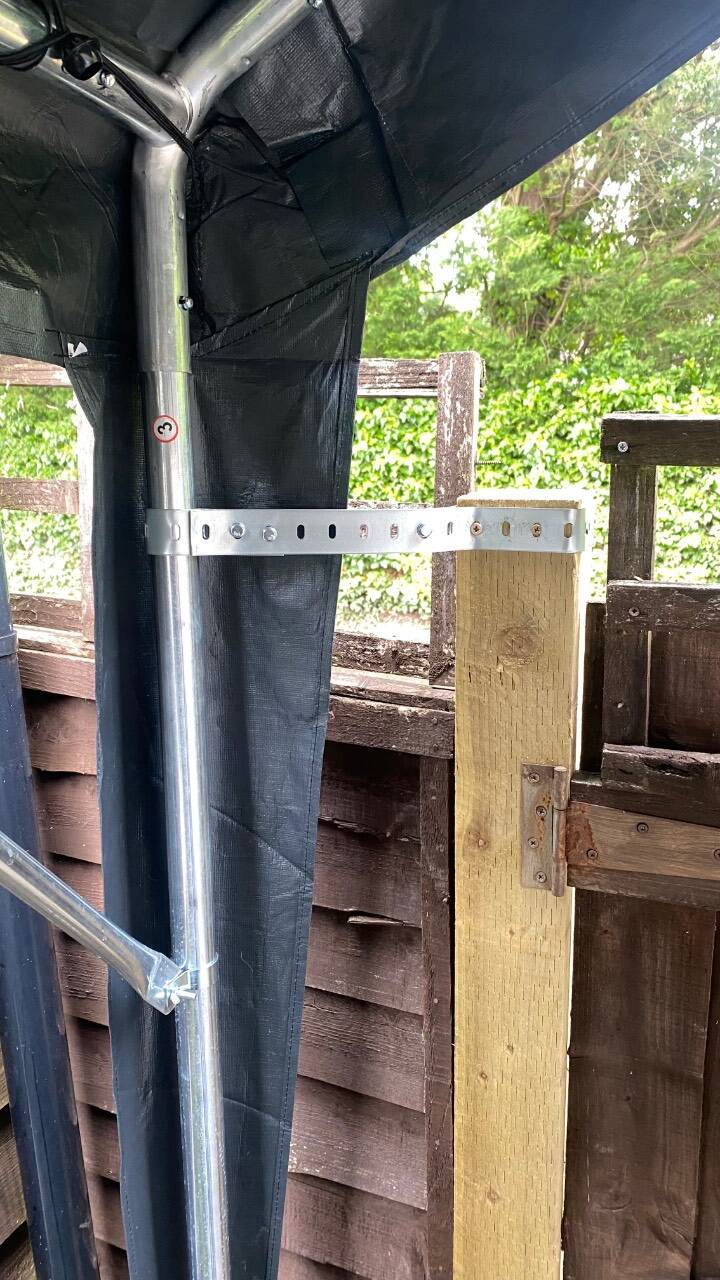
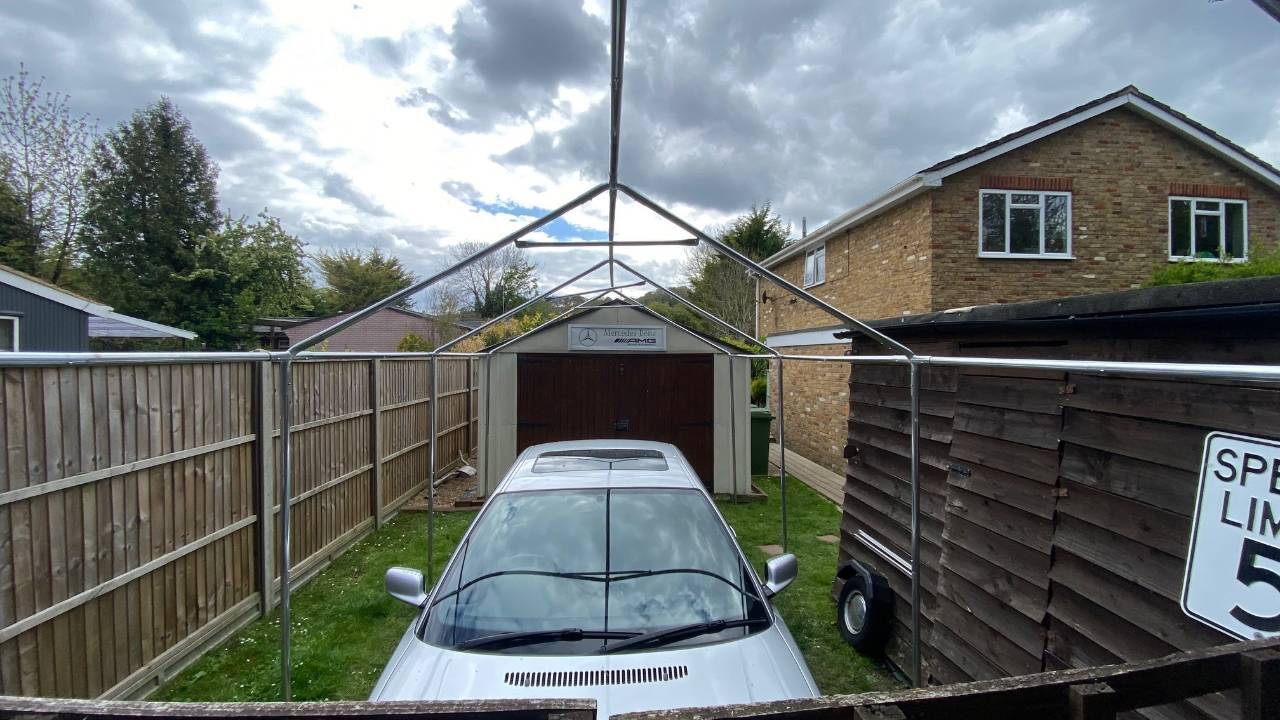
When I was assembling the car port yesterday evening, the air was still, there was no wind whatsoever. Earlier today, I looked out of the window and saw the trees across the road swaying in the wind. The car port was also moving around, too much for my liking. I quickly popped over to Homebase and bought some galvanised metal strips and a couple of packs of nuts and bolts. The metal strips were easy enough to cut in half and mould into shape, so that one end of each strip can wrap around the car port post. I started on the gate end of the car port first because that's the end that was moving around more and getting fixings into the timber gate posts is much easier than fixing the straps to the front of the garage. I've fitted two straps per post. Due to the positioning of the two car port posts in relation to the two gate posts, it was not possible to fix the straps in a straight line and each strap has to have a curve to it. This might not be a bad thing. If the connections were too rigid, movement of the car port could disturb the gate posts and cause them to break. The angled straps are sufficiently robust to keep the car port in place but also absorb some of the movement, rather than transmitting it directly to the timber posts. It's still windy now and the front of the car port looks nice and stable. I will use the same method to secure the car port to the front of garage, however the process will involve removing the internal linings from the garage and providing a robust base to secure the fixings to, as the 2mm thick external cladding is definitely not up to the job. I will do this on Saturday. In other (car!) news, this arrived today. Job for Sunday.
- 891 replies
-
- 11
-

-
Yes and yes. I have fitted pegs into the ground, which secure the post bases but I haven’t fitted the heavy duty strings that should extend from the four upper corners down to ground level, hence the need for installation of the solid connections to the gate posts and garage. The solid connections will be far better than the strings.
-
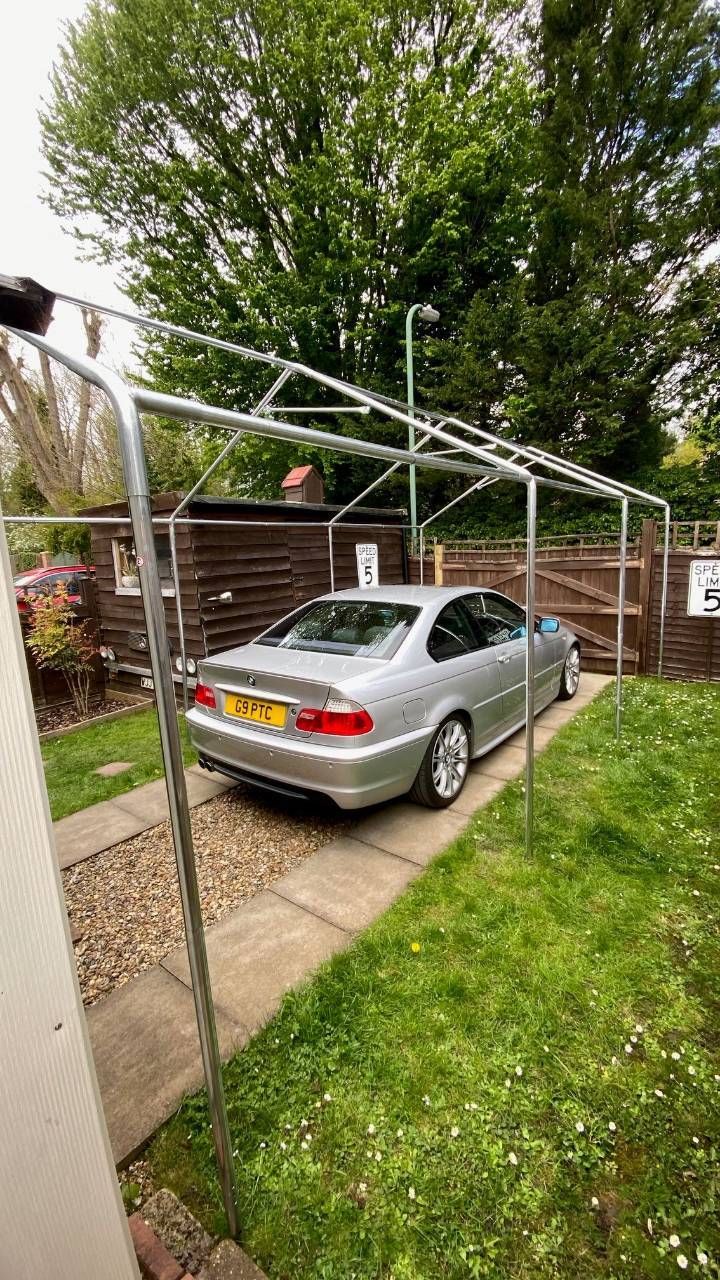
It’s up. I will need to form solid connections along the four corners to the two gate posts and front of the garage to provide much needed bracing as stability is not a strong point but that’s a job for Saturday morning. Whatever car will be parked under the car port will be adequately protected from rain, bird shit and crap that drops from the trees across the road.
- 891 replies
-
- 21
-
-
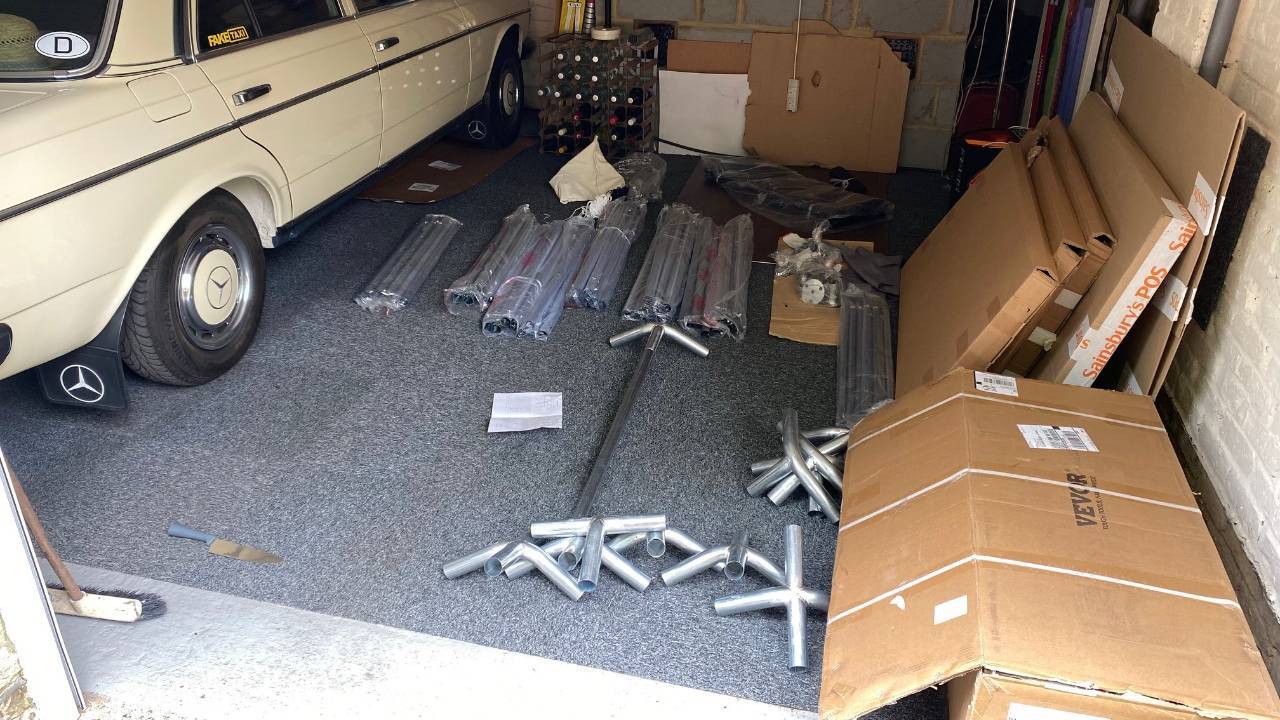
UPS delivered a big brown box this afternoon. I opened up the box and laid out all the bits on the garage floor. All the elements are clearly labelled and one look at the instructions booklet was enough to understand how they fit together. Within 40 minutes, with the help of my wife to lift the roof structure, I achieved this. Ok, I haven't aligned and tightened up the ridge bracing, nor have I installed the eaves bracing, or the roof tarp, or fixed the structure into the ground but it's looking good so far. The outdoor parking space outside the workshop will now be fully covered by the car port. Weather permitting, I will finish the installation this evening.
- 891 replies
-
- 17
-
-
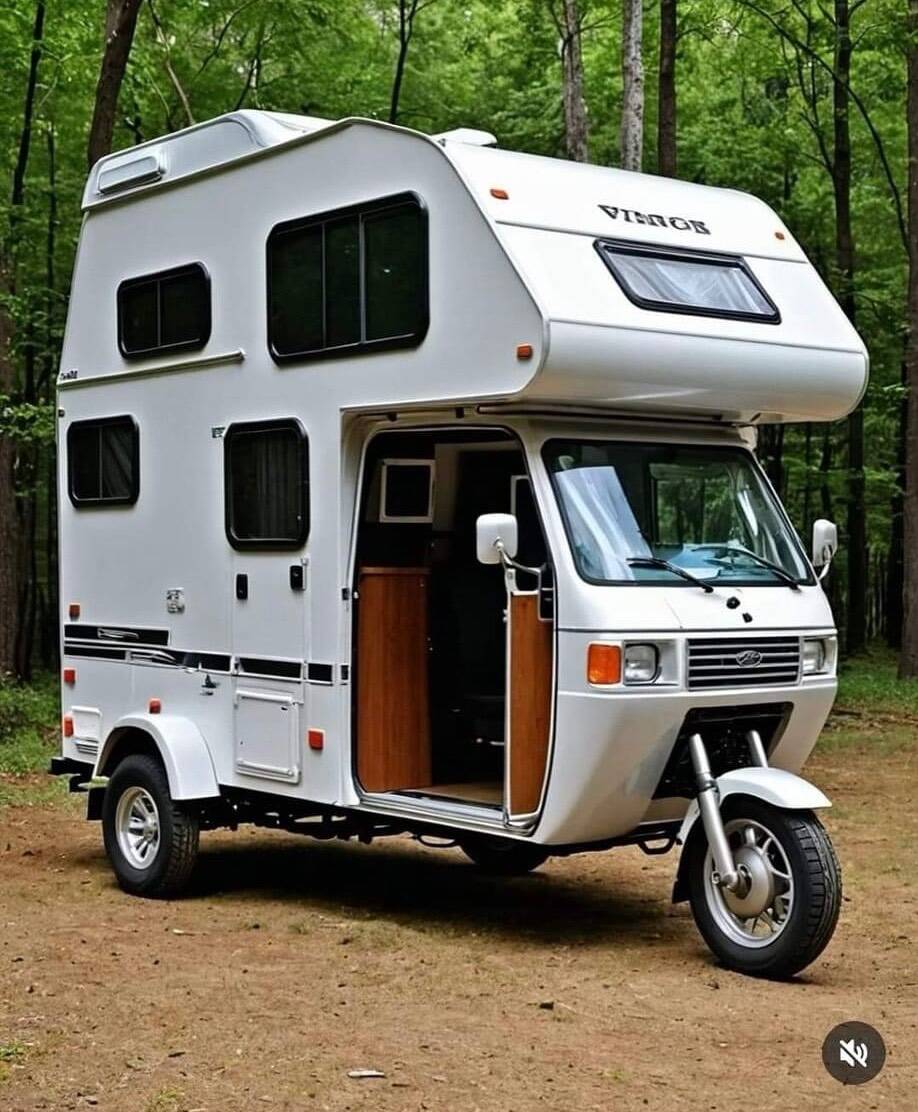
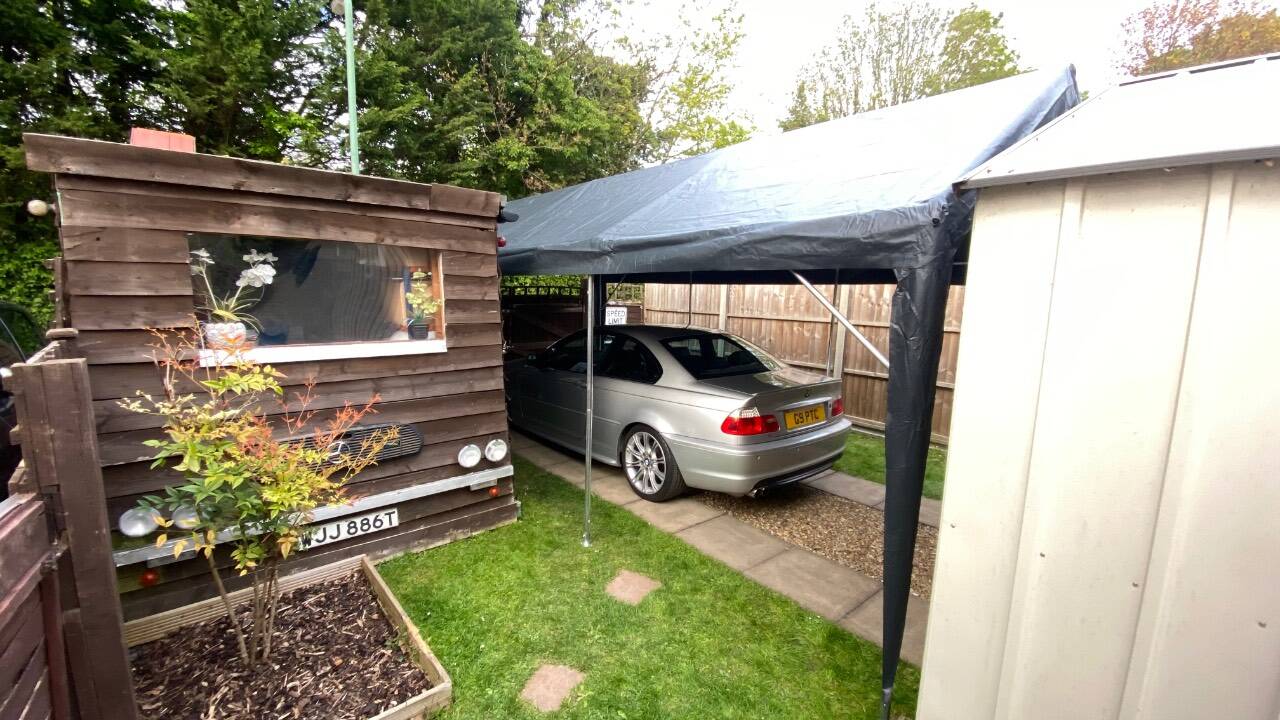
I’Ve decided that I’m not going to keep the Sierra outside where it will get rained and crapped on and covered in all sort of mess and ordered one of these: If I’ve done my measurements correctly, the car port should fit nicely in the space outside my workshop. Fingers crossed.
-
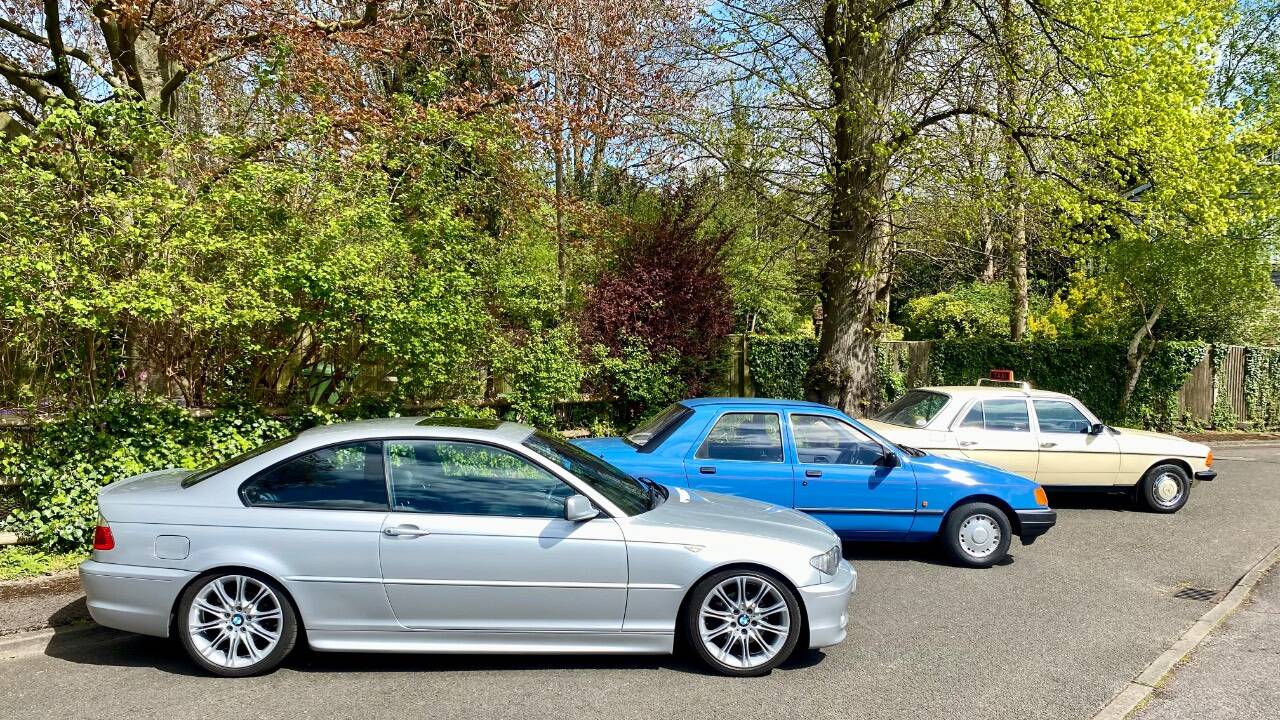
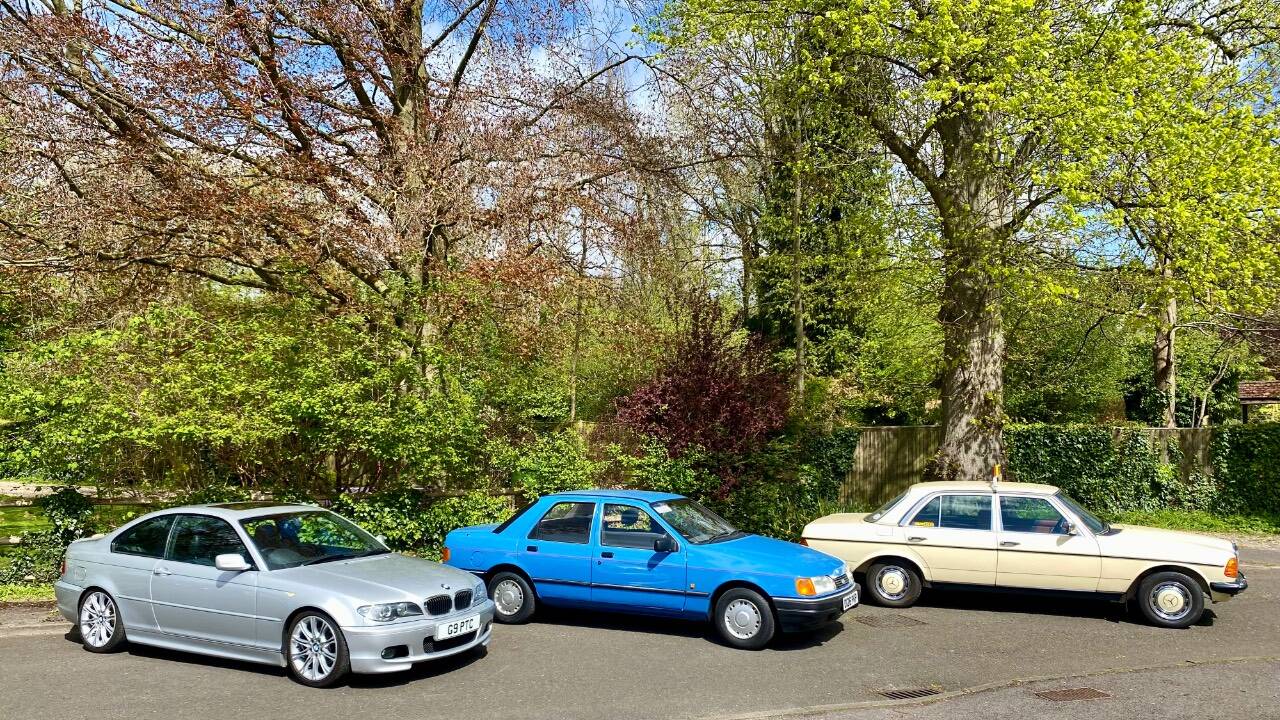
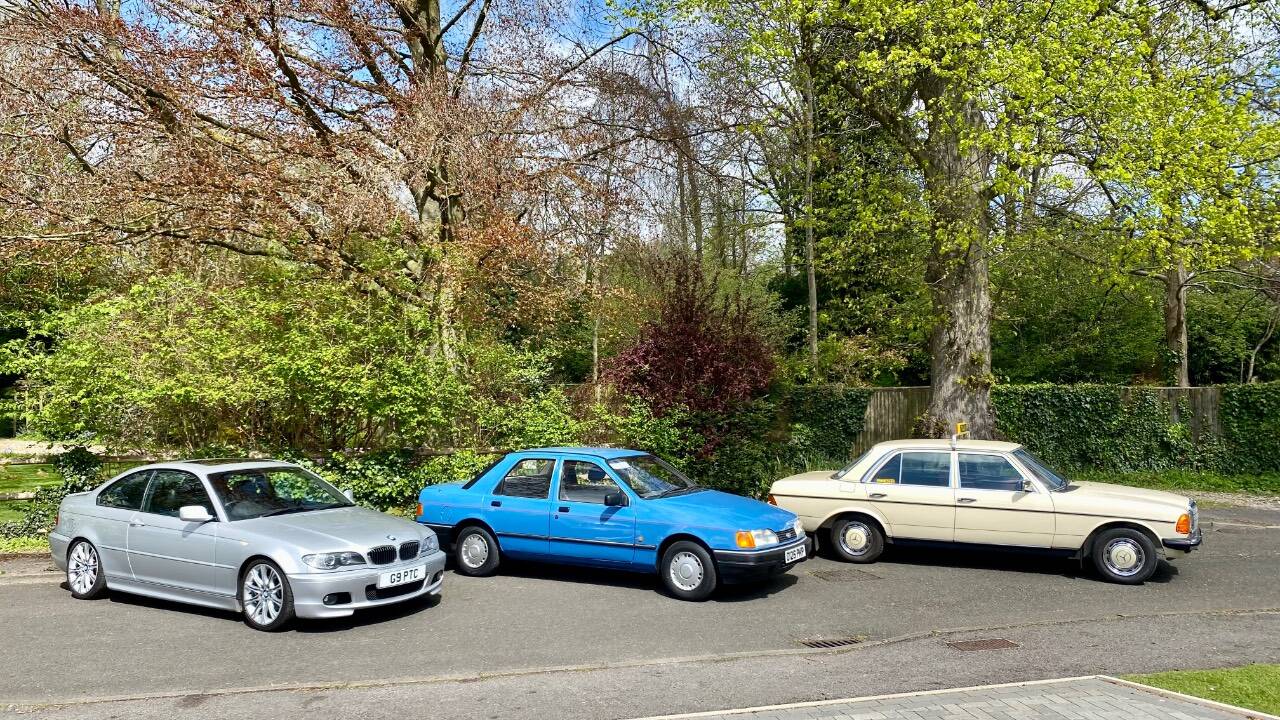
My three toys (aka money pits), first time together.
- 891 replies
-
- 39
-
-