Sham Posted August 24, 2022 Share Posted August 24, 2022 It makes me happy to see you address this cars issues quickly and properly. Such a wonderful machine Dyslexic Viking 1 Link to comment Share on other sites More sharing options...
juular Posted August 24, 2022 Share Posted August 24, 2022 1 hour ago, Dyslexic Viking said: I've been thinking a bit and I think I'll try my hand at welding a bit more and especially if I can find out how to weld the holes after the pop riveting. Then I think I'll have to drill some holes of the same size in some plates and try. But one of my problems is that I have the world's worst gasless MIG welder, so combined with me, I don't have much hope, but I have to try. You could open up those holes you found (maybe with a big drill bit) in an attempt to get rid of the worst of the rot, then simply treat and paint the remainder. I think the metal prep stuff that comes in the POR15 kit is phosphoric acid which is pretty good at stabilising rust before painting it. If you're going to be getting a permanent repair done in the future then there's probably no point filling it. Just cut out the worst, treat and paint. I used to be against using gasless MIG on cars, but recently I've found it a lot easier after getting hold of some 0.6mm flux core wire. I'm really surprised how well this works on sheet metal and have done the majority of my Amazon using it so far, actually in preference to using the solid wire plus Argon. It's quite hard to find, but might be worth a shot? Dyslexic Viking 1 Link to comment Share on other sites More sharing options...
Dyslexic Viking Posted August 24, 2022 Author Share Posted August 24, 2022 8 minutes ago, juular said: You could open up those holes you found (maybe with a big drill bit) in an attempt to get rid of the worst of the rot, then simply treat and paint the remainder. I think the metal prep stuff that comes in the POR15 kit is phosphoric acid which is pretty good at stabilising rust before painting it. If you're going to be getting a permanent repair done in the future then there's probably no point filling it. Just cut out the worst, treat and paint. I used to be against using gasless MIG on cars, but recently I've found it a lot easier after getting hold of some 0.6mm flux core wire. I'm really surprised how well this works on sheet metal and have done the majority of my Amazon using it so far, actually in preference to using the solid wire plus Argon. It's quite hard to find, but might be worth a shot? Thanks for the good advice and will look into this. The reason I wanted to cover the holes was to prevent water from getting into the sills. But fortunately the holes after the pop rivets are so recent that they haven't started to rust properly yet. And I'll go out and check what kind of wire my welder has now and come back with more info. Link to comment Share on other sites More sharing options...
Dyslexic Viking Posted August 24, 2022 Author Share Posted August 24, 2022 36 minutes ago, juular said: I used to be against using gasless MIG on cars, but recently I've found it a lot easier after getting hold of some 0.6mm flux core wire. I'm really surprised how well this works on sheet metal and have done the majority of my Amazon using it so far, actually in preference to using the solid wire plus Argon. It's quite hard to find, but might be worth a shot? Turns out I have 0.9 wire. Can I ask what kind of improvement I will get by going to 0.6 wire as I have no idea. And these are the specs on my welder and it can take 0.6 wire. Link to comment Share on other sites More sharing options...
juular Posted August 24, 2022 Share Posted August 24, 2022 9 minutes ago, Dyslexic Viking said: Can I ask what kind of improvement I will get by going to 0.6 wire as I have no idea. I find it runs far less hot, reducing the chances of blowing through thin panels. The downside is if the wire feed on your welder isn't great, 0.6 can feed badly. But it's still worth a try? You'll need 0.6mm tips as well. Dyslexic Viking 1 Link to comment Share on other sites More sharing options...
Nullzwei Posted August 24, 2022 Share Posted August 24, 2022 Always thought the wire size you use depends on the thickness of metal you are going to weld. 0.6mm good up to 2mm thick metal. Along with the corresponding size tips you also have the wire inner liner to consider which could be a pain in the arse to change/ obtain. I recently used Lidl's parkside 0.8mm flux cored wire to weld 16 small sections of new metal into my w201 190d and it worked fine on the 3mm thick steel i was using. https://www.mig-welding.co.uk/ Dyslexic Viking 1 Link to comment Share on other sites More sharing options...
Dyslexic Viking Posted August 24, 2022 Author Share Posted August 24, 2022 7 minutes ago, juular said: I find it runs far less hot, reducing the chances of blowing through thin panels. The downside is if the wire feed on your welder isn't great, 0.6 can feed badly. But it's still worth a try? You'll need 0.6mm tips as well. Thanks, I'll look for 0.6 wire then. But good you said it about tips it didn't know about this. Not sure if 0,6 tip came with the welder, if it didn't come with it I'll have to find it. Wondering if welding tips are universal? Link to comment Share on other sites More sharing options...
lisbon_road Posted August 24, 2022 Share Posted August 24, 2022 This is a fantastic car and thanks for sharing your story with us. There are always problems when you buy a car of this age and you clearly are determined to sort it out. Good to see that there are such crazy people in your country too. Looking forward to more updates. Dyslexic Viking 1 Link to comment Share on other sites More sharing options...
Rust Collector Posted August 24, 2022 Share Posted August 24, 2022 1 minute ago, Dyslexic Viking said: Thanks, I'll look for 0.6 wire then. But good you said it about tips it didn't know about this. Not sure if 0,6 tip came with the welder, if it didn't come with it I'll have to find it. Wondering if welding tips are universal? You just need to take your current tip out of the gun and measure the thread of it - I think most of the hobby welders I've had are M6 from memory, but worth checking before you buy some replacements as some guns use larger threads. Dyslexic Viking 1 Link to comment Share on other sites More sharing options...
Dyslexic Viking Posted August 24, 2022 Author Share Posted August 24, 2022 After checking again my welder has a unused 0.6 tip and a wheel? So then I have it just need wire now. GrumpiusMaximus, tooSavvy, privatewire and 10 others 13 Link to comment Share on other sites More sharing options...
juular Posted August 24, 2022 Share Posted August 24, 2022 1 minute ago, Dyslexic Viking said: After checking again my welder has a 0.6 tip and a wheel? So then I have it just need wire now. Excellent! A small reel (0.45kg) is enough. Find the right settings for the combination of metal thickness on the car (probably 1mm) and wire size. It's likely to be a very low voltage with a low to medium wire speed. Get the good steel as clean as humanly possible with degreasers and then wire wheel / sander / file. Same for the location you put the earth clamp on. Get around 2-3cm of wire sticking out of the tip, and try to keep that same distance from the piece. Weld in small 1-2 second tacks, one at a time with a pause in between to let the metal cool. Move to other locations on the piece regularly to stop one area getting too hot. Keep tacking until you've joined all the tacks up. Low Horatio gearbox, sdkrc, Jim Bell and 2 others 4 1 Link to comment Share on other sites More sharing options...
juular Posted August 24, 2022 Share Posted August 24, 2022 31 minutes ago, Nullzwei said: I recently used Lidl's parkside 0.8mm flux cored wire to weld 16 small sections of new metal into my w201 190d and it worked fine on the 3mm thick steel i was using. The parkside wire is excellent. I did however find 0.8 difficult to use on my 205 as the metal was so thin it was easy to blow huge holes in it. The 0.6 is easier to control the heat and size of the weld. Next time it shows up in the middle aisle I'll be buying the lot! Nullzwei and Dyslexic Viking 2 Link to comment Share on other sites More sharing options...
Dyslexic Viking Posted August 24, 2022 Author Share Posted August 24, 2022 5 minutes ago, juular said: The parkside wire is excellent. This sounds good as I can't find anyone in Norway who sells 0.6 wire, but I have found someone on ebay in the UK who sells exactly this wire. And 1 roll should last a while or should I buy 2? juular 1 Link to comment Share on other sites More sharing options...
juular Posted August 24, 2022 Share Posted August 24, 2022 3 minutes ago, Dyslexic Viking said: This sounds good as I can't find anyone in Norway who sells 0.6 wire, but I have found someone on ebay in the UK who sells exactly this wire. And 1 roll should last a while or should I buy 2? If all you have to do is the shelf and the bottom of the wing, then one will be more than enough. On the Amazon I've done the whole bulkhead, scuttle, inner wings, A-Pillars and some of the floor with one reel of 0.45kg and it's still got some left. Dyslexic Viking 1 Link to comment Share on other sites More sharing options...
Dyslexic Viking Posted August 24, 2022 Author Share Posted August 24, 2022 2 minutes ago, juular said: If all you have to do is the shelf and the bottom of the wing, then one will be more than enough. On the Amazon I've done the whole bulkhead, scuttle, inner wings, A-Pillars and some of the floor with one reel of 0.45kg and it's still got some left. Then I will only buy 1 as it should last a long time. juular 1 Link to comment Share on other sites More sharing options...
juular Posted August 24, 2022 Share Posted August 24, 2022 I just noticed the shipping and import charges! I wonder if I bought some here and sent it over it would be cheaper? Link to comment Share on other sites More sharing options...
Dyslexic Viking Posted August 24, 2022 Author Share Posted August 24, 2022 3 minutes ago, juular said: I just noticed the shipping and import charges! I wonder if I bought some here and sent it over it would be cheaper? Yes unfortunately this is normal. And thank you for offering this and it would maybe be cheaper but it would be a bit of a hassle so I will only buy 1 roll now from that ebay seller and then can see in the future how I do it. juular 1 Link to comment Share on other sites More sharing options...
juular Posted August 24, 2022 Share Posted August 24, 2022 4 minutes ago, Dyslexic Viking said: Yes unfortunately this is normal. And thank you for offering this and it would maybe be cheaper but it would be a bit of a hassle so I will only buy 1 roll now from that ebay seller and then can see in the future how I do it. No probs. For future reference. Dyslexic Viking 1 Link to comment Share on other sites More sharing options...
Dyslexic Viking Posted August 24, 2022 Author Share Posted August 24, 2022 Now a roll of Parkside 0.6 wire has been bought and I hope I get it before next weekend. The next challenge, if I have to cut something in the car, I would have preferred something smaller and more accurate than an angel grinder, but I don't know if this exists so I'm looking for this now. I probably also need a new welding mask. But I have a maximum of a month left before the weather becomes too bad to do body work outside, so that's why I'm pushing to get as much done as possible in the next few weeks. The downside of this is that I am broke, so buying welding wire went out of the food budget so everything is chaos now. But I really appreciate all of you taking the time to help. Low Horatio gearbox, juular and sdkrc 3 Link to comment Share on other sites More sharing options...
loserone Posted August 24, 2022 Share Posted August 24, 2022 I have in the past bought Snake Venom (65+%) and removed the labels and re labelled it as home brew of below 4% before posting to get it into Norway.. It might be that you need a bottle posting when the weather comes in ☺️ Link to comment Share on other sites More sharing options...
Dyslexic Viking Posted August 24, 2022 Author Share Posted August 24, 2022 2 minutes ago, loserone said: I have in the past bought Snake Venom (65+%) and removed the labels and re labelled it as home brew of below 4% before posting to get it into Norway.. It might be that you need a bottle posting when the weather comes in ☺️ This will probably come as a shock to many of you, but I don't drink alcohol. It's nothing religious I just like to be sober. Low Horatio gearbox, juular, lisbon_road and 3 others 6 Link to comment Share on other sites More sharing options...
loserone Posted August 24, 2022 Share Posted August 24, 2022 Not at all, I think with long winters I would avoid it myself as well. At that proof it doesn't really count as alcohol anyway 😂 Dyslexic Viking 1 Link to comment Share on other sites More sharing options...
Mrs6C Posted August 24, 2022 Share Posted August 24, 2022 11 hours ago, juular said: try to keep that same distance from the piece A small block of wood of the correct thickness, placed between the torch and the metal you are welding, is a useful as a spacer for the wire tip, to keep a consistent distance between it and the metal. You slide the wooden block along the metal as you weld it. Also, be sure to push the torch forwards and away from you rather than pulling it back towards you, to make sure you are always welding into a little pocket of gas and keeping oxygen away from the fresh weld. Dyslexic Viking, Rust Collector, Low Horatio gearbox and 1 other 4 Link to comment Share on other sites More sharing options...
Dyslexic Viking Posted August 24, 2022 Author Share Posted August 24, 2022 That's a very good idea and I'll try that, thanks. Mrs6C 1 Link to comment Share on other sites More sharing options...
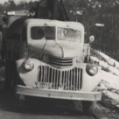
Dyslexic Viking Posted August 24, 2022 Author Share Posted August 24, 2022 I have just made a discovery that may cause me problems. The lift pump I bought was for Unimog and I assumed they had the lift pump in the same place as the cars, but they don't. They have it on the front of the engine where the vacuum pump is on the cars. Lift pump on a Unimog marked in red So this will be exciting if it fits. And this was the youtube video where I discovered this if anyone is interested. juular, AnnoyingPentium and tooSavvy 3 Link to comment Share on other sites More sharing options...
Dyslexic Viking Posted August 25, 2022 Author Share Posted August 25, 2022 Got a bit done with this today also. Got the oil filter and the diesel filter in the post today, I bought the filters that my main parts supplier could get the fastest. And hoped that these would fit. And started with the most important filter, the oil filter. And the holes on this were surprisingly small, but the engineers probably know what they are doing. But will it fit in the oilfilter housing? Yes it does! Then the next thing was to attach this to the engine again. And the location of the oil filters on these is not something I like this together with this type of filter and this is not a fun job and there was a lot of swearing but I got it on in the end. And since it's tight here, I had to use my imagination when it came to tools and this was the only thing that worked with the bolt for the oil filter. So I hope I have managed to tighten it up enough. Then next is the diesel filter. And does this also fit? Yes it does! So with filters I am much closer to being able to start it. I also changed the engine oil yesterday. Tickman, Scruffy Bodger, Rusty_Rocket and 22 others 25 Link to comment Share on other sites More sharing options...
Dyslexic Viking Posted August 25, 2022 Author Share Posted August 25, 2022 The next thing was the glow light / heat resistor or whatever it's called for the glowplugs in the dashboard, this doesn't work. And a new part for this is no longer available, so I bought a new one for an International tractor instead. I don't think there are any differences between these and both are 12 volts and the bit inside is the same thickness. And with a new one, it works again. But the first time I tested the new one, there was a little smoke, which scared me, but this cleared up, so it was probably just something that had to be burned off. But this system still doesn't work but I'm getting new glow plugs soon and that should fix it. Low Horatio gearbox, sdkrc, GrumpiusMaximus and 18 others 21 Link to comment Share on other sites More sharing options...
Rust Collector Posted August 25, 2022 Share Posted August 25, 2022 2 minutes ago, Dyslexic Viking said: The next thing was the glow light / heat resistor or whatever it's called for the glowplugs in the dashboard, this doesn't work. And a new part for this is no longer available, so I bought a new one for an International tractor instead. I don't think there are any differences between these and both are 12 volts and the bit inside is the same thickness. And with a new one, it works again. But the first time I tested the new one, there was a little smoke, which scared me, but this cleared up, so it was probably just something that had to be burned off. But this system still doesn't work but I'm getting new glow plugs soon and that should fix it. I've never seen one of those before, that's terrifying 😅 Well done on the work mate, I'm really enjoying seeing updates on this car. mercedade, Low Horatio gearbox, Asimo and 3 others 5 1 Link to comment Share on other sites More sharing options...
Dyslexic Viking Posted August 25, 2022 Author Share Posted August 25, 2022 And I also got new seals / gaskets for the bootlid today as the old ones are completely ruined and let in a lot of water. And the new one seems to fit. So I tore off the old one which revealed some small rust spots that I need to fix so it will be a few days before the new one can be installed. But I forgot the glue for the new one. But I don't know what to use, do any of you have any recommendations for the type of glue for this? LabRat, rainagain, juular and 13 others 16 Link to comment Share on other sites More sharing options...
Dyslexic Viking Posted August 25, 2022 Author Share Posted August 25, 2022 11 minutes ago, Rust Collector said: I've never seen one of those before, that's terrifying I haven't either, but I've known about them. And I was terrified the first time when smoke came out of it and that I discovered it was getting hot, which I now think is normal. These are strange things, a normal lamp/light would have been better. Rust Collector 1 Link to comment Share on other sites More sharing options...


Recommended Posts
Create an account or sign in to comment
You need to be a member in order to leave a comment
Create an account
Sign up for a new account in our community. It's easy!
Register a new accountSign in
Already have an account? Sign in here.
Sign In Now