rainagain Posted May 3, 2022 Author Share Posted May 3, 2022 Next up on the list was the air filter. Again not the best access and you have to pop the bumper off to get in. The one I replaced was a genuine Saab one. Saabnut, Shirley Knott, lesapandre and 2 others 5 Link to comment Share on other sites More sharing options...
rainagain Posted May 3, 2022 Author Share Posted May 3, 2022 After this I put some linseed oil on the black plastic, a great tip I got from this site. Have some before and afters. I did all the side trim and windows frames, I think it’s made a big difference to it’s appearance. AnnoyingPentium, Shirley Knott, beko1987 and 7 others 10 Link to comment Share on other sites More sharing options...
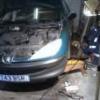
rainagain Posted May 3, 2022 Author Share Posted May 3, 2022 I gave the engine bay a wee clean as well as fitting the battery cover kindly supplied by @gadgetgricey The towels on the windscreen are to protect it whilst I was treating the rust on the wiper arms. AnnoyingPentium, lesapandre, Saabnut and 4 others 7 Link to comment Share on other sites More sharing options...
Saabnut Posted May 3, 2022 Share Posted May 3, 2022 That is looking SO much better than at anytime I had it. So pleased it went to a good home. lesapandre and rainagain 1 1 Link to comment Share on other sites More sharing options...
rainagain Posted May 31, 2022 Author Share Posted May 31, 2022 The front tyres just squeaked through the MOT, the middle part of them was literally just 1.6mm and no more. As prices continue to rise and we hurtle towards a mad max economy, I traded the almost new tyres off my Pug, a small amount of cash and a sack of crisps for some part worns. aldo135, Split_Pin, Shirley Knott and 1 other 4 Link to comment Share on other sites More sharing options...
rainagain Posted June 1, 2022 Author Share Posted June 1, 2022 Next on my list was the cambelt and water pump. First job was to remove the aux belt. Back in the day I would have just fitted a new one but lack of cash meant this one was going back on. It doesn’t look too bad, the aux pulley came off with just a wee bit of a fight. Luckily the crank shaft seal looks good as I didn’t have a replacement. Saabnut, Split_Pin and Shirley Knott 3 Link to comment Share on other sites More sharing options...
rainagain Posted June 1, 2022 Author Share Posted June 1, 2022 The aux belt tensioner was next to be removed. This was a bit of faff trying to get off due to access. Then despite me checking the weather forecast the day before and the morning to check it wasn’t going to rain, it naturally started chucking it down. Shirley Knott 1 Link to comment Share on other sites More sharing options...
rainagain Posted June 1, 2022 Author Share Posted June 1, 2022 The top timing cover was held on with some small hex bolts. Amazingly enough the engine was sitting stop on tdc. Lacquer Peel, Shirley Knott and Saabnut 3 Link to comment Share on other sites More sharing options...
rainagain Posted June 1, 2022 Author Share Posted June 1, 2022 This is when I noticed and @steveo3002 agreed that there was a bolt missing off my engine mount. Removing this mount was a serious PITA. Sockets were no good I had to use a deep ring to most of them off. I had the engine sitting in a block of wood on a trolley jack, even moving it up and down slightly didn’t help. You can see a socket in the pic. There’s no way to get a ratchet handle on it. Shirley Knott, Saabnut and Split_Pin 3 Link to comment Share on other sites More sharing options...
grogee Posted June 1, 2022 Share Posted June 1, 2022 On 5/3/2022 at 9:45 AM, rainagain said: After this I put some linseed oil on the black plastic, a great tip I got from this site. Have some before and afters. I did all the side trim and windows frames, I think it’s made a big difference to it’s appearance. Linseed oil! Great tip, thanks. It'll be a damn sight less messy than the Back To Black I've been using. Link to comment Share on other sites More sharing options...
Shirley Knott Posted June 2, 2022 Share Posted June 2, 2022 On 6/1/2022 at 5:49 PM, grogee said: Linseed oil! Great tip, thanks. It'll be a damn sight less messy than the Back To Black I've been using. Don't count on it. It works a treat but DOES get messy, it also pongs. Excellent work going on here @rainagain, exactly the sort of thread I come here for. grogee and rainagain 1 1 Link to comment Share on other sites More sharing options...
rainagain Posted June 3, 2022 Author Share Posted June 3, 2022 After much faffing and annoyance that I couldn’t find my 15mm ratchet spanner I got the engine mount off. I found the aux belt idler pulley that lives under this plate on the mount was seriously dry and very noisy. I didn’t have a replacement pulley and the idea of having to take this mount off again in the future was something I didn’t want to consider. With some very gentle persuasion I was able to remove the seal from one side of the bearing and force in some fresh grease before replacing the seal. The result was a lovely quiet and smooth pulley. Shirley Knott and Lacquer Peel 2 Link to comment Share on other sites More sharing options...
rainagain Posted June 3, 2022 Author Share Posted June 3, 2022 I had bought an eBay locking kit but to get the camshaft lock in you have to remove all these gubbings to get to the blanking plug. Bugger that I thought, I just made sure everything was timed up and popped off the belt. With the belt off I could remove the water pump which was date marked 2011. This came off nice and easily. And looked and felt completely fine. Vantman, Shirley Knott, Saabnut and 2 others 5 Link to comment Share on other sites More sharing options...
rainagain Posted June 3, 2022 Author Share Posted June 3, 2022 I fitted my nice new Dayco pump with a smear of grease on both sides of the metal type gasket. I cleaned up the block with a scotch bright pad before this. I was struggling to get the tension set and running out of time so I settle on this as being the final tension. Almost in the right place. I had intended on changing all the coolant but as I was short of time I just topped it up with some universal coolant I had. The HBOL and the internet refer to a bleed screw located at the front of the engine but mine had a different design of pipe and was missing this. I couldn’t find a bleed screw anywhere else so I just ran it up to temperature whilst squeezing the hoses. This worked fine and it’s set for another 60,000 miles. Lacquer Peel, Shirley Knott, Back_For_More and 1 other 4 Link to comment Share on other sites More sharing options...
bear-in-the-air Posted June 3, 2022 Share Posted June 3, 2022 It's about a month since you did the linseed oil, have you got a picture of how it is now? Has it lasted well? RoverFolkUs 1 Link to comment Share on other sites More sharing options...
rainagain Posted June 3, 2022 Author Share Posted June 3, 2022 2 hours ago, bear-in-the-air said: It's about a month since you did the linseed oil, have you got a picture of how it is now? Has it lasted well? Before a month later Erebus, bear-in-the-air, Shirley Knott and 1 other 4 Link to comment Share on other sites More sharing options...
bear-in-the-air Posted June 4, 2022 Share Posted June 4, 2022 Looks pretty good, around the same or a touch better than the usual suspects. Link to comment Share on other sites More sharing options...
rainagain Posted August 10, 2022 Author Share Posted August 10, 2022 Thought I'd update this with what I'd done to the Saab before the engine stopped doing engine things. Firstly for some reason none of my USB cigarette chargers like the Saab sockets and they all work their way out. This was annoying as you'd put your phone on to charge only to arrive at your destination and find it was still flat. Before my Pug made its final trip over the bridge I liberated the USB sockets I'd fitted to it, I decided to fit them where a blank used to be in the lower panel. Annoyingly the USB socket's casing had two flats on it which were 90 degrees out from what I wanted, meaning it sits on its side. I did think about opening up the hole in the fascia but I can live with a sideways socket. I cut some scrap 3D printer raft to fill in the gap. I picked power up from the cigarette lighter by soldering the two wires onto the wiring terminals, the black tape is just to keep the wires together and out of the way. I also took the opportunity to added an extra 12V ignition controlled wire to use to control my new head unit when I finally get round to fitting it. Shirley Knott 1 Link to comment Share on other sites More sharing options...
Saabnut Posted August 10, 2022 Share Posted August 10, 2022 41 minutes ago, rainagain said: Thought I'd update this with what I'd done to the Saab before the engine stopped doing engine things. Wot? Wot? Wot? Nothing serious I hope? Link to comment Share on other sites More sharing options...
rainagain Posted August 10, 2022 Author Share Posted August 10, 2022 1 hour ago, Saabnut said: Wot? Wot? Wot? Nothing serious I hope? It’s looks ok now, I’ll add the details to this thread for completeness later. You can see the problems in the ask a shiter section. Link to comment Share on other sites More sharing options...
rainagain Posted August 16, 2022 Author Share Posted August 16, 2022 Being nice and warm I thought it was an ideal time to spruce up the interior of the Saab. Here’s a before, all the seats had a general brown/grey tinge to them just from being used as seats for so many years. Carpet shampoo action shot, look at the lovely brown foam! All done, my phone’s failing to really capture the colour change but they all look nice and black now. AnnoyingPentium 1 Link to comment Share on other sites More sharing options...
rainagain Posted August 16, 2022 Author Share Posted August 16, 2022 A couple of months back I was driving up a hilly bit of the M90 and the car lost all power and the engine started shuddering. The eml wasn’t on and when I stopped and tried to read the faults codes they weren’t any. I limped home and the next day carried out a leak off test using my home made leak of kit. Injector one doesn’t look so good. Rust Collector 1 Link to comment Share on other sites More sharing options...
rainagain Posted August 16, 2022 Author Share Posted August 16, 2022 I also cleaned all the injectors plugs. Whilst I doing this and the leak off test it fixed itself. I ordered a second hand injector from eBay with the idea to replace injector one as soon as it arrived. But of course life got in the way and I forgot all about the fault until it returned a month later. I disconnected all the pipe work and the clamp but I couldn’t not get injector one out. I was twisting it and levering it but whilst it would slightly rotate it wouldn’t come up. Of course whilst I was doing this, it again fixed itself. I gave up at this point and decided I’d try again another day. Link to comment Share on other sites More sharing options...
rainagain Posted August 16, 2022 Author Share Posted August 16, 2022 About another month later I was driving to work and the engine started to try and shake itself out the bonnet and I lost all power. I also noticed a whistling noise and black smoke. I made it to work then limped it to my dads. On the following Saturday I wrapped some wire round injector one and connected this to a slide hammer this did the trick and the injector popped up. I cleaned the seat up and installed my eBay injector with a new copper washer. Lacquer Peel and AnnoyingPentium 2 Link to comment Share on other sites More sharing options...
rainagain Posted August 16, 2022 Author Share Posted August 16, 2022 This made the engine idle nicely but it still drove like a bag of shite. I limped home with the plan for more work on Sunday. The next morning the rough idle had returned. I then planned to do everything that had been suggested online. First map sensor, well that’s not good. This was cleaned up as was the throttle plate The egr valve appeared jammed in the closed position which sort of confirms my suspicions it was mapped out, but just in case I installed a blanking plate. At this point I’d happily take an eml light in exchange for a running car. Cento16v 1 Link to comment Share on other sites More sharing options...
rainagain Posted August 16, 2022 Author Share Posted August 16, 2022 I then turned my attention to the noise I was getting whilst accelerating. There was evidence of oil around the air con condenser which looked like it was getting blown forward from the intercooler. Link to comment Share on other sites More sharing options...
rainagain Posted August 16, 2022 Author Share Posted August 16, 2022 I had trouble removing the air con condenser as the car has been in a front end smash and the passenger side of the crash beam has been pushed in slightly. Annoyingly as I was removing the condenser I found it had some pressure in it meaning my air con could just need an re-gas m8. As I was removing it one of the bolts sheared off the drier. I eventually got to the intercooler, it didn’t look happy. I blocked one end and filled it with water. That’s not good, I then proceeded to waste a quid entrance fee and then another four quid for a hi-vis vest as I’d forgotten mine to get into upullit only to find their website was wrong and they didn’t actually have a 9-5. I tried SCB but they wanted £70 for a second hand intercooler and a week to retrieve it from stock so I passed. I managed to find one off eBay for £100 delivered next day. Lacquer Peel and Rust Collector 2 Link to comment Share on other sites More sharing options...
rainagain Posted August 16, 2022 Author Share Posted August 16, 2022 I forgot to check the pipe work from the turbo to the intercooler until I went to fit it. I found this. I think the engine shaking from the fault had caused it to rub against this clip on the air con hose which was opening up. Saabnut, Coprolalia, CreepingJesus and 3 others 6 Link to comment Share on other sites More sharing options...
rainagain Posted August 17, 2022 Author Share Posted August 17, 2022 It was looking at around £60-100 for a replacement hose and 1-2 weeks for delivery. Before I invested more money into this car I patched up the torn pipe. The crack was wrapped twice with Self-amalgamating tape, then fibre glass tape, then gaffer tape, then some tie-wraps. Ain’t she a beaut Matty, CreepingJesus, Rust Collector and 1 other 4 Link to comment Share on other sites More sharing options...
rainagain Posted August 17, 2022 Author Share Posted August 17, 2022 This was then fitted with the new intercooler. I do love seeing shiny new parts on an old car, it must be the juxtaposition that appeals to me. Of course one of the bolts that holds the brackets on that the intercooler and radiator sit on sheared off when I was first removing the original intercooler so I had to drill it out and install a nut and bolt. I also changed all the old rusty nuts for nice new stainless steels ones. I drilled out the broken bolts for the power steering cooler and bolted that in as well. No more being held by tie wraps. Saabnut, Matty, Coprolalia and 1 other 4 Link to comment Share on other sites More sharing options...

Recommended Posts
Create an account or sign in to comment
You need to be a member in order to leave a comment
Create an account
Sign up for a new account in our community. It's easy!
Register a new accountSign in
Already have an account? Sign in here.
Sign In Now