vulgalour Posted August 18, 2020 Share Posted August 18, 2020 Those Mini ones are what you want. The Princess uses the same gear selector unit as the Mini, just with longer selector rods. eddyramrod, phil_lihp and plasticvandan 3 Link to comment Share on other sites More sharing options...
phil_lihp Posted August 18, 2020 Author Share Posted August 18, 2020 Marvellous! Thanks all, this place is a wealth of useful information. Link to comment Share on other sites More sharing options...
SiC Posted August 18, 2020 Share Posted August 18, 2020 There are holes to the side of them. Is it a captive nut or is the nut accessible on the other side? Hopefully accessible and then shouldn't be too bad a job! ? phil_lihp 1 Link to comment Share on other sites More sharing options...
somewhatfoolish Posted August 19, 2020 Share Posted August 19, 2020 4 hours ago, Christine said: Dab of Screwfix no nonsense superglue and jack it up and leave it for ten .... Same bobbins fail on a T4 undertray ! Last about a year ....then do it again .Sikaflex might work but it'll be 24 hr wait by which time new ones will have arrived.... If sikaflex is taking that long to set it's shite or gone off. If there's an exhaust centre near you take one of the old mounts in and they will have identical or similar mounts in their rack of rubbery things, saves waiting for the post. Given modern rubbery things' propensity for being shite and perishing and/or debonding like these have, get two short lengths of nylon webbing, poke holes with a soldering iron and put over the studs before fitting them; if it happens again your gearshift won't be dragging on the ground, it'll be wobbly but you would be able to get home without AA assistance or the need of a bungee. phil_lihp 1 Link to comment Share on other sites More sharing options...
Angrydicky Posted August 19, 2020 Share Posted August 19, 2020 If they do screw into captive nuts, the remains should be shiftable with heat and molegrips. If there's not enough sticking out to get onto them, I'd try rotating them with a hammer and chisel, and if that fails, cut a slot in the bottom of the slot with a hacksaw (or dremel) then use a big screwdriver. But heat will be your friend if they are captives. Hopefully there's access from the top to the nuts. phil_lihp 1 Link to comment Share on other sites More sharing options...
phil_lihp Posted August 19, 2020 Author Share Posted August 19, 2020 I don't think they're captive, the nuts on top are accessible(ish) so I have some hope this won't be too difficult to fix. What could possibly go wrong? On the plus side, the car's at least high enough off the ground to make this easier now! I have ramps as well though. somewhatfoolish 1 Link to comment Share on other sites More sharing options...
2flags Posted August 20, 2020 Share Posted August 20, 2020 On 8/19/2020 at 1:20 PM, phil_lihp said: What could possibly go wrong? You are about to find out!!!! Get the swear box out and expect to be able to fund next years holiday! Hopefully the nuts will release, if they do it will be easy. If not...….. Link to comment Share on other sites More sharing options...
phil_lihp Posted August 21, 2020 Author Share Posted August 21, 2020 Well I got the bobbins off the selector easily enough last night but the top bits in the frame just spin with the bolt so I will have to get a bit more inventive over the weekend with a Dremel. Jim Bell 1 Link to comment Share on other sites More sharing options...
Mr_Bo11ox Posted August 21, 2020 Share Posted August 21, 2020 you might be able to clamp em in position with a really tight molegrip and undo the nuts that way with a bit of luck phil_lihp 1 Link to comment Share on other sites More sharing options...
phil_lihp Posted August 21, 2020 Author Share Posted August 21, 2020 I did wonder about that - access is not the best with the wheels on the ground (although massively better than it was!) so it will go up on ramps at the weekend for another go. I tried drilling the rivet but mostly just made a lot of noise. I have to say I'm impressed with the thick coating of underseal on this car - it's a good few mm in places, still sticky and oily after several decades and has not dried to a hard crust which I gather is when it will end up promoting corrosion rather than preventing it. It is making this job particularly unpleasant as I got quite a lot of it on me but it's clearly doing its job, the underside is pretty much perfect until you get to the corners of wheelarches/sills where a bit of rot has set in. I will get my mechanic to spray it with oil next time it goes to him for something (probably the MOT next month) as he's done that on a couple of my cars and it does seem to work. Link to comment Share on other sites More sharing options...
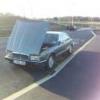
phil_lihp Posted August 23, 2020 Author Share Posted August 23, 2020 Well, after several hours lying under the car getting covered in dirt and underseal I had to admit defeat on getting the broken bobbin stubs off the car. I tried every conceivable method of clamping them to stop them rotating with the nuts on top, I tried chiselling them off, I tried drilling them but all I got was a sore neck from contorting myself under the car for 3 hours - it was up on ramps but it was still very cramped. The main sections came off the gear selector easily enough though, so I thought "what would BL do?" and the solution seemed obvious. Perfect. It actually works fine but the car can go over to my mechanic who can grind the stubs off and fit the new ones which, yes, look to be spot-on replacements. He can also have a crack at getting the exhaust joint to seal as I can't quite get it 100% and am bored of lying under cars for now. Today I attacked the front seats with some APC and a steam cleaner - quite pleased with the results, it took most of the grey dirt off them and let the yellow nylon really come into its own. The camera flatters them but they are a lot better, I'll probably give them another run though as rubbing them down afterwards turned a white towel brown. The fuel gauge has never worked so I earthed the tank connection and confirmed the gauge and wiring is fine, as it slowly rose to the Full mark for the first time in 30 years. I cleaned up the connection as it was caked in underseal but still no joy so when I get around to flushing out the tank I'll have a look at the sender unit. Hopefully new ones can be obtained, I'd like to hope it's a generic BL part. Resplendent with clean seats and a bodged gear selector, this afternoon I took it on its longest trip yet, 10 miles down the road to see my parents. Verdict: mother not impressed, father moderately keen, passer-by loved it. Instead of driving straight home I decided to take a few detours and as it seemed to be getting better and better with more use, ended up doing around 50 miles with no problems whatsoever. It definitely seemed to enjoy having its legs stretched and the new suspension is a joy, it rides smoothly, irons out bumps nicely and can be hooned quite readily - body lean is quite controlled and I can say wholeheartedly that it was worth every penny to have this done. I stopped for a little photo op next to an old steam vessel called the SS Freshspring which has been tied up on Bideford Quay for the last few years gradually being restored from a rusty hulk. Seemed appropriate although it's definitely got better paint than the Princess. Perhaps it'd have been better to have parked it a couple of hundred meters further down next to the Ionia, an ex-Thames tugboat which has been tied up in the same spot for over a decade and has been deteriorating steadily ever since. ETCHY, adw1977, BeEP and 29 others 32 Link to comment Share on other sites More sharing options...
phil_lihp Posted August 27, 2020 Author Share Posted August 27, 2020 Here's a slightly stupid question - what coolant should I put in this? It had almost nothing in it when it turned up other than a bit of green in the header tank, it's currently on plain water which isn't ideal - as it had a few leaks and issues to start with I didn't want to keep wasting coolant but now it's settled down it's time it was done properly. I know it should not get pink OAT but if I need to use green coolant I can't find anyone selling it - is the blue silicate one OK to use instead? Link to comment Share on other sites More sharing options...
Angrydicky Posted August 27, 2020 Share Posted August 27, 2020 You want the blue stuff in there - ethylene glycol. phil_lihp 1 Link to comment Share on other sites More sharing options...
phil_lihp Posted August 27, 2020 Author Share Posted August 27, 2020 Super, thanks! Link to comment Share on other sites More sharing options...
vulgalour Posted August 27, 2020 Share Posted August 27, 2020 You'll be disatisfied to learn the sender is unique to the Princess. There's a rumour the sender is the same as Maxi, though I've never found confirmation of that and Maxi senders aren't exactly common place either. The pump is shared with the SD1 so they're easy to get if you have to. Also, when you remove the sender unit from the tank it will probably leak afterwards, although the ring is the same as Land Rover and MGB, so donor sections can be used from other fuel tanks if needed. If you're lucky, the sender is just stuck from lack of use, they can sometimes be revived with care and patient cleaning. The brown from the seats is probably the foam disintegrating which is a sort of orangey-brown rust colour, most HL seats shed these days and there's not much beyond refoaming that you can do about it. This car really did end up with the right person, it's a joy to read your updates on it. I might be slightly bias there. Shite Ron, SiC, Stevebrookman and 3 others 6 Link to comment Share on other sites More sharing options...
phil_lihp Posted August 28, 2020 Author Share Posted August 28, 2020 Thank you, kind words indeed, next thing I'll look at is bodywork/paint but that will be a slow burner. Yes the foam is disintegrating on the seats and they're definitely not as good as they should be - is refoaming them a big job? I'd really like velour but aside from the top of the back seat they're in decent condition otherwise so probably better to keep the originality, plus even if I did swap for plusher seats they'd probably be just as knackered inside. Link to comment Share on other sites More sharing options...
vulgalour Posted August 28, 2020 Share Posted August 28, 2020 The HL seats are probably the most prone to shedding, the HLS ones seem to fare better. To sort out the foam you have to strip the seats down which is a fairly involved job. It's probably the scrim foam (like a thin sheet of foam) on the back of the fabric that's falling apart, possibly also the structural foam block of the base. The bulk of the work is getting the old covers off and cleaning off the disintegrating foam, actually putting new foam in isn't too bad unless you've got to carve the whole base piece from scratch. Reassembly is also going to be pretty annoying since it requires strength and dexterity to get everything tensioned properly. It's not very autoshite of me, but I'd recommend giving this sort of job to a professional to do purely because of how much hassle it can be. A professional is going to have the experience and tools to do the job well and quickly and then all you need to do is remove and refit the seats, because it's not a full retrim it shouldn't be horrifically expensive, the seat covers do tend to be quite robust. phil_lihp 1 Link to comment Share on other sites More sharing options...
phil_lihp Posted August 28, 2020 Author Share Posted August 28, 2020 Yeah, back seat top aside the nylon's in good nick. Will look into it but the rest of the interior's shabby enough that I'm not overly concerned for now, it's clean and tidy-ish which suits for now and the seats are acceptably comfortable if not quite as good as they could be. Link to comment Share on other sites More sharing options...
Skut Posted August 28, 2020 Share Posted August 28, 2020 I love this Brown wedge as much as that Buick that went to live in the Orkneys. Nothing helpful to add. Just love. phil_lihp 1 Link to comment Share on other sites More sharing options...
phil_lihp Posted August 29, 2020 Author Share Posted August 29, 2020 I wasn't intending to do much, if any work on the Princess today but ended up doing quite a lot. Picked it up from the mechanic this morning with its new gear selector mounts installed, so the gear change is back to its recalcitrant norm. Ran a couple of errands, got home, had lunch, decided to have a crack at tidying up what's left of the paint with some wet sanding. I'd bought some 2000 grit wet & dry but never tried it before, guessed I couldn't make it much worse and might get some of the vactan mess off it as well. I did the driver's wing, part of the roof and the very tired bootlid as a test and I'm pretty pleased with the results. Before... After... A corner of the heavily oxidised roof... It's a lot of work to wet sand, wash, dry, T-cut, rub down and wax but worth it - I will eventually get around to the rest of it. The bonnet is beyond all help so I will have to look into getting that resprayed before it starts to dissolve. I then flushed out the manky brown water that's been passing for coolant - I chucked some detergent in here a while back which has hopefully got rid of most of the muck. I stuck a hose in several pipes and kept flushing until the bottom of the radiator ran clear consistently, then refilled with Halford's finest. For some reason I then started mucking about with electrical bits around the interior - with a lot of sanding of corroded contacts, a good splash of contact cleaner and a new LED bulb (it's all I had) the interior light now works. There's no lense on it and I believe they're unobtanium - the light unit itself is quite fragile and crumbly, I reckon though there's probably a way to 3D print stuff like this if you've a printer and a mind to. I then had a look at the non-functioning brake warning light test switch - pulled it out, tested the switch (pass), tested the wiring (fail), repaired a damaged wire, replaced the little bulb in the switch, reassembled, wedged the broken bit of dash facia back into place to get rid of the unsightly hole...fixed. Tested the clock wires - they work fine, the clock is dead but I'm not pulling the dash apart to fix that. The only other thing left now that doesn't work is the fuel gauge which I know is the sender unit - really must fix that, I went out for a drive and it almost died on me in the middle of nowhere, I thought it had plenty of fuel but evidently not. It was kind to me though, we just about made it to a tiny 24/7 Texaco in the middle of nowhere which I've never used before, splashed in some premium unleaded and had no further issues. Loving this car! Mr Laurence, colino, Angrydicky and 14 others 17 Link to comment Share on other sites More sharing options...
SiC Posted August 29, 2020 Share Posted August 29, 2020 In the meantime until you fix the sender: https://www.halfords.com/tools/garage-equipment/breakdown-essentials/halfords-green-metal-fuel-can-10l-330134.html phil_lihp 1 Link to comment Share on other sites More sharing options...
phil_lihp Posted August 29, 2020 Author Share Posted August 29, 2020 Yep, I do have a fuel can which needs to go and live in the boot! I never learn, the Granvia's fuel gauge is hopelessly unreliable and I've been caught out twice by it saying it had 1/4 left when in fact it did not. That wasn't helped by not realising the fuel tank was 20 litres smaller than I thought! Only thing there is I don't really want a stinky can of diesel in my camper... Link to comment Share on other sites More sharing options...
SiC Posted August 29, 2020 Share Posted August 29, 2020 Those metal cans aren't the cheapest but it's the first modern can that I've found which not only doesn't leak but also has a spout that actually seals. Link to comment Share on other sites More sharing options...
Parky Posted August 29, 2020 Share Posted August 29, 2020 This Maxi interior light might be a similar fitting? It looks a similar shape to me https://www.ebay.co.uk/itm/Classic-Car-Interior-Light-courtesy-lamp-Austin-Maxi/193531286455?hash=item2d0f5d13b7:g:GmkAAOSwEBJe8RDU phil_lihp 1 Link to comment Share on other sites More sharing options...
phil_lihp Posted August 29, 2020 Author Share Posted August 29, 2020 Thanks but no, that's not quite the same shape. Not worried, it's OK as it is for now. Link to comment Share on other sites More sharing options...
vulgalour Posted August 29, 2020 Share Posted August 29, 2020 The Princess ones are unique to the Princess, annoyingly, and one of the hardest items to get hold of these days, the plastic they're made of just crumbles away, usually accelerated by the interior light getting too hot. Impressive work on the paint, that's coming up really well. phil_lihp 1 Link to comment Share on other sites More sharing options...
cms206 Posted August 30, 2020 Share Posted August 30, 2020 Not been on the beige in ages bar brief snooping but just binge read this thread in one hit. Looks tremendous, Princesseseses always look better to my eyes with the quad headlights. 112%/10 would read again. dollywobbler, phil_lihp and LightBulbFun 3 Link to comment Share on other sites More sharing options...
phil_lihp Posted September 3, 2020 Author Share Posted September 3, 2020 Cheers! OK, dropped it off at a tyre centre near my office today - it's made the same 10 mile journey before without issue but it wasn't entirely happy today and it has done this a couple of times lately since I thought I'd run it out of fuel - which presented the same symptoms. On a long uphill stretch at 60mph it started to lose power and eventually started to cough and die/come back - I barely made it to the top, got into a layby where it sat and idled/revved absolutely fine, pulled away again and had no further issues. I've established that the last couple of drives out where it's done this, it's always on full or near-full throttle and generally uphill, it very much feels like fuel starvation but as soon as I pull over to let it catch its breath it's fine again. I did hear the electric fuel pump clicking away hard at idle for a few seconds before settling down shortly after pulling over - hence my theory that it's not getting enough fuel. It's not overheating, the choke is completely off and there's no other odd noises of note. Any suggestions? I'm intending to pull off and clean the float bowl again just in case and will change the fuel filter again. Until I ran out of fuel (or at least, assumed I had) it hadn't shown any signs of this and would power up hills on full throttle no problem at all. It's not home at the moment anyway, the tyre place had an order cockup so I left it there overnight and a company pool car 69 plate Golf with 800 miles has taken its place on the driveway. It's fine but it's no Princess - although the radio is better. Also had a parcel delivered today, two new sealed beams to fix her squint! Link to comment Share on other sites More sharing options...
dozeydustman Posted September 3, 2020 Share Posted September 3, 2020 Could be an air leak between tank and pump. If electric pump is going like the clappers there’s either a blockage or air leak somewhere I would guess. How old/new are any flexi lines in the fuel system? phil_lihp 1 Link to comment Share on other sites More sharing options...
phil_lihp Posted September 3, 2020 Author Share Posted September 3, 2020 Hmm, at the tank end they're mostly ancient I think but the fuel lines under the bonnet are fairly recent. The tank needs to come out for a clean and gauge sender fix anyway so probably a good time to review all that as well. Link to comment Share on other sites More sharing options...

Recommended Posts
Create an account or sign in to comment
You need to be a member in order to leave a comment
Create an account
Sign up for a new account in our community. It's easy!
Register a new accountSign in
Already have an account? Sign in here.
Sign In Now