rainagain Posted February 12, 2020 Author Share Posted February 12, 2020 I'd try the slightly longer ones for a tenner first, I managed it with the short ones minus one coil so the long ones should be no problem with a complete spring drewd 1 Link to comment Share on other sites More sharing options...
yes oui si Posted February 12, 2020 Share Posted February 12, 2020 Yolk protector? Designed to save your eggs? ? I find that the easiest way to explain cut springs getting stiffer to someone is to use a steel rule analogy - if you hang 20cm over the edge of a table, it is easy to deflect the tip, but if you hang 5cm over the edge, it is much more difficult to deflect the tip. The steel itself hasn't changed properties, just the length over which the deflection occurs. Link to comment Share on other sites More sharing options...
rainagain Posted August 16, 2020 Author Share Posted August 16, 2020 An interesting thing happened recently just as I was pulling into my car park. I suddenly found I only had 3rd or 4th. The gear level had gone all loose in the left/right plane. Luckily I only had one small hump to climb over on third then my car park is downhill. Once parked up I found I only had 3rd, 4th and reverse. I wasn’t sure if it was the cables or the gearbox that given up. I took the air filter and trunking off and found if I reached my hand in I was just able to manually force the gearbox into first. This let me drive very slowly and noisily to my dad’s to have a proper look at. Cord Fourteener 1 Link to comment Share on other sites More sharing options...
rainagain Posted August 16, 2020 Author Share Posted August 16, 2020 I managed to get a set of cables off eBay for £30 delivered so with fingers crossed I started to strip down the interior. first off remove the gaitor round the gear level, then the ash tray. This allows you to get to the torq screws to remove the lower piece of silver trim. Then you need to remove the heating ducts either side of the cables as shown below. I also removed the earth bolt to the right of the cables. I popped out the air bag switch and tried to do the same with the roof blind switch but this fell apart instead. Then I remove the torq bolt under the piece of rubber trim next to these buttons. You’re then suppose to be able to remove the centre console by sliding it over the handbrake. Mine wouldn’t do this as I couldn’t get it over the handbrake so I just worked around it. If I was doing this again I wouldn’t bother disconnecting the two buttons as you don’t need to, you can just lift the console enough for access Cord Fourteener 1 Link to comment Share on other sites More sharing options...
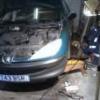
rainagain Posted August 16, 2020 Author Share Posted August 16, 2020 Then from the engine bay you need to remove the top of the air filter box and associated trunking, the battery and the battery box. Remembering to allow the car to go to sleep before doing this. There’s one sneaky bolt on the battery box that you have to remove the inner wheel arch to get to. Next pop off the two ball joints and then use a small screwdriver to push down one of the clips holding each cable in a then rotate them out. I found the best way is to push down the clip on one side then turn the cable away from the clip and they pop out. Access is usual Peugeot excellence A bit closer Cord Fourteener and scdan4 2 Link to comment Share on other sites More sharing options...
rainagain Posted August 16, 2020 Author Share Posted August 16, 2020 Next you’re supposed the drop the exhaust heat shield. The six bolts holding my heat shield on looked like rusty barnacles. I knew there was no chance they’d undo. So instead I attached some washing line round the old cables. Your supposed to release the plastic clip round the large rubber grommet on the cables from under the car, hence removing the heat shield. Cord Fourteener and Remspoor 2 Link to comment Share on other sites More sharing options...
Cord Fourteener Posted August 16, 2020 Share Posted August 16, 2020 Crikey, that looks like fun* Good luck! Link to comment Share on other sites More sharing options...
rainagain Posted August 16, 2020 Author Share Posted August 16, 2020 As I couldn’t remove the heat shield I instead unbolted the gear level from inside the car (four bolts) and just yanked the cables really hard. This worked and the original plastic clip broke allowing me to remove the whole lot. I removed the original cables from the gear level and compared them to the ebay ones, they ‘looked’ identical apart from the ebay had an adjuster for the left/right cable. I wrapped a plastic bag round the new cables with the washing line cord to make it easier to pull them through. scdan4 1 Link to comment Share on other sites More sharing options...
rainagain Posted August 16, 2020 Author Share Posted August 16, 2020 Going back and forth from inside the car to the engine bay (this would have been easier with a helper) I managed to feed the new cables through by pulling on the washing line. I had already covered the new grommet and plastic clip in rubber grease to make it easier to pop it in. I connected up the cables in the engine bay and then reinstalled all the trim inside the car. It all looked good, and the great news was the gearbox was fine. Tickman and Remspoor 2 Link to comment Share on other sites More sharing options...
rainagain Posted August 16, 2020 Author Share Posted August 16, 2020 Then I noticed a problem, the ebay cables outer must be slightly too long and excess length was pushing the heat shield into contact with the exhaust. I knew if I left this the cables wouldn’t last long. I went back under the car and tried see if I could somehow tie the cables out of the way. I found a bracket and tired to use a piece of wire to hold the cables away from the shield but it didn’t work. I then had the idea of putting a twist into the cables. So I had the fun job of removing them, again, from the gearbox and the stupid cable clips. Luckily the twist worked. I noticed the new gear change is much better than my old cables as there’s much less play but it’s a bit stiffer. I don’t know is this is due to the twist or the fact the cables don’t seem to have any lubricant on them. Would could I put on them if anything? scdan4, Jimbob McGregor and Remspoor 3 Link to comment Share on other sites More sharing options...
rainagain Posted August 16, 2020 Author Share Posted August 16, 2020 26 minutes ago, Tim_E said: Crikey, that looks like fun* Good luck! It certainly was, especially having to redo the gearbox connection again. Cord Fourteener 1 Link to comment Share on other sites More sharing options...
rainagain Posted August 16, 2020 Author Share Posted August 16, 2020 I had not long sorted the gear change cables when this happened my OH has spent too long round shite cars as when it fell it, I said “what was that” and she correctly guessed the back box had fallen off. Luckily I had the blue bungee cord shown above in the car so I was able to tie it up to get me home. Link to comment Share on other sites More sharing options...
rainagain Posted August 16, 2020 Author Share Posted August 16, 2020 It had broken where the centre section joins the back box. Luckily I managed to get a whole new centre section from amazon for £12.50 delivered, but unluckily i can’t use the pit at my dad’s to fit it as I’m using his garage for storage for an upcoming house move. Link to comment Share on other sites More sharing options...
rainagain Posted August 16, 2020 Author Share Posted August 16, 2020 I’d rescued a lovely piece of stainless steel from work, what it was meant for I’ve no idea. But it was the perfect fit for the remains of the centre section. I had no gum gum so I used high temp silicon. I can’t see any problem with this as the gases are pretty cool by the time they get to the tail pipe. I also didn’t have the right type of exhaust clamp, so I had to use this flange one. I found two rusty studs nearby and used a die to remake the thread on them. Then I stuck on some repair washers and used some twisted wire to act as a support. Yes this truly is a lash up job! Good news is it’s actually quite quiet so it can stay until the mot is due and I get a chance to sort it properly. CreepingJesus, scdan4, UltraWomble and 2 others 5 Link to comment Share on other sites More sharing options...
Remspoor Posted August 18, 2020 Share Posted August 18, 2020 I do like to save money when I can. However in this case I do have ask why the bother of doing this work when a new box is little money. Installing a box in the first place would save getting under the car twice plus all the hassle of making those temp odd an sods. Link to comment Share on other sites More sharing options...
rainagain Posted August 18, 2020 Author Share Posted August 18, 2020 Quite possibly because if you read my posts and look at the pics you can see the centre section needs replaced as well. As I said I have both parts it’s just I can’t get under the car easily right now as I don’t have access to my pit. Also the inner teenager in me was curious how it would sound with no back box and also if it would feel any quicker. Turbos cars are more affected by exhausts than non turbo cars. I had already planned to open up the replacement back box I have and gut it. Then fit a resonator pipe in place of the normal baffles and weld it back up. Then fit this with my new centre section. But I’m a bit busy right now trying to move house. The car of course had other ideas and decided to remove the back box itself. outlaw118 and Tickman 2 Link to comment Share on other sites More sharing options...
scdan4 Posted August 18, 2020 Share Posted August 18, 2020 The exhaust terminating under the car makes me twitch a bit. Keep a window open.... CreepingJesus and Remspoor 2 Link to comment Share on other sites More sharing options...
rainagain Posted July 17, 2021 Author Share Posted July 17, 2021 Thanks to working at home and having a ton of work to do on my new house the mot on this expired and it got left on the driveway under a tree. As I’m now having to go into site at least three days a week sharing a car with my OH hasn’t really been working out so it’s time to get this thing sorted out and mot’d. Some things had been growing on the seat belts Luckily I used a tip I’d read on here and wiped them over with white vinegar. Remspoor 1 Link to comment Share on other sites More sharing options...
Remspoor Posted July 18, 2021 Share Posted July 18, 2021 On 7/17/2021 at 6:13 PM, rainagain said: Thanks to working at home and having a ton of work to do on my new house the mot on this expired and it got left on the driveway under a tree. As I’m now having to go into site at least three days a week sharing a car with my OH hasn’t really been working out so it’s time to get this thing sorted out and mot’d. Some things had been growing on the seat belts Luckily I used a tip I’d read on here and wiped them over with white vinegar. Then lucubrate with silicone spray. rainagain 1 Link to comment Share on other sites More sharing options...
rainagain Posted July 18, 2021 Author Share Posted July 18, 2021 Being left under a tree hasn’t done the paintwork any wonders either stephen01 and Remspoor 1 1 Link to comment Share on other sites More sharing options...
rainagain Posted July 18, 2021 Author Share Posted July 18, 2021 First job was to remove the rusted through middle exhaust section, no need to remove the back box that had self removed itself. Dick Longbridge, RayMK and Remspoor 3 Link to comment Share on other sites More sharing options...
rainagain Posted July 24, 2021 Author Share Posted July 24, 2021 Whilst the exhaust was off I took the opportunity to vactan and paint some of the worst bits under the car. i RayMK 1 Link to comment Share on other sites More sharing options...
rainagain Posted July 24, 2021 Author Share Posted July 24, 2021 The rubber part of the bracket that supports the back box fell off when the back box decided it wanted to pursue a solo career. The nuts wouldn’t budge and I didn’t want to risk shearing the studs so they were cut off with a grinder. I bought a new bracket but sadly it looks far too small, I had to use some washers to both space it from the chassis and allow the nuts to hold it not ideal RayMK 1 Link to comment Share on other sites More sharing options...
rainagain Posted July 24, 2021 Author Share Posted July 24, 2021 Next up was fitting the centre exhaust section Thanks to eBay I even managed to get a genuine Peugeot clamp. Nothing but the best for this shitbox. Dick Longbridge and RayMK 2 Link to comment Share on other sites More sharing options...
rainagain Posted July 24, 2021 Author Share Posted July 24, 2021 Finally I fitted the back box to the new bracket. I had bought a new clamp for this too but it proved impossible to get on so I ended up using the old clamp that I was previously using to hold on the ‘sports box’. Remspoor, Dick Longbridge and RayMK 3 Link to comment Share on other sites More sharing options...
rainagain Posted July 24, 2021 Author Share Posted July 24, 2021 It was then time to lower to the ground and extract it from the bush that was growing round it. Here’s the view from the driver’s seat. Thanks to my solar panel plugged in the OBD it started no problem. And I was pleased so see no warning lights. Dick Longbridge and RayMK 2 Link to comment Share on other sites More sharing options...
rainagain Posted July 24, 2021 Author Share Posted July 24, 2021 This was very satisfying sadly I couldn’t do much about the roof. It’s been suggested to soak this in dilute bleach. Anyone else tried this before? Dick Longbridge, Sham, Isopon and 1 other 4 Link to comment Share on other sites More sharing options...
Sham Posted July 24, 2021 Share Posted July 24, 2021 I wouldn't use bleach, myself. Some kind of bug or tar spot remover might do it? Or even just a pressure washer? RayMK 1 Link to comment Share on other sites More sharing options...
Dan302 Posted July 24, 2021 Share Posted July 24, 2021 Traffic film remover at a suitable dilution? Link to comment Share on other sites More sharing options...
rainagain Posted August 10, 2021 Author Share Posted August 10, 2021 I got my MOT booked but it was so far away I thought it would be worthwhile looking at little tiny crunchy bit on one of the chassis outriggers. Massive thanks to @DodgyBastard for the use of his ramp and gear. Lets have a little poke at the rusty bit: Nasty, I did all this with just my hand and screw driver What's strange is the other side is completely solid. Link to comment Share on other sites More sharing options...


Recommended Posts
Create an account or sign in to comment
You need to be a member in order to leave a comment
Create an account
Sign up for a new account in our community. It's easy!
Register a new accountSign in
Already have an account? Sign in here.
Sign In Now