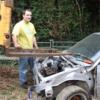
ruffgeezer Posted January 8, 2013 Author Share Posted January 8, 2013 So as avid subscribers to the news 24 thread will know, I had a pre-MOT done on the van just before Christmas, on the whole the result was looking pretty good until this happened: Prod, prod, CRUNCH! Bugger! The problem probed: So yesterday, the back workshop was clear ready for work to commence. Did I mention before that I've never welded a car or van before? Ok, well I haven't. Stage 1: have a dig around inside and see what is there that might catch fire:Remove the trim clips and pull this plastic trim off: Ah, that'll be the rear lighting loom, best not to weld that then! Scabs from the inside: Wiring removed (string is to pull it back in when the work is finished) After this, I loaded the van on the lift (it's a Bradbury Toocalift for those wondering) and with a deep breath, made the first incision. The flange in this picture is to prevent water from splashing on the door bottoms, it's useless and traps water to the sill and rots them out, what I've done here is used an air grinder with a cutting disc and cut along the top edge where the upper sill panel attaches to the flange. I get an hour a day at this, so progress is slow, this is day 2, and after a brief period of "WTF have I done?" I got stuck in to the spot welds on the flange with the angry grinder, it didn't take long to break it free: And after a little persuasion with a sharp chisel: In the picture above, you can just make out a chalk mark on the sill to show what needed to be replaced, another job for the air grinder, and this is all starting to look a terrible mess... ...as was the floor below! Well I started to clean around the edges with the grinder, ready for a new plate, but as so often happens, once I started poking, I found more soft bits, oh and some treasure, a colbalt hacksaw blade no less. The net result of the extra crunchy bits was that I chopped off rather a lot more than I thought I was going to need to, and that rounds out today's work, tomorrow I'll be making a template and cutting the new plate to shape. I'd be grateful for any advice or points based on what I've covered so far, I'm more than a little apprehensive of carrying this out, but given what the van owes me, I'd be a fool not to have a try! Mrs6C 1 Link to comment Share on other sites More sharing options...
dollywobbler Posted January 8, 2013 Share Posted January 8, 2013 Top marks for bravery. I'd worry about doing the job with it on a lift though. That's putting all sorts of strain on the structure I would have thought. Might it not end up being banana-shaped by the time you're done? I might be paranoid - after all, there's a roof and no door openings. Not like doing sills on an MGB. 2cvspecial 1 Link to comment Share on other sites More sharing options...
ruffgeezer Posted January 8, 2013 Author Share Posted January 8, 2013 It depends where it's the lift picks it up, on this one, I've got the front leg under the subframe on some 2" wooden blocks, and the rear on a sturdy bit of box section about halfway down the van, well in front of the bit I'm working on, the sill here isn't really doing anything other than filling the gap between the inner sill and the box of the van body. Link to comment Share on other sites More sharing options...
freebird Posted January 8, 2013 Share Posted January 8, 2013 There is one of these for sale up the road from me. Its on a 51 plate and is up for under £500. Its a card in the windscreen jobbie,its advertised as having an MOT and the seller has now removed most of the signwriting off of it, IIRC it was a plumbers van. I suppose that shows that its had fairly light use and hasnt been beaten to death as a builders hack or been stuck in a field for the last six months.What are these like to live with? Do they really go for peanuts? Worth a punt at that price? 2cvspecial and Mrs6C 2 Link to comment Share on other sites More sharing options...
ruffgeezer Posted January 8, 2013 Author Share Posted January 8, 2013 Well I bought my last one from MrScruff on here for £250, it had a month's mot on it and I gambled that, worst case scenario, I could scrap it and see most of it back. It was a 2000/X with the old XU diesel in it, it would sit happily at 70 (if a little noisily) and after a pair of tyres and some TCA bushes, it got another 12 months ticket, I loved that little van, and after buying it I used it every day instead of my Ax vts. The 03 one I'm working on here has the later DW8 engine (same as the berlingo) it doesn't feel as responsive as the older engine but still capable of sitting at the national speed limit when required. Things to look out for: [*:3k51qybg]Rusty bonnets, they are nigh on impossible to locate second hand, mine took me 3 months and a trip to Bradford in the end.[*:3k51qybg]Crunchy sills (see pics above)[*:3k51qybg]Rusty door bottoms[*:3k51qybg]Rear door lock barrels break, rebuild parts are now unavailable.[*:3k51qybg]Camber on rear wheels indicates rear axle bearing failure[*:3k51qybg]Window runners rot and cause the regulators to break[*:3k51qybg]Heater fans pack up regularly. Those a just a few things I've come across that are more difficult to deal with, other than that, it's pretty much a disposable van because no matter how new it is, it still looks ancient. 2cvspecial 1 Link to comment Share on other sites More sharing options...
freebird Posted January 8, 2013 Share Posted January 8, 2013 Well I bought my last one from MrScruff on here for £250, it had a month's mot on it and I gambled that, worst case scenario, I could scrap it and see most of it back. It was a 2000/X with the old XU diesel in it, it would sit happily at 70 (if a little noisily) and after a pair of tyres and some TCA bushes, it got another 12 months ticket, I loved that little van, and after buying it I used it every day instead of my Ax vts. The 03 one I'm working on here has the later DW8 engine (same as the berlingo) it doesn't feel as responsive as the older engine but still capable of sitting at the national speed limit when required. Things to look out for: [*:3h010dzb]Rusty bonnets, they are nigh on impossible to locate second hand, mine took me 3 months and a trip to Bradford in the end.[*:3h010dzb]Crunchy sills (see pics above)[*:3h010dzb]Rusty door bottoms[*:3h010dzb]Rear door lock barrels break, rebuild parts are now unavailable.[*:3h010dzb]Camber on rear wheels indicates rear axle bearing failure[*:3h010dzb]Window runners rot and cause the regulators to break[*:3h010dzb]Heater fans pack up regularly. Those a just a few things I've come across that are more difficult to deal with, other than that, it's pretty much a disposable van because no matter how new it is, it still looks ancient.Thats why i like them. If I can get it past the missus, i may go and have a closer look.Thanks for the info, appreciated. Link to comment Share on other sites More sharing options...
Lacquer Peel Posted January 8, 2013 Share Posted January 8, 2013 I'd wondered why you don't see many C15s now...I'd still like one, with an XUD9TE. Link to comment Share on other sites More sharing options...
purplebargeken Posted January 8, 2013 Share Posted January 8, 2013 Good buy there! Until recently I never realised they made 'em so late. Looks like you are doing a good job there. Ken Link to comment Share on other sites More sharing options...
ruffgeezer Posted January 10, 2013 Author Share Posted January 10, 2013 Well I must say, the last 2 sessions haven't gone as well as I'd hoped, it's to be expected really, I never let a lack of any apparent skills stand in the way of trying to save a few bob. Wednesday's work saw me making up the panel like so, the holes are to plug weld it to the bracing underneath... ...which had to be reattached with some pigeon shit: I'll confess I couldn't get my eye in and so I was left at the end of the hour with this mess: Today, I ground it back, took stock and considered ripping it all off and starting again, but instead I persevered, and here is today's mess: I need to dress the top a lot more, and just run over a few spots again, there are several pin holes to attend to, I'm a bit annoyed I couldn't get it neater, but I guess that only comes with experience. Mrs6C 1 Link to comment Share on other sites More sharing options...
hairymel Posted January 11, 2013 Share Posted January 11, 2013 saw your post over @white forum your technique looks about right for a garage monkey first impressions are that you really need to clean the surrounding area squeaky clean - at least 1or2 inches away from the weld area - you should be doing this anyway to check for further rot. welding to paint and stonechip is not easy i find it best to set the power a bit higher and use a buzz--buzz--buzz method so you can get good penetration/joining but the weld doesn't get hot enough to blow through. have a look at their tutorials at the top of the page especially the thin metal technique one. have a practice is your best bet fair play for giving it a go - i have been practicing for years now and i'm still useless Mrs6C 1 Link to comment Share on other sites More sharing options...
Danblez Posted January 11, 2013 Share Posted January 11, 2013 Good effort, keep at it it will only get better. I echo what's already been said get everything shiny and clean and make sure the elder has a good clean earth! Keep us updated! Mrs6C 1 Link to comment Share on other sites More sharing options...
hairymel Posted January 11, 2013 Share Posted January 11, 2013 ... make sure the elder has a good clean earth! my old chap prefers it a bit dirty Link to comment Share on other sites More sharing options...
freebird Posted January 11, 2013 Share Posted January 11, 2013 What a pleasure to see......shit welding just like mine!!! I have now just about reached the stage where the welds actually penetrate and prevent me from being able to peel off the metal I used to think id welded together......The grinder is your friend, it can make even the shonkiest weld look pretty presentable.Good on you for having the bollocks to attack it and have a go.You will get there, maybe i will too. Link to comment Share on other sites More sharing options...
ruffgeezer Posted January 11, 2013 Author Share Posted January 11, 2013 Yeah it's probably about 85% there, unfortunately there weld along the front edge hadn't taken at all, so I'm going to get the die grinder between the panels and have another bash on Monday. It'd got me properly pissed off by that stage so the best thing really was to down tools and walk away. Link to comment Share on other sites More sharing options...
cort16 Posted January 11, 2013 Share Posted January 11, 2013 It really has to be mega mega clean on both sides of the metal or it won't take and it'll just send red hot lumps of metal down your socks and bubble up.Also rather than butt welding it if you slide the new bit of metal under the old bit it's much harder to blow through as you're going metal to metal rather than metal, air metal. If you want to bring it flush you can use a joggler to put a flange in it. Another thing it took me ages to figure out was big welds look cool but stringing lots of little tacks into a longer weld means you won't blow through as readily, Link to comment Share on other sites More sharing options...
hairymel Posted January 12, 2013 Share Posted January 12, 2013 don't be discouraged that you may have to go again, if its not right you will feel better afterwards. i remember the pain of chopping a freshly welded sill off my sunbeam and doing it all again cos i did a really shitty job remember its all practice, you could be sticking bits of spare tin together on a bench or blobbing repair patches on your citroen - its all the same at the end of the day. if it is all going horribly wrong i find it is useful to walk away and come back later when you are feeling the love next time will be better Link to comment Share on other sites More sharing options...
ruffgeezer Posted January 16, 2013 Author Share Posted January 16, 2013 Well half way into the week, I've managed another 2 hours on the van, Blobbed all the way around: The front wouldn't take as there was a gap between the panels... I had a spare 5 mins after tidying up a bit so chucked this on it for a giggle: And at the end of play today, I have the patched portion in seam sealer now, I'm going to paint it with some stone chip paint once the workshop is warm enough: Mrs6C 1 Link to comment Share on other sites More sharing options...
scruff Posted January 17, 2013 Share Posted January 17, 2013 C15s are WICKED.I really miss my one, like ruff says, it was prob the best vehicle I ever bought...!Thinking of getting another. Might even be extravagant and go for the RED version. Link to comment Share on other sites More sharing options...
Danblez Posted January 17, 2013 Share Posted January 17, 2013 Good stuff, there is a serious lack of shite repairs on here considering what we all drive! Link to comment Share on other sites More sharing options...
ruffgeezer Posted January 17, 2013 Author Share Posted January 17, 2013 Here it is in it's first coat of paint, it looks a bit grufty, but once layered up, might be passable. Mrs6C 1 Link to comment Share on other sites More sharing options...
ruffgeezer Posted January 31, 2021 Author Share Posted January 31, 2021 Getting a few notifications about this lately, has someone linked to it elsewhere? Link to comment Share on other sites More sharing options...
holbeck Posted January 31, 2021 Share Posted January 31, 2021 6 hours ago, ruffgeezer said: Getting a few notifications about this lately, has someone linked to it elsewhere? You did! last year my thread about it. Your welding still sound btw. Mrs6C 1 Link to comment Share on other sites More sharing options...
MJK 24 Posted January 31, 2021 Share Posted January 31, 2021 Did the rabbit have a name? 🐰 Link to comment Share on other sites More sharing options...
ruffgeezer Posted February 13, 2021 Author Share Posted February 13, 2021 On 1/31/2021 at 11:34 PM, MJK 24 said: Did the rabbit have a name? 🐰 That's Max from the cartoon "Sam and Max". I'd make another one if I had a decent copy of corel and the patience to make another multi layer sticker. Edit; I'm assuming you are referring to the one that appeared on the original Trev; chaseracer and Mrs6C 2 Link to comment Share on other sites More sharing options...
MJK 24 Posted February 13, 2021 Share Posted February 13, 2021 This is the rabbit! 40C2298A-E7EC-46FD-95DC-6A476C12F9D9.webp Link to comment Share on other sites More sharing options...
ruffgeezer Posted February 13, 2021 Author Share Posted February 13, 2021 Oh that one! It was just having a wee nap. Snuffsy was the name. 😇 MJK 24 and holbeck 1 1 Link to comment Share on other sites More sharing options...
2cvspecial Posted December 4, 2021 Share Posted December 4, 2021 page 1 of the thread is echoed e.g Hi Hi Link to comment Share on other sites More sharing options...
ruffgeezer Posted December 4, 2021 Author Share Posted December 4, 2021 Odd innit? Link to comment Share on other sites More sharing options...

Recommended Posts
Create an account or sign in to comment
You need to be a member in order to leave a comment
Create an account
Sign up for a new account in our community. It's easy!
Register a new accountSign in
Already have an account? Sign in here.
Sign In Now