mat_the_cat
-
Posts
6,425 -
Joined
-
Last visited
Content Type
Profiles
Forums
Events
Everything posted by mat_the_cat
-
That Metro is starting to look better and better value! 😜
-
At least they're an easy job to change! Just don't leave it too long otherwise the DPF may get clogged from a lack of regens.
-
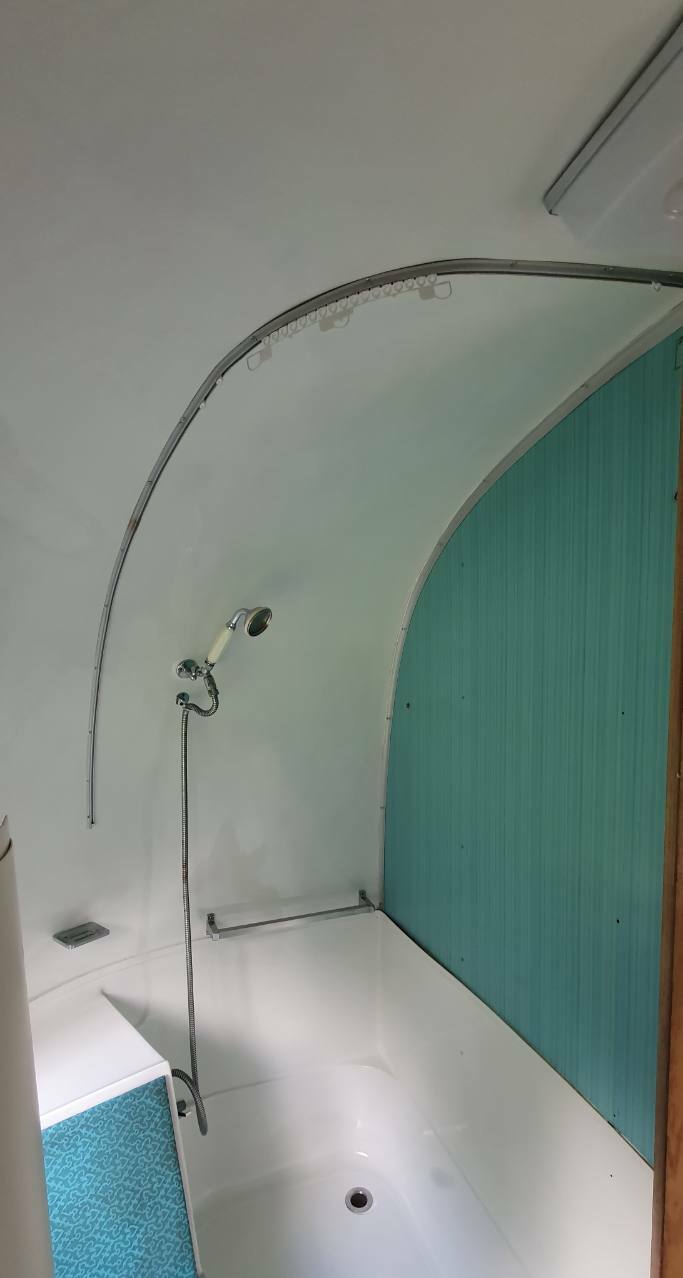
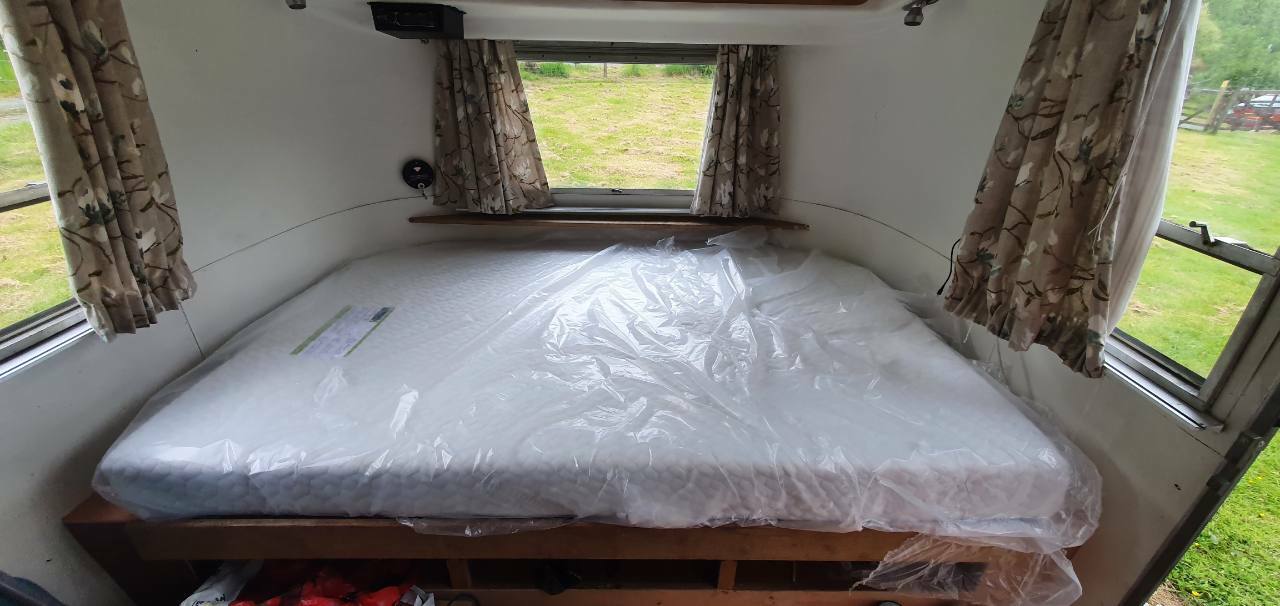
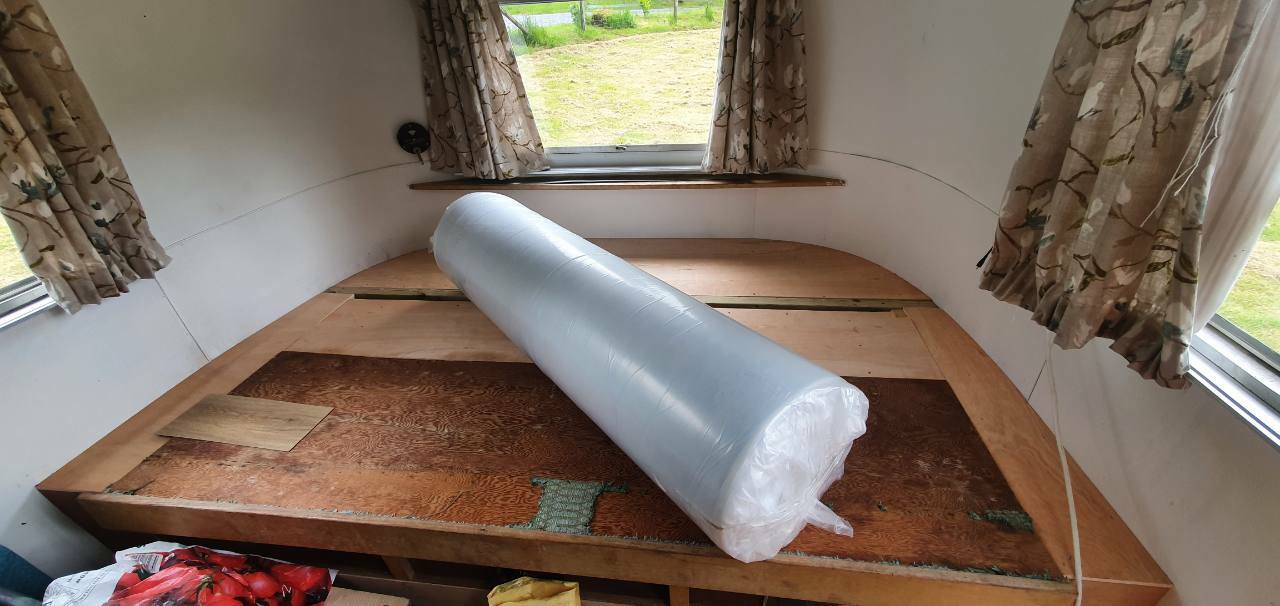
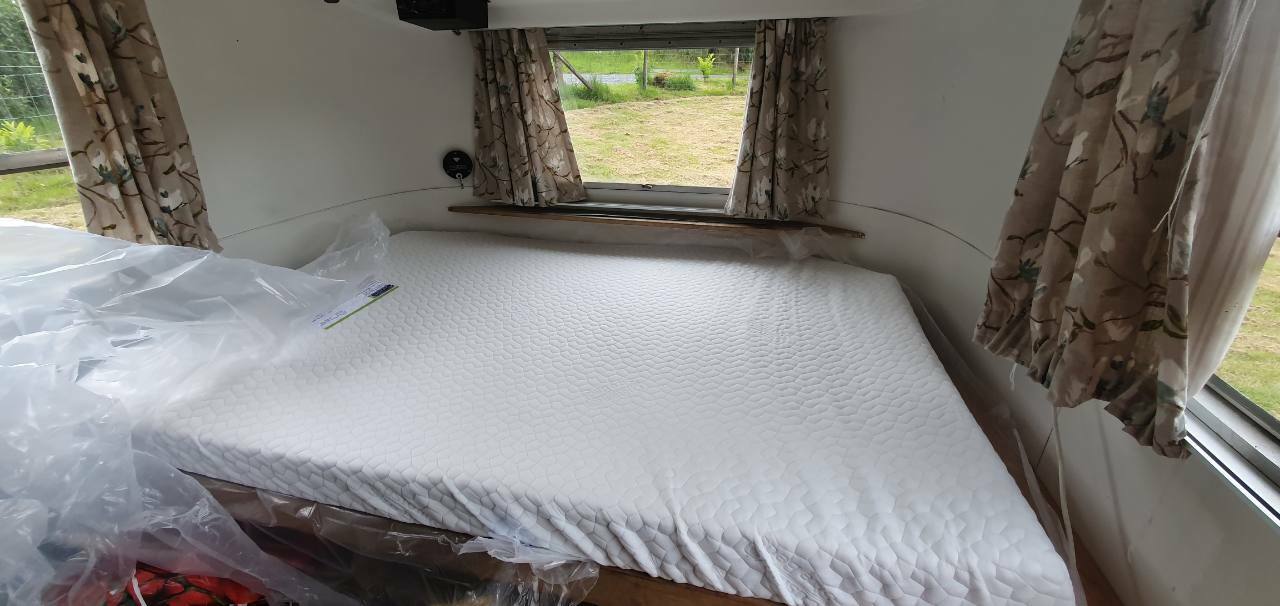
I've not been able to do much more polishing, as the weather has been against us, so focus switched to the interior. We'd been scratching our heads for quite some time on how to fix a shower curtain. The ceiling is curved in two directions, and just to complicate matters, neither is a constant radius curve! Plus the bath is also curved, although not as critical to match the curvature precisely. The solution was a section of aluminium rail, which with careful heating I was able to form into the required 3D curve. The other bit of fun with variable radius curves was the mattress; fortunately my better half is a design engineer, so made a drawing to get a mattress made. It arrived in a worryingly small box, but only because it was vacuum packed. Remove the packaging and wait... Not yet tested it, but feels good! Still need to build up around the top and bottom edges so there are no gaps. The curtains are now all complete too, and blinds for the kitchen and bathroom windows are on order.

-
 I do love a bit of beading!
-
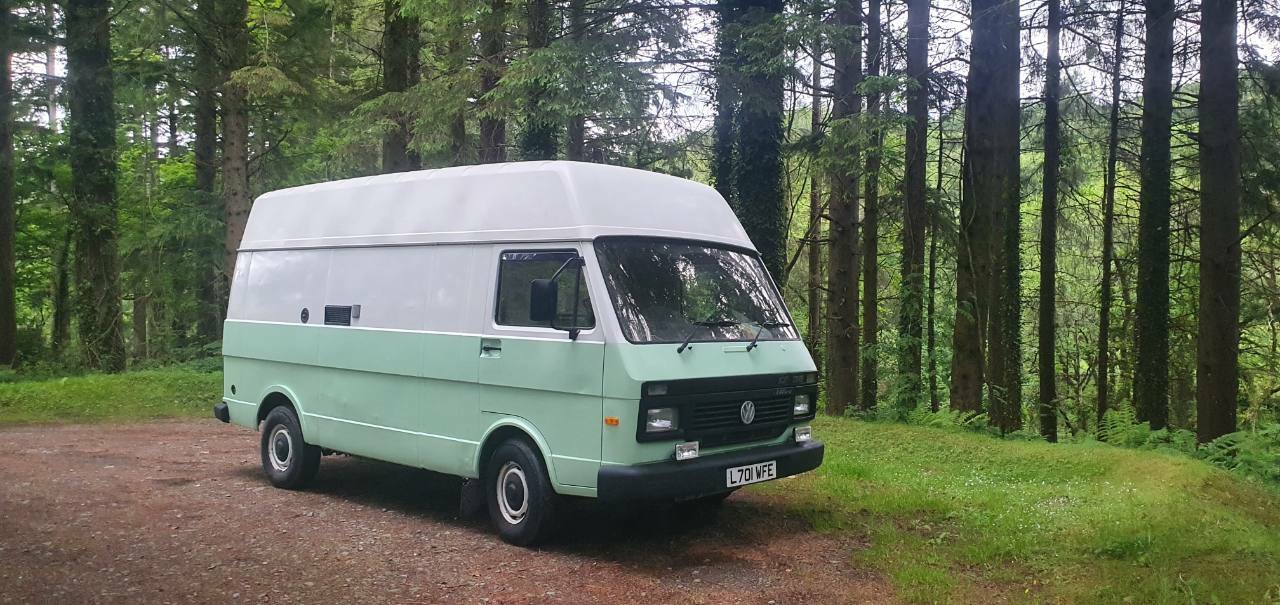
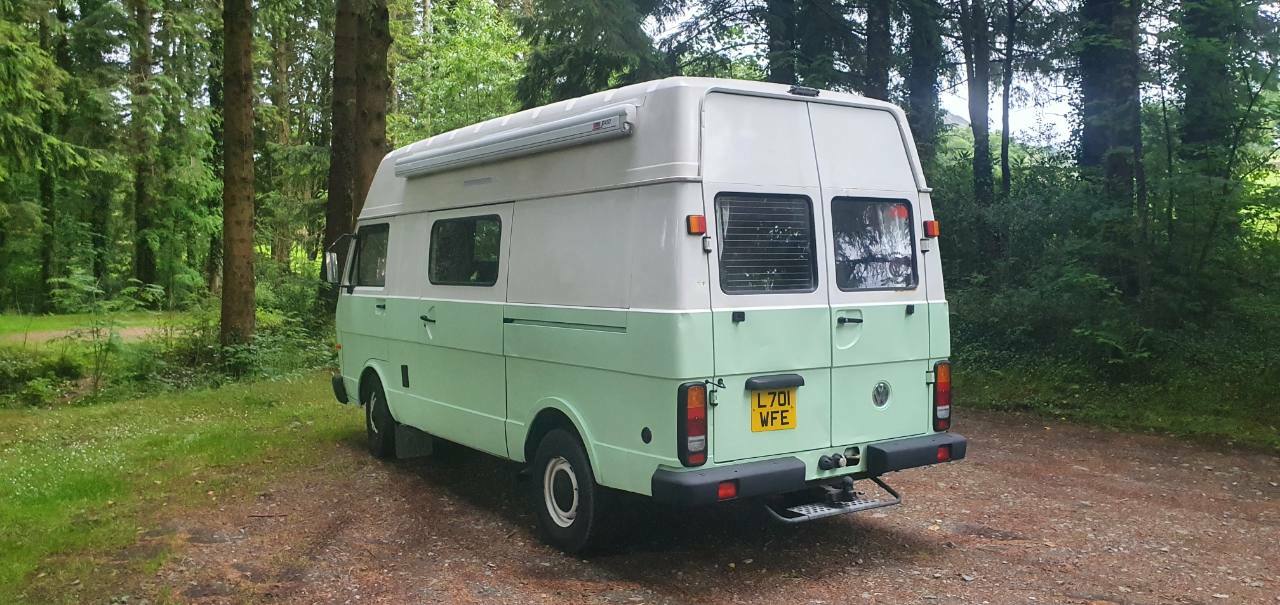
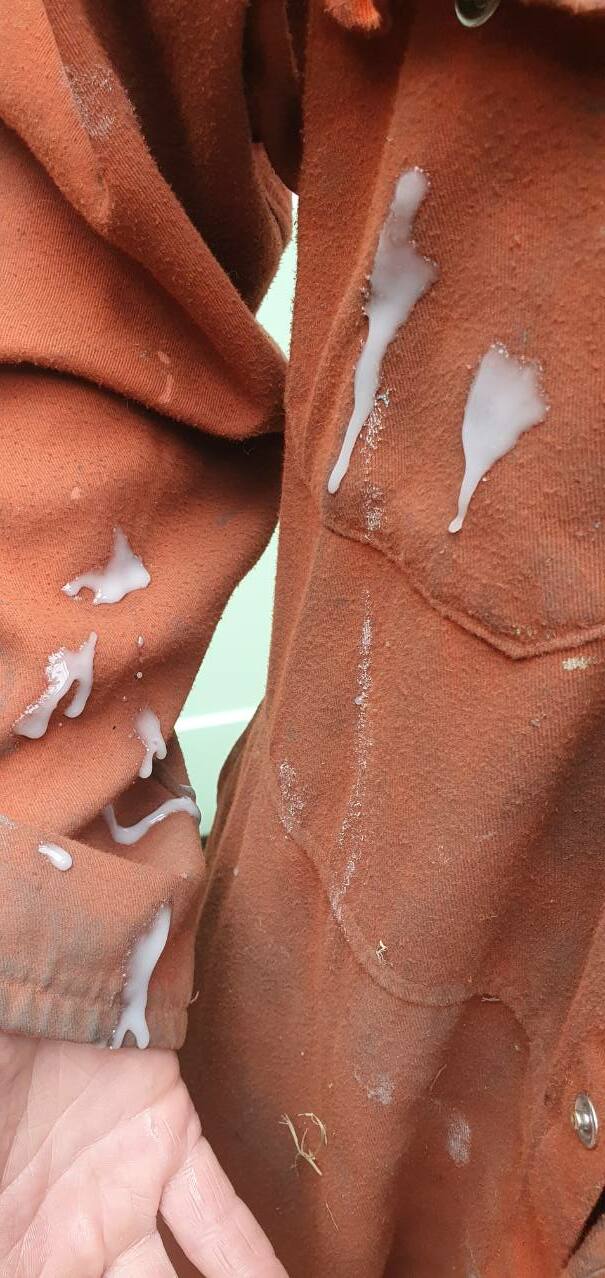
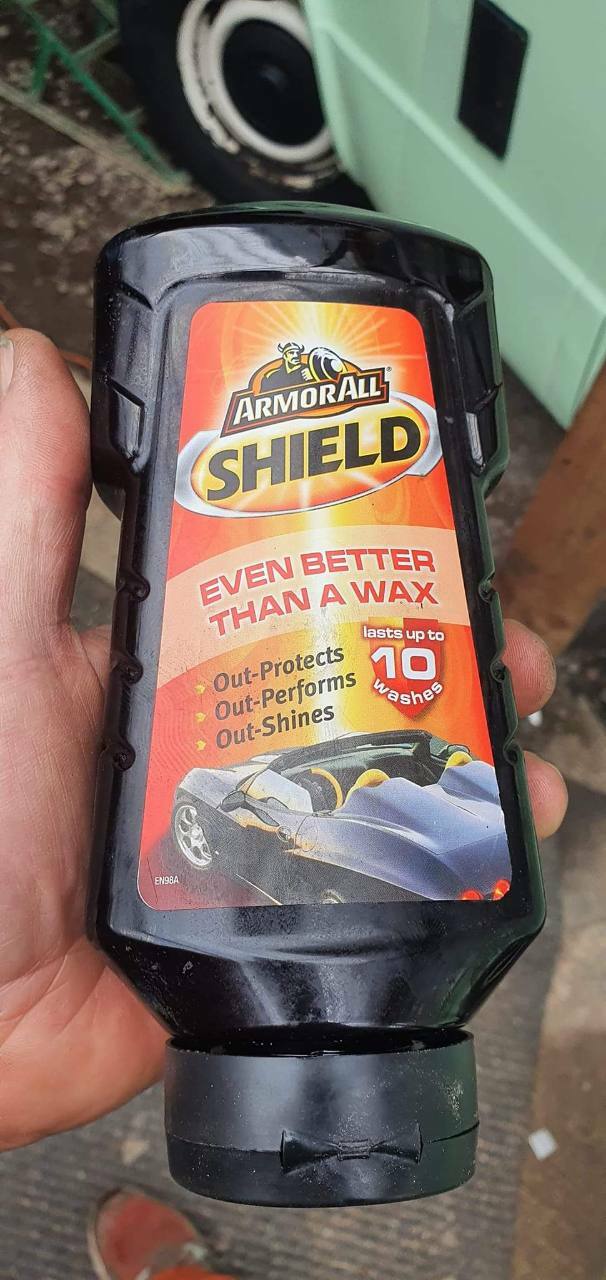
The end result wasn't too bad TBH. Certainly smarter than before! Inbetween coats of paint I did one or two little jobs, including sorting out the LED strip above the sliding door step. Id bought a roll purely on price around 10 years ago, and it didn't last at all! The strip from Toolstation seems to last, so have soldered that in (a bit longer than the original too). Once the paintwork was done I wanted to wax it. I've been using Armor All for a couple of years now, and it's really easy for someone lazy like me. It needs very little buffing, and the biggest plus point is that if you get it on the trim, it doesn't leave white residue all over it! In fact it does a possible job of a plastic trim restorer, so an added bonus. It'd been a while since I'd used it, so the nozzle on the bottle was slightly blocked. I gave it an extra squeeze, and... Once I had cleaned myself up, it probably only took about an hour to do the whole van, and it was back on the road today. There's a couple of spots on the white paintwork which could do with tidying at some point, and one of the wheels is a lot rustier than the rest, but on the whole it's an improvement. I do have a brand new never used spare wheel somewhere, complete with 1980s tyre which I don't think I'm ever going to use on the road So may swap that tyre over.
-
It's more likely I'm just a weirdo TBF. Although the seats do seem different on mine (more sculpted), although I would doubt enough to make anything other than a cosmetic difference.
-
Now there's the weird thing. I may* be odd, but I don't actually find it that bad! It's a bit more upright than I'd like for relaxing travelling, and a touch more space would be welcome - but it's strangely appealing. The soundproofing makes a difference, but I don't think the parabolic springs increase the comfort levels significantly over un-seized originals.
-
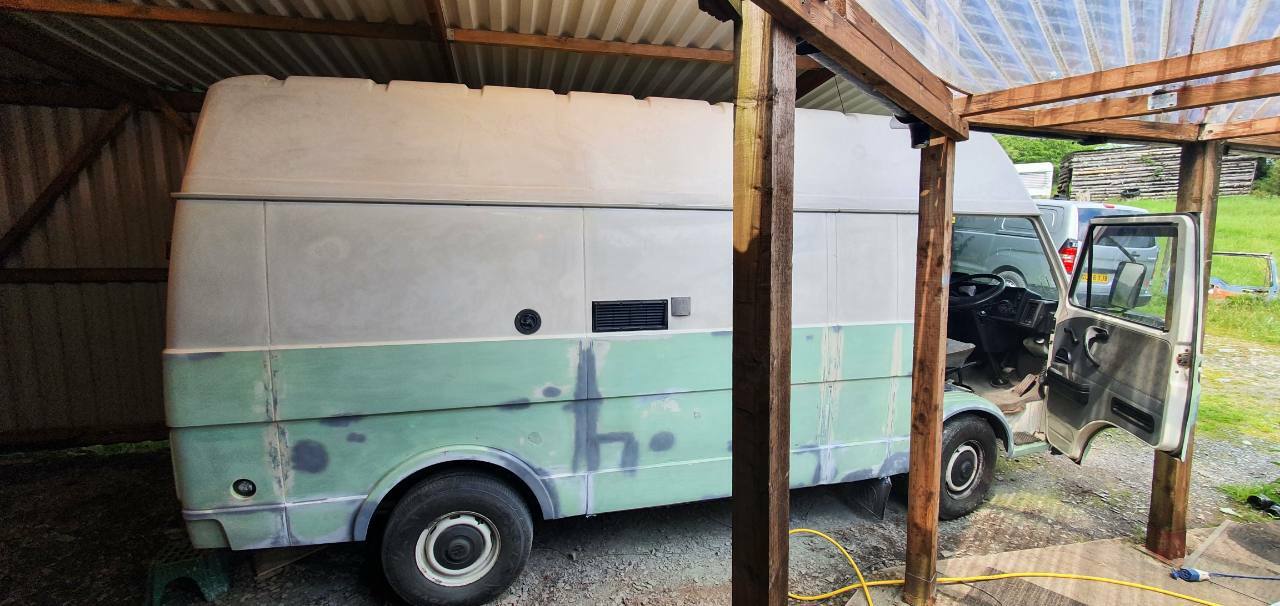
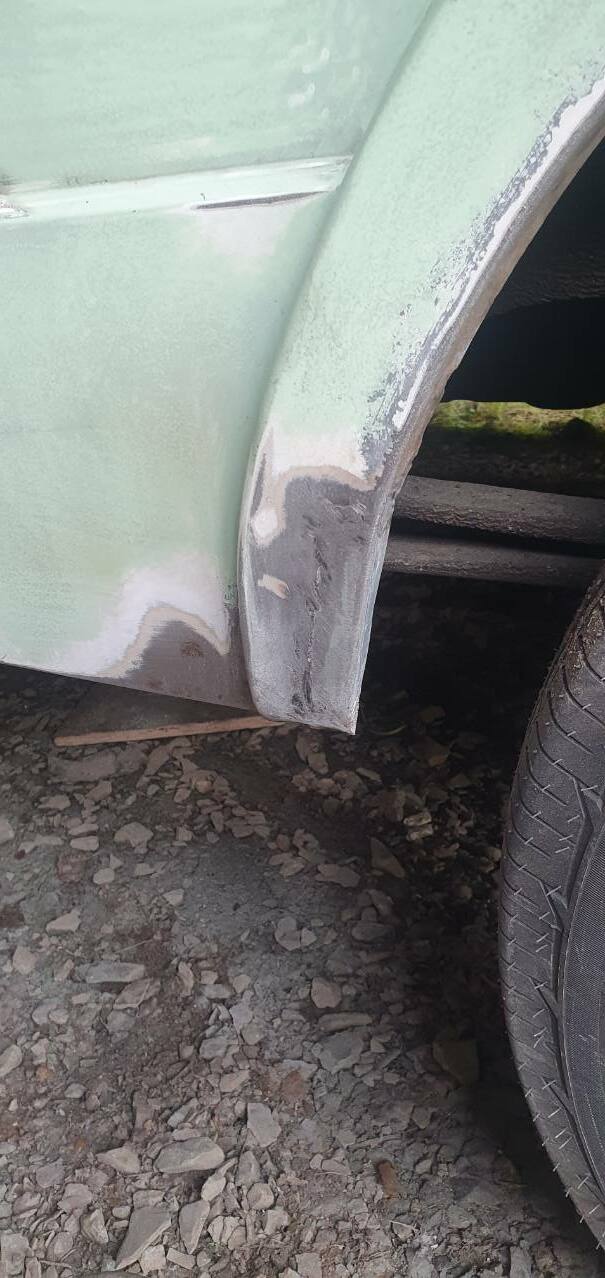
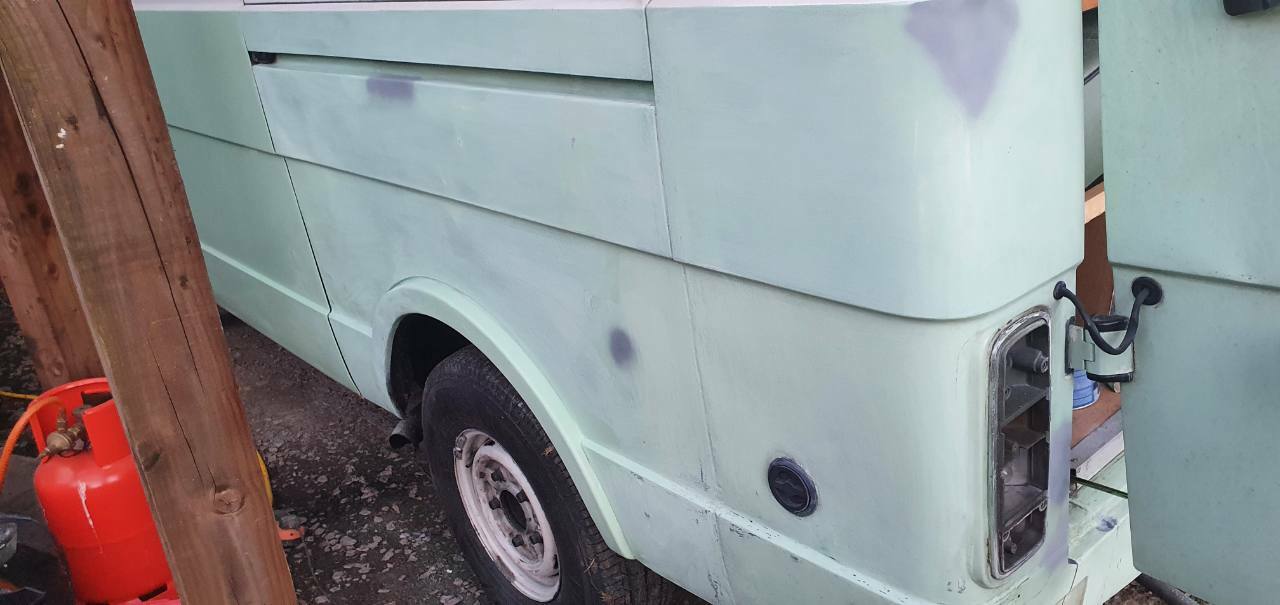
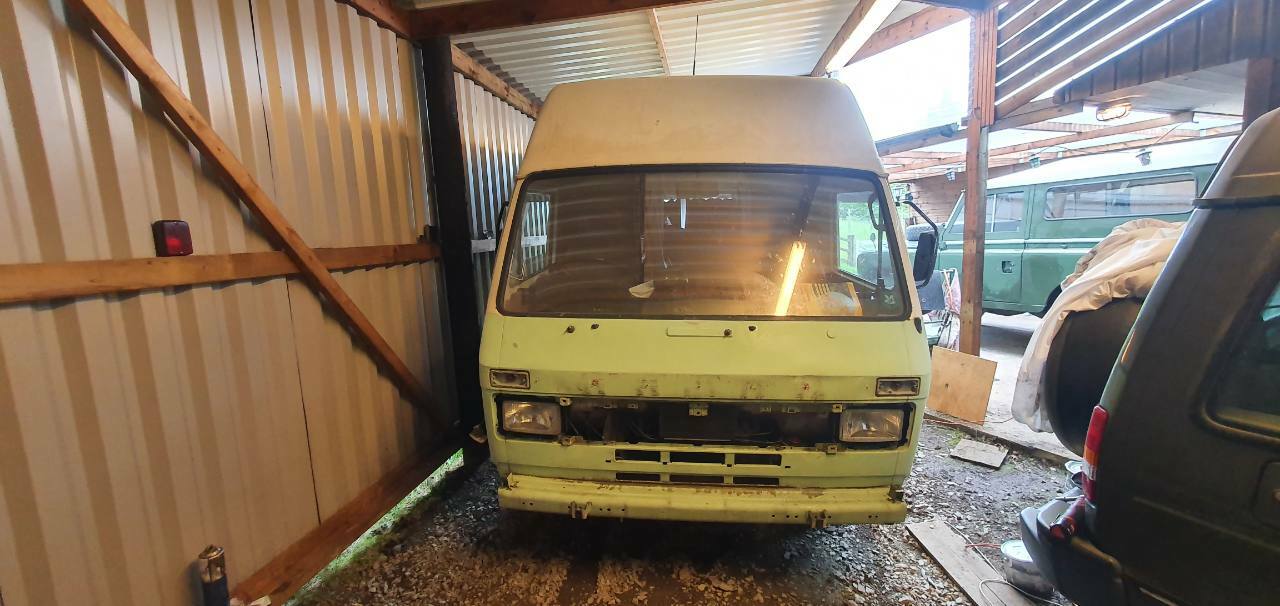
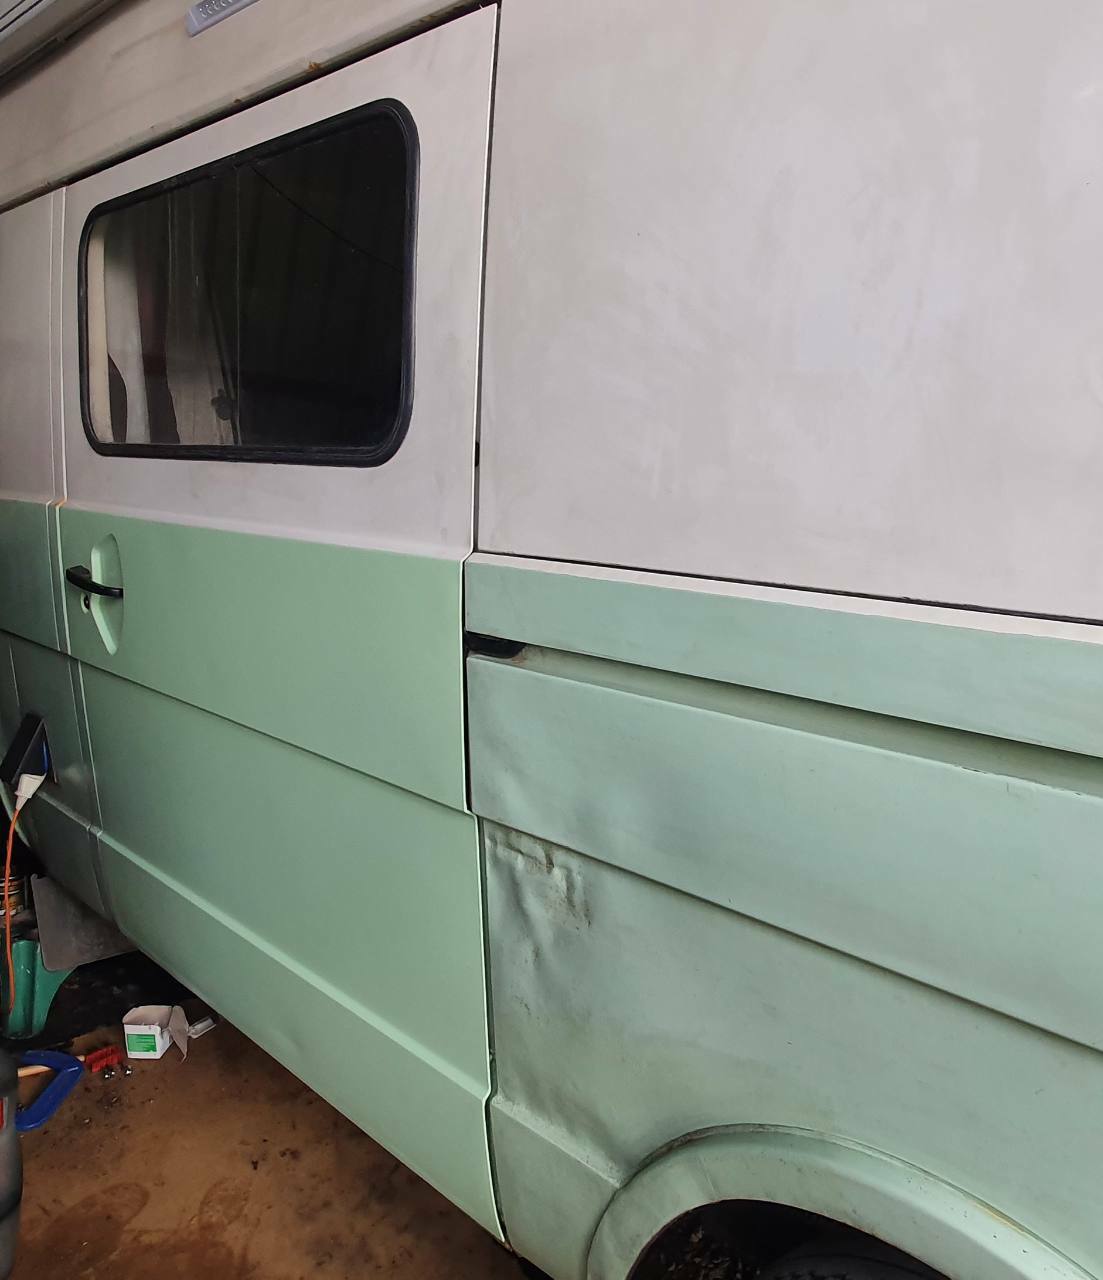
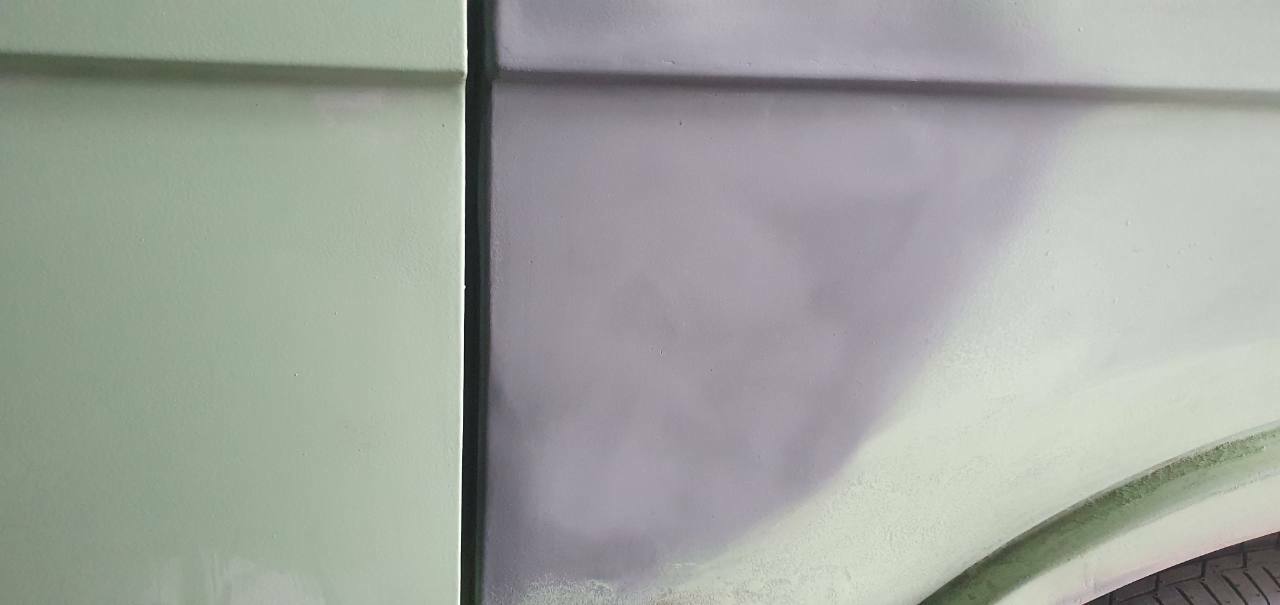
As usual, jobs spiral to become bigger than first intended. There was a couple of pinholed areas around the wheel arch, so had to let in new metal. Not a pretty job, and as new arches are available I think it'll be getting a pair in the next 5 years or so. Then the laborious task of flatting back, guide coat (using up my random off-white aerosol cans), flatting back again etc. The repaired areas were given a coat of green for better coverage, then the whole lower half was rollered. Starting to look a bit better now, but when I came to reattach the front grille, it looked a bit too tatty! This earlier photo shows it, and also that it doesn't match the grey of the bumper. So I got a can of dark grey plastic paint, and started to spray... ...no way in the world is that dark grey, and totally different to the cap colour! Wary of getting into a minefield of 50 shades of grey, I bought a couple of black cans from Amazon prime which arrived today. I'm not totally convinced, as it seems to be drying rather blotchy looking, but we'll see in the morning.
-
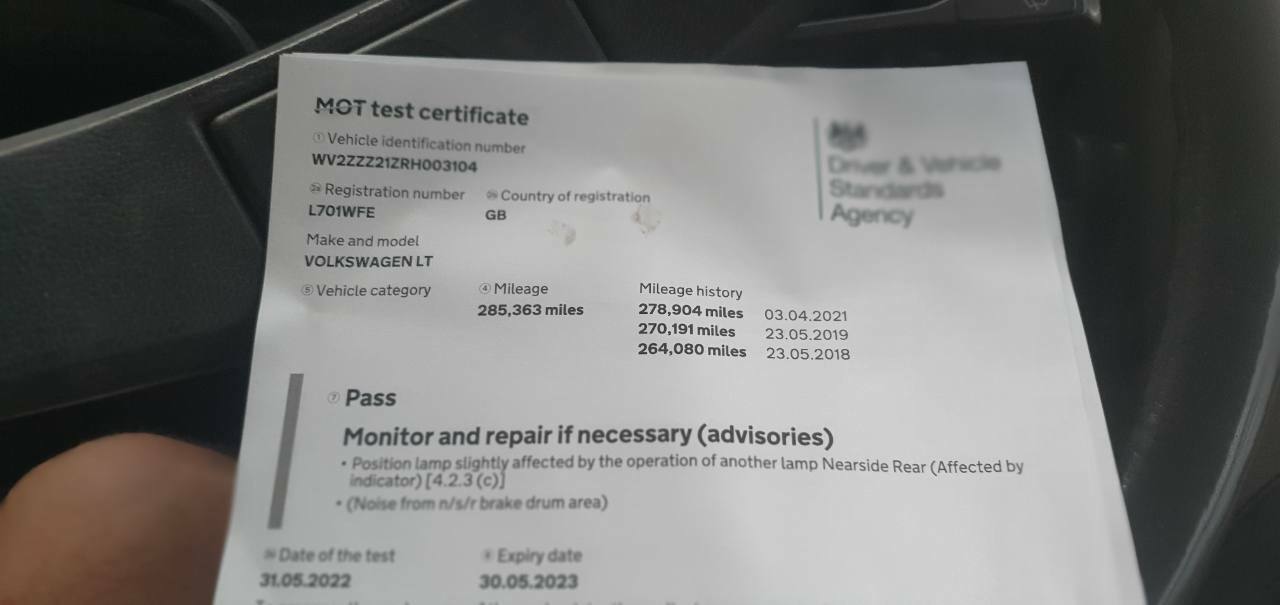
Yesterday I phoned up to book an MOT, expecting it to be after the BH weekend. I was surprised to find they had a cancellation for today, as they're normally booked up for a while. I only use this garage for LT MOTs, as they're about 20 miles away but my normal local garage can't fit the van in. Bearing in mind I only see them once a year, I was even more surprised when I gave them the reg: "Ah, a proper LT! Is it green?" "Yes, partly..." "Yeah, I remember testing it before. It's the biggest Transporter I've seen!" So last night I was putting back together, in readiness for taking it in (half-painted!) The only photo I have, is of the mains inlet being fitted. The sealant I'd previously used had cracked, so have gone with a strip of butyl sealant which never really sets. Time will tell! And......another pass 😀 The nearside rear brake is rubbing ever so slightly I think, not enough to give a significant resistance, but enough to hear. I've probably just wound the adjuster out too far. Will pop off the wheel and take a look. The front and nearside are painted, so am planning to do the rest before the weekend is out. Unfortunately working Friday though :-(
-
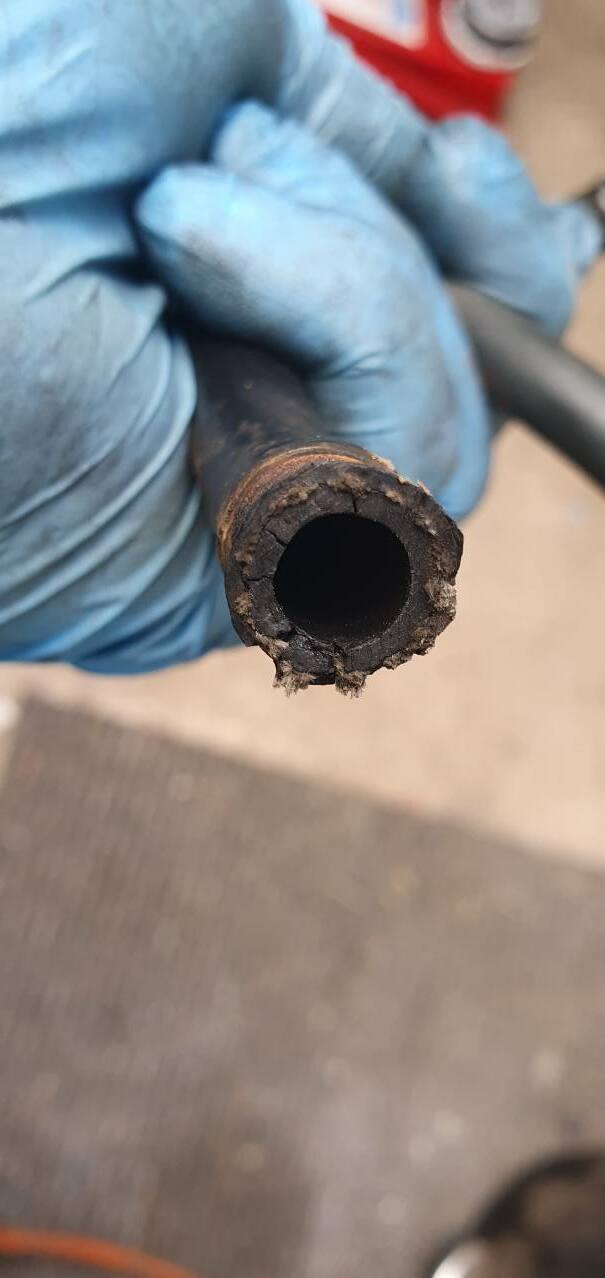
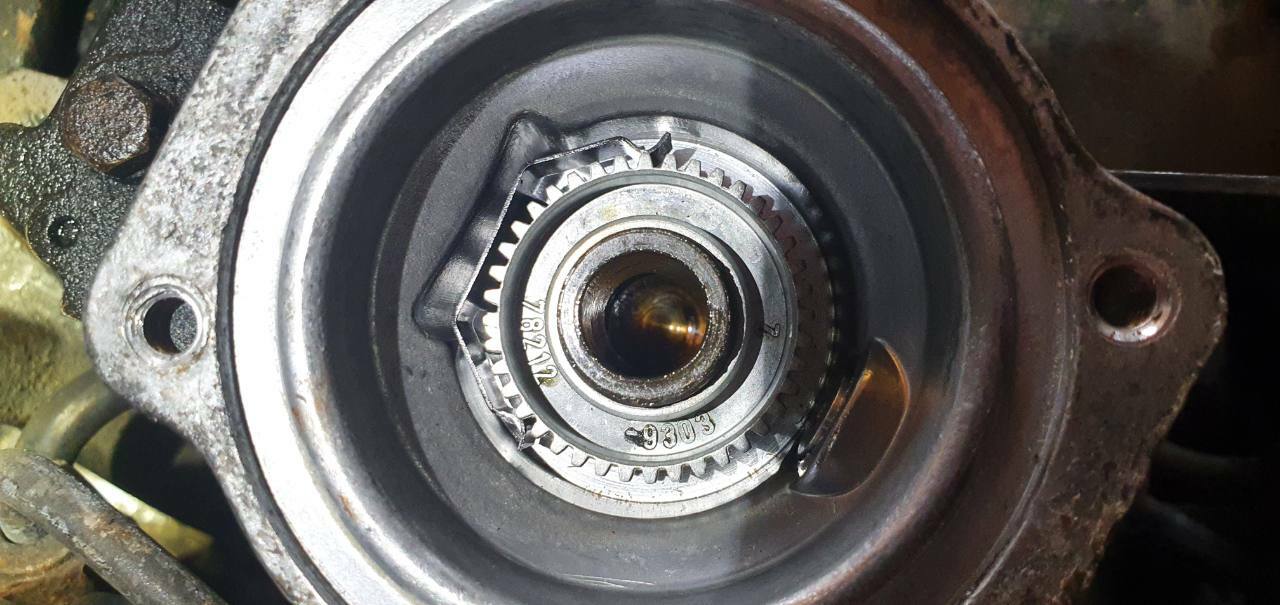
The cable I ordered was the right-hand cable, which I checked and double checked in order to get the correct part number, 281 609 702 D. However, I didn't take note of the length. The handbrake rod runs down the right-hand side of the van, hence the right cable is the shorter one. It looks like every single listing I can find has this wrong for a RHD van! So I had to re-order the correct cable, and pay postage again Still, both sides are now fitted, and wheels back on. Next job was the fuel pump. I'd previously noticed a bitbof rough running under certain conditions only. At 2k rpm under load it will hunt a bit, but if you ease off from full throttle, or drive through the problem to higher revs, all settles out again. Similar at 2.5k rpm, but only with a light load, i.e. cruising at 50mph. A light load at other revs is fine, and if you accelerate, it stops the uneven running. Chatting to @Talbot at the FoD a couple of weeks back, he suggested it could be the on-boost fuel compensator diaphragm starting to break up, as both scenarios are when the turbo is starting to spin up properly. This made sense, and given that I changed it around 13 years ago seems plausible. A new one was fairly cheap, so I ordered it anyway before taking the top off the boost capsule. There was no visual failure, but it felt slightly stiffer than the new one so think the rubber is hardening. Plus, the bottom of the boost pin was all gummed up - looking down into the pump you can make it out. I reckon that the combination of the two factors meant there was a bit of resistance to movement, changing the point at which it starts to respond to the initial change in manifold pressure. Hence not enough fuel as the turbo starts to spool up. As soon as more boost is generated, the pin moves as it should and fuelling is OK. I took it out for a test run, and all is perfect again 😀 Which means, using man maths, that the 380 mile round trip to the FoD actually saved me £300 on a rebuilt pump! Another job was the fuel hoses, which I'd noticed during the recent service had started to perish. All were replaced with Gates Barricade from a known supplier, and the crimped banjo fitting swapped with a standard push-on type. Back onto the bodywork, and I've started to strip it down for paint. There's a couple of spots which needed primer, but it actually looks around 80% better after just flatting the paint back, and solvent wiping to remove the engraved grime!
-
I chickened out of that one when I had mine (now with @Cord Fourteener) and took it to the garage. Even they said it can be a PITA of a job, and if it was a run it into the ground kind of car they'd advise not to bother.
-
I've actually been able to trim the opening slightly, and with a little directional enlargement of the socket mounting holes, the alignment is much better. Onto another section of bodywork: Also dating from before purchase, it had been hammered out Father Ted style. I'd already replaced the lower panel in 2007, but had thought little point in doing more with a mahoosive dent in the door! I managed to flatten out the metal to some degree, so it was no longer proud in places. Then applied sone filler, although more than I'd like to have done. The upper part of the repair, the metal has actually been pushed into the door shut aperture slightly, exaggerated by this photo above. It's not so visible from straight on, as it's simply a squarer edge than the original edge below. But it's hugely improved, and is perfectly acceptable to my eyes given the amount of minor dents all over the rest of the van. It's a good sign that VW now appear to be supporting the LT more spares-wise. I hadn't been able to find a genuine handbrake cable previously, only one side from a dealer clearing out old stock. But now both sides are available via VW Classic Parts, and postage from Germany is probably faster than Hermes in this country! Hopefully I'll get it in for an MOT next week.
-
Likewise. I've never been a fan of the later dash, but recently its Frenchness is growing on me quite a bit. @dollywobblerIf you ever sell at a time which coincides with me having actual money...
-
BeEP's motors - Pride MOT'd, Cinq starts, C1 for sale.
mat_the_cat replied to BeEP's topic in AutoShite
Is that a tyre pressure monitoring system on the right of the dash? -
It's probably a yearly job, but should be significantly quicker keeping on top of the shine rather than dealing with neglect. A light buffing with the final stage polish should be all that's required, although weather is going to limit when I can do it! We're thinking of painting the roof with a heat-reflective paint, as they do on modern Airstreams. You can get stuff to slow down the deterioration, but the flip side is that they then need removal before polishing. Good point about the windows - I may just allow the front and rear windows to function. They are flat pieces, so at least possible to get toughened sheets made to suit without requiring a mould! Those, plus 3 roof vents, and AC should keep the inside well-ventilated and cool enough. It is possible to replace the curved windows with a polycarbonate sheet, but it's a bit too flexible really.
-
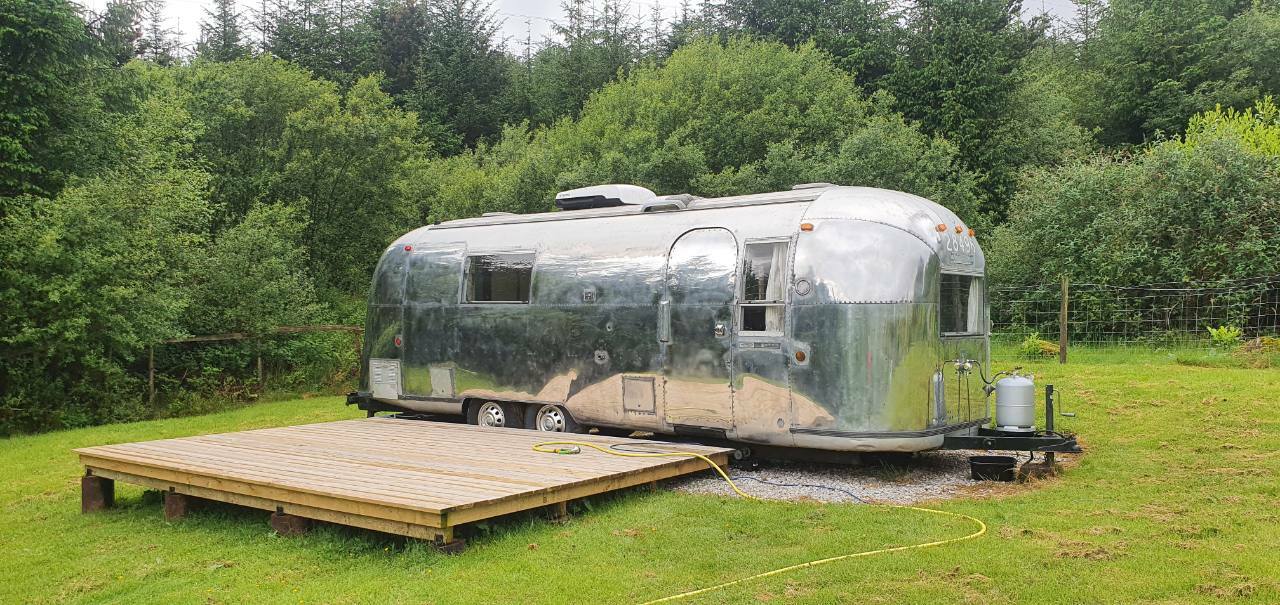
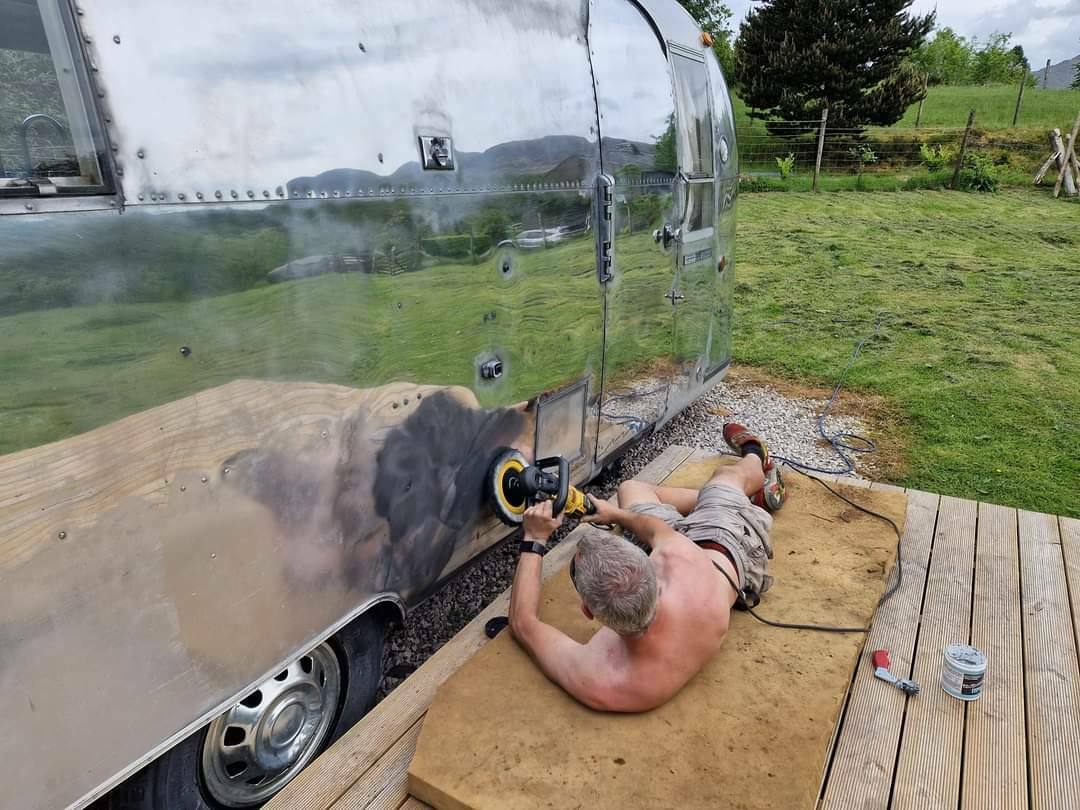
We're only gearing it towards couples, as there will only be the one (fixed) double bed. In theory you could sleep a child on the sofa, but I think we'll probably just leave it at two. Not made a firm decision on pets - we do allow them at the house for a £15 charge. But the worry is, with relatively fragile fittings, in a confined space, is it really pet-friendly? Damage would be a worry, and potentially a loss of income if we can to cancel bookings (worst case scenario) waiting for parts. Actually, damage is a bit if a worry as it is. To open the windows for example, you have to release a catch *before* cranking the handle to pivot the glass. I can well imagine a mechanical numpty just cranking the handle without releasing the catch and smashing the glass. Not available new, and a variable radius curvature so a nightmare to get custom made. If you can find a second-hand one you're looking at £3-400, plus postage, if you can find someone willing to ship from the US! It's things like that which make a beige static caravan seem more appealing...but then you look at it and think again. About half-way through the coarse polish, excluding the fiddly bits around the lights/windows etc. So less than a quarter of the way through, and I'm working on it probably 4-6 hours a day. Still, at least I get to lay down on the job As a bit of geeky interest to a materials engineer like myself, the aluminium they used is 2024 alloy for strength, with a layer of pure aluminium on the surface for improved corrosion resistance. And because it's softer, better 'polishability'.
- 189 replies
-
- 16
-

-

-
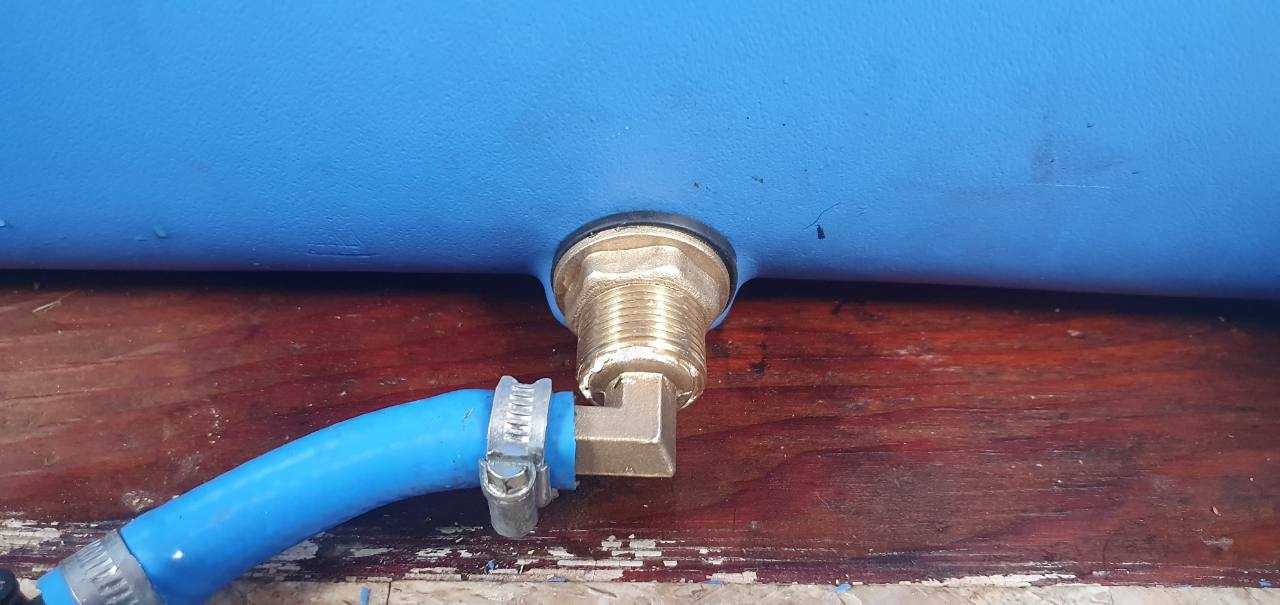
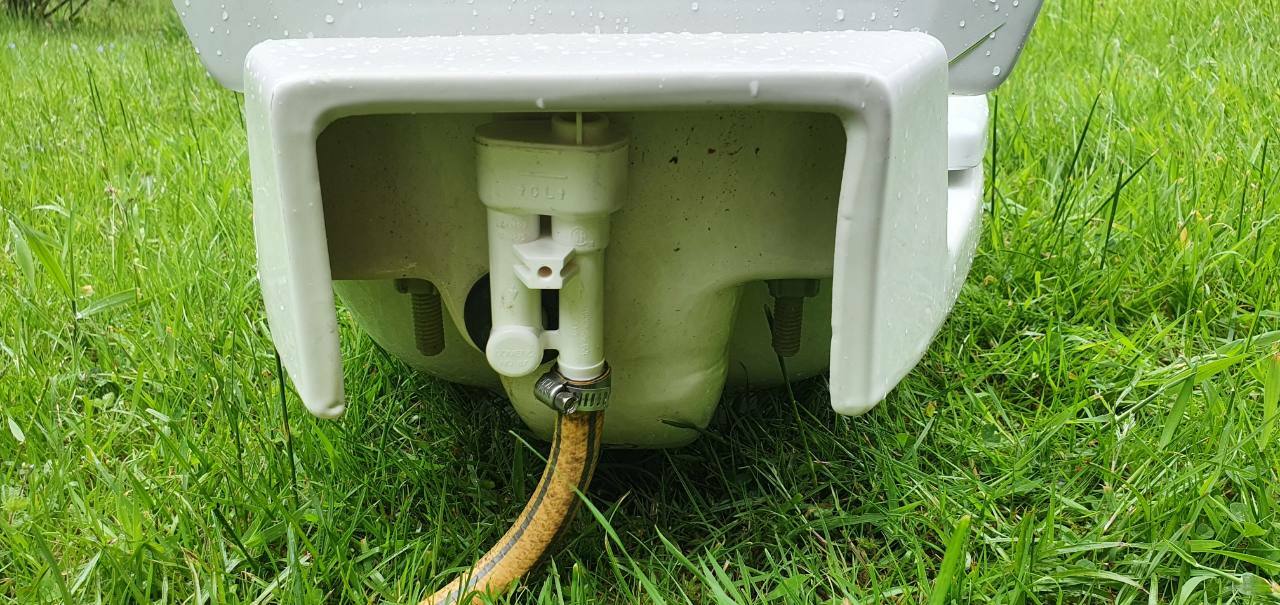
A bit more positivity now. I've replaced the old tank outlet connectors, of which two out of three had started to leak. Whilst they seemed to hold water last autumn, I think that the problem is because the sealing face inside the tank isn't flat. This is despite the outlets coming with the tanks, so seemingly not fit for purpose. I bought a replacement for the stripped thread one, and torqued it by fingers only. Still a dribble, so tightened it more still just with fingers and it too stripped before halting the drip. So I've replaced all three with brass versions. So far so good! Back onto the toilet leak - a replacement vacuum breaker arrived. Connected it to the garden hose to test for leaks, and all was good. Finally, I was able to reinstall the toilet and test it out. Well, not a complete test but the principle works!
- 189 replies
-
- 12
-

-
-
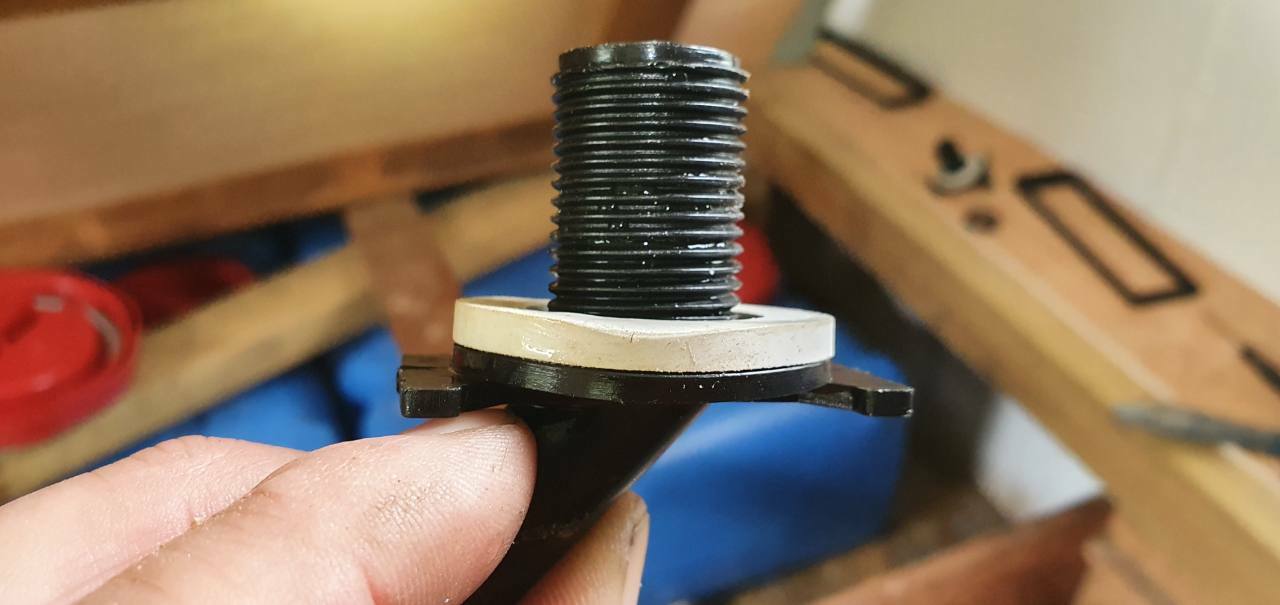
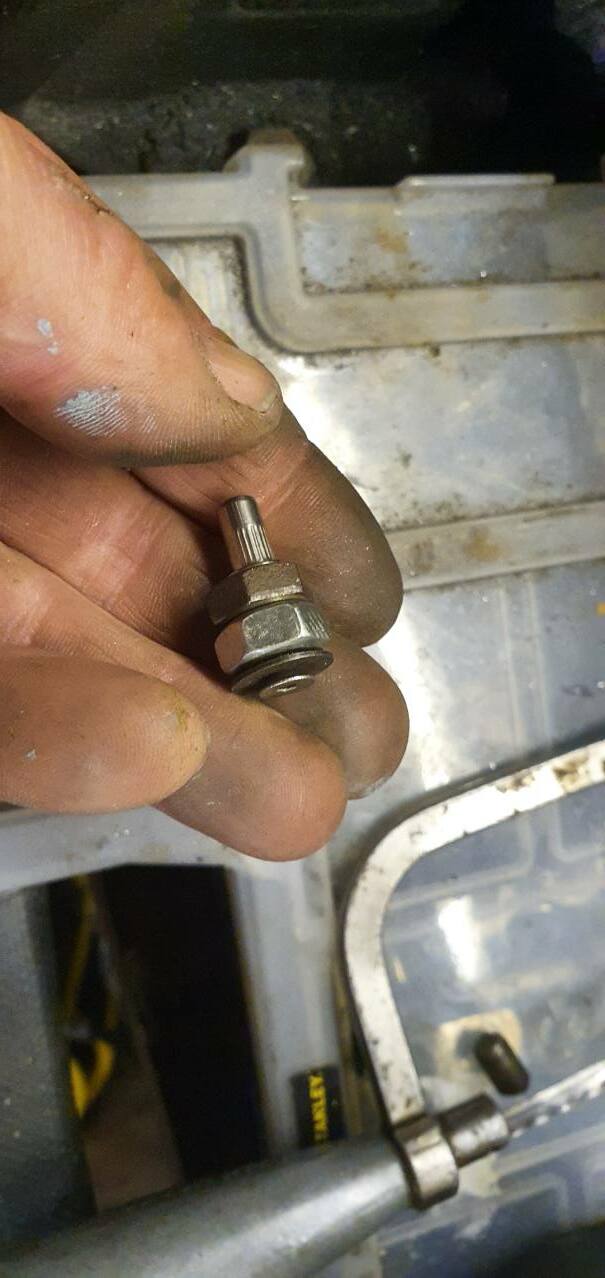
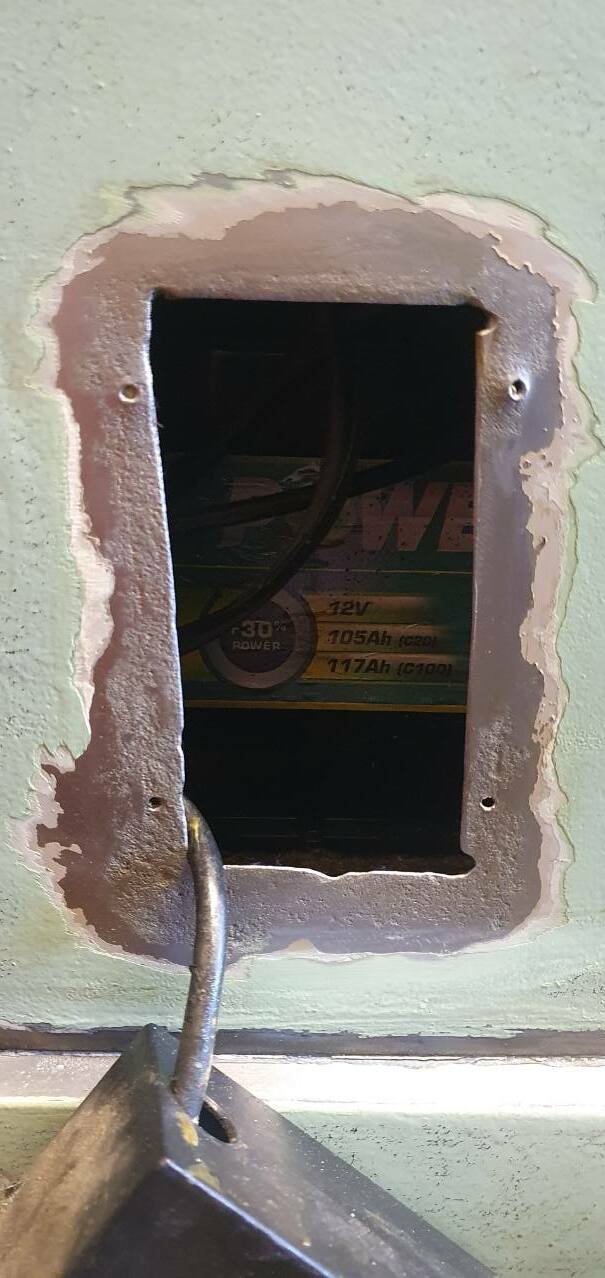
One of the other things which had been done to this van before I bought it, was fit a mains inlet socket. Badly. It's not even straight, and the edge of the hole hadn't been painted. Consequently it has rusted over the years. Time to sort it out! All rust now removed, although I'll live with the slight angle - don't really want to weld it up and remake the hole! I wanted to replace the self-tapping screws and use threaded inserts instead. But first I had to make up a crude tool to fit the inserts. M8 screw, drilled out to 4mm. Then screw on a nut, and thread an M4 screw down the middle with a washer under the head. Unscrewing the nut will push on the washer, expanding the insert and lock it in place. All fitted and ready for paintwork. A quick freshen up is getting more involved!
-
How much shite is too much shite? Not Over for the Rover - Yet!
mat_the_cat replied to Saabnut's topic in AutoShite
If speed is proportional to noise then it's very fast indeed! -
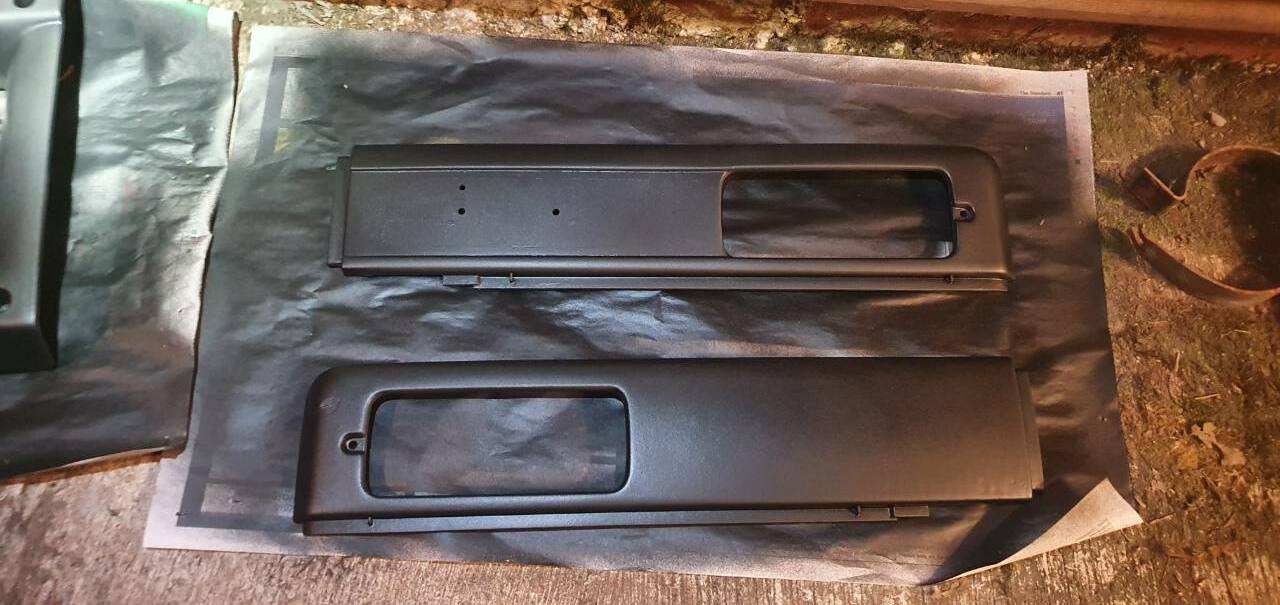
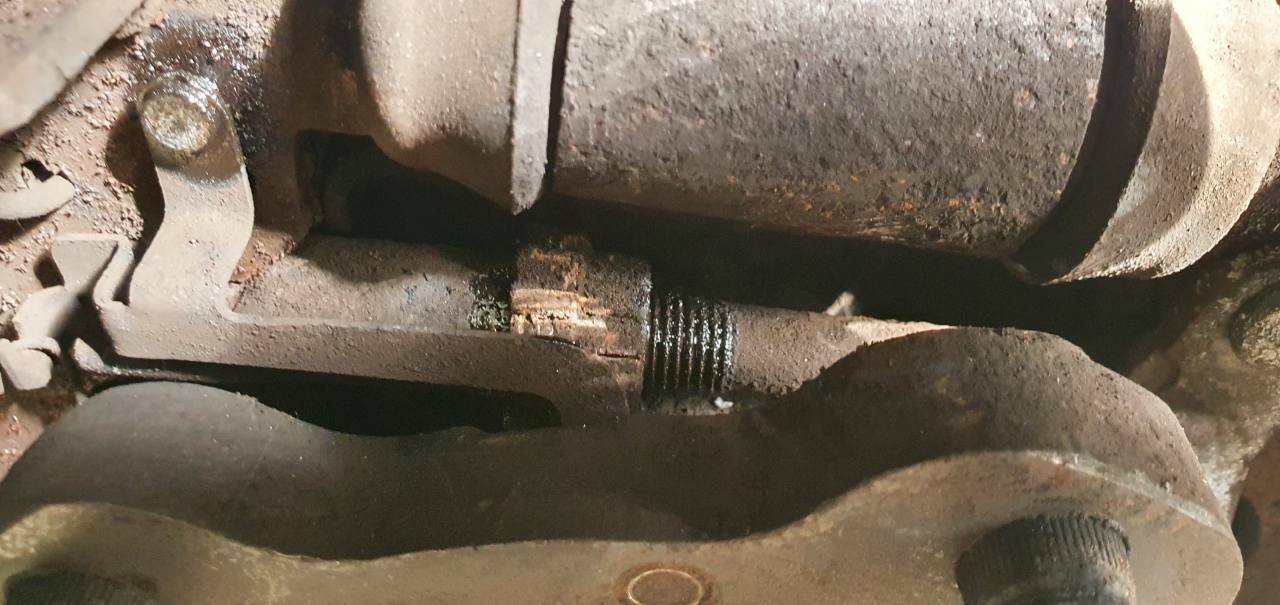
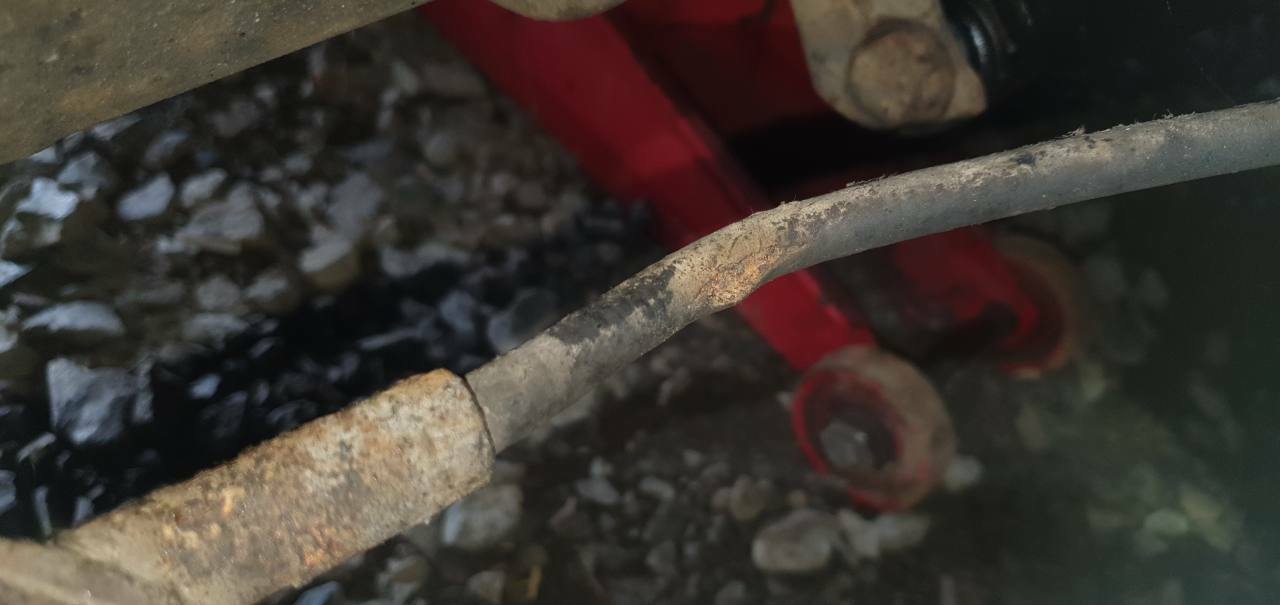
Rear brake time. There's a few little touches on this van, that I'm sure wouldn't have lasted through today's cost-cutting exercises. No need to hammer the drum, or use a puller. Just insert 3 M8 screws, and draw it off towards you. It wasn't seized on, but was binding on the shoes slightly so resisted my efforts to pull off by hand. No problems here... ...so just a few drops of oil on the adjuster threads to keep them moving freely. I worked the adjuster up and down the threads a bit to make sure all was lubricated. The other side was much the same, until I spotted this: I changed both cables 40k miles (8 years - how did that happen?!) ago, but could only get hold of a pattern part for one side. Guess which one has failed! Happily though now, parts availability seems to have improved slightly so I've ordered a genuine one from VW Classic Parts - £27 including delivery from Germany. While I wait for that to arrive I did a little cosmetic job. When I bought the van it was being used as a motorbike race van with an awning channel roughly screwed to the side (see first post for a picture). We replaced the top piece with a roll-out awning, but left the the vertical channels in place as I didn't really want to weld up the holes and risk setting fire to the insulation. But then I had an idea. First of all droll out the self-tapping screw hole and countersink it. Then fit a sealed countersunk rivet. Dipped in Zinga prior to riveting, and this is the result. Annoyingly, several of the shafts snapped proud of the surface so had to be filed flat. But I reckon with a quick rub down and coat of paint they should be almost invisible.
-
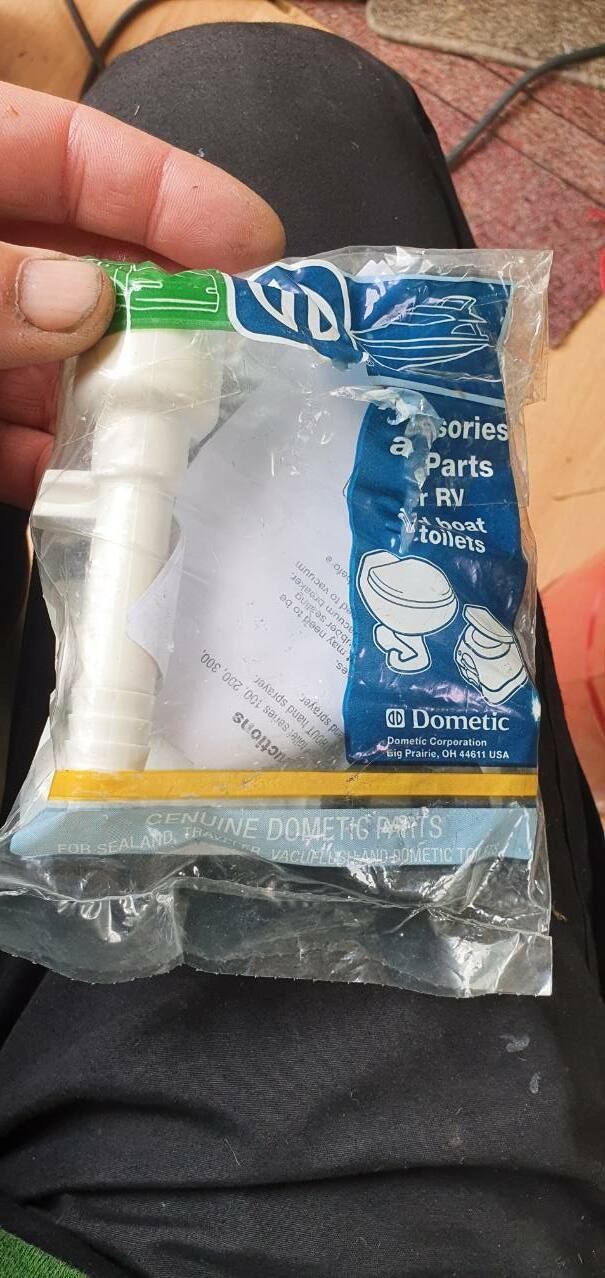
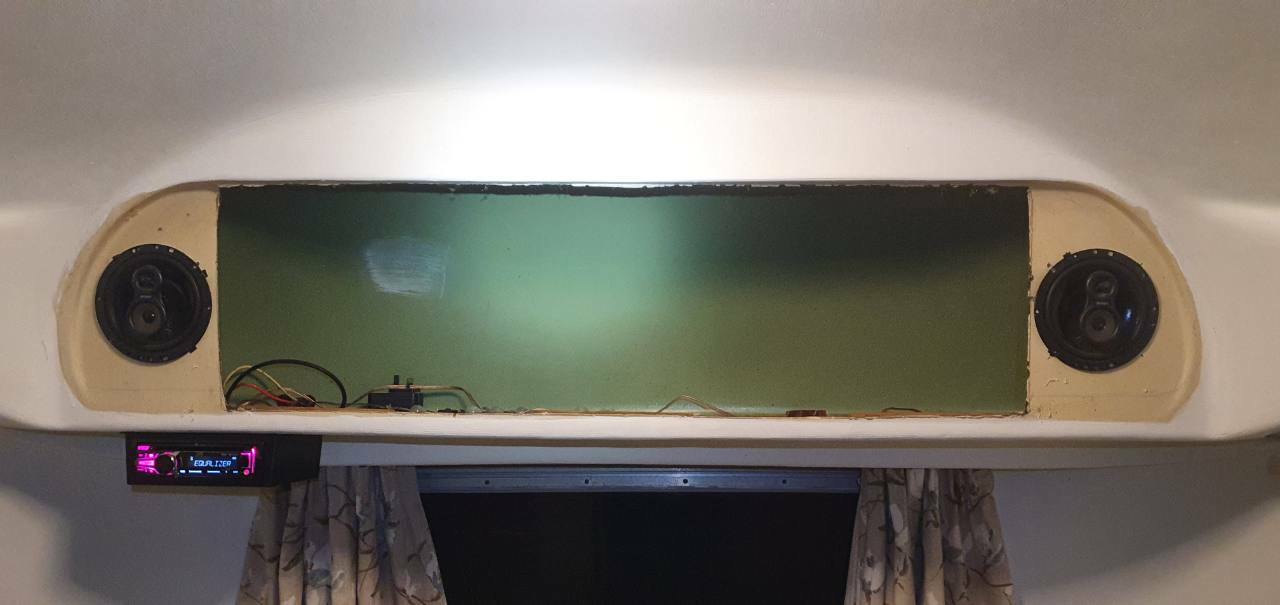
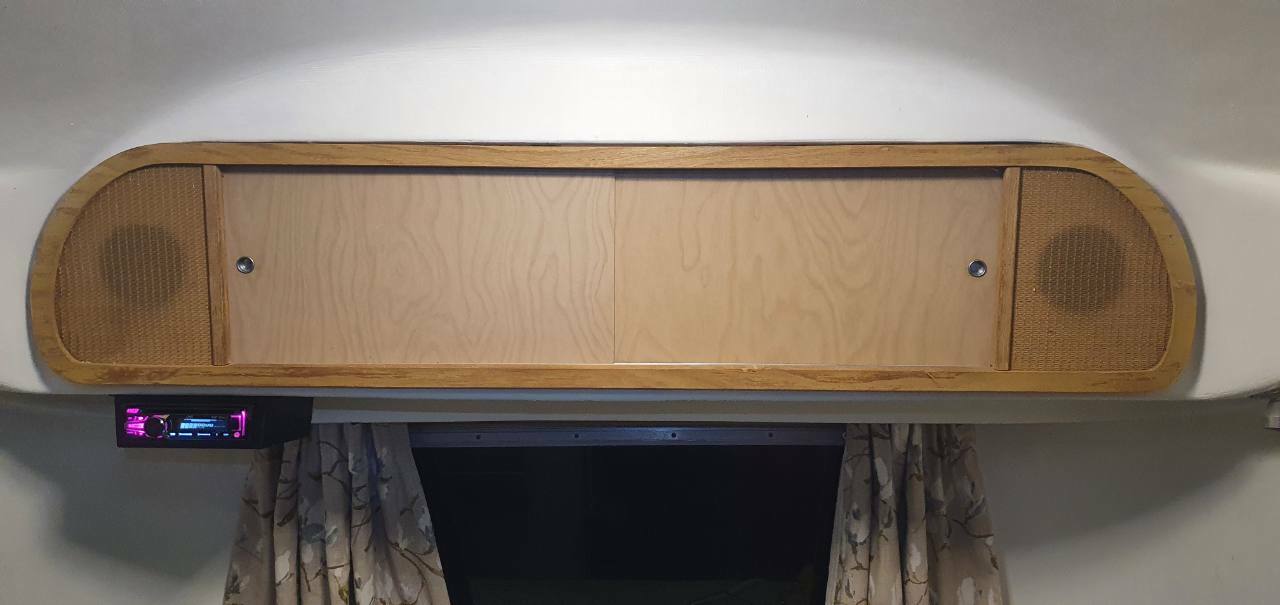
I've spent another couple of days on it now, and the door is now done, and the lower part of this side to the LH edge of the window. As a bit of a break to that, I've fitted a radio inside, as wiring was already present. I also wanted to replace the speakers, which had gone a bit crumbly. Radio in: Unsurprisingly, this pre-dated the ISO connector, so one was duly added. I pinched the rear set of speakers from the LT to fit here, as I'm using this as an excuse to upgrade the ones in the van 😀 And with the original panel back in place, you'd never know! I might swap the head unit for something a little less flashy, or at least tone down the display colours. But it was a spare I had so will do for now. Sounds much improved! Nor sure whether I mentioned, but my wife has christened the Airstream Dixie, as she was thinking of it anyway - then saw the previously unknown to us Dixie cup dispenser in the bathroom. So that seemed like a sign! I don't tend to name vehicles, but it was agreed that Dixie needed a nameplate so we wondered about just getting a numberplate made up. Didn't look right to my eyes, so I suggested an American-style plate. Obviously all states have their own variations, but found something fairly generic looking, with options to include a registration date and state name. Eventually this arrived. 1968 is the date of the Airstream, and Meirionnydd is the area of Wales in which we live. Much polishing needed before I can fit it though... Less positive news is the fact that the vacuum breaker on the toilet is leaking, so I've had to take that all out again. And one of the freshwater tanks was weeping slightly from the outlet, so I started to see whether it could be nipped up further. At which point the threads stripped, 70 litres of water started draining onto the floor, and I almost started weeping too. 2 steps forward, 1 step back.
-
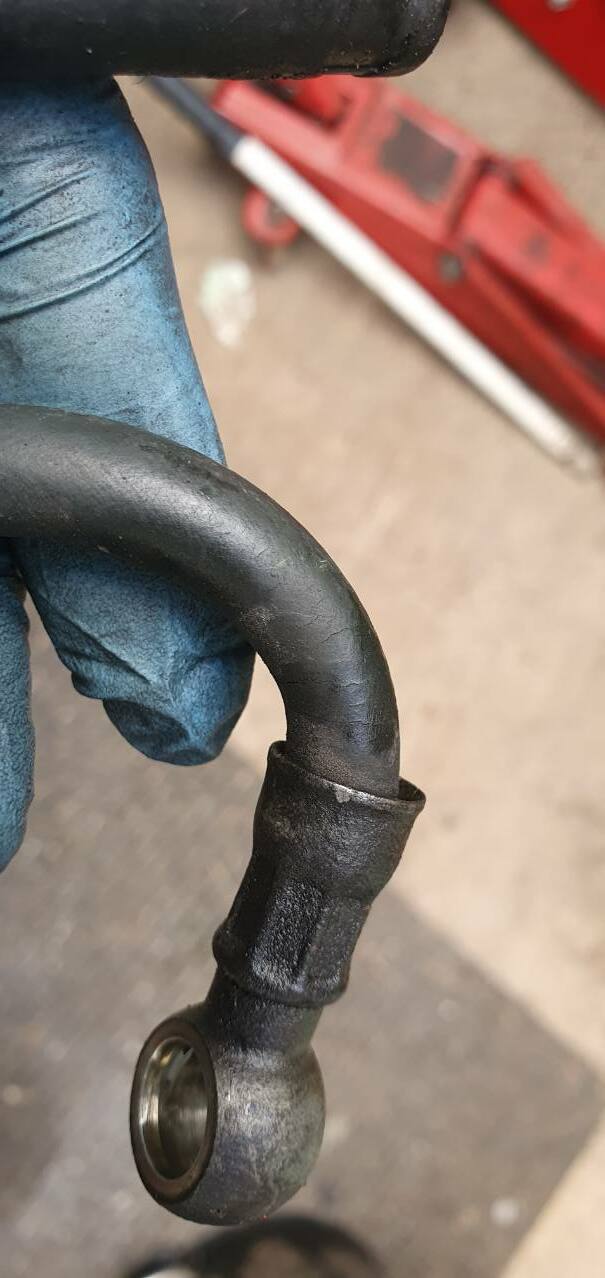
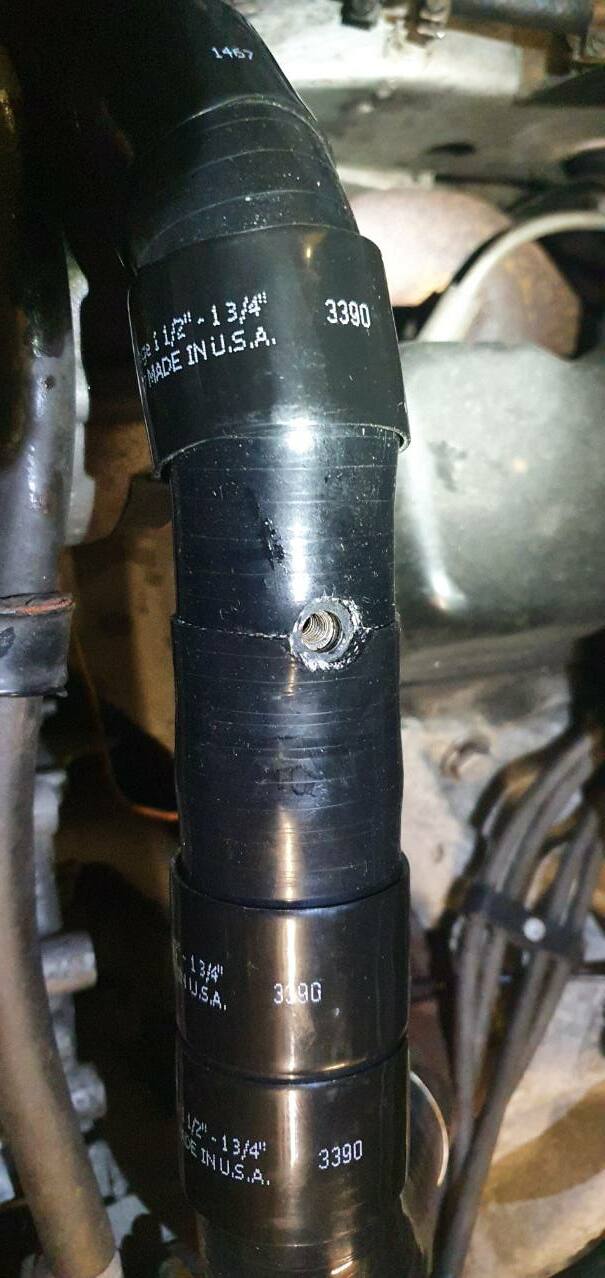
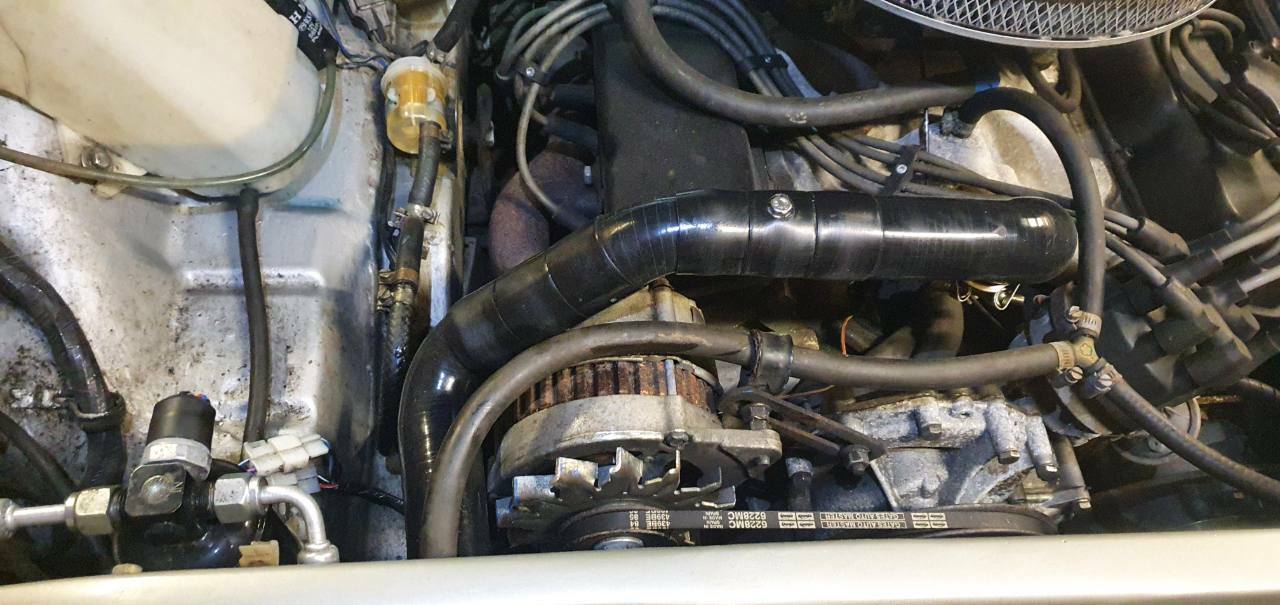
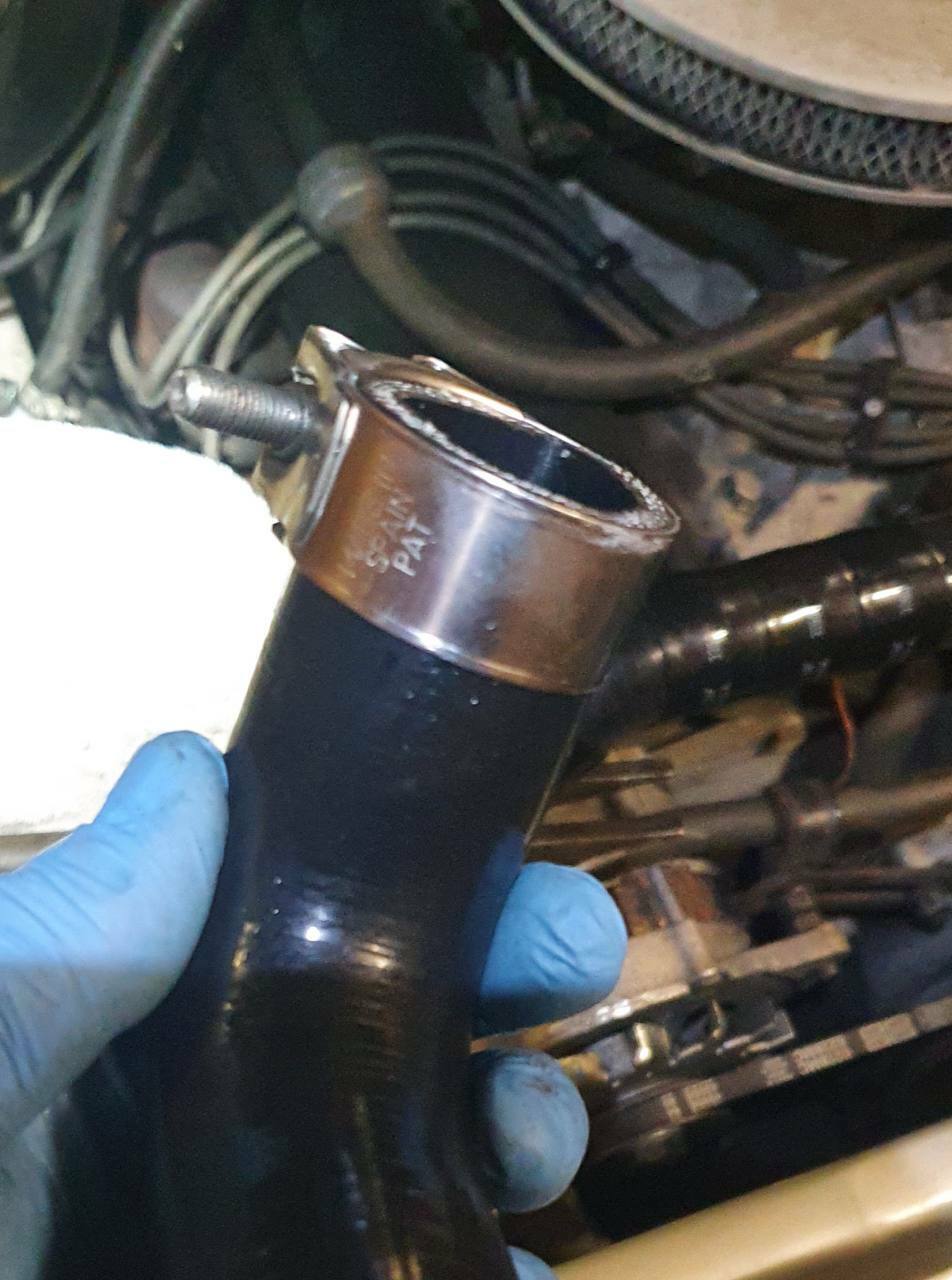
This has been on my mind since you mentioned it - could my problems be down to something as simple as an airlock? Even if not, it can't hurt to include a bleed screw at the high point, so I purchased a short length of joiner tube with a threaded boss in it. But I still wanted to have the appearance of a factory fit, one-piece hose. So I notched the ends of the hoses to fit around the screw: I also had to replace a hose, as it had been partly eaten by the alternator fan. There's clearance when the engine is running, but obviously things must shift around under load. A new hose was cut down to fit: Using a hose clip to try and get as straight an edge as possible, seeing as I don't own a hose cutter. I then shrunk all the hose 'clamps', and scuffed them up to remove the in your face writing. The alternator fan I had previously trimmed down so it's just smaller than the body. This was hastily done before the trip to the FoD, using the slightly dodgy method of an angle grinder flap disc, and an idling engine lathe. Apart from having a fun day meeting up with folk down there, the ~400 mile trip was an absolute joy. It's my first long trip in it for a while, and for once there was no traffic jams on the M6 at Birmingham! I particularly enjoyed the return journey, with fewer cars on the road, convoying with @AnthonyG (for a short while 😉). The fuel economy is so much better getting out of the Welsh hills - I normally average low 20s!
-
I traced the feed line back from the lift pump to the tank, and stuck it in a jerry can. Fuel *was* getting to the pump, just not leaving it! I thought initially it was trying to fire on one cylinder, but think the speeding up of cranking was down to low compression on one.
-
They didn't include this one for some reason... (Actually a test of the concrete block, not the vehicle so high speed/ heavily loaded). Engine access on the LT is pretty good actually, and you can work on it in the rain whilst staying dry! Opening the bonnet is a bit of a faff though; you have to fold the passenger seat out of the way and completely remove the driver's.
-
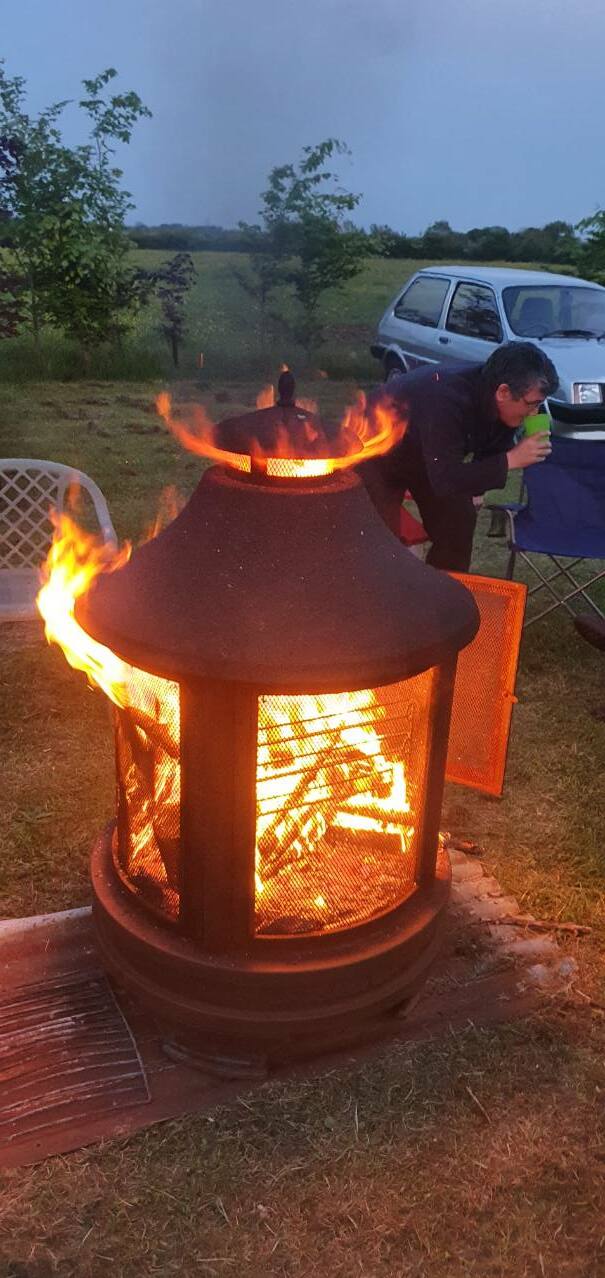
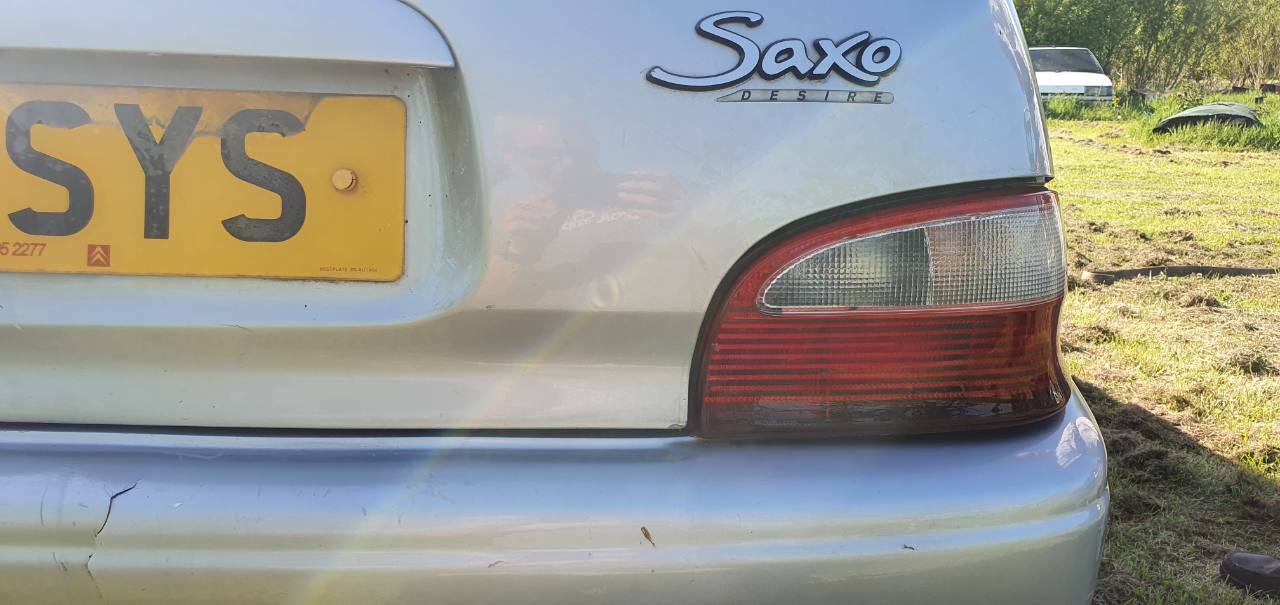
381 miles later I'm back home again after an uneventful drive back. Nice to be behind this set of instruments for a long drive again Thanks to @Six-cylinder and @Mrs6C for their hospitality, and the usual suspects for good company. Illuminations were just about the only positive result with the CF: A Saxo named Desire: (Which rhymes with fire!) NB, @hairnet isn't vomiting into his cup, at least as far as I know.