jonny69
-
Posts
2,416 -
Joined
-
Last visited
Content Type
Profiles
Forums
Events
Everything posted by jonny69
-

Cars you didn't know existed until very recently.
jonny69 replied to philibusmo's topic in AutoShite
I actually saw one of these a couple of months ago. It was a bit more jacked up than that and I think it was a camper conversion. I did a double take, of course, but assumed the owner had just swapped badges for a bit of hilarity. Didn’t know they actually existed. -
Free bump. Kempton is excellent. The steam engine is HUGE and they start and run it all day. It’s very old-school and there’s little in the way of barriers or guards. That means you can get very close to some impressive machinery running. If you go outside, you might get lucky and they’ll open up the door of the boiler furnace when it’s at full chat. It takes the hairs off your arms! The main engine: There’s a second unrestored one that you can walk around inside. The mercury arc rectifiers (you can get right next to these):
-
You guys are funny 😛 It's possible in theory. The cells are welded together but I understand they break apart with a bit of force. Then it would be a matter of doing the Youtube spot welding trick with nails and a car battery to stick them back together. I think I've got enough sticks to be able to avoid doing that though!
-
Tidied up the rig a bit, checked it didn't explode or overheat and left it discharging overnight: That suggests a remaining capacity of 6.4AH. Original sticks were supposedly 6.5AH so that looks pretty promising. I've now got one of the bad sticks discharging to see what it does. The starting voltage was about 0.1V down on the known bad cell. After about 1.4AH discharged from it, the bad cell was empty and showing a negative voltage while the others were still holding 1.26V. I'm not purporting to be an expert on this, but it’s looking like the ultimate bench test for these sticks is to charge them fully, leave them for at least a month to weed out the high self-discharge cells, then test them.

-
I had a look with the scope attached but it didn't actually tell me anything extra that was useful. Good stick followed by 'bad' stick: I guess what it has told me is that the voltage drop when the load is connected is almost instantaneous, as it happens in about 5ms. I was expecting it to be slower than that. So having cleared that up, I tested all the sticks using the basic voltmeter method, making a note of the resting voltage and the voltage after 5 seconds with the load connected. That resulted in 17 sticks which were almost identical and 3 outliers which dropped more voltage. So what I did on the outliers was got a leather punch and made some small holes in the heatshrink so I could measure the voltage across the individual cells while they had a load attached. I did the same on a good stick so I had something to compare it to. It basically showed that the bad sticks had a single weak cell in them that was dropping a lot more voltage under load: Good one, voltages written above the holes, all about the same: Bad one, with one weak cell showing about 0.3V instead of 1.3V: The other two bad sticks looked exactly the same. So that leaves me with what look like 17 good sticks and 3 bad ones: What I really need to do now, is get the other pack out the car and do the same on those sticks, and get the third pack charged and cycled a few times so I can do the same on that one. In the meantime, I've also rigged up a capacity checker with a cheap Chinese eBay current and voltmeter. It's got a shunt so it can measure current and will log battery capacity. I've got it wired up on a good stick with an 8 Ohm resistor doing the discharging (about 1A when the stick is charged) to have a look at what it does:
-
Lol, how come the garage doors look so wonky? That’s not the angle of the picture doing funny business!
-
That’s not a bad shout. I’m not an expert on that scope but I’m pretty sure it’ll do what you’ve described and hold the trace on the screen.
-
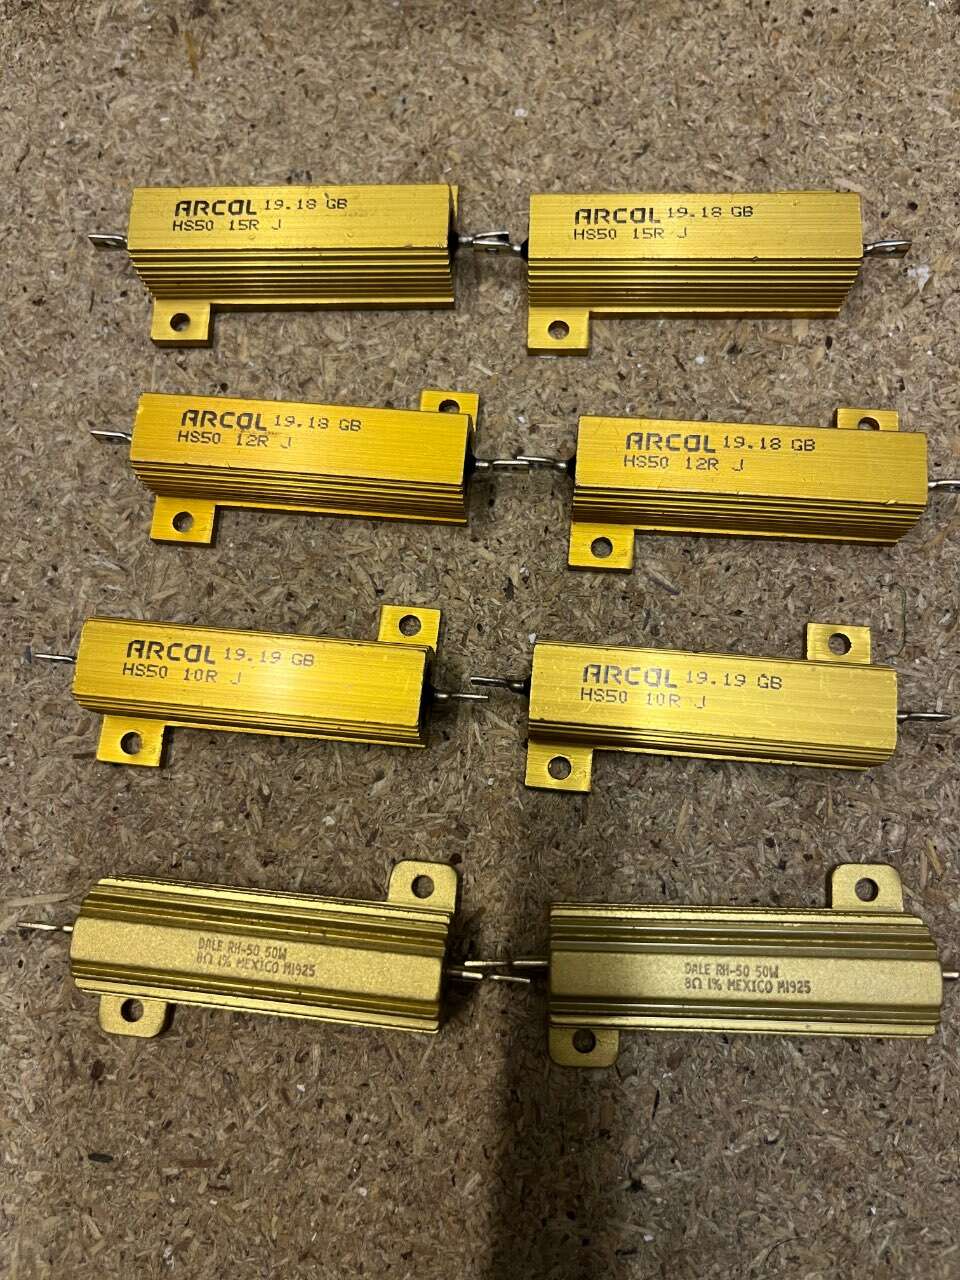
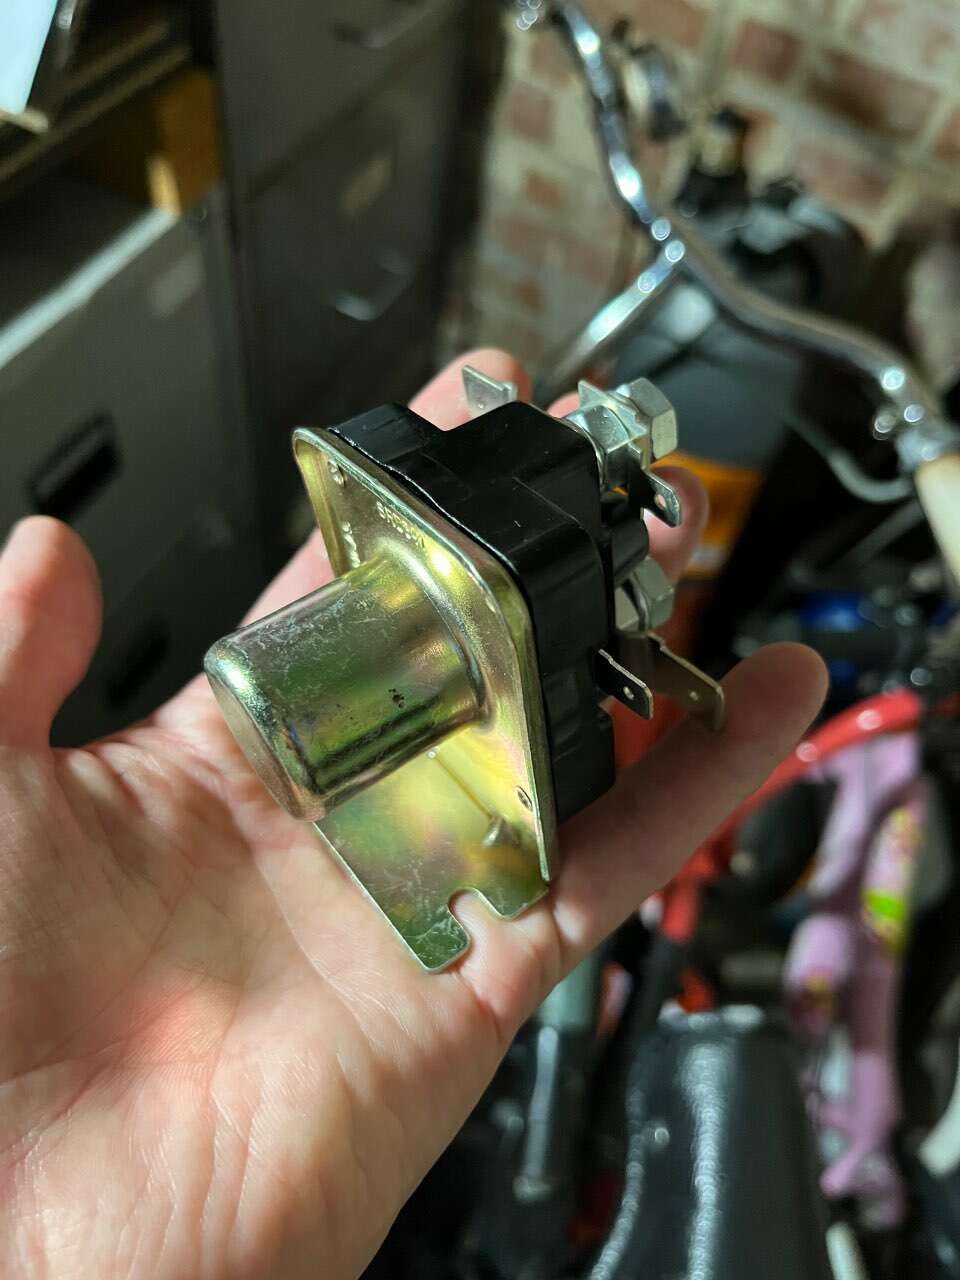
Lunchtime shens. I soldered up the resistors and connected the solenoid up to my 12V supply so I could trigger it manually and have a look at what the battery sticks do. Started with an 8 Ohm resistor because not much can go wrong there and then added in the 1 Ohm ones one by one as I got braver. So with all five 1 Ohm resistors in parallel, that's 0.2 Ohms, which is about 40A at 8V and 35A at 7V depending on the state of charge. Just for reference, the car commands about 10A for cranking and 35-40A at around 50% hybrid assist when driving. This stick was sitting around 7.7V resting voltage, and pulled down to 7V with the full load attached: Emergency snips on hand in case anything bad happens. Snip through that thick red wire on the left. The voltage actually settled after a few seconds so I don’t think I’ll need to bother with the Arduino. I think I'm just interested to see what it drops to under heavy load, to see if there are any weak cells and I'm pretty sure this will tell me what I need to know. It’ll be pretty obvious which sticks have a weak or bad cell in them because the voltage will drop further. I actually brought two sticks in to play with and, based on the above, it looks like I might have one good one and one bad one on the bench. MUCH EXCITE. 'Bad' stick was 7.3V resting and 5.2V under load - a much bigger drop. However, I do need to repeat this after a full charge because these Insight sticks haven’t been charged since July and are probably a bit self-discharged. Then I can rattle through these of a lunchtime. Takes very little time per stick, but there are 60 of them to do!
- 450 replies
-
- 11
-

-
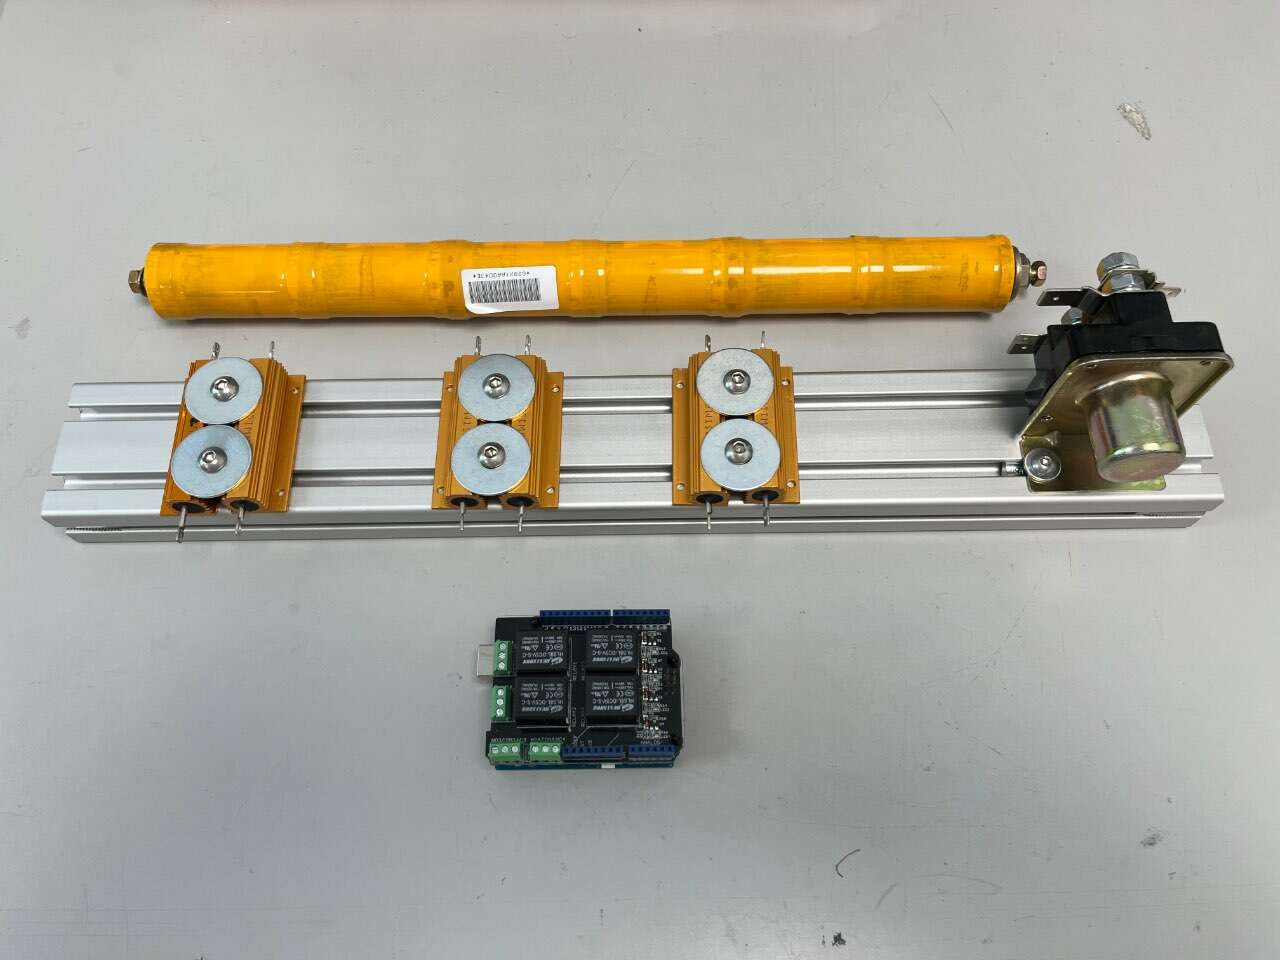
Right then, got pretty much everything I need. Essentially what I was planning to do was just take a voltage reading, manually trigger the solenoid and take another voltage reading after 5-6 seconds. This would be perfectly adequate, but I decided to complicate things a little by adding some Arduino control. I can get the Arduino to automatically trigger the solenoid and read/log the voltage for 5-6 seconds, then disconnect it again. So below I’ve got: Spare bit of aluminium extrusion construction kit stuff, two Insight sticks, bag of high current M8 ring terminals, Arduino UNO, 4x relay board for the Arduino, bag of 100W 1R resistors, and a 1970s Triumph starter solenoid. Well spotted @captain_70s Quick mock-up with some bolts and washers and T-slot nuts for the extrusion stuff and it’s going to look something like this: The Arduino will be controlling the board with 4x relays. Will get one of those relays to switch on the starter solenoid from a 12V supply. It pulls about 3A at 12V DC so it’s probably going to need a flywheel diode across the solenoid coil to protect the relay. Relay is rated to 10A at 30V DC but my experience is switching DC tends to make those sorts of relays stick. I found some 1N5401 diodes in my stash at work which are pretty big. They ought to handle anything the coil spits back out. So then the Arduino reads the voltage. It only reads up to 5V and the stick voltage is 8-9V depending on state of charge, so I’ll put it on a 10k potential divider with a 50/50 split. My pal also suggested I put a 5V Zener diode across the Arduino to protect it from getting fried when the solenoid disconnects the batteries. I had another root in my stash and found some 1N5338B Zeners which are 5.1V. Voltage reading range will be up to around 4.2V so they’re ideal. I am of course wondering if I’m over-complicating things. It’s not too late to back out of this and just do it manually…
-
I thought it was originally about the stuff piled on the roof rack (vintage suitcases, oil drum, random old tyre, bmx, hay bale etc) from that era of modded VWs in the 00s, but it has evolved to refer to the look as a whole (lowered, camber, poke & stretch, roof rack + pineapple additions, sticker bomb, 1 rusty wing, fake patina, whiff of Ankor wax etc etc.
-
Well for a start there’s a 207 sat outside, so everything else is more special than that. Note no asterisk required on everything. Nothing is well thought out on that turd; bad design decisions on other cars look like engineering marvels in comparison.
-
Full pineapple on the Beetle please. Those hand-painted plates, you tend to see them on much older stuff. I usually see them on VSCC-age vehicles or older, Brooklands kind of stuff. Cool find.
-
This is looking gr9 m7. Those pinholed lower panels - I did exactly the same with the rear panel on my Anglia. As long as you seal it well on both sides it works just fine. Painted mine in 2007 and it’s one of the panels which have survived the best!
-
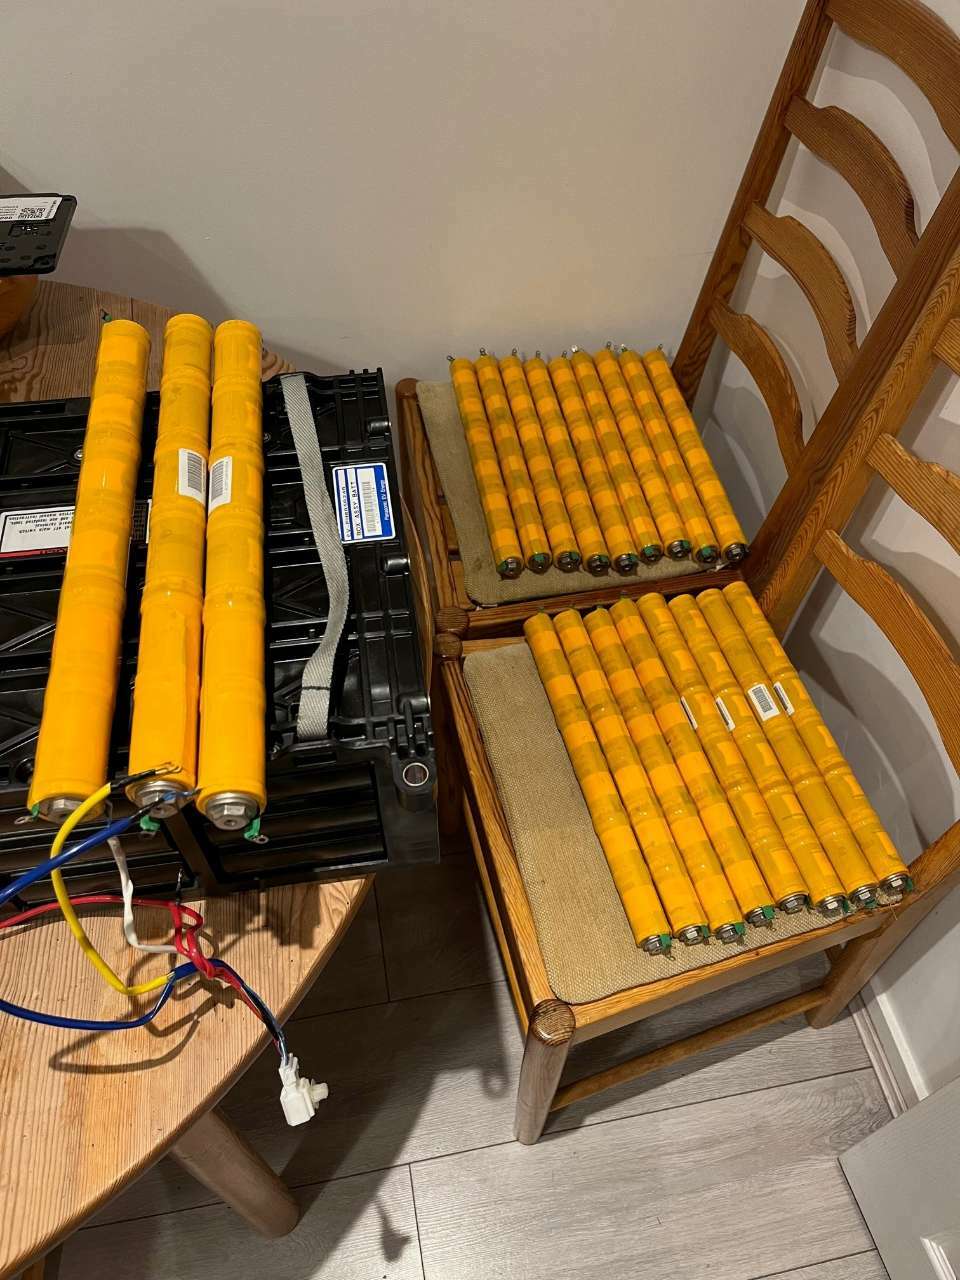
They must have been absolutely amazing batteries. If you think that up until a couple of months ago mine was still happy delivering 100A at full assist until just one or two of them in the pack couldn’t do it. A hundred amps; that is in excess of MIG welding currents out of an 18 year old battery!
-
I didn’t mean just for this. I can think of all sorts of things a bit of rubber hose will help me frustratingly wiggle something into a hole too tight to be fingering around in.
-
I did a learn. I didn’t know about the rubber hose spark plug trick
-
Ugh, I’m about to have to deal with Flux transferring my insurance from the Inshite to the replacement. They’re fine until you have to deal with them, then I think their true colours shine through.
-
Hold on, so you’re not going to that London at all. I want my money back!
-
Another Civic battery has entered the building. Let the stick matching commence. So the rough plan of action here is to get an idea of the capacity of the sticks and to see what they do under load. I had a root through my resistors in the loft and I’ve got these, which will do me a selection of loads from almost nothing up to a couple of amps: They’ll be fine for voltage readings and light discharge. Then to pull some serious current out of them to highlight any bad cells, I’ve bought five 1 Ohm 100W resistors. The stick voltage is around 8V when charged, so each of these will pull 8A. That’s about 64W going through the resistor. With all of them in parallel, I’ll be able to pull 40A out of a stick for a couple of seconds and basically see what the stick does under heavy load. That’s a lot of current, so I’ll be switching it with a spare solenoid I found in my shed stash: Handy. I’ve also got some heavy gauge wire and M8 ring terminals that can handle that sort of current. I should be able to sort all the sticks and pick the best ones and make a good pack. I’m stressing a little less about this now because I’ve sorted out a tiny replacement. That means I don’t have to worry too much about timescales or insurance, I’ll just sort that out ad-hoc for test drives, MOT etc.
- 450 replies
-
- 13
-
-
Not clicked a single like, but this is one of my favourite buys and collections of all time!
-
Ok, cool, you're familiar with the basics then. None of this is difficult, it's just very time-consuming. You need to determine a couple of bits of information for each stick in the pack: the capacity of the stick and the voltage drop when you put a big load on it. First make sure the cells are all active. So if it's a pack which hasn't been used for a while, charge it up and discharge it a couple of times to re-activate and balance the cells. You'll need some big resistors and a digital voltmeter for the next bit. To measure the capacity, take a fully charged stick out the pack and put something like a 8 Ohm resistor across it so it's discharging at around 1A. Measure the voltage at the beginning and at 30 minute intervals until it has fully discharged. You can do some V=IR calculations to work out the rough capacity. A new stick should be 6.5AH. Repeat that on all the sticks, number them as you go and make a list with the capacities. You'll have a list of high to low capacities. Then put them all back in the pack and charge them up again using the grid charger. To measure the voltage drop under load, which is probably the more important of the measurements, take a fully charged stick and put a 0.5 Ohm load across it so it's discharging at around 15A. This is a lot of power to dissipate, so use 4 cheap 50W eBay resistors mounted on something that can dissipate the heat. Ideally you actually want to pull about 30A out of it but this is a hell of a lot of current and power to deal with. You don't need to fully discharge the stick like this but you want to note the voltage drop when you connect the load. Again, repeat this with all the sticks and make a list. This tells you how strong the stick is (how it's effectively performing when the car asks for assist) and if there are any dead cells in the stick. Any stick with a dead cell will be obvious because it will drop a lot more volts than the other sticks - you should discard those ones. Repeat all that on a second pack and you can basically make up a set of 20 of the strongest, best-matched sticks. Could give it a try! I'm guessing he'll basically need my VIN and Honda Japan will be able to access the information if they have it?
-
Honda UK gave me a phone number but I was put off by the language barrier. I tried to get in touch by other means but the Honda Japan site is in Japanese so I sort of gave up there. I guess it's technically possible, but TFL are pretty clear cut about the pre-2006 imports and I didn't want to bury too much more time into it. I haven't seen any examples yet where it's been done.
-
Do you have a grid charger fitted? If you have, have you discharge cycled the pack before?
-
Thanks - all of that is exactly what I was thinking. I have completely run out of time to do it unfortunately. I need to transfer my insurance to another car but I'd want to at least put a few weeks of miles on the car to be able to comfortably tell the new owner the pack works fine. You'll be able to get the letter from Honda for yours because it's a UK car - there's an example on Insightcentral that you can follow. I can't do it on mine because it's a pre-2006 Japanese import. Post-2006 imports are already exempted because the relevant information is on the V5. Pre-2006 are not automatically exempted and Honda couldn't access the relevant information like they can with the UK cars. It's annoying!
-
It's been a while. 3 years by the looks of it. Why's that? I don't fucking know. Well actually it's probably because I've got two young kids which means not a lot of time for the cars. I pulled the Anglia out about 6 months ago and put an electric fuel pump on it when I changed the leaky fuel line. That meant this happened outside my house: Needed a bit of a wash after sitting in the garage for best part of 5 years: The Insight just kept going on and on and never missed a beat so nothing interesting to post about there. I went over all the 100,000 mile service items and most of them didn't even need doing. Then in June when the hot weather hit, the IMA battery decided to give up. It stopped responding to discharge cycling, which I was doing a couple of times a year, and I narrowed it down to one of the sticks in the pack with what looked like a dead cell or two. I tried to revive it in situ with various targeted charge-discharges but eventually I had to accept that it wasn't going to have it. This was all really annoying because I was about to put the car up for sale due to the upcoming ULEZ in London. This car is a Japanese import and because it's pre-2006 cannot be registered as exempt. I looked into a new pack, which are available for about £2k from Peter Perkins in Hull and he fits it for you on the day, but I couldn't justify the cost because I am selling the car. The other option is to take a risk with a whole second-hand pack or take the bad sticks out and replace them with good ones. Insight packs are pretty rare, but I discovered the pack in mine had the yellow Civic Hybrid (HCH) sticks in it. This made things a lot easier because those packs are easy to come by. I found a huge vehicle dismantler in Oxford with 4 packs on the shelf (ASM Auto Recycling, £60 each) and they just brought them down on a pallet truck for me to check over. I picked one and took it home. Slowly charged and discharged it a couple of times to revive the cells and prepared to swap the sticks from the HCH pack into mine: Everything looked fine. The discharge curves for the stick pairs and the pack as a whole looked pretty good so I simply switched the sticks and put it back in the car. Unfortunately the car wasn't happy with it and put the IMA light on fairly quickly, signalling a fault. Looking at the tap voltages, it was clear that one or two of the sticks were dropping too many volts during cranking. That meant that during hybrid assist they were doing the same and were too weak to supply the current for hybrid assist. I could have kicked myself at this point, because all I had to do was to put a big load on the pack to check this and I could have swapped the weak sticks for some better ones before I put it all back in the car. So we are where we are and I'm back to driving the car with the hybrid system switched off. The Insight needs to be sold anyway, so I've got two options: sell it as is and hope someone wants to take it on without a working IMA battery and do it themselves, or replace the battery and sell it all working. What are people's opinions on this? I think the numbers are going to run something like this: They don't come up for sale very often and that makes pricing difficult. There's been a couple of fresh imports on eBay for £8000 which is JOKES in my opinion. Way over the odds, deluded seller. I had a figure in my head it would be worth about £4500 with a working but original battery. There's a citrus one on eBay with a working battery for £5500 and a blue one on eBay with what sounds like a duff battery for £3500. I think that's a bit over the odds given it needs the battery sorting. I think I'd be happy with £2750 or thereabouts for mine with the dead battery and that leaves the new owner a couple of options: Take the pack back out and choose the 20 best sticks from the two packs by loading them up individually and checking the voltage on them. The car will be off the road for a few weeks while you do this. You'll need to cycle the pack a couple of times a year with my cycler to keep it healthy. This will be the cheapest option and you get a very cheap working Insight at the end, you just need to put the time into it. Go and get another HCH pack (or all of them) from ASM and do the same. Best chance of getting 20 really good sticks if you've got multiple packs to choose them from and you'll be able to use the car at the same time with the hybrid system switched off. Buy a new pack from Peter Perkins. Zero work required from yourself and you end up with a really good Insight at the going rate but with a brand new battery with a 3 year warranty that you won't have to cycle or anything. Just have it fitted and forget about it. Any thoughts welcome, positive or negative.