Angrydicky
-
Posts
6,297 -
Joined
-
Last visited
-
Days Won
16
Content Type
Profiles
Forums
Events
Everything posted by Angrydicky
-

Dicky’s Disastrous Debris - Steering wheel restoration 3/9/22
Angrydicky replied to Angrydicky's topic in AutoShite
I’ve been here since 2009. I was 18 then. I’m 31 now. That’s a big part of my life and for a long time I was addicted and checked the forum several times a day. There were some brilliant threads back then. I’m glad you still enjoy it Grogee. It’s nice to do things that give us pleasure. I’ll still look occasionally but don’t get the pleasure out of it that I used to. I used to dismiss people who left as flouncers, and I don’t want to be considered as such, but I felt I needed to put my point across. -
Dicky’s Disastrous Debris - Steering wheel restoration 3/9/22
Angrydicky replied to Angrydicky's topic in AutoShite
This forum has gone to shit as far as I’m concerned, ruined by excessive moderation and various shouty people with big egos and politically correct mentalities. And barely an old car between them. TDW is like a breath of fresh air in comparison, and it’s really busy. -
The most modern old shite you can get away with?
Angrydicky replied to CrapCarNerd's topic in AutoShite
Rover 600. Or anything else Japanese and late 90s, I.E before cars started becoming complicated and unreliable. -
I very much doubt you will shift it with anything other than either heat or regular soaking with penetrating oil, if you’re lucky. I had exactly the same situation when doing the brakes on my Somerset recently, heating the nut then very careful use of molegrips on the pipe and a spanner on the nut and I quickly got it moving again. Although the pipe was, predictably, a bit pitted once I’d moved the nut and cleaned it up. I didn’t replace the pipe because, like yours it would have been a ballache to replace it. In hindsight it wouldn’t have been a bad thing to do to bite the bullet and replace it. I never fully appreciated how much heat helps free seized stuff off but now I use my very cheap blowlamp regularly and it does a good job, not as good as oxyacetylene but good enough for home use.
-
Probably a bit late, but heat is your friend. Heat the nut up with a blow lamp and you should be able to get it moving. Make sure you slide the nut higher up the pipe to clean up the pipe then put a smear of grease on it to prevent it seizing again.
-
That is a good point. First we knew the reservoir had run out of fluid on my dads Hillman Minx was when the pedal went to the floor, fortunately when he was just reversing it out of the garage. Tiny reservoir on those too. I had a resleeved body ready to go (the larger can type from the disc braked cars, just like yours) so built that up with a new kit and fitted it. It is reassuring to have a better capacity in there.
-
I’d put a new sill on if it was mine, if the step is good you can use a skin sill. The trouble is that unless you’re very skilled with filler a repair in the back of the sill will always be visible if you look down the flank of the car. Because it’s a long flat panel. The master cylinders on the car look like the original ones to me, these are quite rare and sought after by a lot of owners who want their cars to look original under the bonnet. The modern ones you can buy with the plastic reservoirs look crap IMO. You can get the originals resleeved and rebuilt if you so wish. About £100 each iirc.
-
Dicky’s Disastrous Debris - Steering wheel restoration 3/9/22
Angrydicky replied to Angrydicky's topic in AutoShite
Quit ages ago and moved north. -
Dicky’s Disastrous Debris - Steering wheel restoration 3/9/22
Angrydicky replied to Angrydicky's topic in AutoShite
Wow, we are close to each other, no more than two villages away. Do you attend the Stickney autojumble? I went to the last one, was quite a good turnout I thought. -
Dicky’s Disastrous Debris - Steering wheel restoration 3/9/22
Angrydicky replied to Angrydicky's topic in AutoShite
I didn’t realise you were that close! I’m Revesby-sort of way. I’ll let you know if I need a hand! Cheers. -
Dicky’s Disastrous Debris - Steering wheel restoration 3/9/22
Angrydicky replied to Angrydicky's topic in AutoShite
Read “always overlooked” I often get asked which classic cars I have and you can sense the disappointment/person losing interest the moment I say that I’m restoring an Austin A70 Hampshire. They’re ridiculously unloved! In fact, come to think of it, the only car of mine that tends to elicit any enthusiasm from your average MG/Stag/Jag owning classic car owner is my A35 and that’s only because of the historic racing series (which I have no interest in). That’s a good tip about the steering box. I thought it would be a cork seal in there so was quite surprised to see the old seal was quite similar to a modern rotary shaft seal. The new one was a bit tight to fit as the corner of the casing has had a knock at some point, but I managed to drift it in ok using a drop of oil to help it slide. Seems oil tight so far. I bought the seal from AH Spares along with a new brass olive which seals the bottom of the steering box where the wires for the trafficator switch go. I’ve currently got it bunged up with a rubber grommet for testing purposes. -
Dicky’s Disastrous Debris - Steering wheel restoration 3/9/22
Angrydicky replied to Angrydicky's topic in AutoShite
Yeah but oiling the paint is the last thing you want to do if you’re planning to paint it at some point, it gets everywhere and is difficult to remove every trace, and it only takes a bit to ruin the new paint! -
Dicky’s Disastrous Debris - Steering wheel restoration 3/9/22
Angrydicky replied to Angrydicky's topic in AutoShite
Are you calling me daft? Well yes actually I am. Due to space constraints I want to get the body fitted as soon as possible and connect everything back up again. So it’s not that far off being roadworthy. I’ve done a lot of this work the wrong way around so mechanically it’s all ready to go, all the brakes and cooling system are done etc, balljoints and suspension checked, greased and replaced where necessary, just need to get the rear shocks rebuilt and buy a replacement antiroll bar as this one is badly bent/twisted. Must have done some serious rolling at some point! Still in two minds over the paint, on one hand I just want to get it back on the road and enjoy it without months of rubbing down, but there is a lot of surface rust coming through. I’ve just fitted a new seal to the replacement steering box so that’s all ready to fit once the body is on. -
Dicky’s Disastrous Debris - Steering wheel restoration 3/9/22
Angrydicky replied to Angrydicky's topic in AutoShite
Also put a new pair of trackrod ends on. They are new, made in England by a company called Amsteer and have grease nipples like the OEM ones. None of the other aftermarket ones do.
-
Dicky’s Disastrous Debris - Steering wheel restoration 3/9/22
Angrydicky replied to Angrydicky's topic in AutoShite
A quick before.
-
Dicky’s Disastrous Debris - Steering wheel restoration 3/9/22
Angrydicky replied to Angrydicky's topic in AutoShite
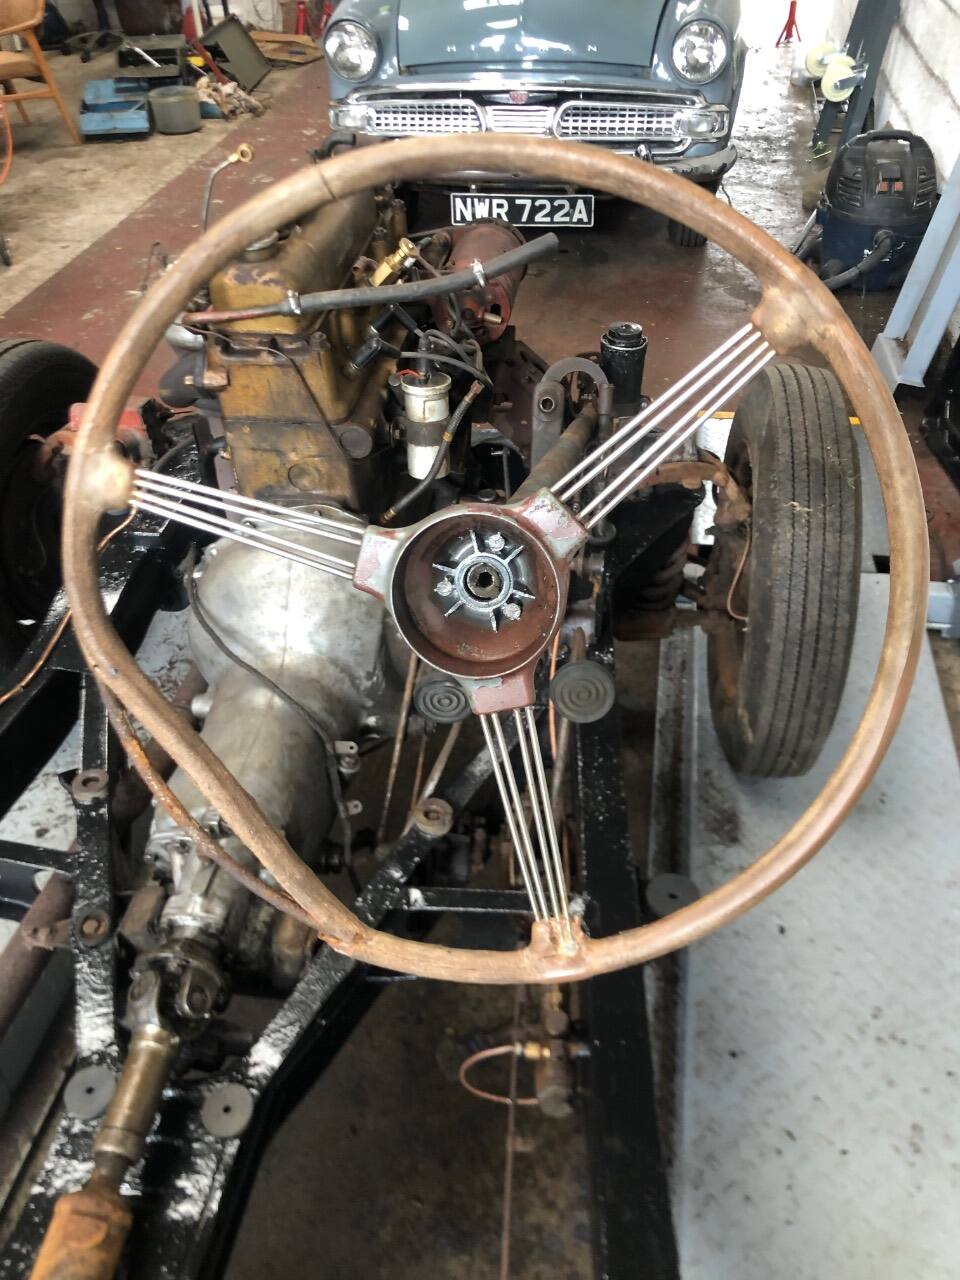
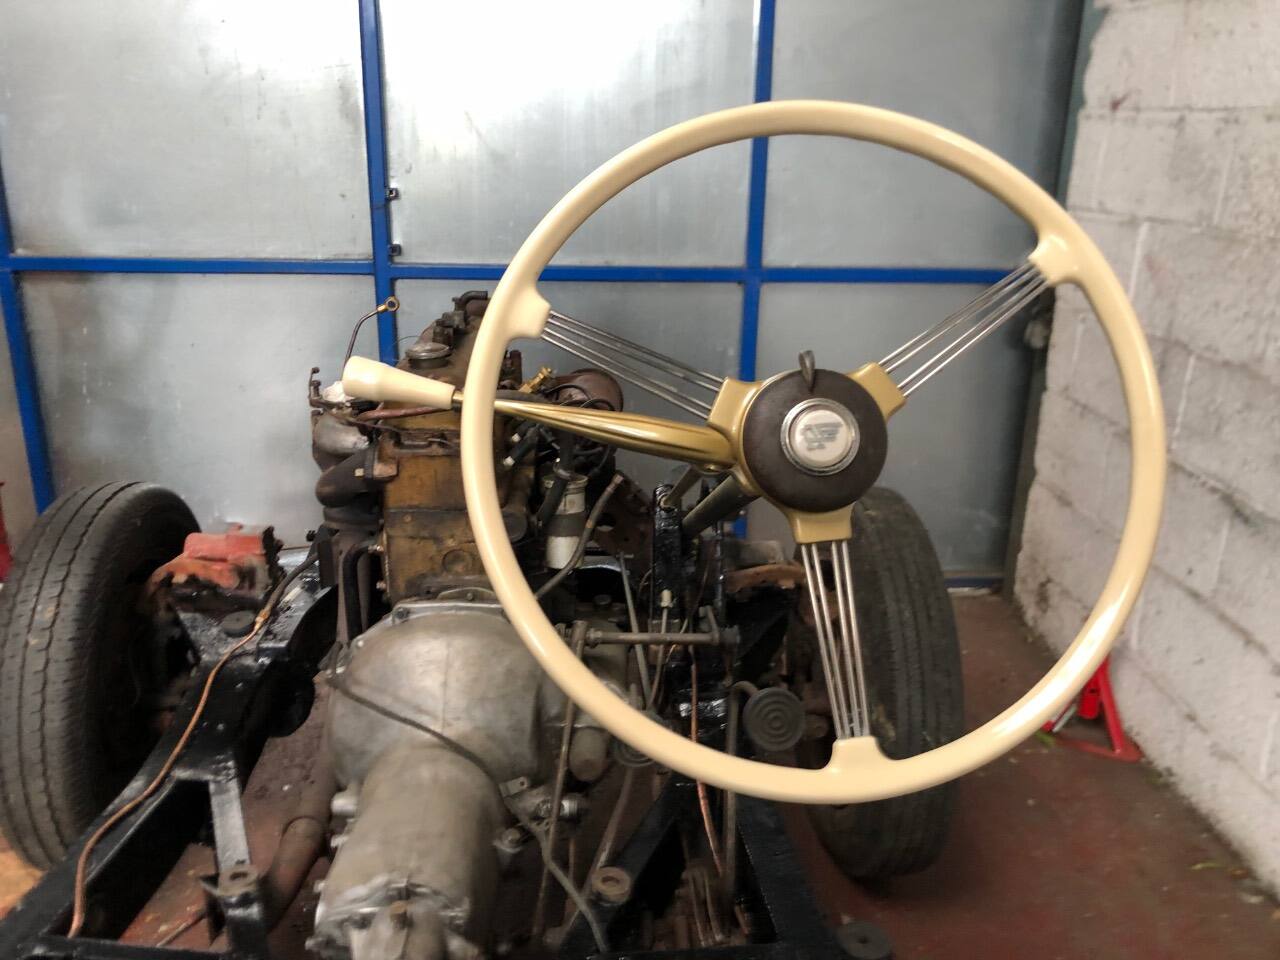
Two days until I go to Holland now. Exciting but quite nervous. Both the steering wheel and gearknob had fallen apart with the UV light as they always do. I decided to send them off for a very expensive refurb at a place in Kent (Myrtle Ltd) that was recommended to me by a friend. I’ve gone for a slight custom job here, they have refurbed the steering wheel in cream to match the gear knob and switches, and I’ve painted the centre and the gear lever metallic gold to match the instruments. To be fair they did a lovely job and quick too (inside a week) and I’m over the moon with the results! Originally all this was a dull dark brown which didn’t do the car any favours IMO (the Atlantic, which has the same dash, has a cream steering wheel). The trafficator switch needs a bit more work, under the brown paint it’s brown Bakelite which I’m going to try cutting and polishing. But you get the idea.
- 515 replies
-
- 30
-

-
I don’t work there anymore. But yes they can rebuild it.
-
Dicky’s Disastrous Debris - Steering wheel restoration 3/9/22
Angrydicky replied to Angrydicky's topic in AutoShite
I should probably clarify, the five Avon tourists which came with the car are new, but are of indeterminate age. They look ok and there’s no cracks but they do feel quite hard. Im going to give them a go, with some new inner tubes, if they’re particularly lethal I’ll look for some others. -
Dicky’s Disastrous Debris - Steering wheel restoration 3/9/22
Angrydicky replied to Angrydicky's topic in AutoShite
Yes, 16”. You’re correct on both counts, the crossply tyres are 5:50x16 and 175 x 16 taxi tyres fit straight on. In the pictures, the nearside front wheel is the radial spare from my Somerset, then there’s two Somerset wheels with crossplies and one Hampshire wheel with a crossply. Basically an assortment of tyres which hold air for moving around purposes. I have a new set of 5:50 x 16 Avon Tourist tyres to go on once I’ve had the wheels Shotblasted and painted. -
Dicky’s Disastrous Debris - Steering wheel restoration 3/9/22
Angrydicky replied to Angrydicky's topic in AutoShite
I’m going to try. I think if I remove the rad support bracket and tie the pedals down it should be ok. The replacement has far more structural integrity than the one I’ve just lifted off which had no floor or sills left. The lifting by the roof method was how Austin fitted the bodies in the factory. As long as it’s structurally sound, there’s nothing to fear. The new body was removed from the chassis using a four post lift, two massive axle stands and a scaffold pole through the front door apertures. Unfortunately he squashed the door trims while doing so. But there’s no other problems and all four doors still shut nicely. Apparently! When I did it I had straps at five contact points on the body, so the load was spread more evenly. -
Poor thing, as much as I love Rover 800s that needs putting out of its misery. The Pride of Longbridge thing is incorrect too as the 800 was a Cowley car.
-
Dicky’s Disastrous Debris - Steering wheel restoration 3/9/22
Angrydicky replied to Angrydicky's topic in AutoShite
The ‘new’ bodyshell has been stored in JLR/Brooks posh Utrecht warehouse for the last couple of months alongside millions of Euros worth of expensive machines. Rows and rows of shiny XK120s, E-types, Ferraris, Astons etc. I can’t find the picture so you’ll just have to imagine. It’s completely lowering the tone of the place and he’s already been quietly asked when it’s going to be shifted!
- 515 replies
-
- 21
-
-
Dicky’s Disastrous Debris - Steering wheel restoration 3/9/22
Angrydicky replied to Angrydicky's topic in AutoShite
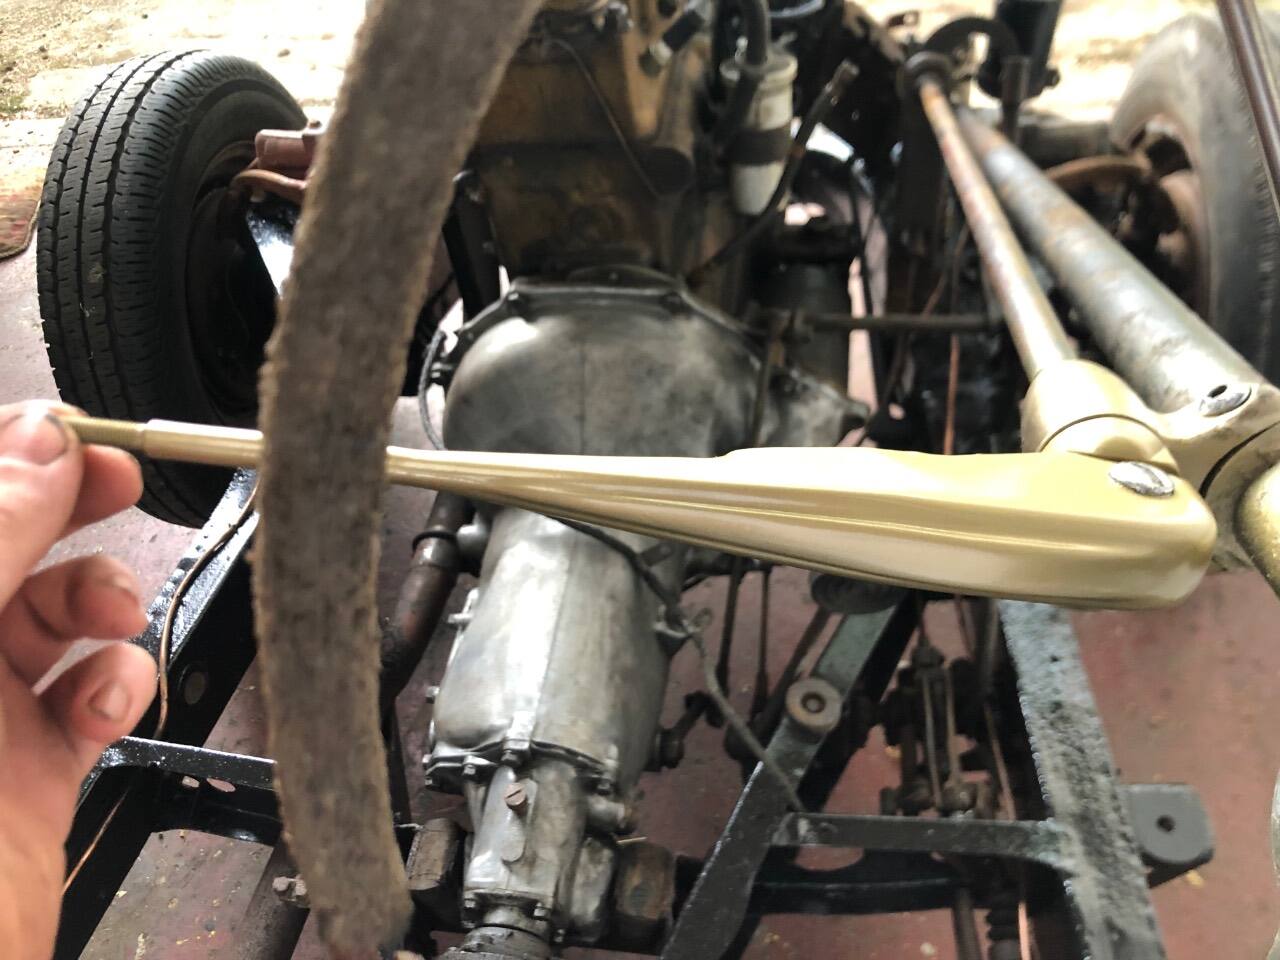
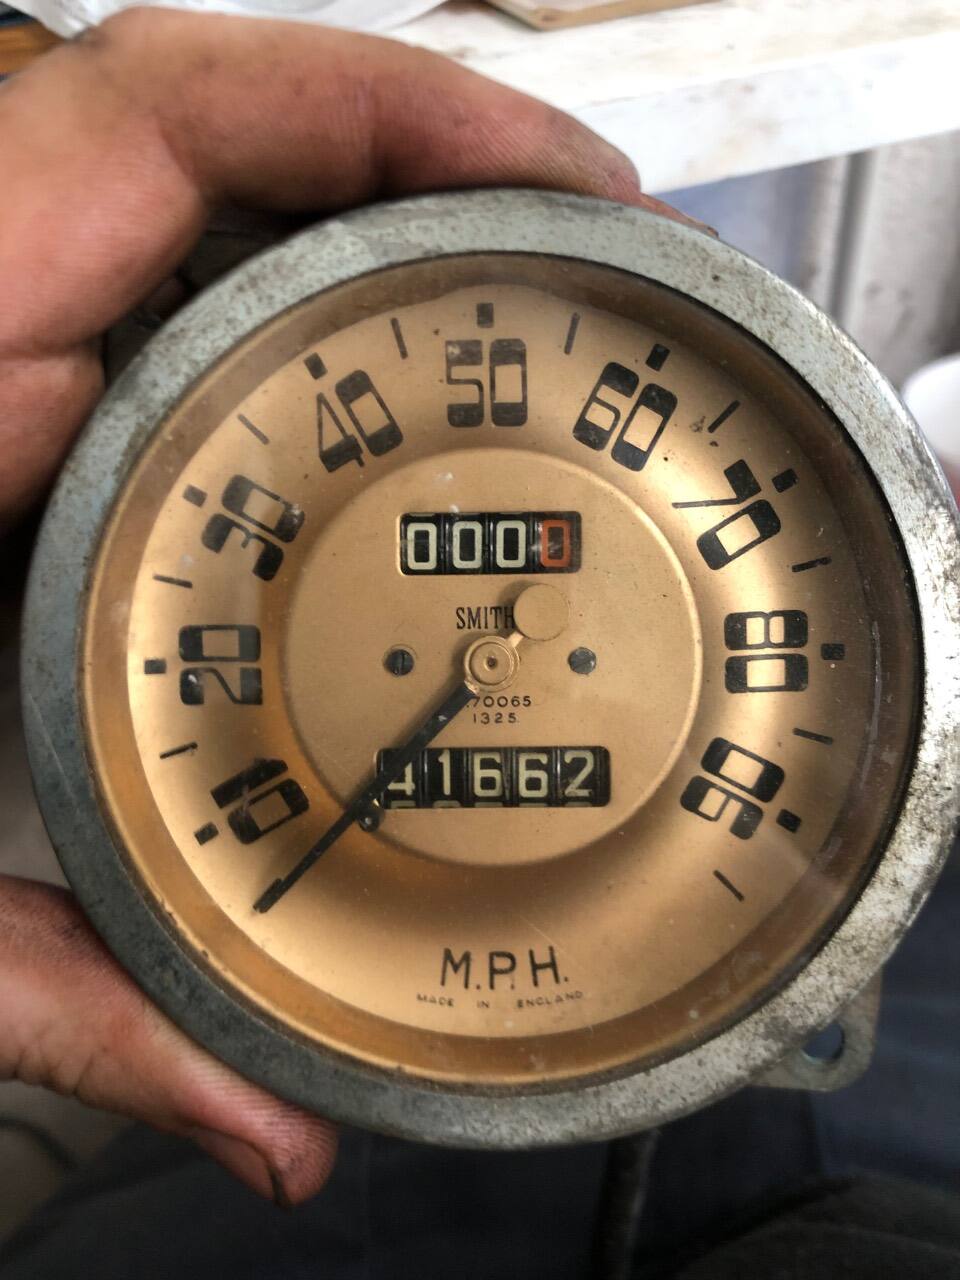
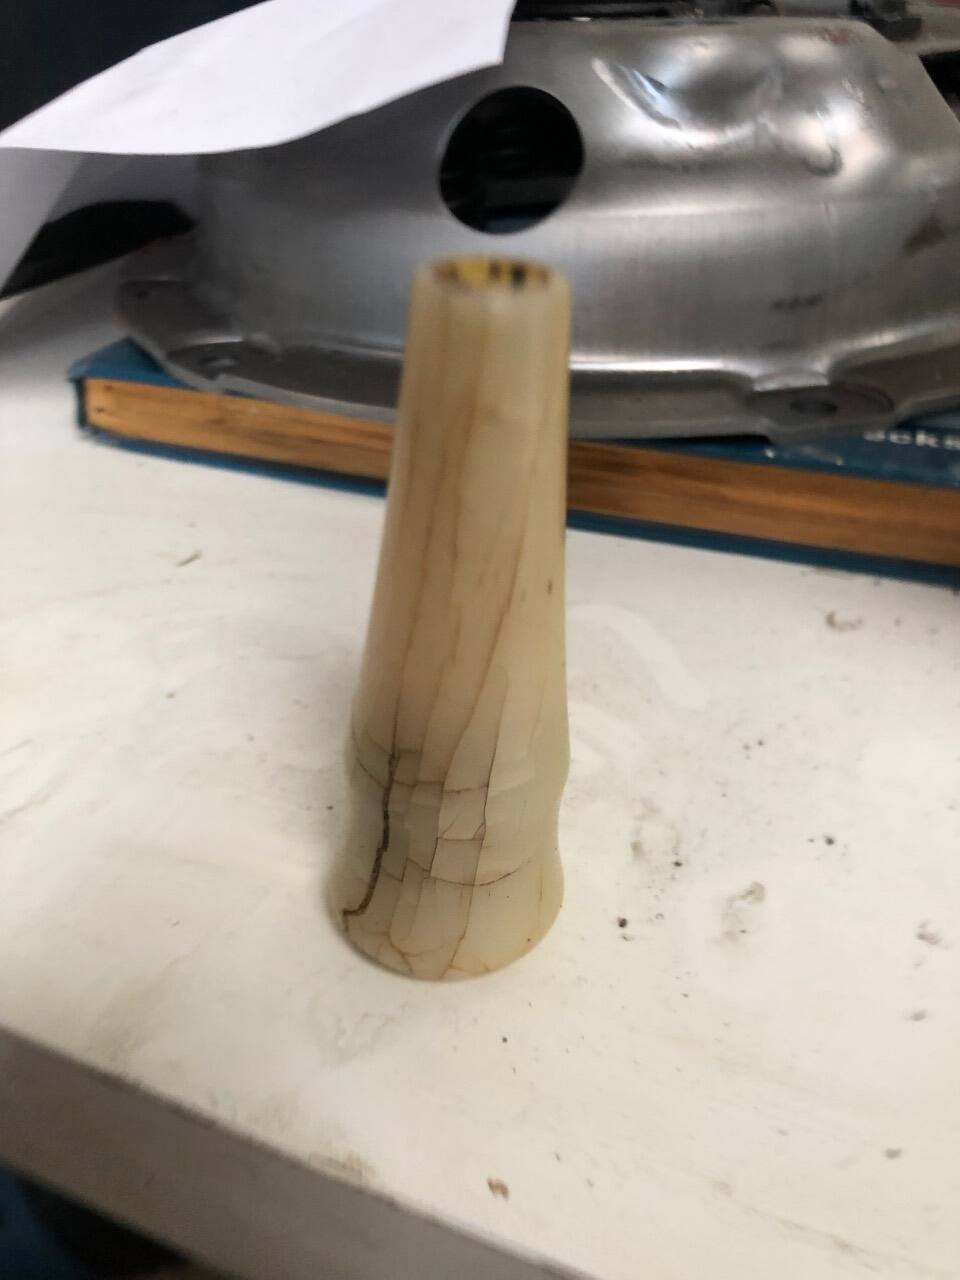
I paid another visit to Graham Potts’ Austin spares emporium in Kent after discovering that the steering box bearings were shot, and the box had excessive endfloat even after removing all the shims. He had about six A70 ‘boxes to choose from, none of which were very good, most were very rough and sloppy apart from one which was seized up completely! But I found one that didn’t feel too bad, the play and endfloat didn’t seem excessive although unfortunately the steering nut thread was damaged. Graham let me have it for half price because it wasn’t great. I also managed to buy a full set of new body mounting rubbers from him, another wheel of the correct type so now I have five A70 wheels (although one of them is quite kerbed) and a few other bits and pieces. Spent about £110 in total. I took the cover off the ‘new’ steering box and it looked surprisingly clean inside. I scraped out the residual gunge and put some oil directly on the bearings before they completely failed like the other one due to the oil having all leaked out. They have a cork type seal which never lasted long and if previous owners haven’t bothered topping them up they are often damaged. I removed the shims which took out most of the endfloat, what remains is acceptable where the original was at the limit of its wear. I popped it in the vice with my “spare” steering wheel, filled up the oil and ran it through lock to lock a few times. It felt really good and was getting better as well. Unfortunately, after about three days it started pissing oil out of the seal, which wasn’t exactly unexpected to be fair. I’ve ordered a new seal from AH spares, I’m going to take a chance that it’s a the same as Healey 100 as the box looks very similar and a lot of parts are shared. Talking of steering wheels. I had had no luck finding a replacement for the original one on which the rim has fallen apart. I rescued one from Grahams scrap pile which to be fair the rim was even worse than mine but I thought it would do for a spare. It has no broken spokes so could be restored. Last week, after over a year of looking for a good secondhand one, I bit the bullet and decided to send the original off to the steering wheel restoration company in Ramsgate for them to work their magic on. I must admit here and now that shock horror, I’m actually going to be doing a slight and subtle deviation from standard here. While the Atlantic had a nice cream steering wheel rim which matched the gearknob, switches, and dash plastics, I think Austin thought it too ostentatious for the markets the Hampshire was aimed at, so they fitted a brown steering wheel with brown centre and a brown gear lever. Very conservative but I’ve always thought it would look so much better with: Ivory rim to match the gearknob and dash plastics Gold centre, and gear-lever, to match the instruments. The steering wheel company are going to try to match the ivory colour of the original gearknob as close as possible. I’ve sent them the knob as well and they are going to cast me a new one, they were asked to do one for an Atlantic a couple of years ago and still have the mould they made for it. It’s going to cost a sizeable wedge of money, almost as much as I paid for the entire car, but it’s a very important thing to do. I’ve already stripped and painted the gear lever, I spent some time in the Range looking at the different gold paints they had on offer and trying to match the colour of the instruments. Ford Solar Gold was what I went with in the end, I still need to lacquer it but it came out ok. The original speedo is completely seized up, nothing works on it, but I managed to buy this replacement, again from Graham, which works perfectly. My dad made a tool for testing speedos in an electric drill and this one doesn’t even stick, and the trip meter works and resets ok. As a footnote, yesterday I went to the Stickney autojumble, and what did I see on a stall? A decent Hampshire steering wheel, possibly refurbished at some point, a few marks on the rim and the centre needed repainting but no cracks. Isn’t that just bloody typical! Ok it’s not the colour I wanted but it was a hell of a lot cheaper than the resto is going to cost when it’s done (next week hopefully) and I could have repainted it for that price. Ah well.
- 515 replies
-
- 25
-
-
Dicky’s Disastrous Debris - Steering wheel restoration 3/9/22
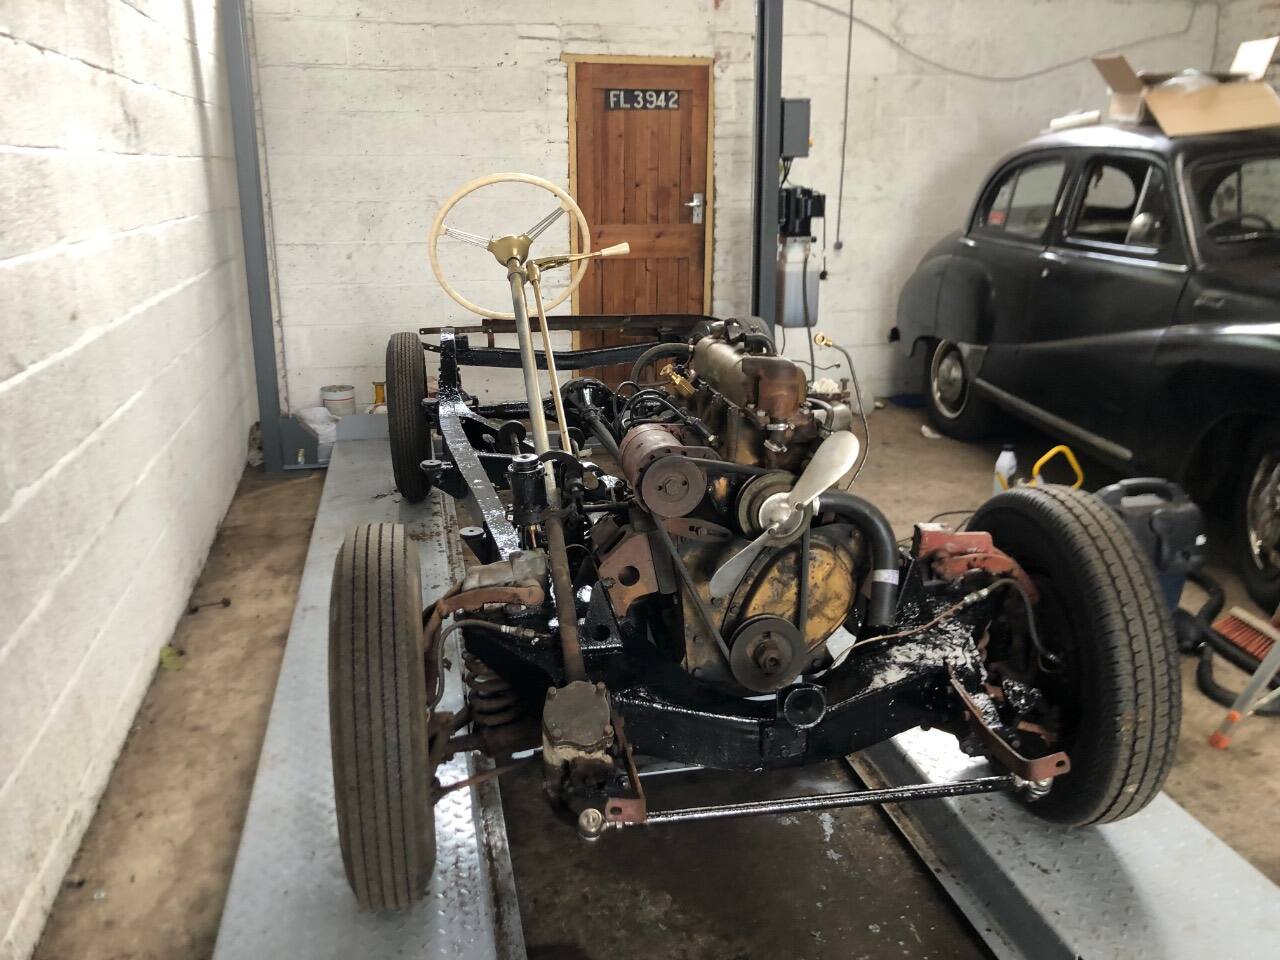
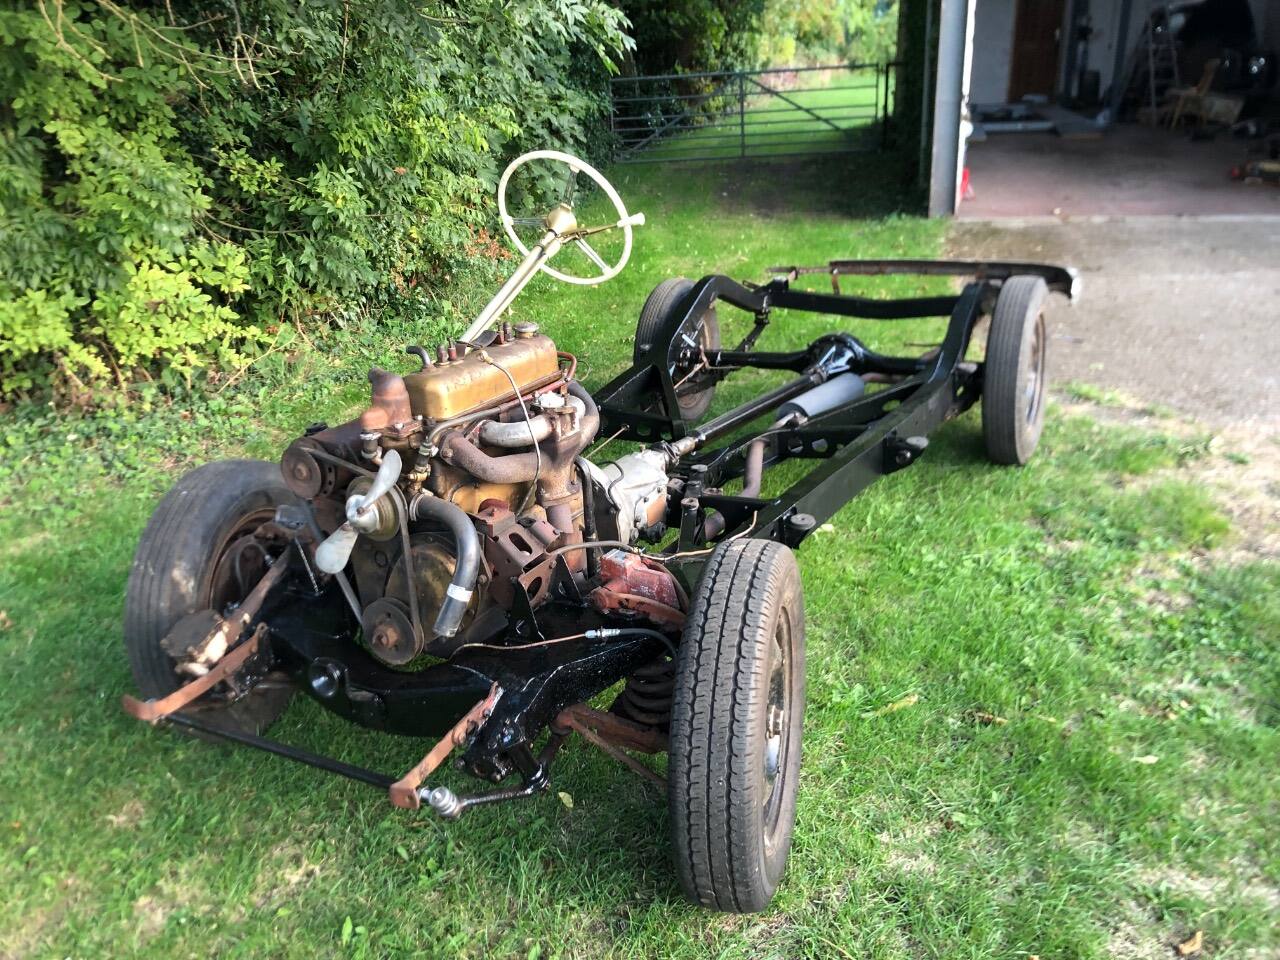
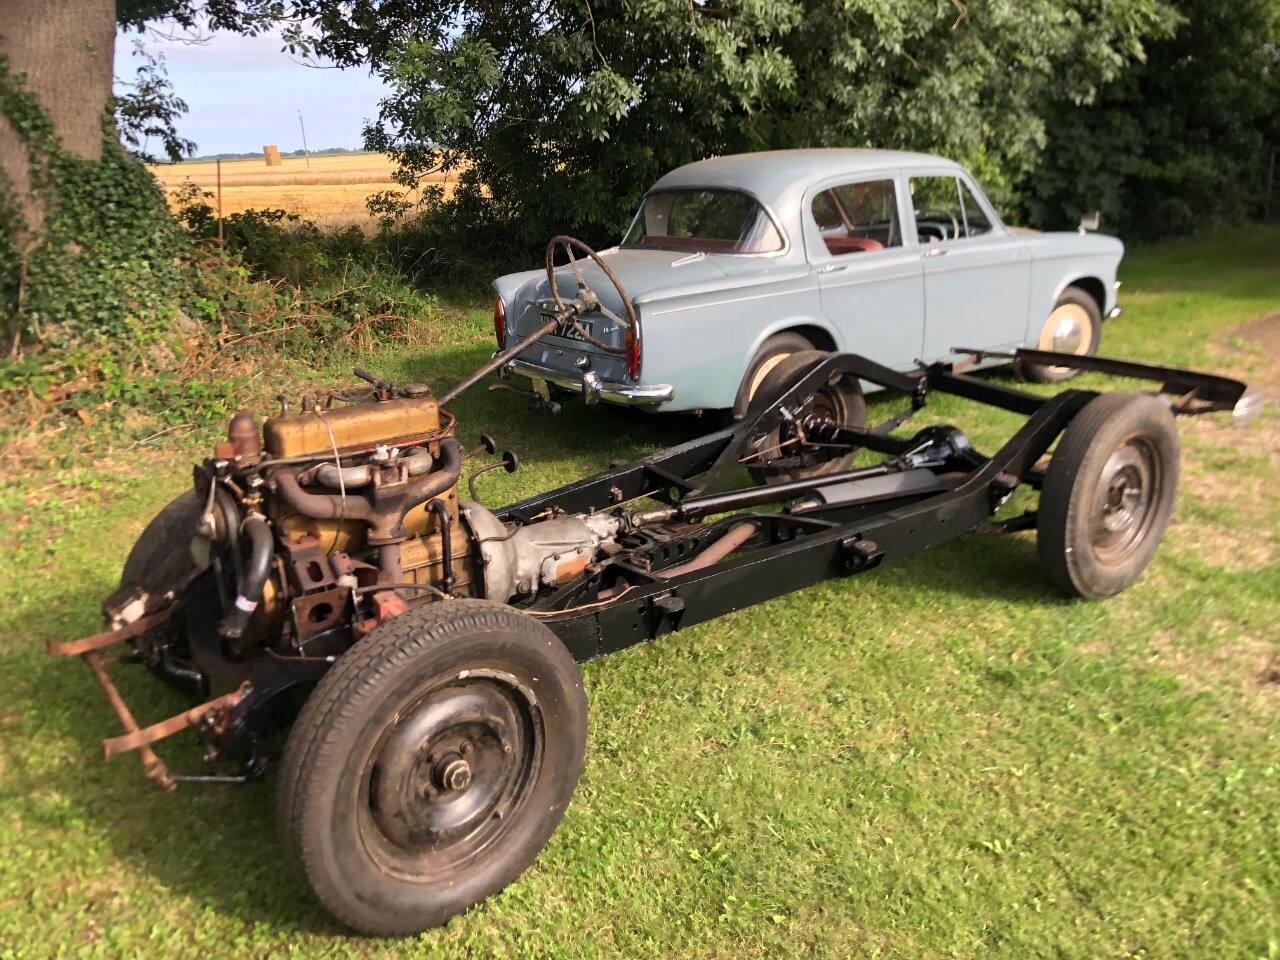
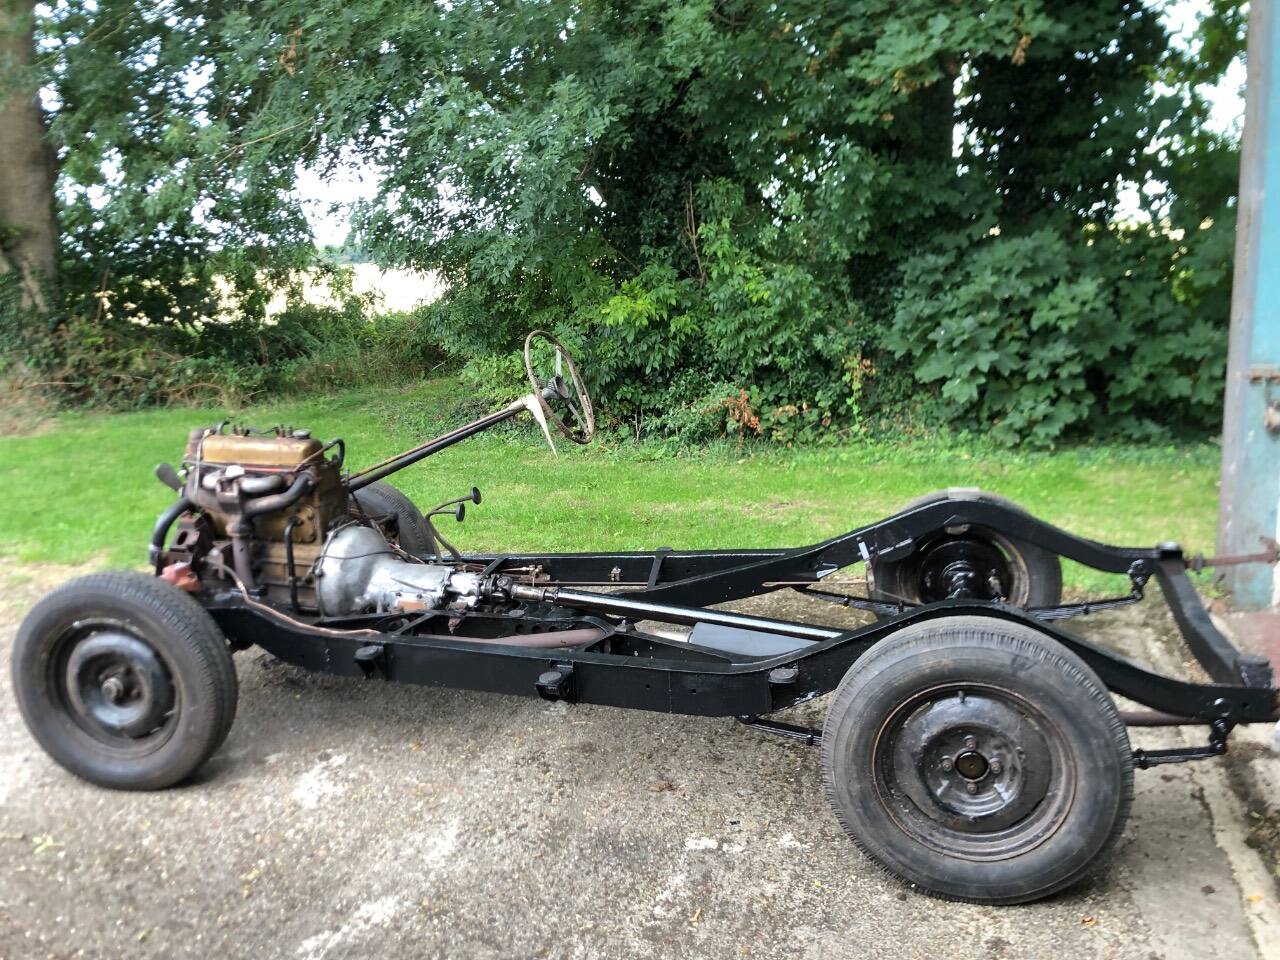
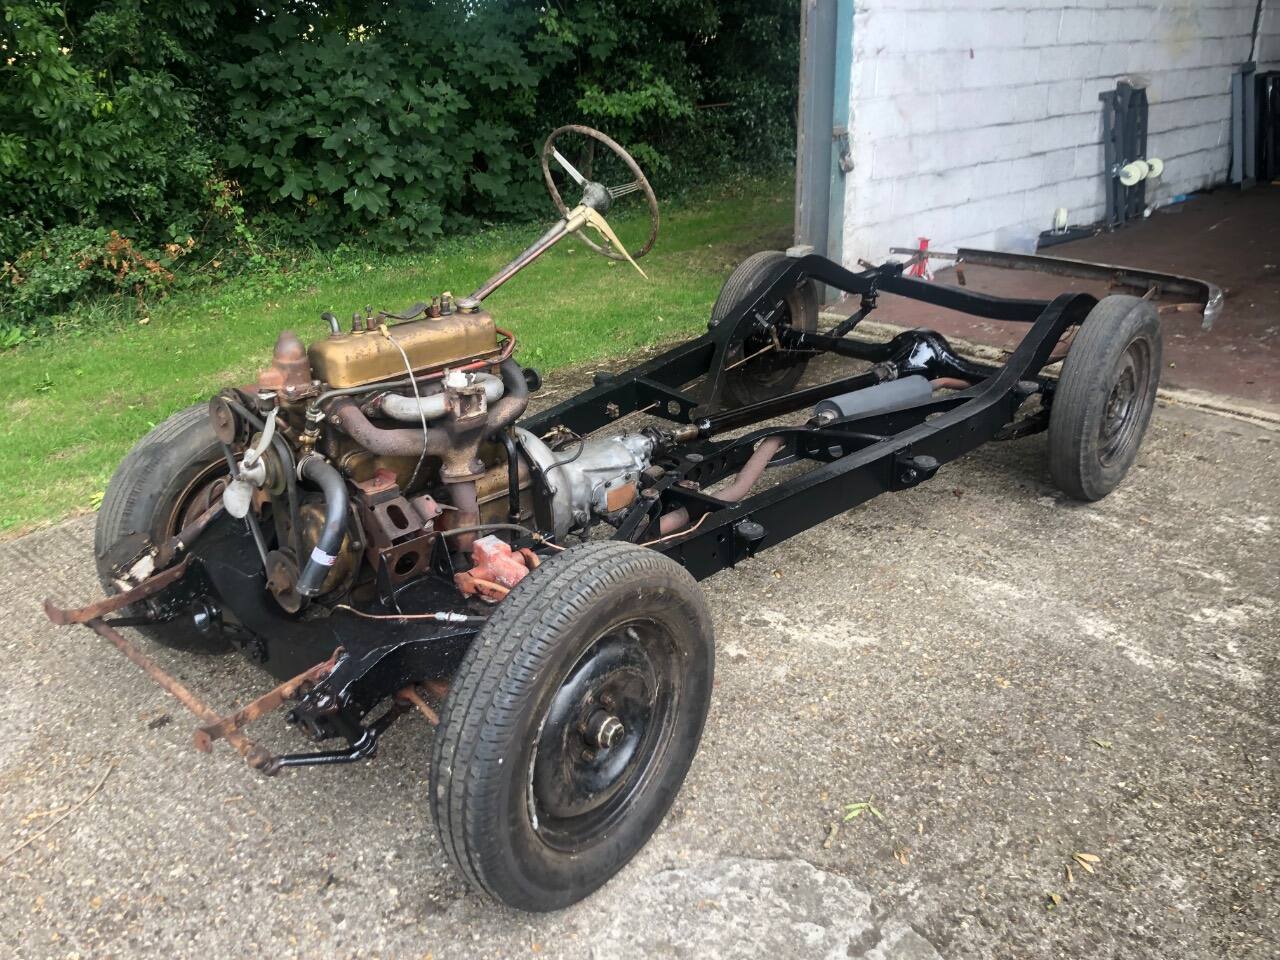
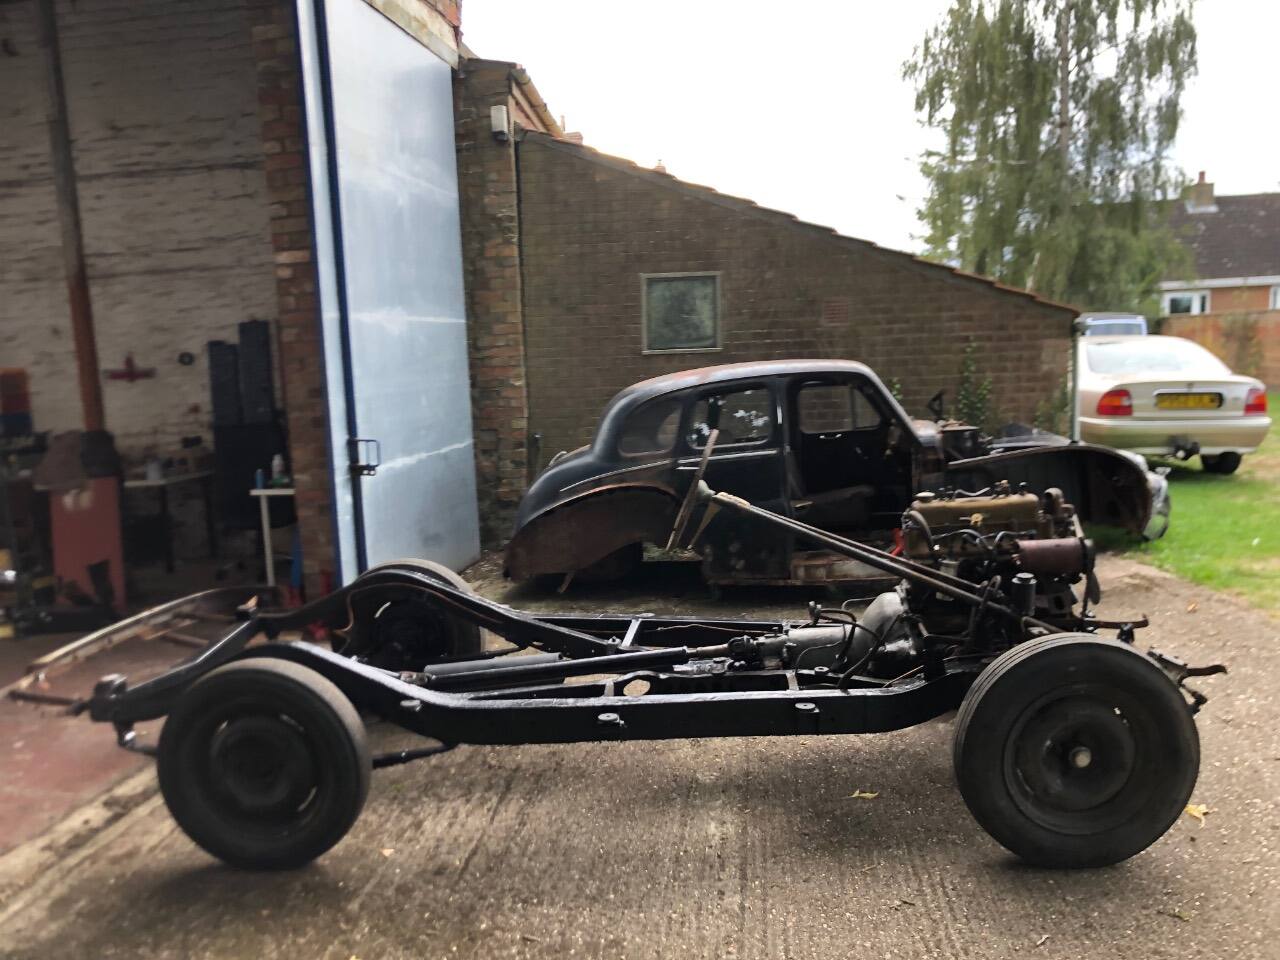
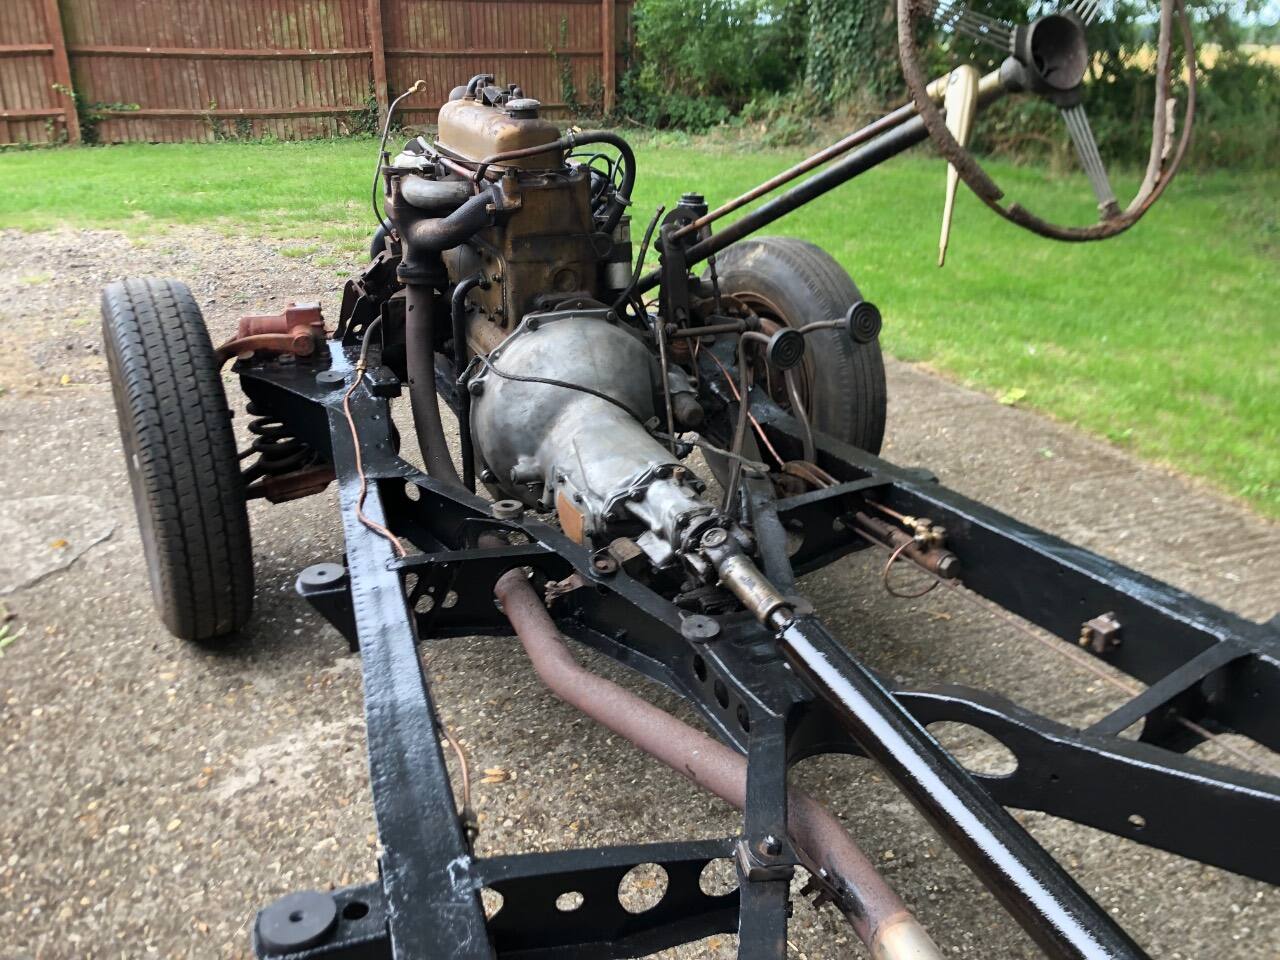
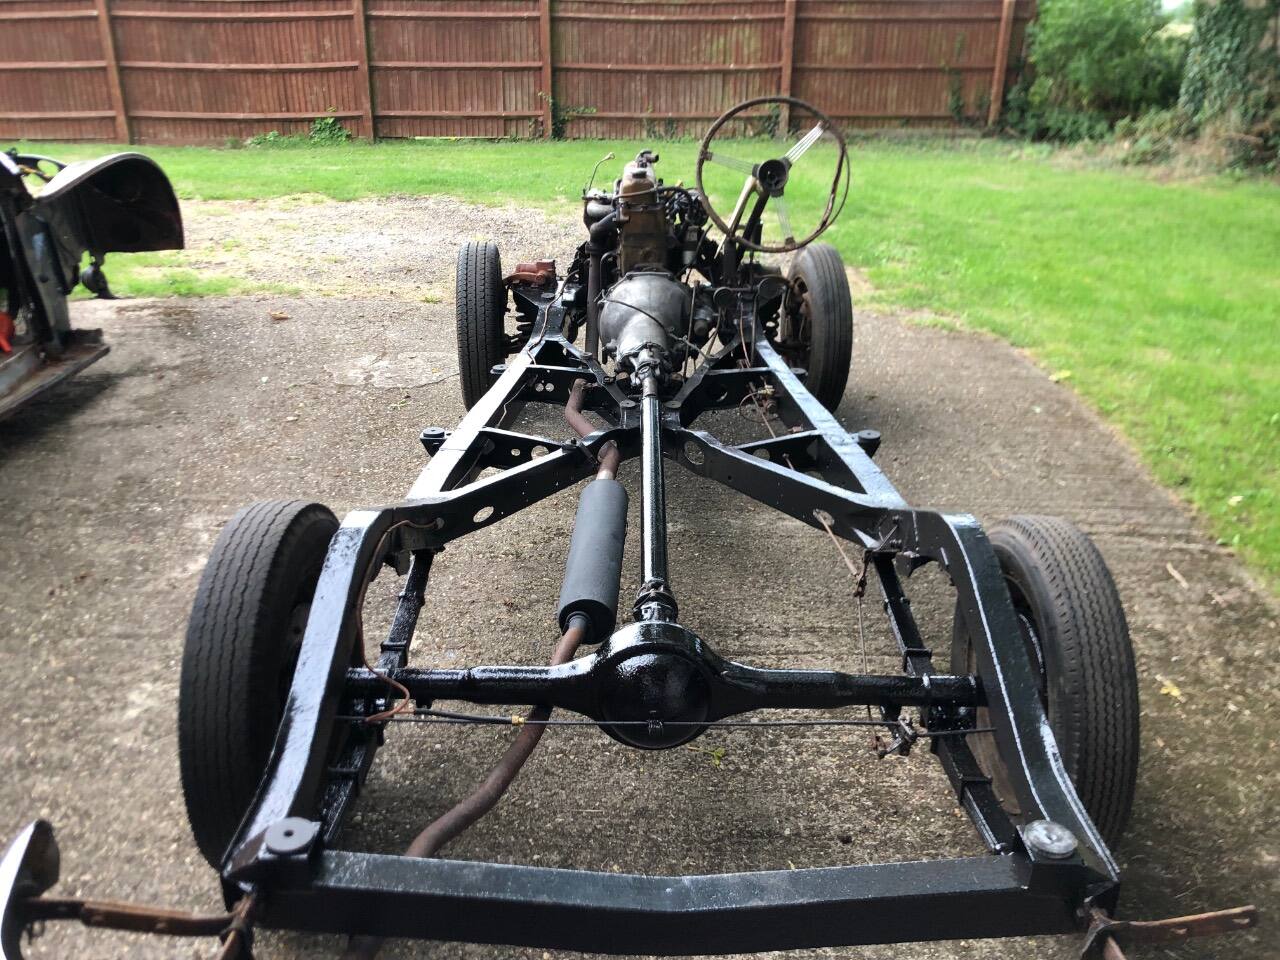
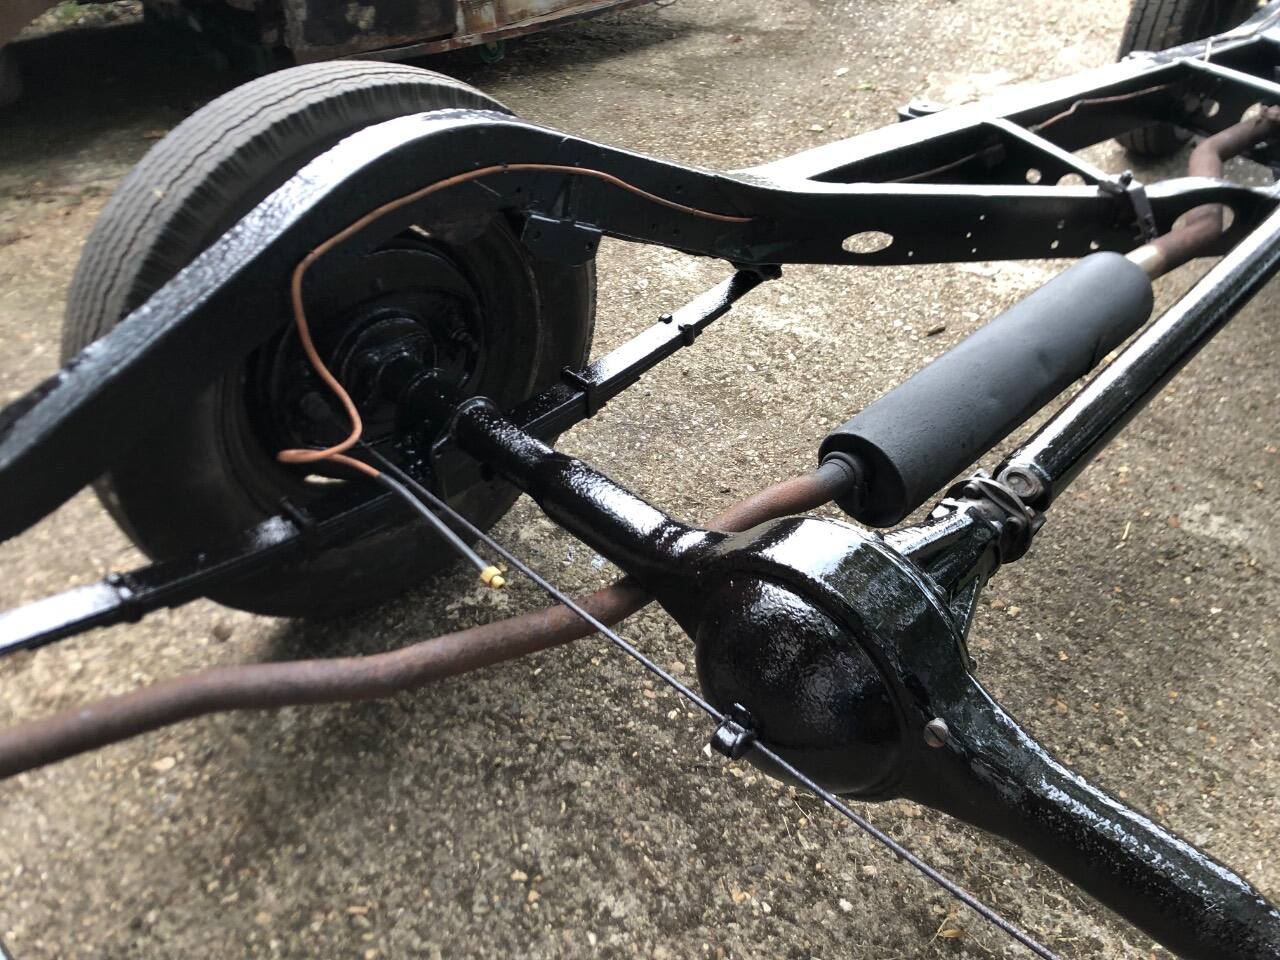
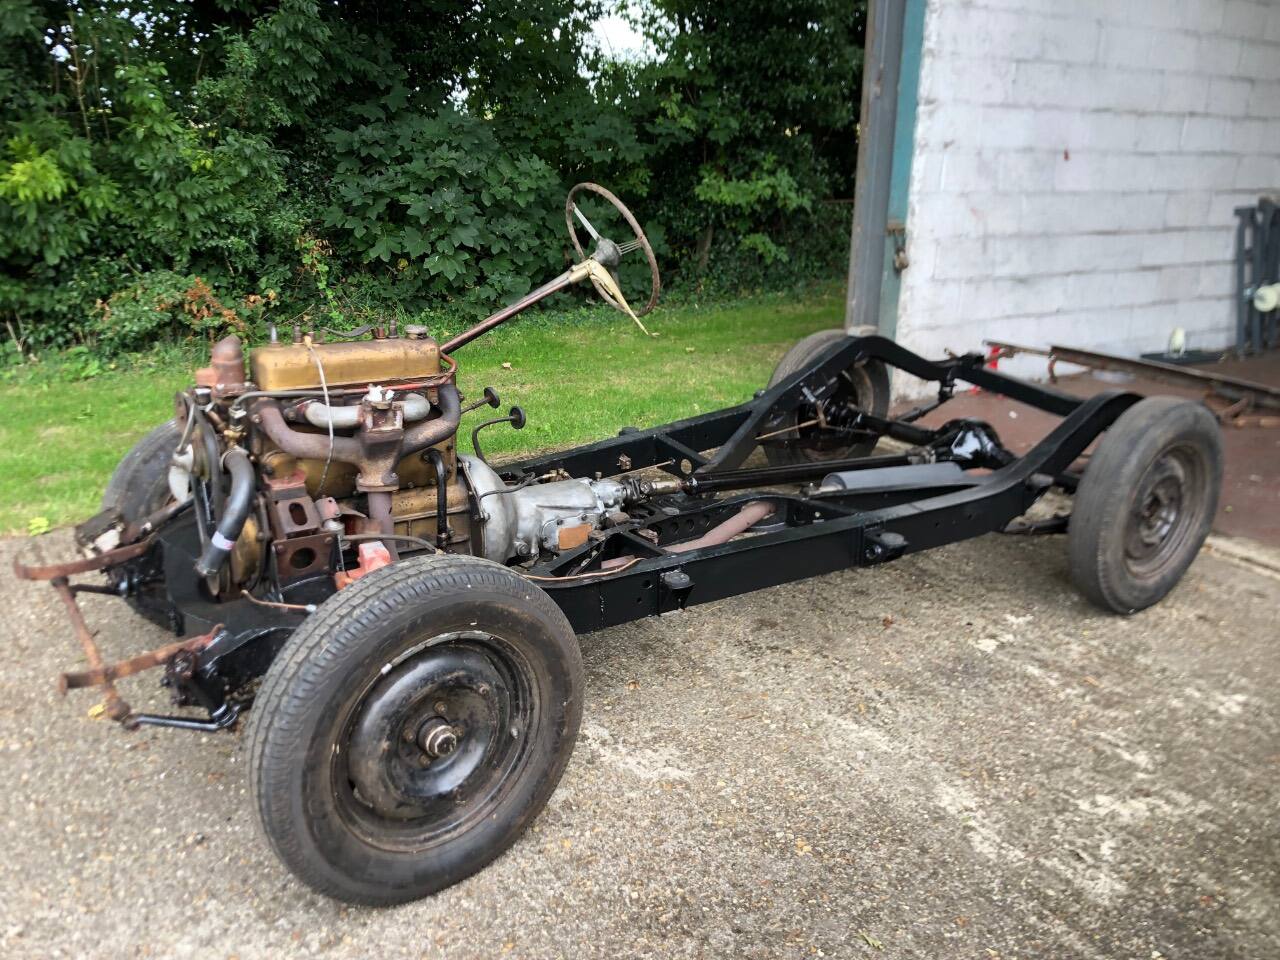
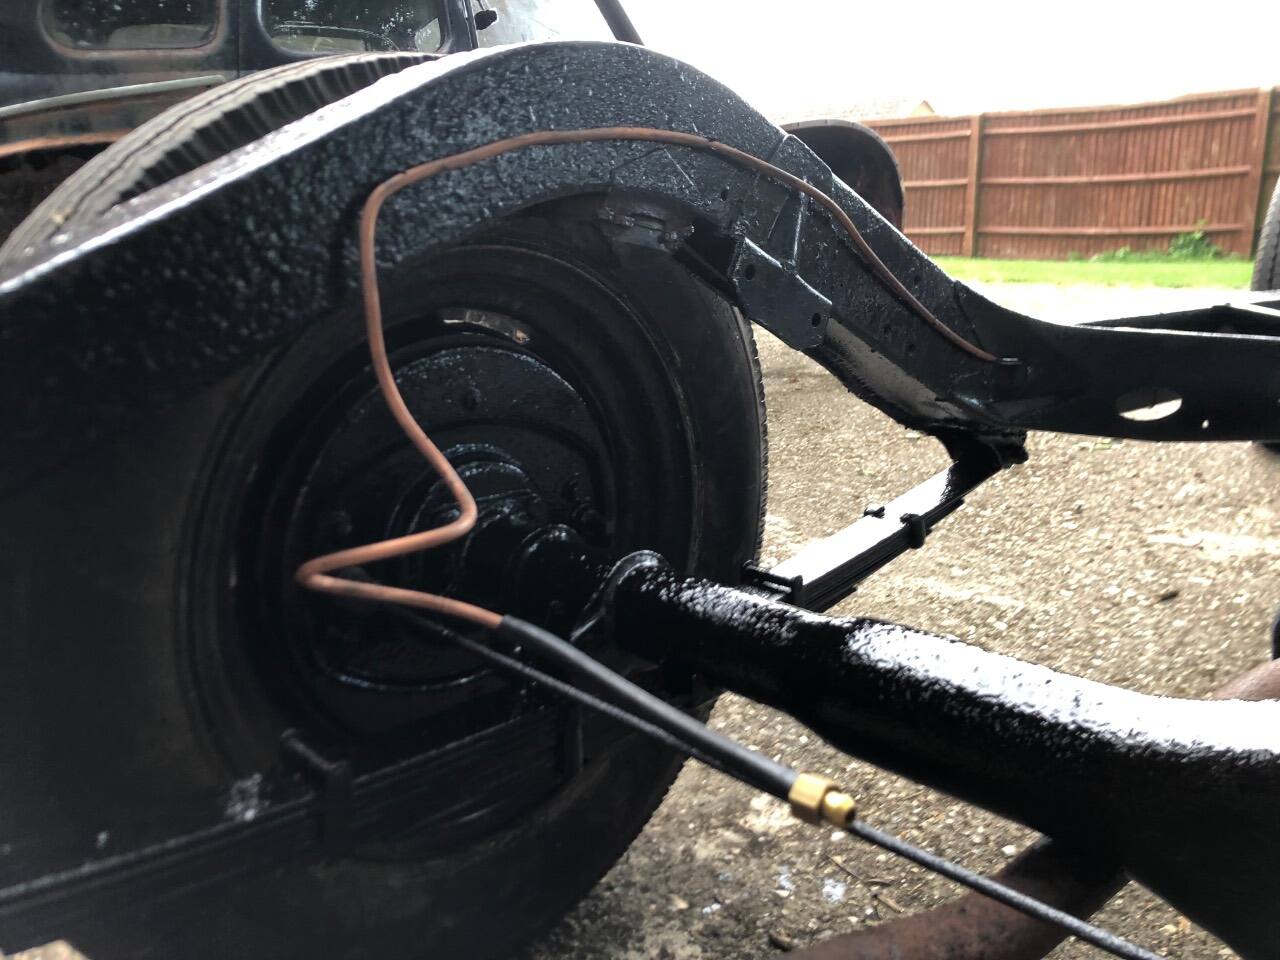
Angrydicky replied to Angrydicky's topic in AutoShite
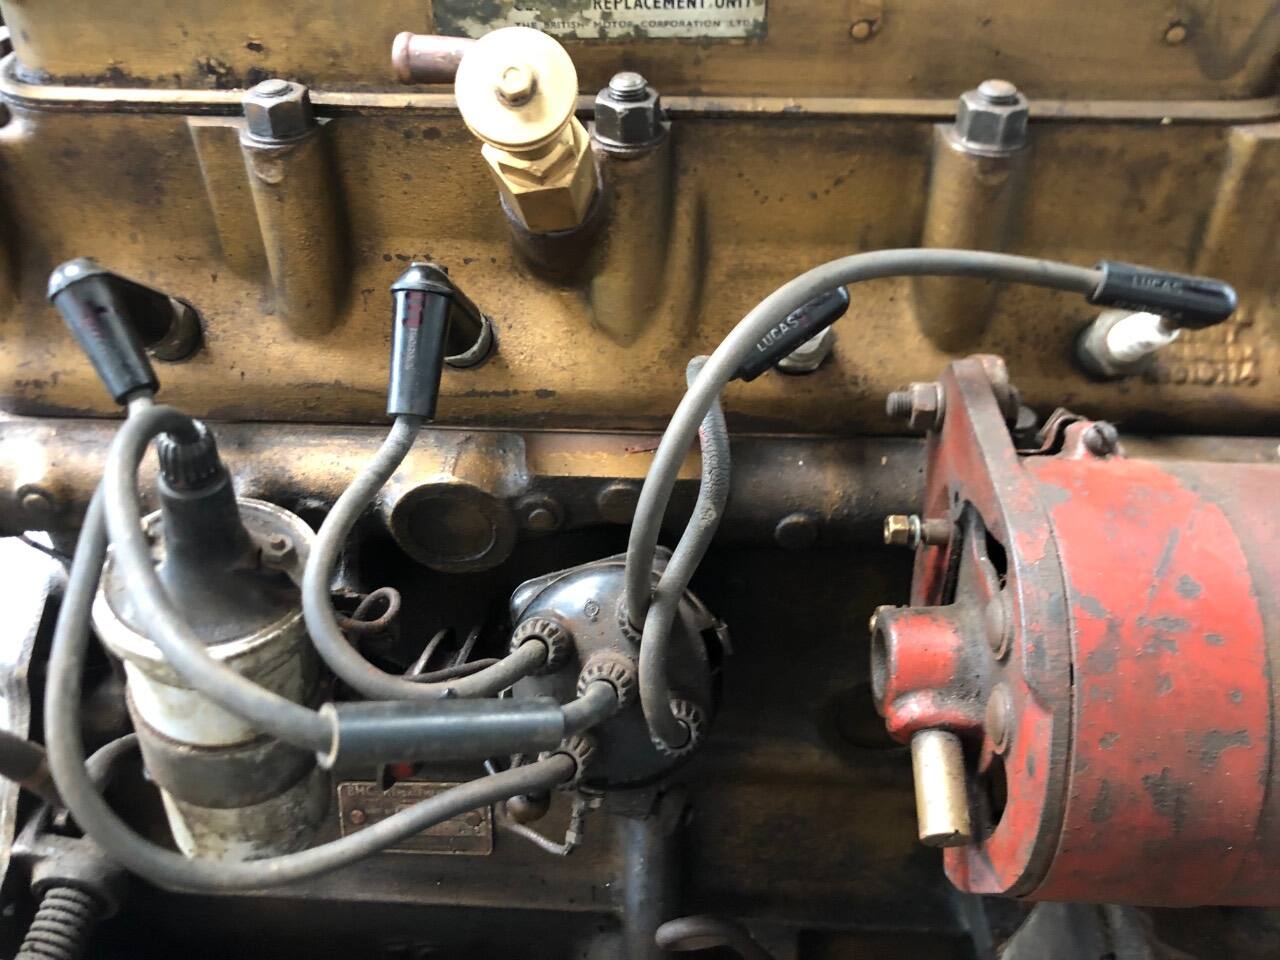
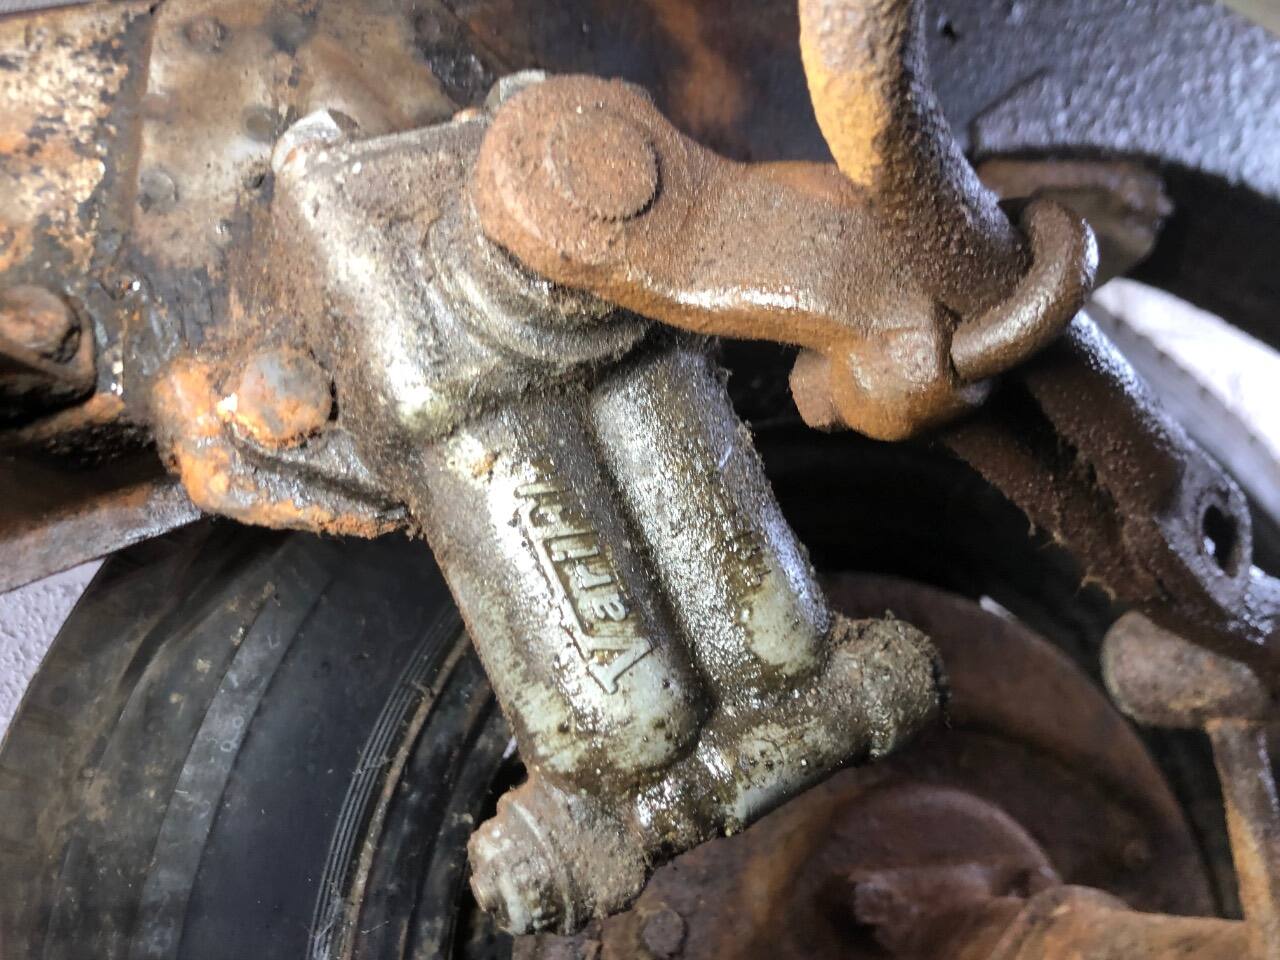
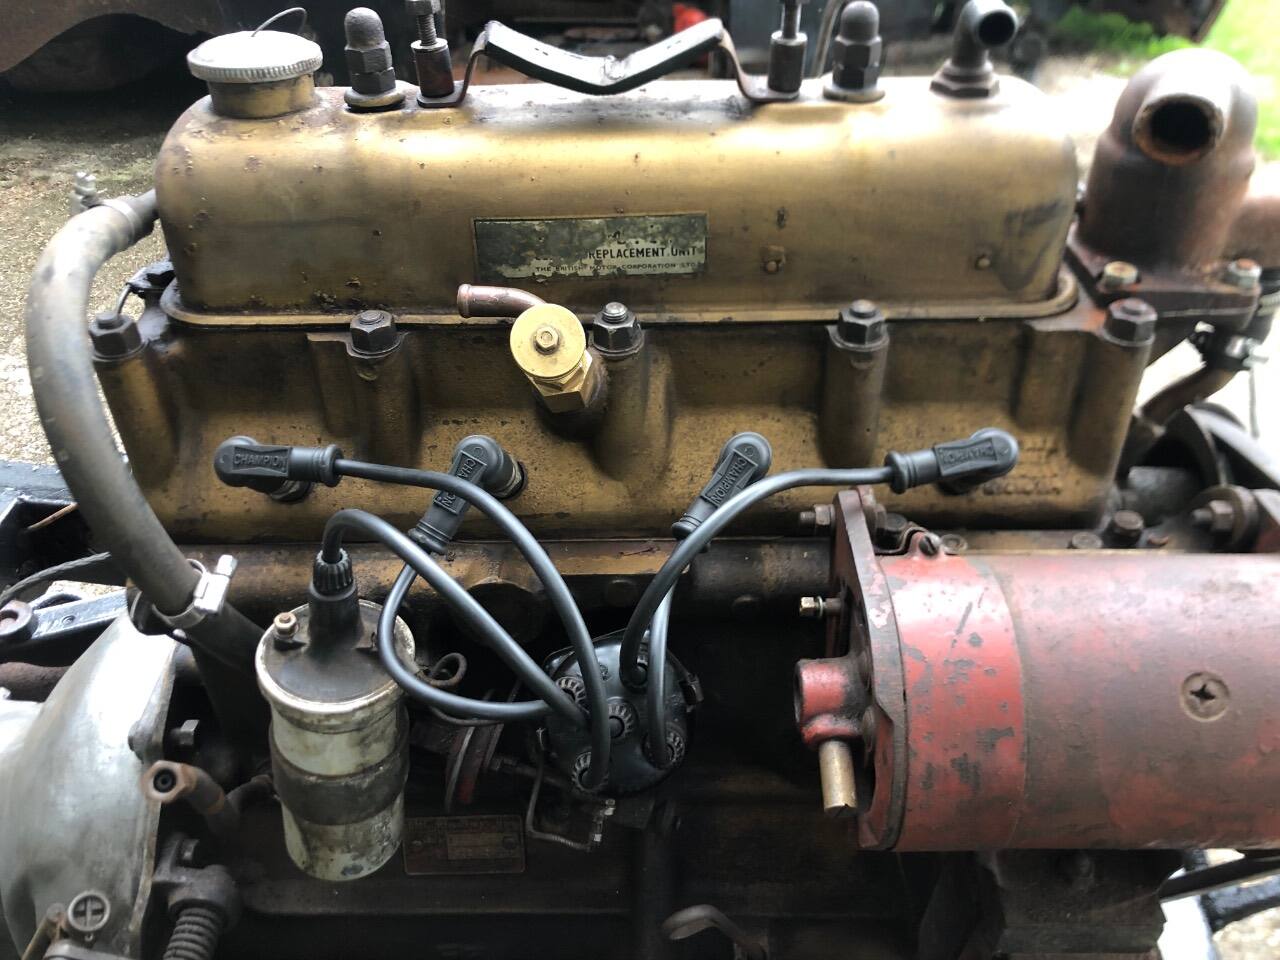
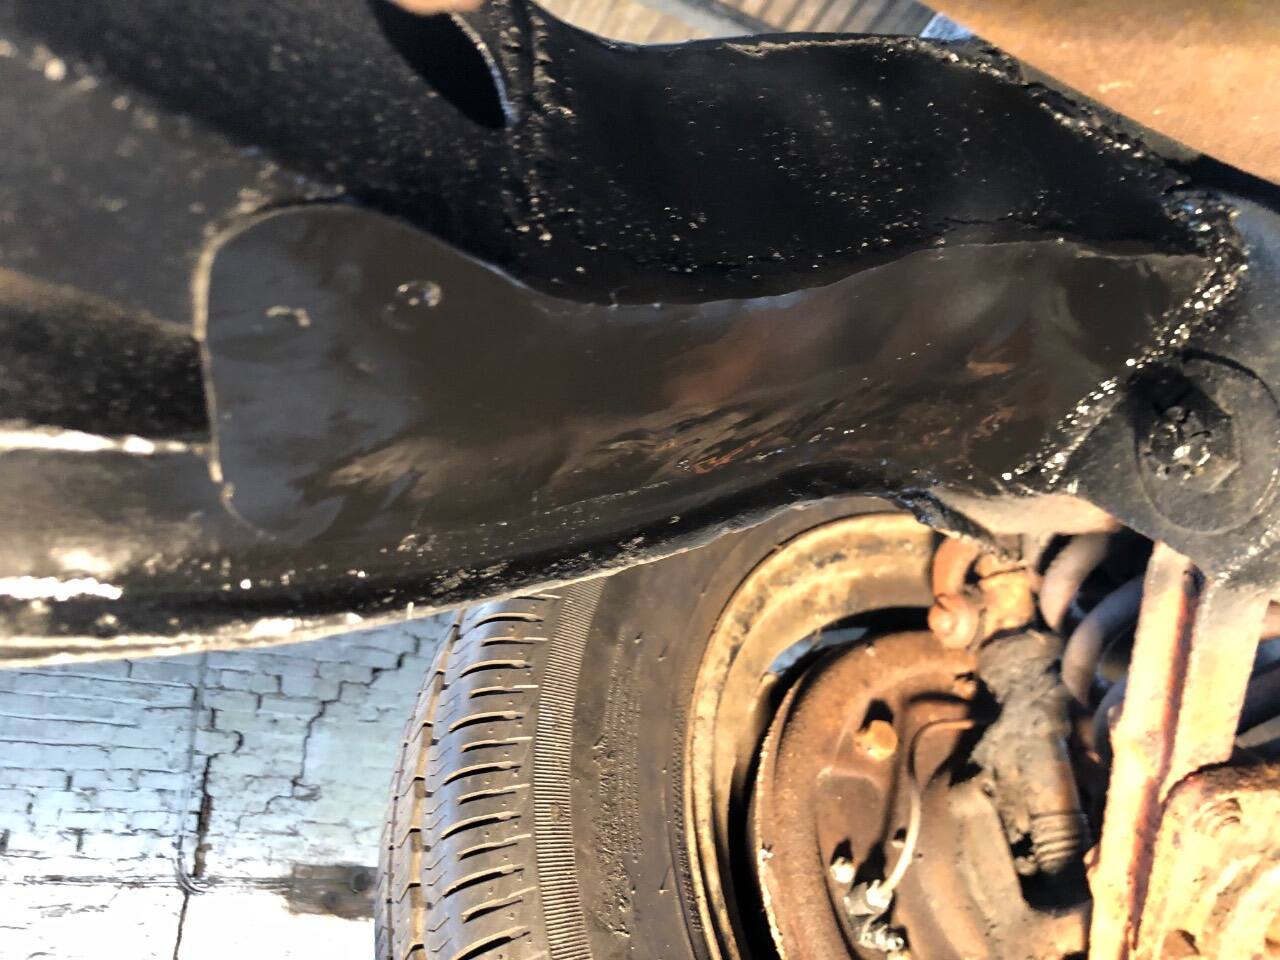
Having completed the welding on the chassis, I then started cleaning it up. Spent several days scraping oil off the drivetrain and chassis, degreasing, wire brushing and going over the entire chassis with a rotary wire brush to clean it all up. I then gave it a coat of Hydrate 80 rust converter, and a couple of coats of chassis paint. I did the same on the rear axle, springs and brake backplates. I removed the rear shock absorbers because they were both leaking and one I think had run out completely because the arms were in different positions and it was twisting the antiroll bar. They turned out to be not the usual Armstrong lever arms, but branded Vari-flo. A bit of Googling tells me that they were an early form of aftermarket adjustable shock absorber, sold by Spax circa 1960/61 and probably ultra rare nowadays. I have a friend who used to rebuild lever arms for a living, he has never seen any of these before. He has offered to rebuild them for me and doesn’t think they’ll be a problem to do as long as he can find seals to go in them, but he’s snowed under with work at the moment and has asked me to leave it a few weeks, which is fair enough, I’m not in a mega hurry. The fuel line was completely rotten, so I made a new one using the old one as a pattern, some 1/4” brake pipe and managed to buy the original soldered type connectors from the local agricultural supplier who use them on vintage tractors. I thought briefly about painting the engine but I thought it would look out of place with the patinated body, and anyway it cleaned up fairly well once I’d removed the years of oil from the sides. I’ve replaced the rocker cover, side and sump gaskets so it should be fairly oil tight (as much as an old British engine can be) we’ll see once it’s back on the road but so far I’ve had it running since replacing those gaskets and i haven’t noticed any leaks. A small but satisfying job I did was making a new set of Ht leads. I think two were original and two had been replaced as the plug caps didn’t match, two had the original Bakelite caps but one was broken. The leads themselves were very perished. I bought some new rubber type Champion caps and copper cored Ht lead and made my own using the old ones as patterns.
- 515 replies
-
- 29
-
-
Dicky’s Disastrous Debris - Steering wheel restoration 3/9/22
Angrydicky replied to Angrydicky's topic in AutoShite
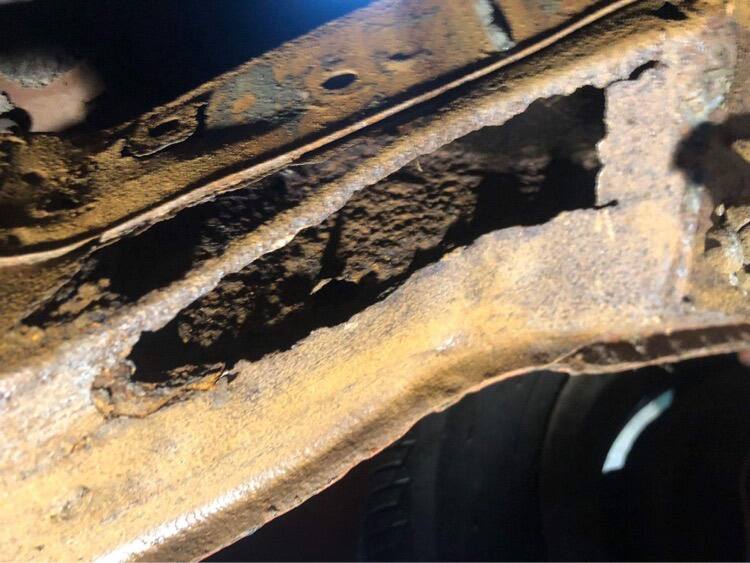
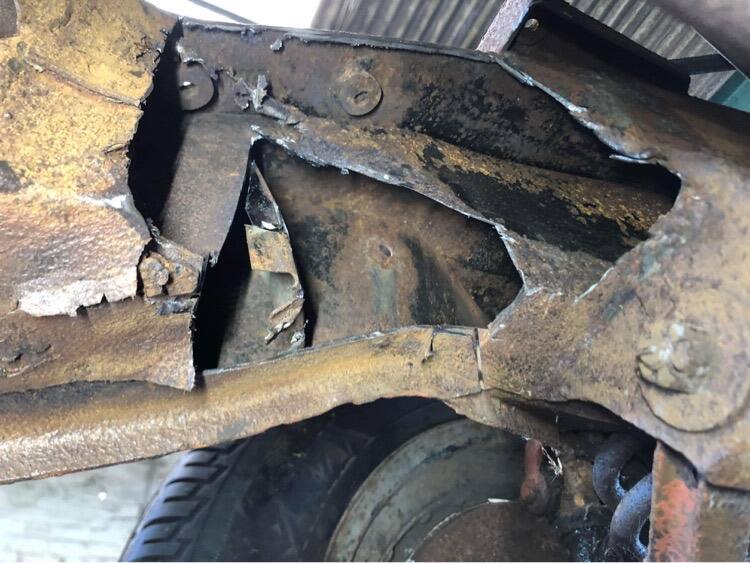
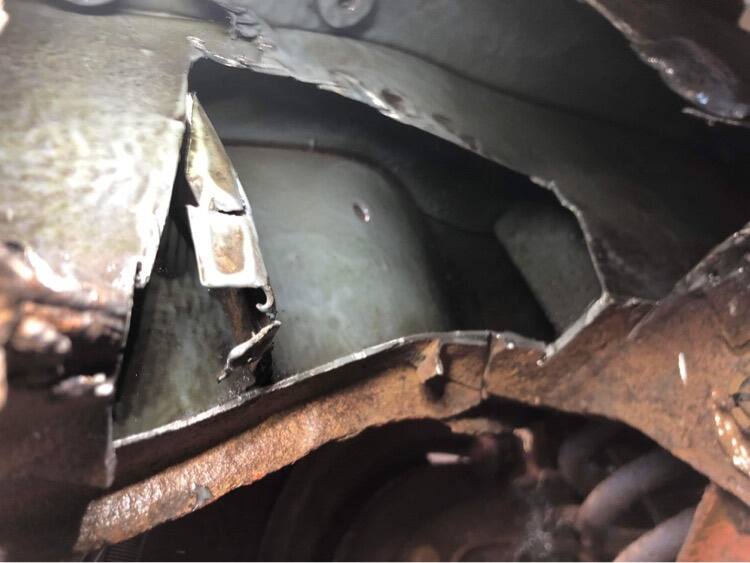
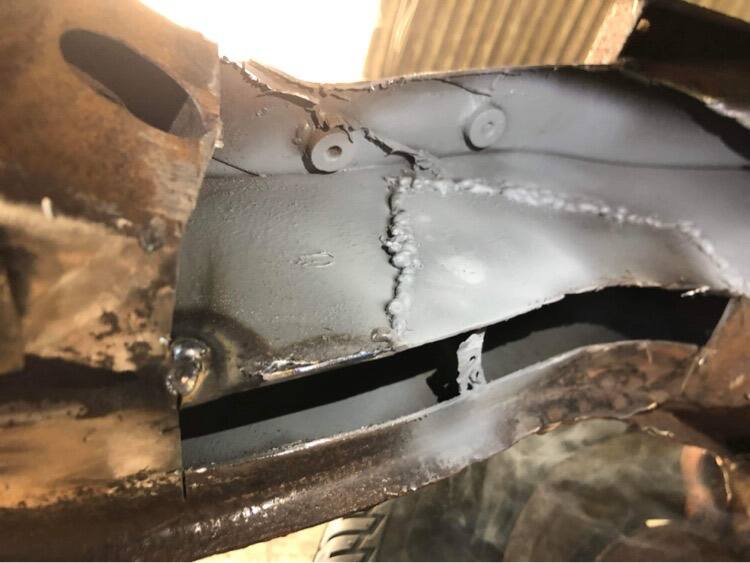
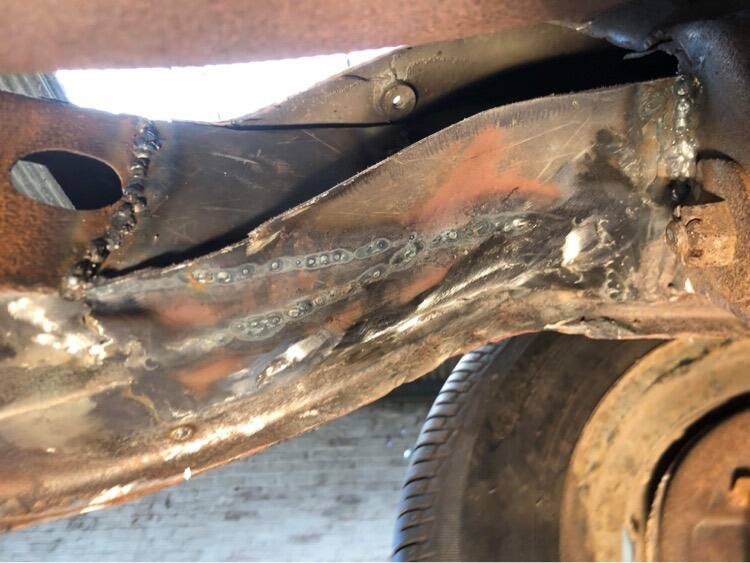
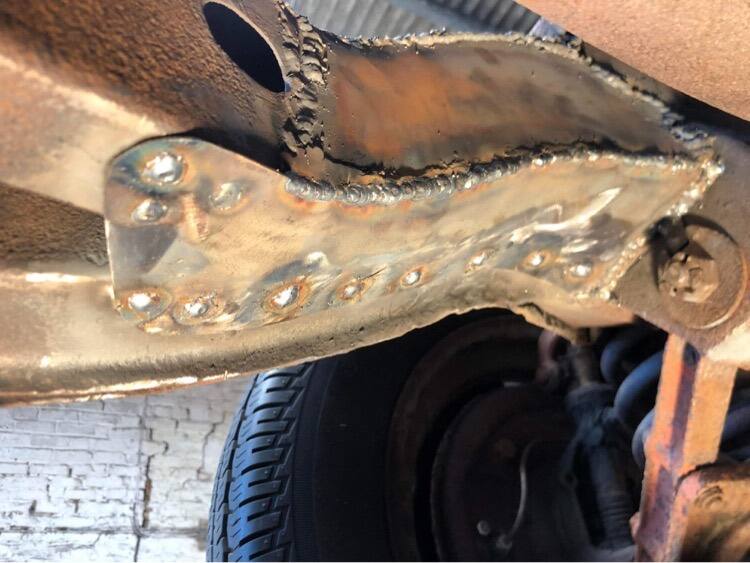
I put the wheels back on the chassis and pushed it back onto the ramp. There was a particularly ropey bit of chassis by the front suspension on the passenger side. It had gone all the way through into the centre structure of the chassis, but fortunately the outer bit by the wheel and the top were both in good condition, so I had plenty to weld to. The hardest part was cutting the rust out, it was very difficult to get the grinder in there. I spent a considerable amount of time cutting back to good metal, before cleaning up and spraying weld-thru primer in there. This is what I was dealing with. And once it was cut back: Strangely, the other side in the same place was solid with no issues! Using a similar gauge steel to the original, I started to piece it back together, trying to replicate the original design as close as possible. Had the welder cranked up to maximum power to get good penetration on those welds! Even though the access was a bit shit, in hindsight I should have removed the engine. I was quite pleased with that repair, but it was certainly one of the most challenging and time consuming repairs I’ve ever tackled. Once that was out of the way, the other repairs were easy, three patches and a 12” section of chassis rail, which I’d already done with the body on.
- 515 replies
-
- 28
-