


JimH
-
Posts
2,233 -
Joined
-
Last visited
-
Days Won
5
Reputation Activity
-

 JimH got a reaction from mercedade in It is just so Super (Sentinel).
Oh you lucky people - a double update.
Time for things to get shiny. Although the primers and undercoats were sprayed on the top has to be brushed. These things just don't look right sprayed and the finish needs a bit of texture in it to look right. There is, however, a big difference between a bit of texture and looking like a lock up Tetrosyl job.
Top coat is a mixture of Craftmaster (black) and Masons P Type (crimson). The bit that makes all the difference is the addition of Owatrol paint conditioner which lets the paint flow like the flowiest thing that is having a particularly fluid day. These are the rear wings finished off.
They were painted a couple of days ago so some dust has settled on them. However, you can probably make out the finish. Not three bad at all.
This is a front wing.
And this is the front tool locker.
The doors were painted separately so we could paint around the door shut.
I really should not be trusted with a camera but if I turn the flash off you should be able to make out that the finish is not bad at all for a brush.
And the other door giving a slightly better view of the finish. This is after one coat so the depth should get a little better after the next coat and varnish.
Here is the front apron after the first coat. The cheek plates weren't a million miles out shapewise. By the way, admire the fancy throttle valve heat shield which I thought was looking pretty cool and groovy.
And a flash free ooh look at the finish shot. We cannot keep the place very dust free so crap will settle on it overnight. After a few weeks to harden off it will get a polish which deals with most of the imperfections.
The next bit to paint is the small acreage of box body side. The the outer edges of the masked panel shows the extent of the panel of pale cream onto which will be painted "UNITED" in the same crimson as the body. "Cooperative Bakery Society" will be painted in cream underneath that. The cream panel breaks up the side a bit more. The line between the cream and the cream and the crimson will be covered with a freehand border in something like lime green so make it look suitably warm and waney.
Here is the headboard after one coat. These will be fitted before the last coat goes on.
And if you stand back things look not too bad at all. The front apron will have a full height "UNITED" the top edge of which follows the wave of the apron plate.
Getting there...
-
 JimH got a reaction from CaptainBoom in It is just so Super (Sentinel).
Oh you lucky people - a double update.
Time for things to get shiny. Although the primers and undercoats were sprayed on the top has to be brushed. These things just don't look right sprayed and the finish needs a bit of texture in it to look right. There is, however, a big difference between a bit of texture and looking like a lock up Tetrosyl job.
Top coat is a mixture of Craftmaster (black) and Masons P Type (crimson). The bit that makes all the difference is the addition of Owatrol paint conditioner which lets the paint flow like the flowiest thing that is having a particularly fluid day. These are the rear wings finished off.
They were painted a couple of days ago so some dust has settled on them. However, you can probably make out the finish. Not three bad at all.
This is a front wing.
And this is the front tool locker.
The doors were painted separately so we could paint around the door shut.
I really should not be trusted with a camera but if I turn the flash off you should be able to make out that the finish is not bad at all for a brush.
And the other door giving a slightly better view of the finish. This is after one coat so the depth should get a little better after the next coat and varnish.
Here is the front apron after the first coat. The cheek plates weren't a million miles out shapewise. By the way, admire the fancy throttle valve heat shield which I thought was looking pretty cool and groovy.
And a flash free ooh look at the finish shot. We cannot keep the place very dust free so crap will settle on it overnight. After a few weeks to harden off it will get a polish which deals with most of the imperfections.
The next bit to paint is the small acreage of box body side. The the outer edges of the masked panel shows the extent of the panel of pale cream onto which will be painted "UNITED" in the same crimson as the body. "Cooperative Bakery Society" will be painted in cream underneath that. The cream panel breaks up the side a bit more. The line between the cream and the cream and the crimson will be covered with a freehand border in something like lime green so make it look suitably warm and waney.
Here is the headboard after one coat. These will be fitted before the last coat goes on.
And if you stand back things look not too bad at all. The front apron will have a full height "UNITED" the top edge of which follows the wave of the apron plate.
Getting there...
-
 JimH got a reaction from UltraWomble in It is just so Super (Sentinel).
Oh you lucky people - a double update.
Time for things to get shiny. Although the primers and undercoats were sprayed on the top has to be brushed. These things just don't look right sprayed and the finish needs a bit of texture in it to look right. There is, however, a big difference between a bit of texture and looking like a lock up Tetrosyl job.
Top coat is a mixture of Craftmaster (black) and Masons P Type (crimson). The bit that makes all the difference is the addition of Owatrol paint conditioner which lets the paint flow like the flowiest thing that is having a particularly fluid day. These are the rear wings finished off.
They were painted a couple of days ago so some dust has settled on them. However, you can probably make out the finish. Not three bad at all.
This is a front wing.
And this is the front tool locker.
The doors were painted separately so we could paint around the door shut.
I really should not be trusted with a camera but if I turn the flash off you should be able to make out that the finish is not bad at all for a brush.
And the other door giving a slightly better view of the finish. This is after one coat so the depth should get a little better after the next coat and varnish.
Here is the front apron after the first coat. The cheek plates weren't a million miles out shapewise. By the way, admire the fancy throttle valve heat shield which I thought was looking pretty cool and groovy.
And a flash free ooh look at the finish shot. We cannot keep the place very dust free so crap will settle on it overnight. After a few weeks to harden off it will get a polish which deals with most of the imperfections.
The next bit to paint is the small acreage of box body side. The the outer edges of the masked panel shows the extent of the panel of pale cream onto which will be painted "UNITED" in the same crimson as the body. "Cooperative Bakery Society" will be painted in cream underneath that. The cream panel breaks up the side a bit more. The line between the cream and the cream and the crimson will be covered with a freehand border in something like lime green so make it look suitably warm and waney.
Here is the headboard after one coat. These will be fitted before the last coat goes on.
And if you stand back things look not too bad at all. The front apron will have a full height "UNITED" the top edge of which follows the wave of the apron plate.
Getting there...
-
 JimH got a reaction from lisbon_road in It is just so Super (Sentinel).
Oh you lucky people - a double update.
Time for things to get shiny. Although the primers and undercoats were sprayed on the top has to be brushed. These things just don't look right sprayed and the finish needs a bit of texture in it to look right. There is, however, a big difference between a bit of texture and looking like a lock up Tetrosyl job.
Top coat is a mixture of Craftmaster (black) and Masons P Type (crimson). The bit that makes all the difference is the addition of Owatrol paint conditioner which lets the paint flow like the flowiest thing that is having a particularly fluid day. These are the rear wings finished off.
They were painted a couple of days ago so some dust has settled on them. However, you can probably make out the finish. Not three bad at all.
This is a front wing.
And this is the front tool locker.
The doors were painted separately so we could paint around the door shut.
I really should not be trusted with a camera but if I turn the flash off you should be able to make out that the finish is not bad at all for a brush.
And the other door giving a slightly better view of the finish. This is after one coat so the depth should get a little better after the next coat and varnish.
Here is the front apron after the first coat. The cheek plates weren't a million miles out shapewise. By the way, admire the fancy throttle valve heat shield which I thought was looking pretty cool and groovy.
And a flash free ooh look at the finish shot. We cannot keep the place very dust free so crap will settle on it overnight. After a few weeks to harden off it will get a polish which deals with most of the imperfections.
The next bit to paint is the small acreage of box body side. The the outer edges of the masked panel shows the extent of the panel of pale cream onto which will be painted "UNITED" in the same crimson as the body. "Cooperative Bakery Society" will be painted in cream underneath that. The cream panel breaks up the side a bit more. The line between the cream and the cream and the crimson will be covered with a freehand border in something like lime green so make it look suitably warm and waney.
Here is the headboard after one coat. These will be fitted before the last coat goes on.
And if you stand back things look not too bad at all. The front apron will have a full height "UNITED" the top edge of which follows the wave of the apron plate.
Getting there...
-
 JimH got a reaction from rml2345 in It is just so Super (Sentinel).
Nothing wildly exciting - just stuff in undercoat. The headboard in undercoat. This will need to be fitted before it can be painted properly because edges over the butt joints need to be dressed down so they sit right.
Mirror brackets which bolt to the ash bend so need to be the same colour. A few years ago I would polish these but we all do stupid things when we are young, don't we? They are screwed to bits of wood to keep them upright.
The rear tool lockers. I pissed away all of last weekend finishing these off so they could be primered. It took an age to get them right. The little slot is to take the LED rear lights.
And the front tool locker in primer. All of these lockers will be painted black.
Rest of the body and front panel in undercoat. This isn't a million miles off what the final colour will be.
More of the front panel. It's been denibbed with P400 which is why it looks matt and swirly.
And the doors in undercoat. Blimey, isn't this exciting?
And that is about it. There isn't much else to do until the masking comes off and things get accessible again. I've just finished the very last, full and final we really mean it this time jobs to do list and it is only about four pages long. The grim realisation is that the damn thing is nearly finished. Now we'll have to find something else to do.
-
 JimH got a reaction from adw1977 in It is just so Super (Sentinel).
Oh you lucky people - a double update.
Time for things to get shiny. Although the primers and undercoats were sprayed on the top has to be brushed. These things just don't look right sprayed and the finish needs a bit of texture in it to look right. There is, however, a big difference between a bit of texture and looking like a lock up Tetrosyl job.
Top coat is a mixture of Craftmaster (black) and Masons P Type (crimson). The bit that makes all the difference is the addition of Owatrol paint conditioner which lets the paint flow like the flowiest thing that is having a particularly fluid day. These are the rear wings finished off.
They were painted a couple of days ago so some dust has settled on them. However, you can probably make out the finish. Not three bad at all.
This is a front wing.
And this is the front tool locker.
The doors were painted separately so we could paint around the door shut.
I really should not be trusted with a camera but if I turn the flash off you should be able to make out that the finish is not bad at all for a brush.
And the other door giving a slightly better view of the finish. This is after one coat so the depth should get a little better after the next coat and varnish.
Here is the front apron after the first coat. The cheek plates weren't a million miles out shapewise. By the way, admire the fancy throttle valve heat shield which I thought was looking pretty cool and groovy.
And a flash free ooh look at the finish shot. We cannot keep the place very dust free so crap will settle on it overnight. After a few weeks to harden off it will get a polish which deals with most of the imperfections.
The next bit to paint is the small acreage of box body side. The the outer edges of the masked panel shows the extent of the panel of pale cream onto which will be painted "UNITED" in the same crimson as the body. "Cooperative Bakery Society" will be painted in cream underneath that. The cream panel breaks up the side a bit more. The line between the cream and the cream and the crimson will be covered with a freehand border in something like lime green so make it look suitably warm and waney.
Here is the headboard after one coat. These will be fitted before the last coat goes on.
And if you stand back things look not too bad at all. The front apron will have a full height "UNITED" the top edge of which follows the wave of the apron plate.
Getting there...
-
 JimH got a reaction from Mrs6C in It is just so Super (Sentinel).
Oh you lucky people - a double update.
Time for things to get shiny. Although the primers and undercoats were sprayed on the top has to be brushed. These things just don't look right sprayed and the finish needs a bit of texture in it to look right. There is, however, a big difference between a bit of texture and looking like a lock up Tetrosyl job.
Top coat is a mixture of Craftmaster (black) and Masons P Type (crimson). The bit that makes all the difference is the addition of Owatrol paint conditioner which lets the paint flow like the flowiest thing that is having a particularly fluid day. These are the rear wings finished off.
They were painted a couple of days ago so some dust has settled on them. However, you can probably make out the finish. Not three bad at all.
This is a front wing.
And this is the front tool locker.
The doors were painted separately so we could paint around the door shut.
I really should not be trusted with a camera but if I turn the flash off you should be able to make out that the finish is not bad at all for a brush.
And the other door giving a slightly better view of the finish. This is after one coat so the depth should get a little better after the next coat and varnish.
Here is the front apron after the first coat. The cheek plates weren't a million miles out shapewise. By the way, admire the fancy throttle valve heat shield which I thought was looking pretty cool and groovy.
And a flash free ooh look at the finish shot. We cannot keep the place very dust free so crap will settle on it overnight. After a few weeks to harden off it will get a polish which deals with most of the imperfections.
The next bit to paint is the small acreage of box body side. The the outer edges of the masked panel shows the extent of the panel of pale cream onto which will be painted "UNITED" in the same crimson as the body. "Cooperative Bakery Society" will be painted in cream underneath that. The cream panel breaks up the side a bit more. The line between the cream and the cream and the crimson will be covered with a freehand border in something like lime green so make it look suitably warm and waney.
Here is the headboard after one coat. These will be fitted before the last coat goes on.
And if you stand back things look not too bad at all. The front apron will have a full height "UNITED" the top edge of which follows the wave of the apron plate.
Getting there...
-
 JimH got a reaction from Tickman in It is just so Super (Sentinel).
Oh you lucky people - a double update.
Time for things to get shiny. Although the primers and undercoats were sprayed on the top has to be brushed. These things just don't look right sprayed and the finish needs a bit of texture in it to look right. There is, however, a big difference between a bit of texture and looking like a lock up Tetrosyl job.
Top coat is a mixture of Craftmaster (black) and Masons P Type (crimson). The bit that makes all the difference is the addition of Owatrol paint conditioner which lets the paint flow like the flowiest thing that is having a particularly fluid day. These are the rear wings finished off.
They were painted a couple of days ago so some dust has settled on them. However, you can probably make out the finish. Not three bad at all.
This is a front wing.
And this is the front tool locker.
The doors were painted separately so we could paint around the door shut.
I really should not be trusted with a camera but if I turn the flash off you should be able to make out that the finish is not bad at all for a brush.
And the other door giving a slightly better view of the finish. This is after one coat so the depth should get a little better after the next coat and varnish.
Here is the front apron after the first coat. The cheek plates weren't a million miles out shapewise. By the way, admire the fancy throttle valve heat shield which I thought was looking pretty cool and groovy.
And a flash free ooh look at the finish shot. We cannot keep the place very dust free so crap will settle on it overnight. After a few weeks to harden off it will get a polish which deals with most of the imperfections.
The next bit to paint is the small acreage of box body side. The the outer edges of the masked panel shows the extent of the panel of pale cream onto which will be painted "UNITED" in the same crimson as the body. "Cooperative Bakery Society" will be painted in cream underneath that. The cream panel breaks up the side a bit more. The line between the cream and the cream and the crimson will be covered with a freehand border in something like lime green so make it look suitably warm and waney.
Here is the headboard after one coat. These will be fitted before the last coat goes on.
And if you stand back things look not too bad at all. The front apron will have a full height "UNITED" the top edge of which follows the wave of the apron plate.
Getting there...
-
.thumb.jpg.723c3487f1bcd0a7d0a546ecb461c65f.jpg) JimH got a reaction from puddlethumper in It is just so Super (Sentinel).
JimH got a reaction from puddlethumper in It is just so Super (Sentinel).
Oh you lucky people - a double update.
Time for things to get shiny. Although the primers and undercoats were sprayed on the top has to be brushed. These things just don't look right sprayed and the finish needs a bit of texture in it to look right. There is, however, a big difference between a bit of texture and looking like a lock up Tetrosyl job.
Top coat is a mixture of Craftmaster (black) and Masons P Type (crimson). The bit that makes all the difference is the addition of Owatrol paint conditioner which lets the paint flow like the flowiest thing that is having a particularly fluid day. These are the rear wings finished off.
They were painted a couple of days ago so some dust has settled on them. However, you can probably make out the finish. Not three bad at all.
This is a front wing.
And this is the front tool locker.
The doors were painted separately so we could paint around the door shut.
I really should not be trusted with a camera but if I turn the flash off you should be able to make out that the finish is not bad at all for a brush.
And the other door giving a slightly better view of the finish. This is after one coat so the depth should get a little better after the next coat and varnish.
Here is the front apron after the first coat. The cheek plates weren't a million miles out shapewise. By the way, admire the fancy throttle valve heat shield which I thought was looking pretty cool and groovy.
And a flash free ooh look at the finish shot. We cannot keep the place very dust free so crap will settle on it overnight. After a few weeks to harden off it will get a polish which deals with most of the imperfections.
The next bit to paint is the small acreage of box body side. The the outer edges of the masked panel shows the extent of the panel of pale cream onto which will be painted "UNITED" in the same crimson as the body. "Cooperative Bakery Society" will be painted in cream underneath that. The cream panel breaks up the side a bit more. The line between the cream and the cream and the crimson will be covered with a freehand border in something like lime green so make it look suitably warm and waney.
Here is the headboard after one coat. These will be fitted before the last coat goes on.
And if you stand back things look not too bad at all. The front apron will have a full height "UNITED" the top edge of which follows the wave of the apron plate.
Getting there...
-
 JimH got a reaction from Matty in It is just so Super (Sentinel).
Nothing wildly exciting - just stuff in undercoat. The headboard in undercoat. This will need to be fitted before it can be painted properly because edges over the butt joints need to be dressed down so they sit right.
Mirror brackets which bolt to the ash bend so need to be the same colour. A few years ago I would polish these but we all do stupid things when we are young, don't we? They are screwed to bits of wood to keep them upright.
The rear tool lockers. I pissed away all of last weekend finishing these off so they could be primered. It took an age to get them right. The little slot is to take the LED rear lights.
And the front tool locker in primer. All of these lockers will be painted black.
Rest of the body and front panel in undercoat. This isn't a million miles off what the final colour will be.
More of the front panel. It's been denibbed with P400 which is why it looks matt and swirly.
And the doors in undercoat. Blimey, isn't this exciting?
And that is about it. There isn't much else to do until the masking comes off and things get accessible again. I've just finished the very last, full and final we really mean it this time jobs to do list and it is only about four pages long. The grim realisation is that the damn thing is nearly finished. Now we'll have to find something else to do.
-
JimH got a reaction from mercedade in It is just so Super (Sentinel).
Nothing wildly exciting - just stuff in undercoat. The headboard in undercoat. This will need to be fitted before it can be painted properly because edges over the butt joints need to be dressed down so they sit right.
Mirror brackets which bolt to the ash bend so need to be the same colour. A few years ago I would polish these but we all do stupid things when we are young, don't we? They are screwed to bits of wood to keep them upright.
The rear tool lockers. I pissed away all of last weekend finishing these off so they could be primered. It took an age to get them right. The little slot is to take the LED rear lights.
And the front tool locker in primer. All of these lockers will be painted black.
Rest of the body and front panel in undercoat. This isn't a million miles off what the final colour will be.
More of the front panel. It's been denibbed with P400 which is why it looks matt and swirly.
And the doors in undercoat. Blimey, isn't this exciting?
And that is about it. There isn't much else to do until the masking comes off and things get accessible again. I've just finished the very last, full and final we really mean it this time jobs to do list and it is only about four pages long. The grim realisation is that the damn thing is nearly finished. Now we'll have to find something else to do.
-
 JimH got a reaction from mat_the_cat in It is just so Super (Sentinel).
Nothing wildly exciting - just stuff in undercoat. The headboard in undercoat. This will need to be fitted before it can be painted properly because edges over the butt joints need to be dressed down so they sit right.
Mirror brackets which bolt to the ash bend so need to be the same colour. A few years ago I would polish these but we all do stupid things when we are young, don't we? They are screwed to bits of wood to keep them upright.
The rear tool lockers. I pissed away all of last weekend finishing these off so they could be primered. It took an age to get them right. The little slot is to take the LED rear lights.
And the front tool locker in primer. All of these lockers will be painted black.
Rest of the body and front panel in undercoat. This isn't a million miles off what the final colour will be.
More of the front panel. It's been denibbed with P400 which is why it looks matt and swirly.
And the doors in undercoat. Blimey, isn't this exciting?
And that is about it. There isn't much else to do until the masking comes off and things get accessible again. I've just finished the very last, full and final we really mean it this time jobs to do list and it is only about four pages long. The grim realisation is that the damn thing is nearly finished. Now we'll have to find something else to do.
-
 JimH got a reaction from HillmanImp in It is just so Super (Sentinel).
Oh you lucky people - a double update.
Time for things to get shiny. Although the primers and undercoats were sprayed on the top has to be brushed. These things just don't look right sprayed and the finish needs a bit of texture in it to look right. There is, however, a big difference between a bit of texture and looking like a lock up Tetrosyl job.
Top coat is a mixture of Craftmaster (black) and Masons P Type (crimson). The bit that makes all the difference is the addition of Owatrol paint conditioner which lets the paint flow like the flowiest thing that is having a particularly fluid day. These are the rear wings finished off.
They were painted a couple of days ago so some dust has settled on them. However, you can probably make out the finish. Not three bad at all.
This is a front wing.
And this is the front tool locker.
The doors were painted separately so we could paint around the door shut.
I really should not be trusted with a camera but if I turn the flash off you should be able to make out that the finish is not bad at all for a brush.
And the other door giving a slightly better view of the finish. This is after one coat so the depth should get a little better after the next coat and varnish.
Here is the front apron after the first coat. The cheek plates weren't a million miles out shapewise. By the way, admire the fancy throttle valve heat shield which I thought was looking pretty cool and groovy.
And a flash free ooh look at the finish shot. We cannot keep the place very dust free so crap will settle on it overnight. After a few weeks to harden off it will get a polish which deals with most of the imperfections.
The next bit to paint is the small acreage of box body side. The the outer edges of the masked panel shows the extent of the panel of pale cream onto which will be painted "UNITED" in the same crimson as the body. "Cooperative Bakery Society" will be painted in cream underneath that. The cream panel breaks up the side a bit more. The line between the cream and the cream and the crimson will be covered with a freehand border in something like lime green so make it look suitably warm and waney.
Here is the headboard after one coat. These will be fitted before the last coat goes on.
And if you stand back things look not too bad at all. The front apron will have a full height "UNITED" the top edge of which follows the wave of the apron plate.
Getting there...
-
 JimH got a reaction from nomiST in It is just so Super (Sentinel).
Oh you lucky people - a double update.
Time for things to get shiny. Although the primers and undercoats were sprayed on the top has to be brushed. These things just don't look right sprayed and the finish needs a bit of texture in it to look right. There is, however, a big difference between a bit of texture and looking like a lock up Tetrosyl job.
Top coat is a mixture of Craftmaster (black) and Masons P Type (crimson). The bit that makes all the difference is the addition of Owatrol paint conditioner which lets the paint flow like the flowiest thing that is having a particularly fluid day. These are the rear wings finished off.
They were painted a couple of days ago so some dust has settled on them. However, you can probably make out the finish. Not three bad at all.
This is a front wing.
And this is the front tool locker.
The doors were painted separately so we could paint around the door shut.
I really should not be trusted with a camera but if I turn the flash off you should be able to make out that the finish is not bad at all for a brush.
And the other door giving a slightly better view of the finish. This is after one coat so the depth should get a little better after the next coat and varnish.
Here is the front apron after the first coat. The cheek plates weren't a million miles out shapewise. By the way, admire the fancy throttle valve heat shield which I thought was looking pretty cool and groovy.
And a flash free ooh look at the finish shot. We cannot keep the place very dust free so crap will settle on it overnight. After a few weeks to harden off it will get a polish which deals with most of the imperfections.
The next bit to paint is the small acreage of box body side. The the outer edges of the masked panel shows the extent of the panel of pale cream onto which will be painted "UNITED" in the same crimson as the body. "Cooperative Bakery Society" will be painted in cream underneath that. The cream panel breaks up the side a bit more. The line between the cream and the cream and the crimson will be covered with a freehand border in something like lime green so make it look suitably warm and waney.
Here is the headboard after one coat. These will be fitted before the last coat goes on.
And if you stand back things look not too bad at all. The front apron will have a full height "UNITED" the top edge of which follows the wave of the apron plate.
Getting there...
-
JimH got a reaction from UltraWomble in It is just so Super (Sentinel).
Nothing wildly exciting - just stuff in undercoat. The headboard in undercoat. This will need to be fitted before it can be painted properly because edges over the butt joints need to be dressed down so they sit right.
Mirror brackets which bolt to the ash bend so need to be the same colour. A few years ago I would polish these but we all do stupid things when we are young, don't we? They are screwed to bits of wood to keep them upright.
The rear tool lockers. I pissed away all of last weekend finishing these off so they could be primered. It took an age to get them right. The little slot is to take the LED rear lights.
And the front tool locker in primer. All of these lockers will be painted black.
Rest of the body and front panel in undercoat. This isn't a million miles off what the final colour will be.
More of the front panel. It's been denibbed with P400 which is why it looks matt and swirly.
And the doors in undercoat. Blimey, isn't this exciting?
And that is about it. There isn't much else to do until the masking comes off and things get accessible again. I've just finished the very last, full and final we really mean it this time jobs to do list and it is only about four pages long. The grim realisation is that the damn thing is nearly finished. Now we'll have to find something else to do.
-
 JimH got a reaction from Dick Longbridge in It is just so Super (Sentinel).
Nothing wildly exciting - just stuff in undercoat. The headboard in undercoat. This will need to be fitted before it can be painted properly because edges over the butt joints need to be dressed down so they sit right.
Mirror brackets which bolt to the ash bend so need to be the same colour. A few years ago I would polish these but we all do stupid things when we are young, don't we? They are screwed to bits of wood to keep them upright.
The rear tool lockers. I pissed away all of last weekend finishing these off so they could be primered. It took an age to get them right. The little slot is to take the LED rear lights.
And the front tool locker in primer. All of these lockers will be painted black.
Rest of the body and front panel in undercoat. This isn't a million miles off what the final colour will be.
More of the front panel. It's been denibbed with P400 which is why it looks matt and swirly.
And the doors in undercoat. Blimey, isn't this exciting?
And that is about it. There isn't much else to do until the masking comes off and things get accessible again. I've just finished the very last, full and final we really mean it this time jobs to do list and it is only about four pages long. The grim realisation is that the damn thing is nearly finished. Now we'll have to find something else to do.
-
 JimH got a reaction from hennabm in It is just so Super (Sentinel).
They both sit drained over winter because it is too easy to break something if they freeze up. Once we are happy it is not going to get cold enough we will start testing it on the track before venturing out onto the highway.
-

-
JimH got a reaction from Tickman in It is just so Super (Sentinel).
And now this month's one. Here is the rear doors with the bolts that I made for them. They are not there yet but getting close. The offside door will never open so is bolted shut on the inside top and bottom. The bolts drop in and then swing over onto pins held in place with wedges. This will let me put a padlock through the wedge to lock it closed. I need to find some suitably old looking chain to stop the wedges from getting lost.
And standing back a bit we see the bolts in all their glory. The bit of steel sheet on the roof is me trying to work out what the rain guard should look like (and so far failing).
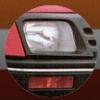
Ooooh, what is that peeking out the bottom corner? The signwriter called in to discuss the job (it is non-trivial) and while he was here painted the number plates. They look pretty damn fine to me.
He also did the 20 plate to tell the local constabulary that having pneumatic tyres means we can do another 8mph.
New plate on the front, too. Done right these hand painted plates look the mutt's.
This isn't meant to be there but the original mirrors on these things are shockingly bad so we do not want to be on the road without a rear facing camera. On the S4 there was a handy glove box on the dashboard that the screen can be hidden in. However, on the Supers there is no dashboard, let alone a glove box so I welded up a sort of a dashboard that bolts in place.
The other thing that is a pain in the very literal neck is that the pressure gauge is on the nearside so you have to keep turning your head every few seconds to see how things are going. I always said with the next Super I wanted a second gauge that the driver could see in front of them. I made the dashboard a wee bit bigger to fit such a gauge in. The final benefit is that it gives you a little shelf to sit your fruit tea on. The big open space next to the gauge is where the screen mounts.
The wing looks odd because it is just resting on the wheel out of harm's way. The thing behind the wing is the offside store box which I have been making. These look a bit odd in wood and steel colour but will be painted black when they are done so they should not be too noticeable. It will be somewhere handy to keep oil and grease and spares.
Again look odd from the rear because they are not black. What I will also use the box for is to mount the small yet modern LED lights for tail, brakes and indicators. Hopefully they won't be too obvious when they are not lit up. I know modern lights look shite but they are pretty small and it really is a good idea to have decent lights if you are on the road at night.
Finally, the loader is having its arm rebuilt. It was last owned by a farmer so maintenance was a wee bit sketchy. No shortage of pins and bushes to remanufacture. We said it didn't need done because we don't use it much but it was too buggered to ignore.
-
JimH got a reaction from Matty in It is just so Super (Sentinel).
Forgot to post this last month. Not much by way of updates so far this year for a number of reasons. To start with here is the spare wheel carrier getting close to being finished.
This is the sort of thing that brings it home just how much work has been done over the last six years. For years one of the jobs on the list was "Make spare wheel carrier" which is pretty quick to say and it was given very little head space until it was needed. The first thing you need to start thinking about is what design to use. Since these things were built on solids originally the pneumatics and by extension the spare wheel arrangement was the responsibility of the factory, the regional service depots and the workshops of the people who operated them. Sentinel's drawing archive lists at least 8 different designs (searching the archive is no mean feat because all you have is the most scant description and about 10,000 drawings) which range from plausible to a draughie's flight of fancy. One is for a flat bed which involves a slot-in davit with a block and tackle to haul the wheel onto the back where it was clamped behind the cab. Aye right.
So you work up a design and then start building it. Wheel frame, wheel frame pivot block, draw bolt, draw bolt pivot frame, nut, spacer for the nut and draw bolt protection tube. They are just the big bits. The wheel frame alone has eight separate components. The nut has four.
This whole thing has soaked up weeks of work. Just to make the bloody thing that holds the spare wheel in place.
Enough whining. This is another job that has been on the list for ages. Despite being very big there is very little room for storing stuff on these things. You have plenty of space for load but pretty much all other available space is taken up with coal. The upshot is that there was no room for oil, tools, spares or your lunch so the ones that were driven longer distances (there were a few) grew boxes in this space. One DG6 flatbed I found grew an extra pair of water tanks which I thought was quite cool.
These are the boxes so far. Angle iron frame, clad in plywood and then sheet steel epoxied over the ply so the construction matched the body.
The corners will have poplar trims to match the trims on the body so hopefully it should look all about the same. Haven't quite worked out the door arrangement yet.
Next are the boxes to hide the water tanks. The nearside one also hides the main battery while the offside one has the modern greasing system in it for the front axle. Again, the edges will all be trimmed in poplar to make everything look neat and tidy. I loath working with plywood.
Baffles for the water tanks ready to go in.
And the lids for the tanks ready to go on. Exciting, huh?
Sadly as it becomes more complete there are diminishingly few things lying around to photograph. The other job that is ongoing at the moment is wiring the thing up but there is nothing very exciting to look at there. So here are some other things that are lying around.
This thing is orsum. You go into the big shed freezing your knackers off, turn this on and half an hour later everything is toasty. At the moment it costs about £2.00 per hour to run but it is a small price to pay when considering improved productivity. The flexible duct was for testing to see how it would heat the other workshops and it is would be worth running some permanent ducting. It can also be poked into the Super's body for extra super warmth.
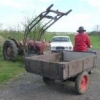
This was purchased from the farmer next door. We had a 3CX before but it was a bit big for most of what we wanted to do. There is a bucket on order for it and the old man has gone down to Darlington today to pick up a set of pallet forks for it. Should be handy to have around. Note insignia in background.
-
 JimH got a reaction from AnnoyingPentium in Automotive bull5hit facts thread
I call bullshit. Everyone knows that a box of tissues on the parcel shelf is the automotive equivalent of growing pampas grass in your front garden.
-
 JimH got a reaction from MiniMort in Automotive bull5hit facts thread
I call bullshit. Everyone knows that a box of tissues on the parcel shelf is the automotive equivalent of growing pampas grass in your front garden.
-
JimH got a reaction from Matty in Automotive bull5hit facts thread
I call bullshit. Everyone knows that a box of tissues on the parcel shelf is the automotive equivalent of growing pampas grass in your front garden.
-
 JimH got a reaction from HMC in Woollarding
Apols if this has been done before but wtf?
Do you reckon he knew about it or did some scally just rip off some Top Gear audio? I've no beef with Mr Woollard's sturdy and dependable presenting style but in today's money you would be forking out about £1.30 at peak rate to listen to his slightly anodyne views on the Vauxhall Belmont or the disappointing gearshift quality of the updated Fiat Regatta.
Maybe it got a bit more Top Gear After Dark.
-
JimH got a reaction from MiniMort in Woollarding
Apols if this has been done before but wtf?
Do you reckon he knew about it or did some scally just rip off some Top Gear audio? I've no beef with Mr Woollard's sturdy and dependable presenting style but in today's money you would be forking out about £1.30 at peak rate to listen to his slightly anodyne views on the Vauxhall Belmont or the disappointing gearshift quality of the updated Fiat Regatta.
Maybe it got a bit more Top Gear After Dark.