Bfg
-
Posts
3,025 -
Joined
-
Last visited
Content Type
Profiles
Forums
Events
Everything posted by Bfg
-
Not much to report today. I did correct the curved shape of the infill piece and then got on with making the first of the handed pair of front bumper side irons. I'm not using the original side-irons, which would have poked through the side of the new valance, but instead have fabricated a new one which also clamps / secures in place that panel at the sides. The slotted hole in the bumper's own bracket gives the necessary vertical adjustment. All too often you see the rear blade of these slim-line bumpers hanging too low ..as if presenting a sad face (similarly slim bumpers used on the Jaguar 240/340 and Daimler 250, as well as the Jaguar S-type, Mk10 & 420 and Daimler Sovereign). The inside curved flange of the bracket is cut to follow the outside curve of the valance panel, and two bolts clamp it up to the underside of the 'crows feet'. I've yet to trim the bottom corner of the (recycled metal) bracket off to be horizontal. From the underside it looks as if the valance panel is positioned a long way under / inward but even there it's almost too far out relative to the wing panel above.. The chassis structure prevents it going inwards any further. Pete. I've also reshaped the back corner of the valance panel to bring it in better line with the shape of the wheel-arch.

-
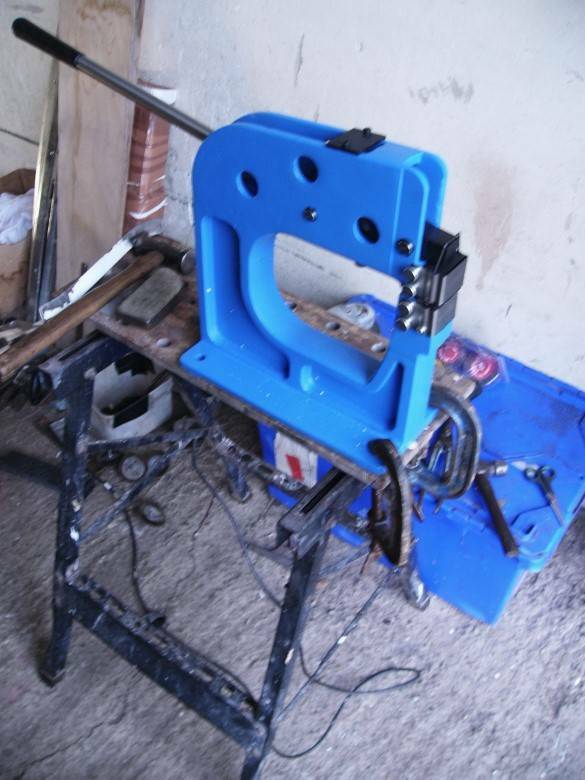
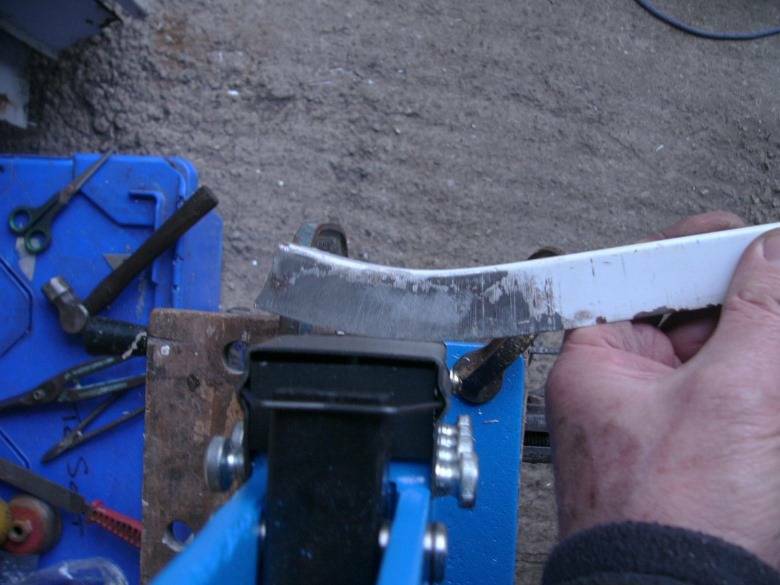
Yesterday I drove down to north London to buy the new-old-stock Daimler radiator grille. I'm very pleased to have found that ..just when I needed one, and then upon my return to Ipswich dropped it off at the radiator repair place for it to be pressure tested (£25+vat). I could have done it myself but I don't have the bungs and making them up would have taken more time than £25 worth. Yesterday I also received the metal shrinker-stretcher I'd ordered off Amazon. Today I opened this pressie to myself. . . In part, I chose this particular tool because it appeared to have a sensible and easy to clamp-down base. That decision turned out to be a good one as it's a pretty heavy cast iron lump and just with two clamps to the edge of my workmate it was solid enough to use straight out of the packaging. It is also light enough to move around when dancing with the full car width of under bumper valance panel. I took it outside to benefit from better light and more space. I started with just trying a test piece out . . . Using the shrinking jaws first, simply because that's the way the tool was set up. And then I had a go with the stretcher jaws. I'm impressed.. Although just a test piece I'm very pleased how neat the flange face remains. It's true there are fine grip marks ..but not nearly so ugly as I might get with clamping tight with a pair of mole grips, and perhaps even more consistent than my hammer & dolly. Those marks would easily be primed and painted smoothly over. Most certainly it's both quicker and far neater than snipping darts to take the flange around a curve, or the subsequent welding of those V's to restore the panel's stiffness. First lesson to be learn was to take things steadily, working along the panel's flange systematically to create a smooth curve, both to the full depth of the flange and then again at just the half-depth of the flange. A second lesson was to clean the paint and crud of the metal to be stretched or shrunk first. The tools jaws are cut with very finely slotted teeth ..quite similar to the face of a fine file ..and these clamp to grip the surface of the metal. If the panel's surface is painted, then that paint comes off and clogs the jaws. a power wire brush soon cleans the paint out, but I can imagine it would quickly become laborious ..removing the jaws frequently to clean them. Much easier to just remove the paint first so that the jaws grip directly onto the bare metal. The valance panel I'm re-making was cut down the centreline and widened by 13". I used a scrap panel off an electrical appliance salvaged from the skip whose edge already had a 90-deg fold. I simply eased that angle a bit before tack welding it in place. The fold was of course dead straight (as seen above) and although it would be completely hidden behind the car's front number plate - so it being flat / straight wouldn't matter a jot.. one of the reasons I bought this shrinker-stretcher tool was to improve the quality of the things I'm making. Other things I make may well be far more visible. So, to practice further today, I stripped the paint off the centre infill section and used the shrinker tool to add a little curvature. . . ^ that to me is mega cool. In fact I got carried away and over-cooked-it ..to be too curvy, but I'm confident that I can stretch it back to where I'd like it to be. At £153 off Amazon ..delivered within 2 days... my major annoyance is that I didn't buy one 20 years ago. Not least before I started cutting & shoving this front valance panel for the Daimler. And not least before I made the metal gearbox cover for my Triumph. Embarrassingly, even as a engineering professional - I didn't even know these tools existed for the home / garage market. But with a sheet metal folder and good quality metal-cutting shears and snips it opens up a whole new dimension to my panel making.. And as the repair rear-valance (under bumper) panel for this car cost £285.31 + delivery + VAT ..I can now make it myself. Likewise the roof bows I need to support around the sunroof. Tbh I don't really like handling cold-steel panels.. I'm very much more comfortable with wood ...but the opportunities this opens up in car repair / restoration is rather liberating. Bidding you a pleasant weekend Pete
- 179 replies
-
- 11
-

-
ps.. it's just been pointed out to me that my car's radiator may be the same as a Jaguar 2.4 rather than a typical Daimler V8 one. This is because all but 750 of these Daimlers were built as automatics, and so had cooling pipes from the radiator to the gearbox heat exchanger. My car was one of those built with a manual gearbox and so its radiator doesn't have the extra plumbing. " automatics...., had cooling pipes from the radiator to the gearbox heat exchanger " is not quite correct ... Referring to the workshop manual and again looking at photos of the radiator for the automatic Daimler versus manual cars it seems that the automatic's radiator simply had a loop of pipe in the bottom of the radiator. With gearbox oil pumped through that, via pipe connectors in the bottom of that tank (see above) the coolant radiator is the gearbox's 'heat exchanger'. Bottom line being that I can use either radiator (intended for the automatic or for the manual gearbox). I'll simply not have a use for the oil-way loop in the bottom tank. Pete
-
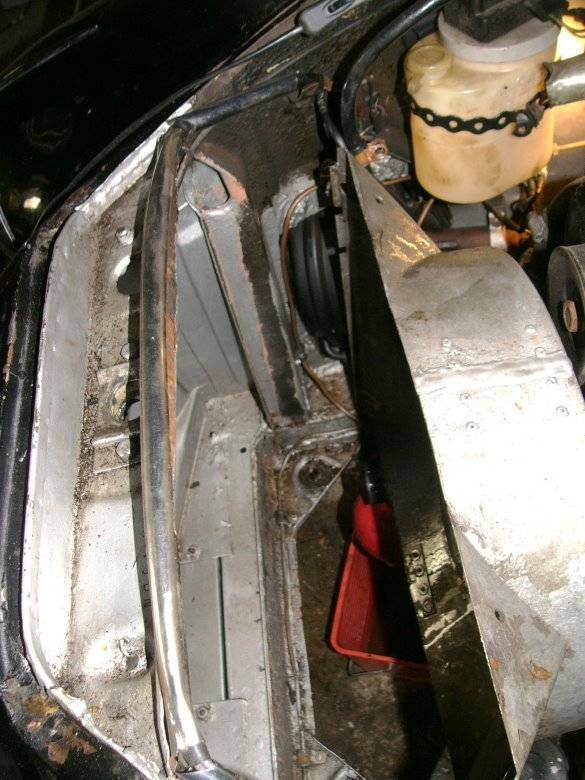
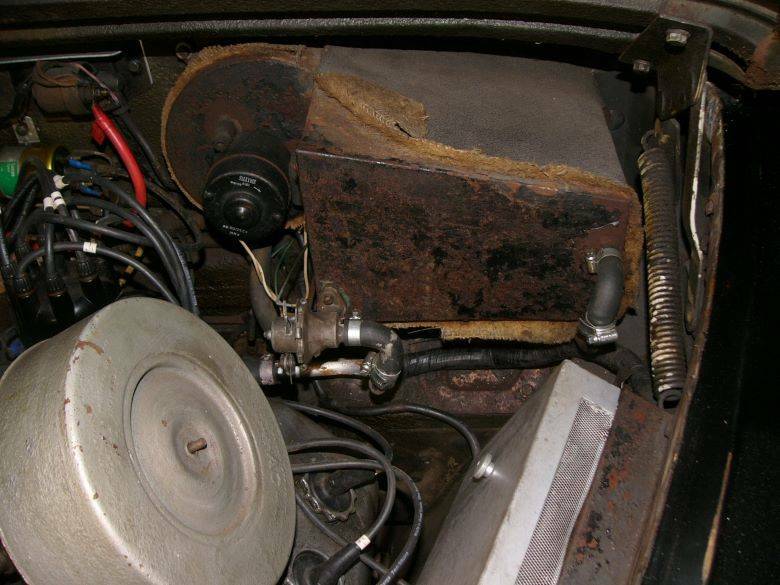
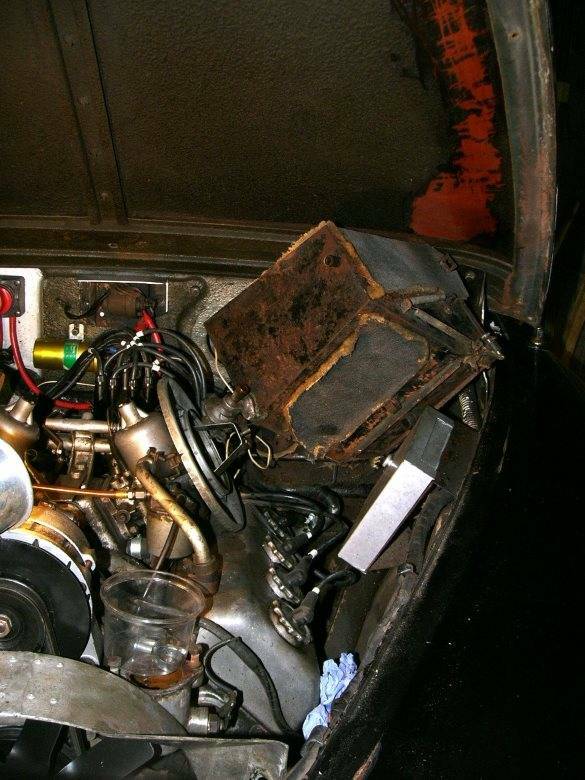
Yesterday, I stopped all else I was hoping to do and removed the radiator. . . ^ not being a modern I didn't have to dismantle the front of the car to get the radiator out. After the top and bottom hoses were freed, four nuts released the fan cowling ..which just pushes back to wait until the radiator is repaired). Then two bolts held the radiator itself in place to the body's grille surround. The bottom of the radiator simply has two pegs to locate it. With the system drained down I took the opportunity to remove the heater. . . My Triumph TR has its heater box tucked-in under the dashboard, and I'm sure that would be a sod to get out. In comparison, aside from the awkward reach to control linkages and bulkhead fastenings, this heater was very easy to remove. After releasing it's fastenings, the water pipes and linkages.. the heater box only needed one air filter to be removed before it lifted out. As we all know.. not everything goes to plan. Some fastenings have turned to ferrous fossil I took this and the radiator down into town (Ipswich) to Sheldrake & Wells, for them to assess and possibly repair. The car's heater was not very very impressive, so I suspect that is just furred up and after 55 years would benefit from a new core. We'll see what they advise. That's all for today, save to add that I've ordered one of these . . . It's a metal shrinker / stretcher to curve the flanges of panels. With promotional discount it cost £153 inc P&P, off Amazon, which is better value than I could find on ebay, or through places like Machine Mart or Tool Station.. I think it'll be useful for tidying up the curved flanges of the valance panel and other bits I tend to make. in effect saving its' cost in less darts and snips needed to form flanges around their curve. I've never used one before, so it'll be interesting to see if such a relatively cheap tool lives up to expectations. Watch this space.. Pete
-
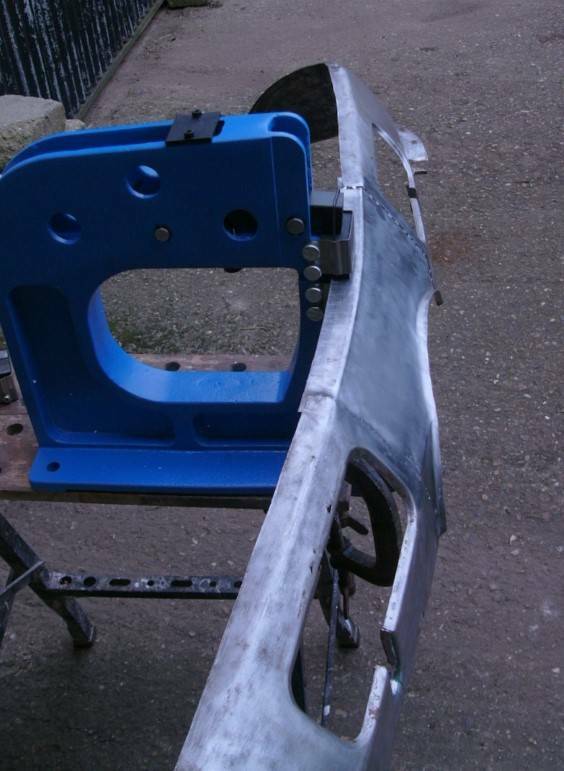
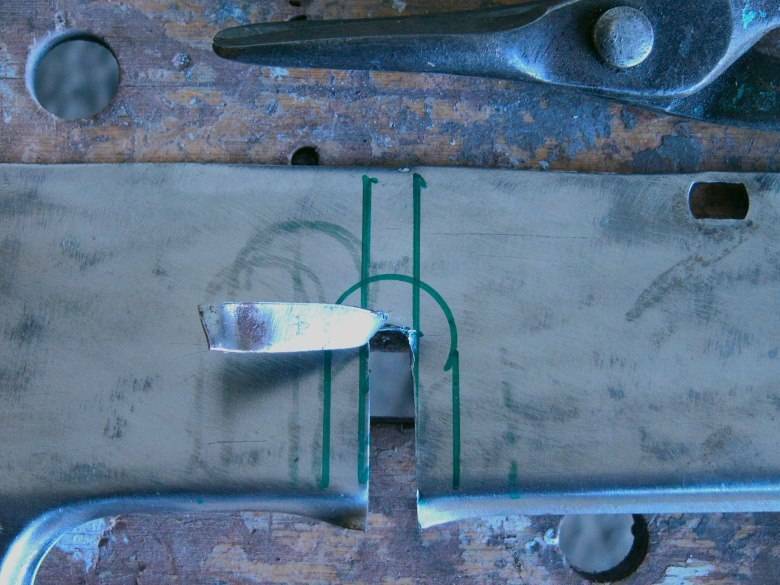
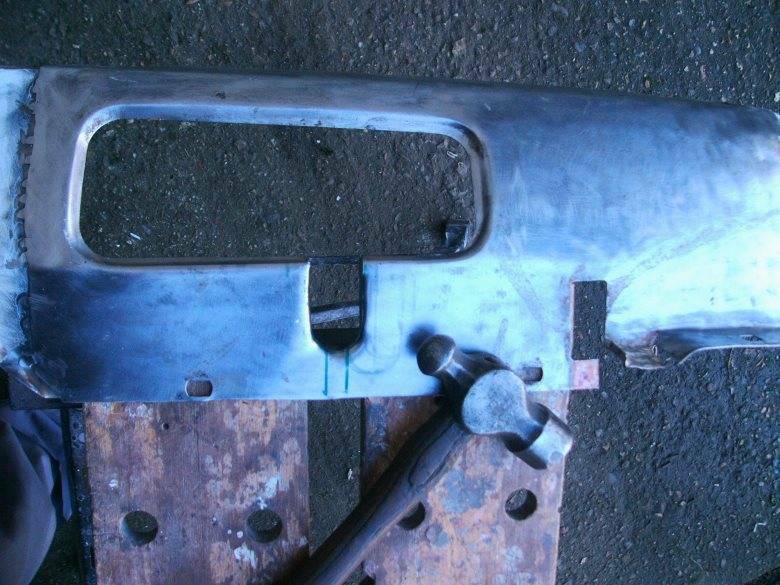
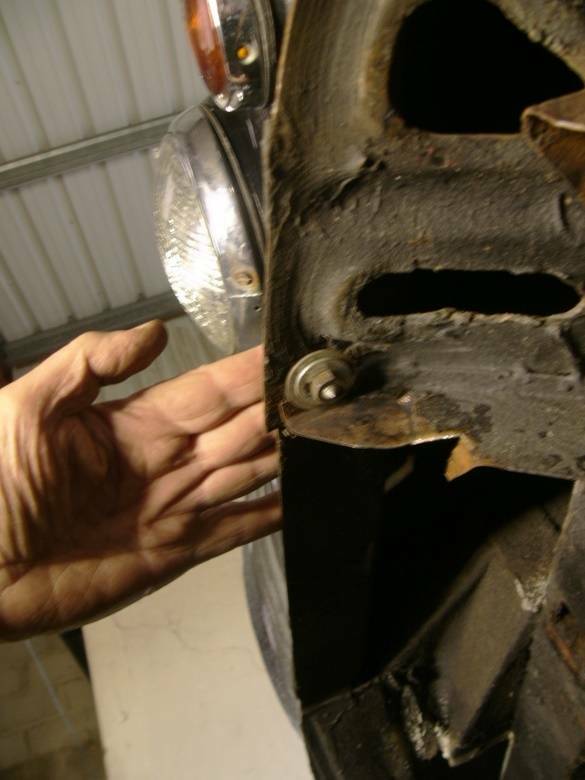
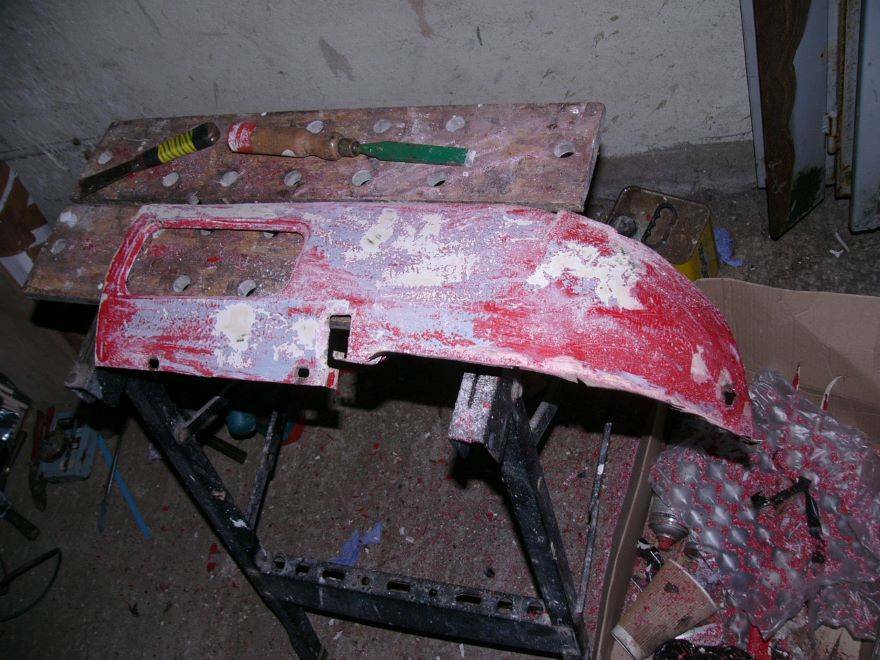
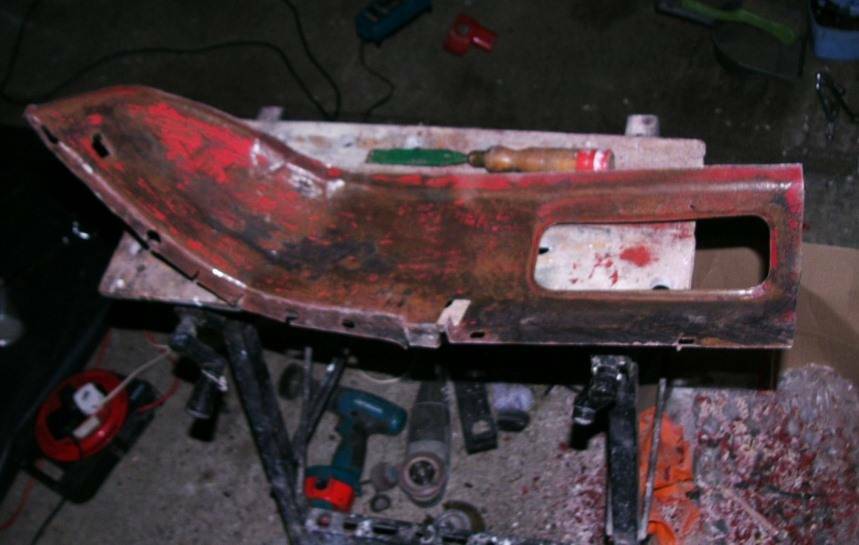
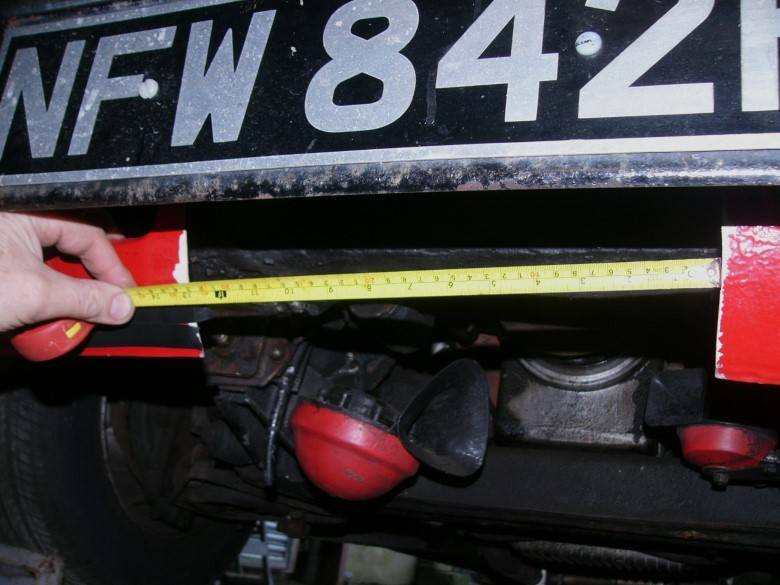
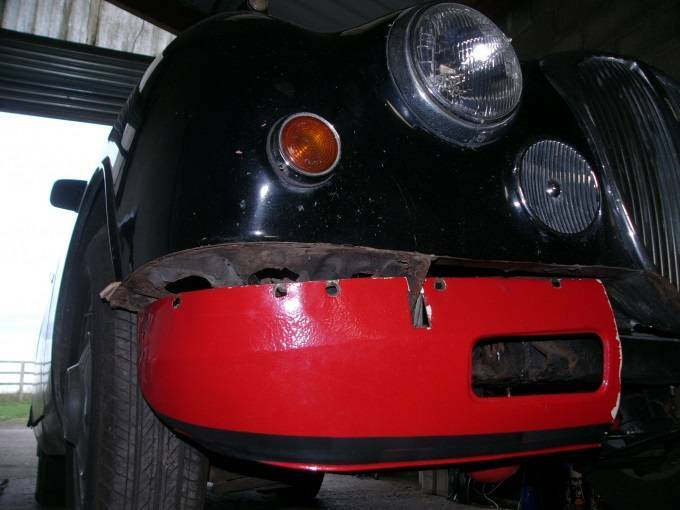
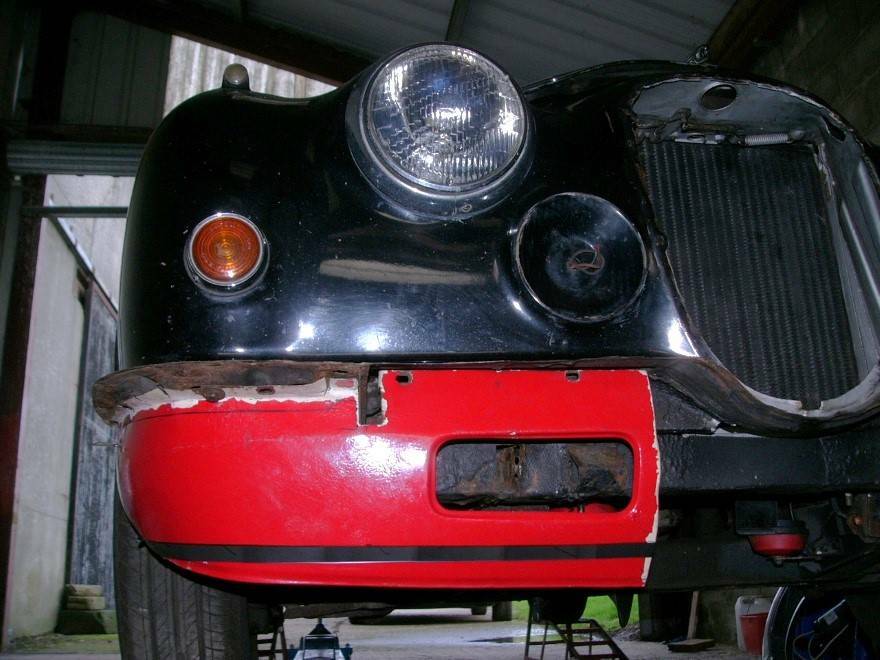
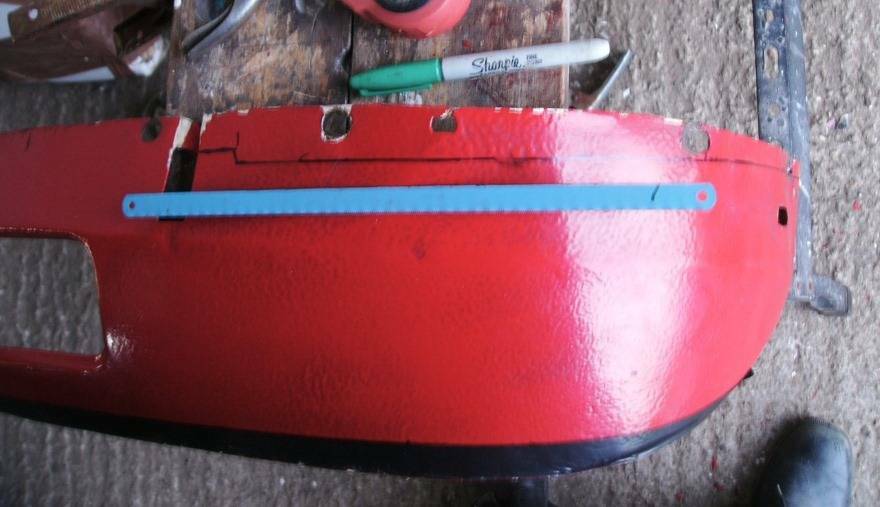
The details can sometimes take longer than one would like but they have to be done. . . ^ in behind the rectangular vent you'll see a hole through the chassis's front cross member where the bumper iron fits. That iron, as it comes forward, curves upwards & outwards, and then is bent for its bolting face (for the bumper) to sit immediately under the body's horizontal / knife edge flange. Getting that exact position of where that bumper iron should pass through the valance panel took a bit of care and attention, with my first marking its position on the underside of that flange (with the valance panel removed) and then transferring those marks, together with a projection of its height down onto the valance panel. The green felt pen marks are where I've determined the bumper iron would pass through the valance. Now how do I cut that slot. ?? This is how I did it . . . ^ Firstly I marked a line around the slot, where I determined the bumper iron would pass through, and then cut just the slot. The outer line is where I want the folded corner of a return-flange to be. . . ^ And then I applied the ball end of a very old hammer, inherited from my father, to fold the required return flange into the gapped size of the workmate's jaws. The return flange so made restores the stiffness of the panel, which otherwise (if just a cut) would have wavered and probably split after a time. This photo shows work in progress but with a little more snipping and 'application' the edges were trued up a little neater. . . ^ I think the slot (with 1/4" clearance around the iron) ended up looking pretty reasonable ..not least considering I'm not exactly well practised in the art of panel-bashing. Of course the same was repeated on the other side of the car, and then the bumper refitted to ensure they work when all was bolted up tight. Thankfully the irons and bumper bolted up just fine, and those grooves ..for all the effort to make them neat, will hardly be seen when the car is down off the ramps ..just the way I like them to be. I may be putting a lamp or else a grille behind those rectangular air intake holes, but I do like their giving relief to the otherwise featureless valance. Unfortunately.. I then noticed a drip or three.. Although I've not touched the radiator, I might only guess that my fighting with stubborn bumper iron bolts and hammering of the valance panel's flanges had shaken it. . . Not much to see on either side of the core, but overnight it dripped about a litre. Odd though it may seem, I'm really very pleased ..because I much prefer to find and rectify this now, rather than when I'm a hundred miles away from home and heading out to a summer show. Pete
-
Quite possibly you're right. The fluted Daimler grille might be better suited to the beige colour i plan to refinish this car in. As it is .. against black paint, I tend to feel that amount of chrome fluting is top-heavy relative to the slim-line bumper. With the doubly broad bumper of the earlier model, I wouldn't have looked to the Jaguar grille. As the two panels are directly interchangeable, save for the wearing through of paint under the taller Daimler grille, I can always swap back, &/or otherwise keep the original for the next owner or for show originality. Yours .. proud to be a peasant
-
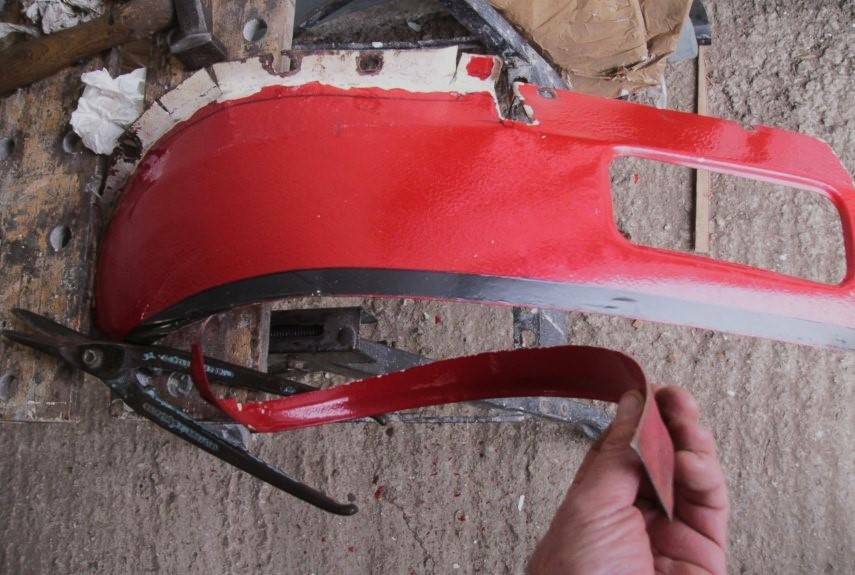
A little more done this afternoon, in part you cannot see anything of it but I had the LHS corner off to panel beat it to a smoother rounder shape. And then i made a centre bridge piece for the two. . . ^ formerly a panel off an appliance, sort of shallow lid shaped which was again salvaged from the scrap bin for the sake of a decent piece of steel. For scale, the width of the piece being cut out is 15" wide. After a bit of reshaping it goes here . . . ^ the top curve is rolled forward for stiffness and the bottom has a reverse flange to likewise stiffen its bottom edge. The two (formerly MGB ) corners and the new infill piece overlap, so I removed the enamel paint in the joint and carefully clamped them together to get a pretty flat face-to-face which again I systematically tacked up. Of course a spot welder would have been neater, but hey ho., when those welds are linished flat, and a skim of filler over it before paint .. I think it'll look okay behind the number plate 😊 In any case the whole idea is to discretely finish the front of the Daimler ..by tucking her chassis underlumps neatly away, rather than it being a carbuncle, as incongruous as that on Ian Callum's Mk2 'facelift'. 'Facelift' is more than just a little ironic ..as it looks more like the double chin ".... bubba my pussy cat, come home to Jabba" discretion being the better part of valour You see it and yet you don't. As for myself - I notice it more when it's not there.! Contrary ol' guffer !
-
I'm not sure a proper mini-skip would cost £6-grand, let alone an unfinished one with cross eyes !
-
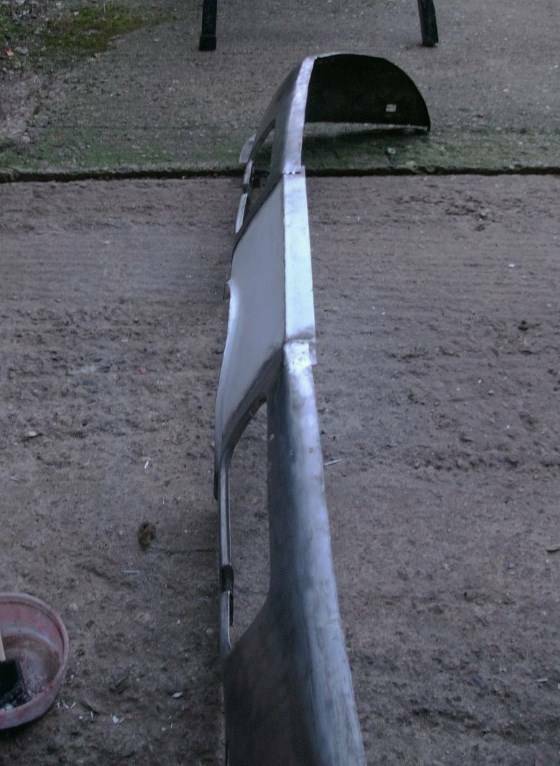
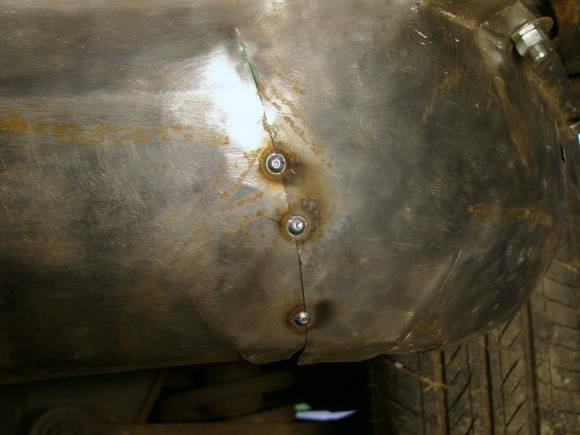
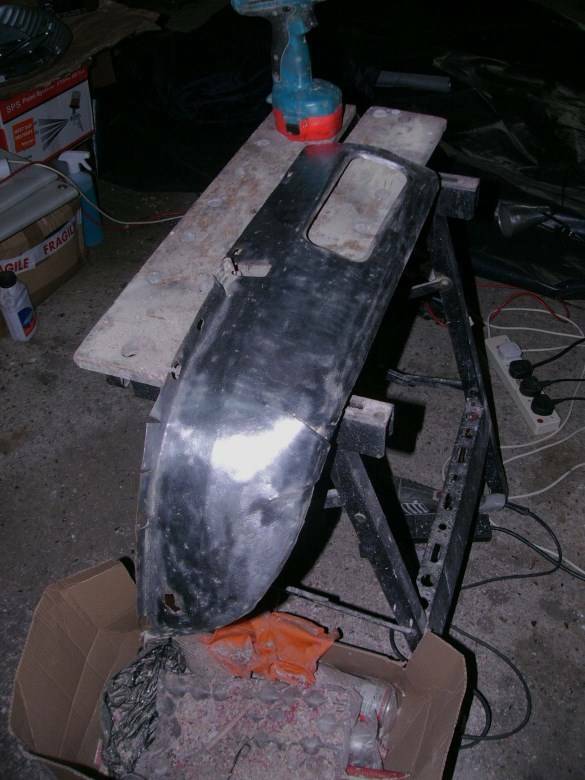
Back onto the job albeit somewhat a bit slower because laying on my back breaths flem into my lungs and starts me off deep-chest coughing ..same issue as preventing my getting a decent night's sleep. Nevertheless I can't sit around waiting to feel better when a job, or a whole lot of jobs need to be done in pretty quick time.. in this case before she goes into paint. So back to it.. After a bit more work to remove the last remnants of paint and primers, I was back down bare metal with surface rust pitting on the inside but clean enough on the outside to see and feel what I was doing in terms of starting to remove dents and creases from where I'd roughly rebent this panel to approximately fit under the Daimler. This time I repositioned the panel half-an-inch further back, which after some rework ought to improve the line down from the wheelarch, and also (from side profile) lessen the jutting out chin. With it so positioned I cut out the overlaps (..of the darts) so as to mate the butt jointed edges. You can see by the air-holes in a few of the spots of weld, that I was having a problem with the mig weld's supply of argon-shield. Bottom line is that regulator isn't worth the value of the plastic bag it was packaged in . . ^ Total waste of space ..in any language.! This one, a regulator for a disposable gas cartridge, was a new-old-stock still packaged item from a friend, who let me have it after the one I'd bought from Machine Mart was similarly crying useless. I took it back for a replacement, and before walking out checked it. The four or five the store had in stock were likewise useless. I hoped they had just a bad batch , so when Mathew had one going free I said I'd give it a try. Not just a batch then ..just a worthless piece of junk. None of those tried (six or seven in total) simply didn't let the gas through from Clark's own disposable gas bottle, likewise supplied by Machine Mart. Last night, on the way back from the barn, I stopped in to Tool-Station to buy another type. This one, sold under the SIP brand-name, it is in cast brass. . . https://www.toolstation.com/sip-mig-gas-regulator/p41163 At £21.62 it isn't cheap ..for a gas regulator with no gauge and poor calibration, but it works. I needed to turn the knob open 3+1/4 full turns to get the gas flow required. On depressing the mig welder's trigger the gas comes as spurt before settling at a lower steady but reliable pressure. My old gas regulator (for full size bottles and with a volume & a flow-pressure gauge) didn't do that initial spurt. Anyway it works and now i can get on and splatter my pigeon-mess more purposefully. ! oh, I also treated myself to a 4-ft long LED strip lamp (formally known as 'fluorescent') < here > with a water resistant rating of IP65. It cost me £35 ..but I needed better lighting without the deep shadows thrown by single bulbs. This 5400k lumen lamp needed a power lead with plug, so that I might use it portably ..low down and around the car, and that came from an old electric sander which had given up its ghost. Lighting and a welder which works.. will wonders never cease. ? Nope.., because next door to Toolstation is a charity shop, where I bought a kitchen toaster and a small electric kettle.. Now I can have light, be able to weld ..AND have HOT Cornish-pasty and HOT coffee for lunch. Whatever next .. a chair to sit on ! ? Back on with the job . . The LHS older repairs are somewhat different to the RHS. Just under my finger you can see a step in the panel line. This is where the replace corner reinforcement (the Jaguar Mk2's infamous 'crows feet', which rusts away because it's 18g ferrous steel placed in such a vulnerable position, just forward of the wheel-arch) was welded in 1/4" too far forward. Normally it wouldn't matter but this and other differences were noted when trying to match one side of the new valance panel to the other. ^ previously the corners were just snipped and overlapped to approximate the required tuck under. Today I checked what I wanted, took a breath and cut the dart. This side being about twice the amount I needed on the RHS corner. I could have tried to make the two corners dimensionally symmetrical, but instead I've chosen to just try and make it look right, from one side to the other. . . ^ taking shape ..literally spot by spot. I'm happy with the tucking under outside shape following down from the wing either side. The overall height presently looks a little less deep on the LHS but it's still work-in-progress. I'll look again tomorrow. In the meantime I bid you a warm n' dry and comfortable evening, Pete
- 179 replies
-
- 11
-
-
Thanks for your support guys. After two nights of barely any sleep, I'm off workshop tasks with a head cold / cough today. Previously I've been stripping the paint off. . . I've been using Nitromor and either the can which I have is old and lost its virility, or manufacturers have been forced into making it safer to handle, &/or else the paint on this panel was resistant to attack (possibly 2k ?) Probably all of the above. In any case its taken flipping ages to get it back down to bare metal so that I can see to weld and panel beat a smooth shape. I'm presently working to clean out the inside of the panels now, which include underseal. The Nitromors doesn't do much with that so it's down to scraping and the power wire brush. I'm winning but don't like wasting so much time doing so little. Pete
-
Took the bottle back to get the deposit refunded.
-
Funny that, as a design professional - I never made the headlines or got noticed very much, because I focused on integrating my design work into what was being developed or else what the rest of the design team were creating. Altogether a pretty counter-productive in terms of promotion, fame or fortune.
-
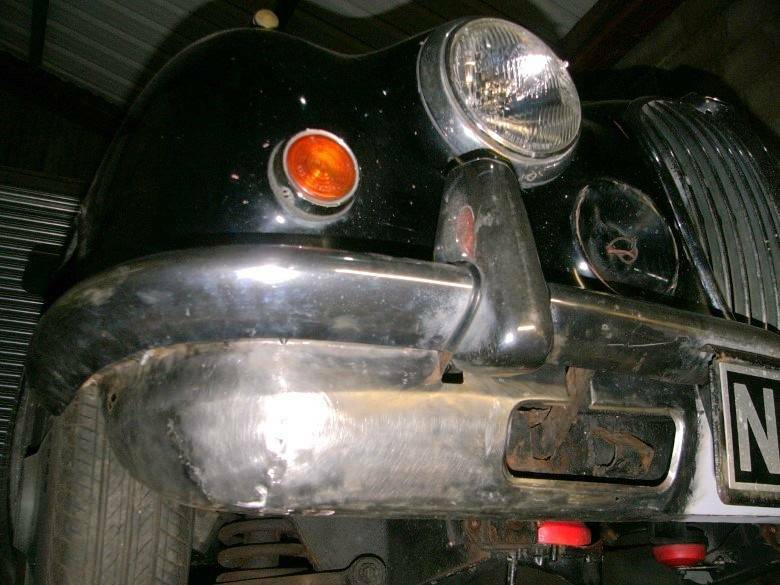
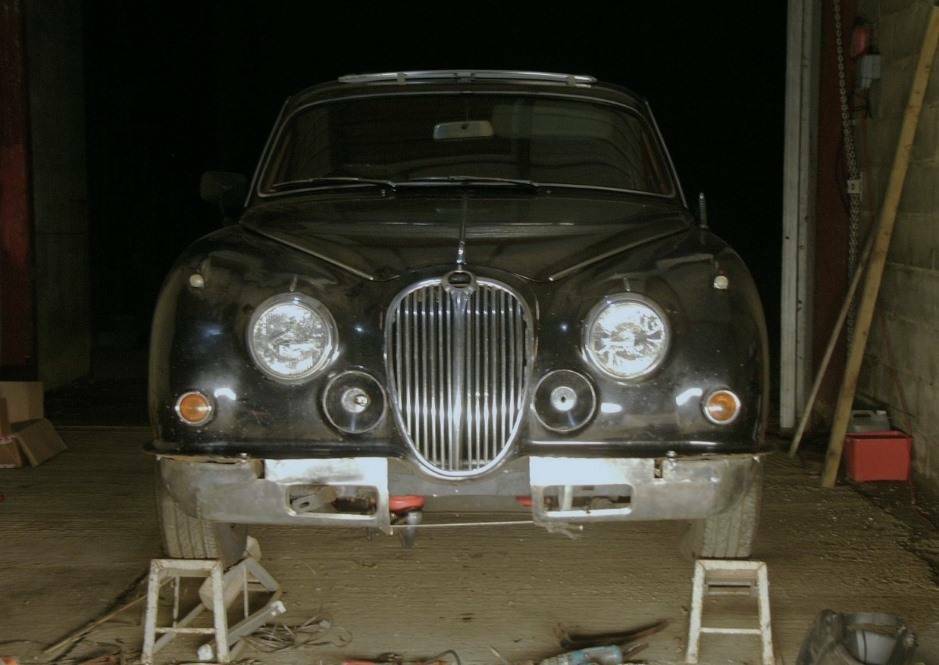
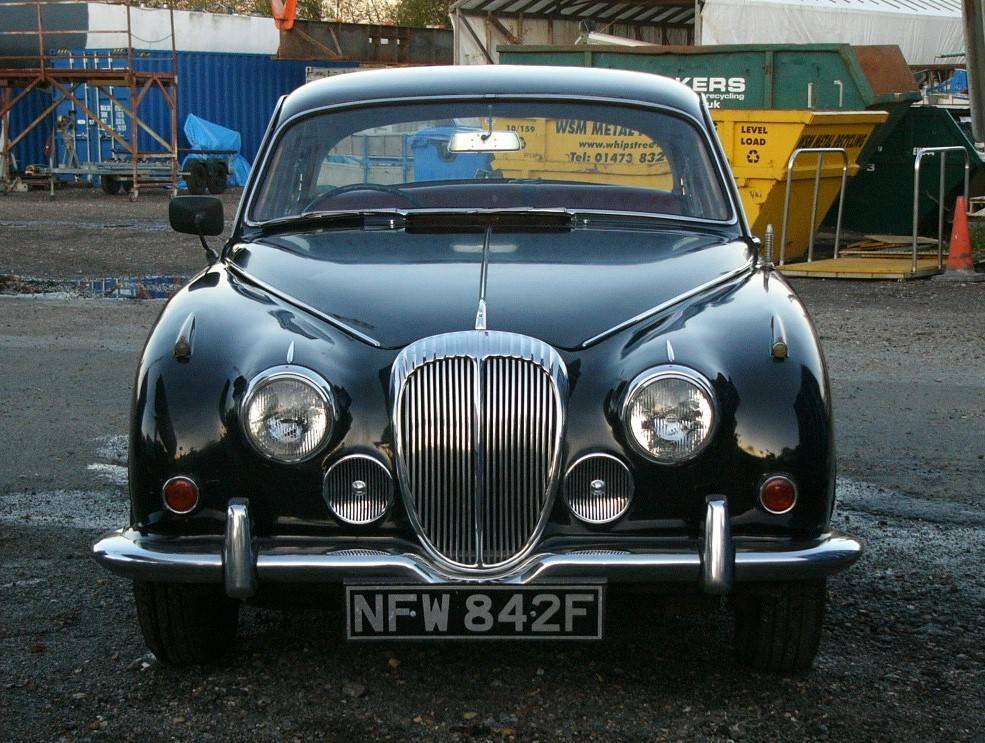
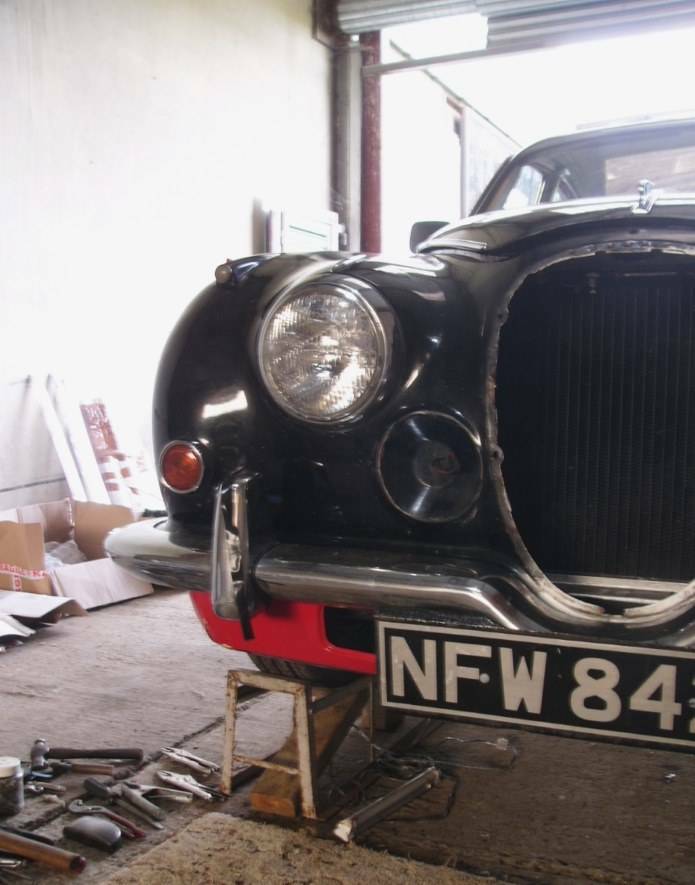
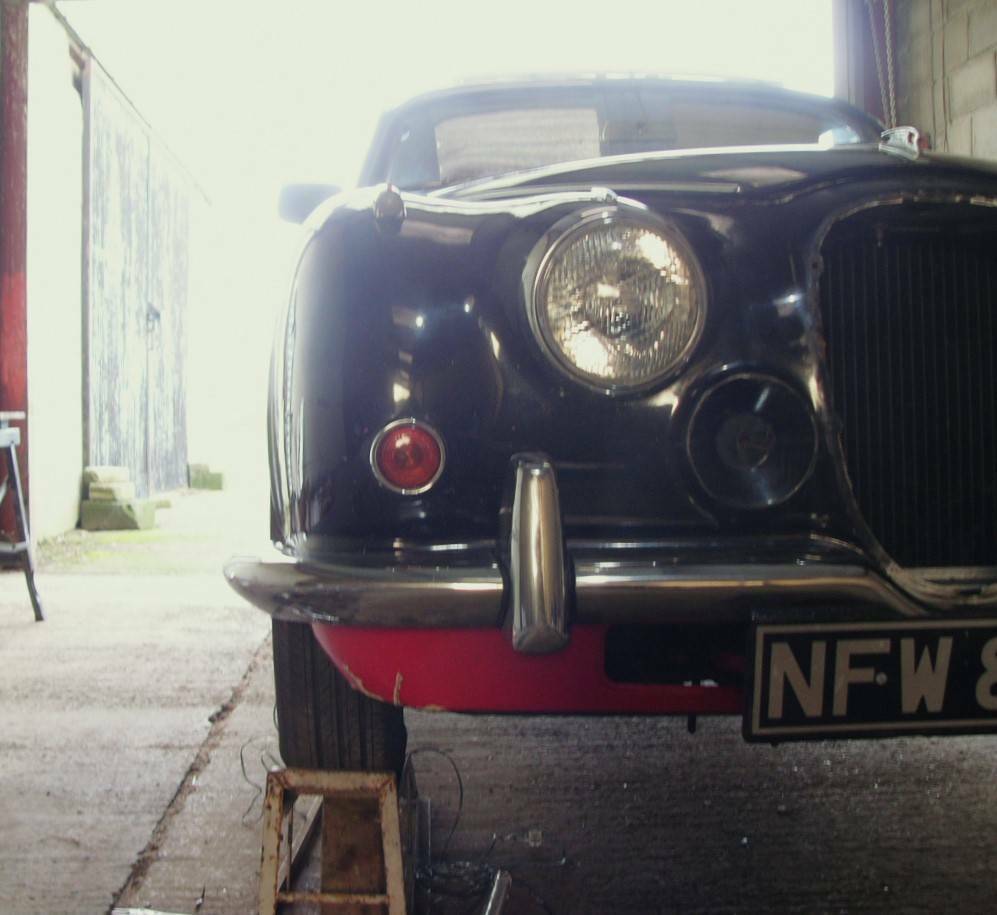
Minor progress yesterday, just getting on with remaking the LHS valance.. trying to match it to the RHS . . ^ You can see how the MGB panel was a little too narrow, which after being cut in half, down the centre, and spreading it - I had the length to wrap further around the sides. The gap (yet to be joined) being neatly hidden under the number plate. I like it ! Even with the car up on ramps, the ugly chassis and suspension 'lumps' are neatly tucked away. And I'm happy with its more discrete size and tighter shape now. Next I'll need to strip off its paint and get the welder set up. I've not used that in two years as I've given up paying BOC bottle rental, so I'm going to try Clark's small gas bottles together with a cheapo plastic regulator. But even when welded up and beaten smooth shaped, the final flange fitting cannot happen until the underside of the body ..where this panel will be bolted onto, is repaired. I've removed the horn grilles from under the headlamps - to see how the front of the car looks with less chrome. I think, without them, the front of the car looks lighter, more sporty, wider and less cluttered. Of course, the mass of chrome will look very different when this car is repainted beige. A few of you may also have noticed that I've swapped out the radiator grille for a Jaguar one, without the Daimler fluting across its top (..that being a stately radiator grille to vie with Rolls Royce ?). I'm not intending to rebadge the car as a Jagwaar but to my eyes the lighter grille header & its body colour surround is a better compliment to this car's slimline bumpers. Is less, not sometimes more ! ? ^ As she was, elegant but perhaps rather over-adorned with chrome. ^^ Conversely (..here & barn-photo above) the much slimmer rim of the Jaguar grille. The horn grilles (see above) are 6" diameter, and the spot-lamps which otherwise fit in those recesses are even more oTT, but perhaps 4" diameter spots would be more in proportion to the rather confined space between the headlamps and the grille. What do you think ? I'm just playing around, and everything is easily reversible. Even the radiator grilles are interchangeable. I'll keep the Daimler's bonnet-top D, rather than using the much more interesting and attractive leaping cat mascot. And in place of the Jaguar (2.4, 3.4, or 3.8) grille badges, I'm on the lookout for a nice condition D horn push button (below) to use as this car's grille badge. I want to keep the unique character of the Daimler, but to me that lies with the V8 and the way she drives, rather than on badge-engineering and bling. Other than that I like an understated Jaguar. Pete
-
The valance is quite tight to, just 1/8" away from, the chassis cross-member's bracket for the side bumper irons, so its rounded corner cannot go inwards any further, but.. to better follow the down-sweep curve of the wheel-arch - I can see that its rear bottom corner (immediately above the corner of the ramp) needs to come back another 1/2" and also be twisted outwards quite a bit further. Taking the time to review photos, in the comfort of one's home and over a cup of coffee, is very often useful. The author of a blogger who was building a light aircraft - perhaps 20 years ago, called it "taking a Jenny" (after his wife) ..who would bring him a coffee and together they would stop and have a look ..and share the progress being made. I liked that and so likewise call my stopping for five, to stand back and look from different angles 'just taking a Jenny' after that good woman. Pete
-
-
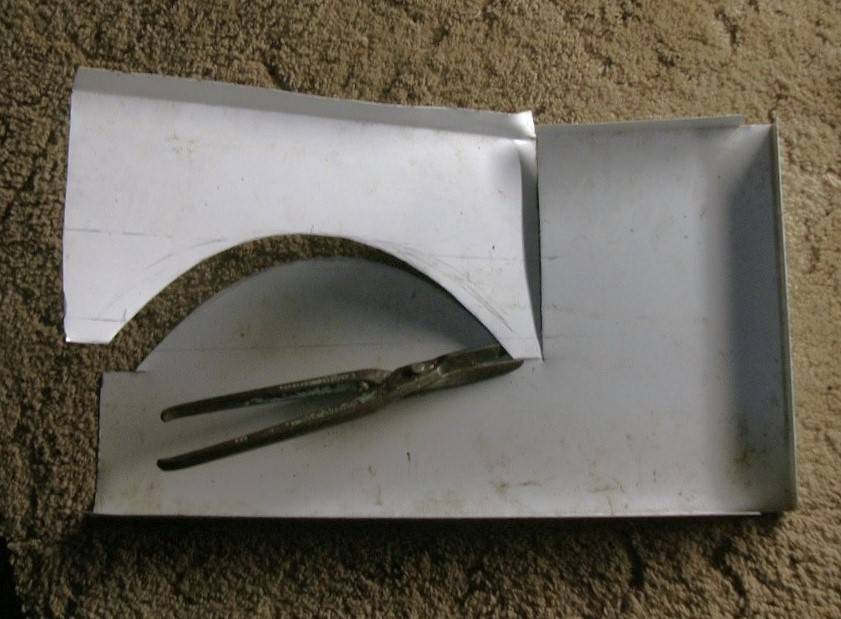
Research ..no not really much choice ..not at least since chrome bumpers and under valance panels went out of fashion 45 years ago. Most everything since went American rubber bumper, Euro rubber spoiler, or plastic. And even those cars (in the UK) which had valance panels / skirts under their front bumper were often limited in dimension. My TR4, and also the TR6, is just 48" wide O/A and their front-valance-panel only goes from inner wing to inner wing. And although the MGB has bulbous doors, that only adds another 3" to the car's overall width. The MK2 Jaguar / Daimler compact saloons may be diminutive by today's standards - but its almost a foot-and-a-half wider than the TR4. If I could have found one off an Austin 1800 Landcrab then I would have thought I'd won the lottery ..as it was I bought an MGB one, via ebay for £30+ postage. I always have been a big spender ^ common as mustard, but I always liked the look of these. Matty.. "a staggeringly close match in the first place" .. The length forward from wheel arch cutout to the front corner of the car is massively different between many a front wheel drive car, or the British sports cars with a wheel at each corner, and a compact saloon like the Jaguar-Daimler. So I cut it down the middle and re-bent it so its end reached around further to the wheel arch. But even then, there are brackets and strengthening webs in the way. There's a real reason the Jaguar-Daimler saloon weighs more than half-a-ton more than a 'sports' car of the period is that it's built to crush anything upon impact. Nevertheless, issue by issue is tackled in turn, even though it's a challenge to hold the thing in place, so I could can stand back to assess how things are shaping up, without drilling holes either in the car or the panel. But then it's 3:30pm and quickly turning too dark to work in a barn. Anyway, the tools you need are at home, and ...no, I really cannot be bothered to drive out to the storage container to look for the rivet gun ..I'll make do. Still., in time, and with a positive outlook, a mind's-eye impression of how it might possibly look, cuts are made, flanges are bent, the panel's corner reshaped around my knee ( literally laying on my back with feet in the air at 67 years old - its child's play ! ..And then after re-straighten that flange out again before folding it 10mm lower down.., things begin to come together. And so was born the initial mock-up.
-
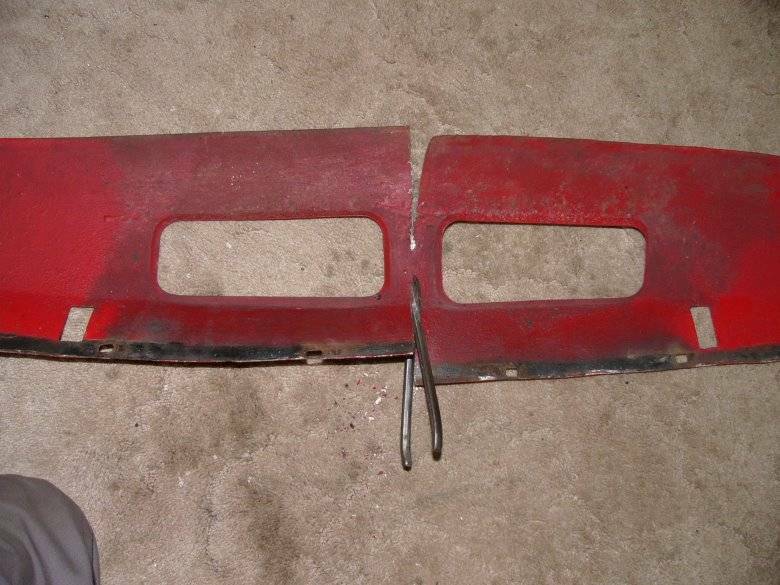
Following the preliminary reshaping & fitting of a front under-bumper valance panel / skirt, two days ago, I've proceeded to slim it down quite a bit. Firstly I raised the whole panel by 30mm across the front and 20mm at its rear corner by the wheel arch. In did this by folding its top edge outwards as a flange. This then facilitates bolting it in place (to the crow's feet). When repositioned, I used black electrical tape to redefine the panel's bottom line. Allowing 3/4" for a bottom flange (folded back) for stiffness, I cut the skirt shorter, and cut darts upwards to close around the corner. I've tried to shape the panels so as to complement the curves of the front wing. I don't want it to project further forward nor to be wider than the body. It's intended to tuck under. There's still a bit more smoothing of the corner shapes, as n' when I get the welder out, but in the meantime I'm happy with its more discrete size. 😎 I'm now proceeding to match the right-hand side to this one. Pete
-
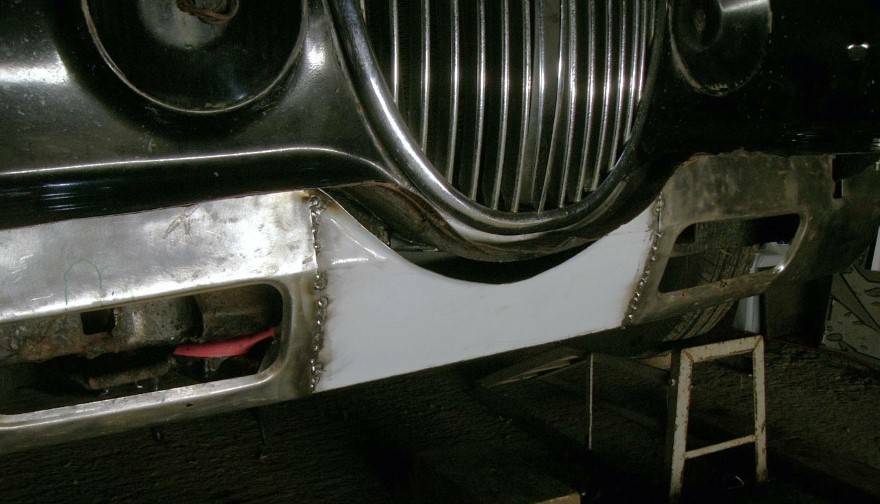
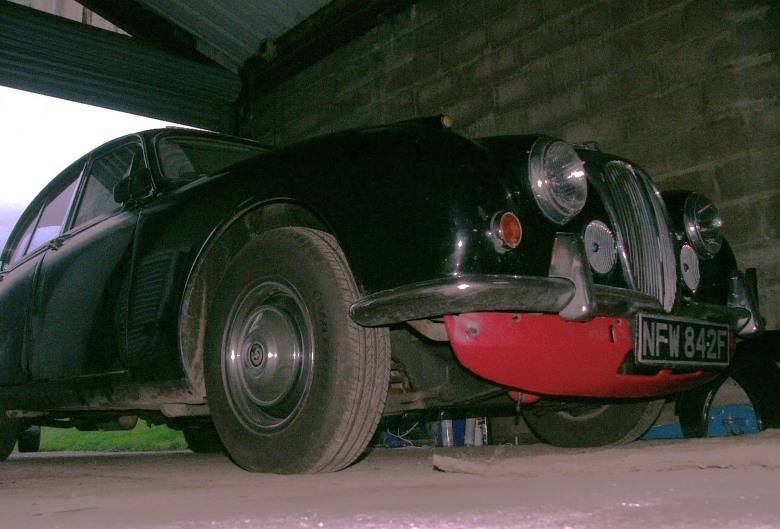
Happy Christmas to one & All. As a single fella without family I've been avoiding shops and instead been playing in the barn with my Daimler. I've never liked the chinless void (..and exposed chassis member) under the front bumper of the slim bumper cars (including the Jaguar 240, 340 and S-type) so am experimenting with adding a lower valance to my car. Photos show just a mock up and to my eyes this valance is presently too deep, but with a little remodelling I think it'll work quite nicely, especially when repainted in body colour. Pete
-
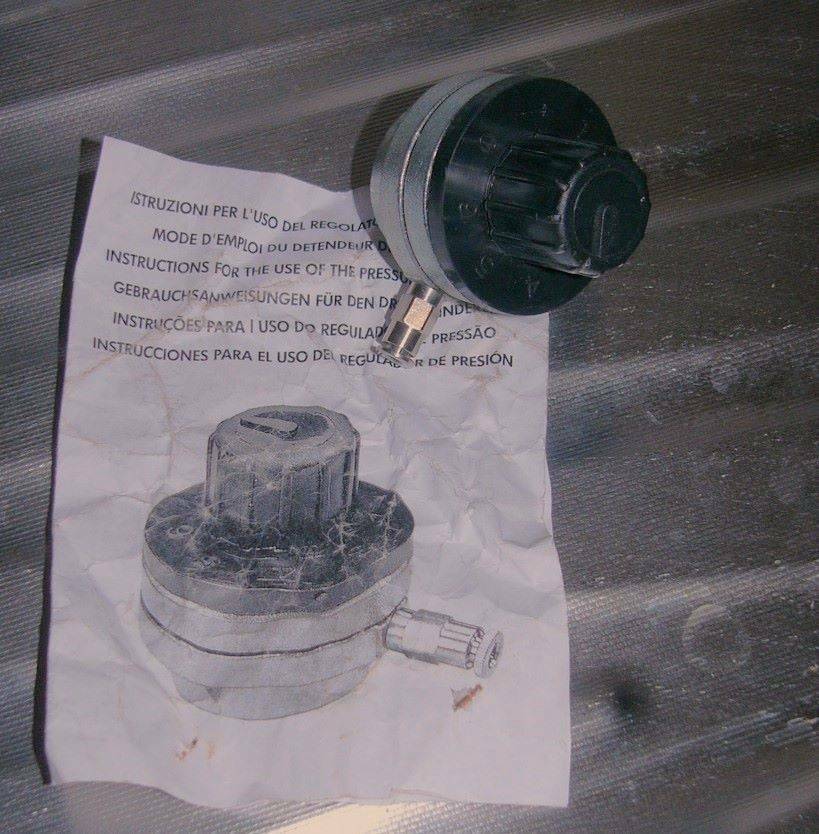
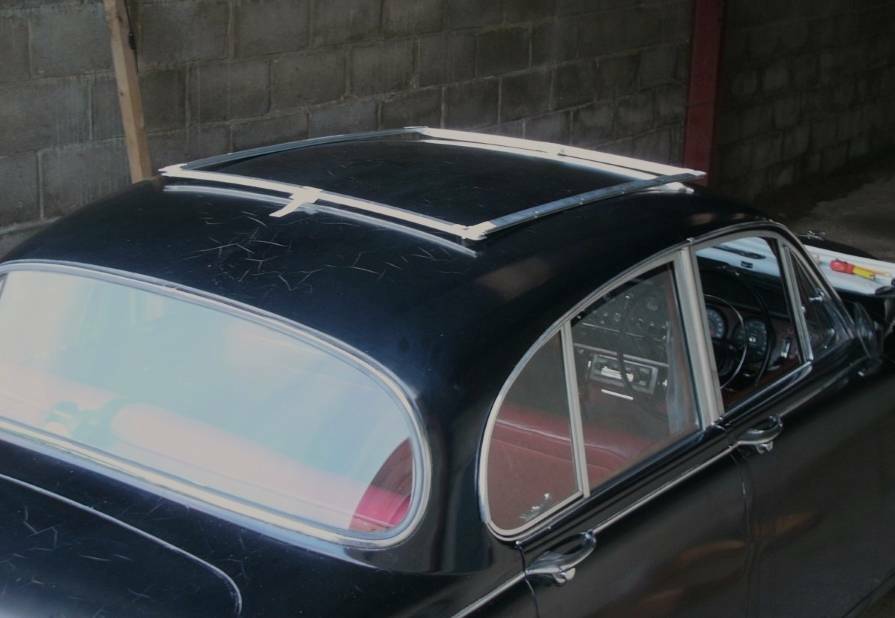
Today, I was down at the barn and looking at a sliding sunroof I'd like to fit. It's a Weathershield (UK made) rather than Wabasto (a German company) and I bought it new-old-stock via a contact I'd made on facebook ..Thanks Alan. It didn't come with a cutting template nor instructions but I've found a generic version of the latter on-line. The sliding-fabric sunroof is approximately 35” square (outside dimensions) and I’m pretty certain it was shaped to fit a Rover P6, which has a flatter roof than the 1960’s Jaguar compact saloon. The attached pictures show the sunroof’s runners / frame, as bought, masking taped in position on the car. The curvature of those aluminium pieces being too flat with 1” gap under the rear corners and 2” or so under the front corners. Carefully bending those aluminium sections, by hand against carpet to prevent bruising at the ends, was reasonably successful in reshaped them, without closing down the hood’s slider tracks very much at all. I’ll readjust those when the frame is dry fitted. Those photos hopefully show how these parts now closely follow the roof’s curvature. I have in fact very slightly over-bent them, for sake of a slightly better final roof shape. Once they were shaped and taped back into position - I set about making templates of the roof’s curvature, because I’d like to have some steel roof beams rolled, to be welded in place all around the cut edge. I used the aluminium frame to position a piece of ¼” plywood, while marking the curve to cut. So far I’ve only cut the templates for the front & rear across-beams. The sides I hope to template later in the week (pending daylight & weather). As you might have noticed ; the black paint on this car (over an original silver-grey) isn’t so beautiful insomuch as it’s shrunk and cracked. My friend Mathew is going to paint the car for me (very likely a fetching shade of Terry Wogan beige) ..so it’ll be a few months yet before the sunroof is finally fitted. I’ve never done one before so it’ll be exciting to cut the hole. Hope it’ll be of interest to yourselves to see progress and the finished job.. Pete.
- 179 replies
-
- 12
-
-
The Alfasud was a highly regarded engine and mechanicals when I was building kit-cars, although most often considered for kit-cars with rear-engines. Those designs were at the other end of the market than the cars I was building, but still there was occasional talk of using the Alfasud in lieu of Citroen's GS power plant. If I recall Midas played around with it too, in lieu of the mini cooper engines.
-
An interesting feature of this car's construction was that it was a bonded assembly. The pop rivets along the hand bent (no sophisticated equipment, just a hammer and dolly) were only there to hold the panels in place while the adhesive set. Only in recent years, and with modern adhesives, have glued together car panels become more commonplace. Tony was doing this 55+ years ago, for a car which was to be pushed to the limit with regard to cornering, steering & braking, forces. Like contemporaries of the time (Ford GT40, Lola 170, E-Type Jaguar, etc, etc.) the car's sills were very deep for overall structural rigidity. But Tony, for sake of easiness ! ..had it's doors hinging up from the windscreen pillars. It was also a road car and so the roof was an essential practicality to everyday motoring. I think it turned out to be a good looking / well balanced car, not least considering it was mostly made up from a few flat sheets of aluminium (probably 16swg) and off-the-shelf (..or scrapyard) proprietory parts, by one man, in a home garage, all within months rather than years. Another useless tid-bit of trivia is the owl logo seen on the side of the car was derived from Athens. Ann Tony's good lady wife was a researcher of antiquities and they loved to holiday there. The owl (..albeit in a slightly more friendly looking style) was used on the Cipher (..save those which had Lada badging) and then again on his electric vehicles. Pete
-
Tudor_Websasto_sunroof_manual_part 1, page 2 " Pass the cold chisel Fred ..and a big 'ammer ..got to make an 'ole in this nice Daimler's roof " 🤓
-
For your delight and delectation I give you . . . 1958 Motor show feature from 1923 1936 and 1944 . From 1954 and 1966 ..so do you reckon they've got much experience in making weather resistant roofs ?
-
Yes I remember those. Good spot !
-
Sure, why not ? I'm sure it'll all be fine by the time the big 'voiced' lady sings.! true, I may not get it as perfect as a seasoned professional might, but I've certainly done very much more risky things than this. Have faith my friend.