fatharris
-
Posts
2,421 -
Joined
-
Last visited
-
Days Won
6
Content Type
Profiles
Forums
Events
Everything posted by fatharris
-
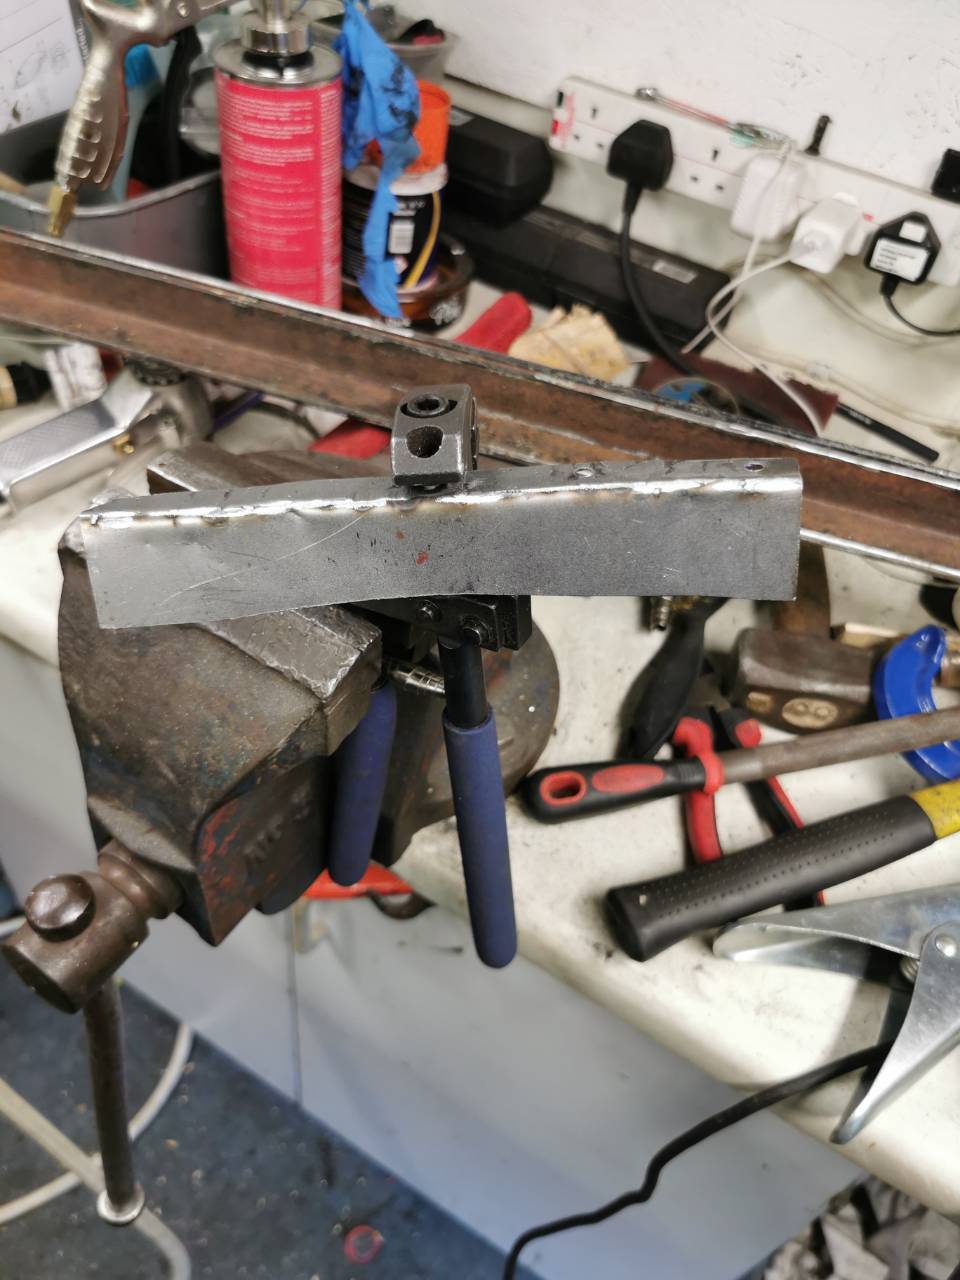
Was I going to let being a parent stop me from getting in the garage until half eight tonight? Apparently so. Does that mean I wasn't going to achieve something today? Does it bollocks. First things first, stock up on brain juice: Buy a toy for the boy who did great swimming today: And when the kids finally get to bed, start getting to work on stripping the engine. Oil pump out first, this was a piece of cake, although I'd already made my first error of the day and left that end plate on - it was meant to come off at this point, but didn't affect anything until later. I used my paint pen and placed dots and numbers everywhere to allow correct orientation of all items upon refitting. The Conrod caps were removed and the shells inspected - they will benefit from a replacement, but the crank itself looked good so far. With all the Conrod bearing caps removed, it was time to utilise one of the more precise instruments in the garage: And eventually, 4 hefty pistons were removed. The rings were inspected and there wasn't any obvious signs of wear. I'll be looking a lot closer at everything over the coming days. Big end caps were labelled prior to removal: And the shells on these were spot on, with only minor wear evident. They'll be going back in on the rebuild. With the flywheel end main oil seal removed, and all the caps off, the crankshaft was lifted out, signalling the end of the internal stripping. The only dilemma I have at the moment is the crank pulley end - there's slots for two woodruff keys, but I've only retrieved one during the disassembly. Hopefully it turns up. Either way, there's only a few external bits and pieces to come off, including the water pump and mount bracket, then it'll be ready to go to the machine shop later this week. So, a short period in the garage today, but a productive one. Cheers.

- 388 replies
-
- 16
-

-
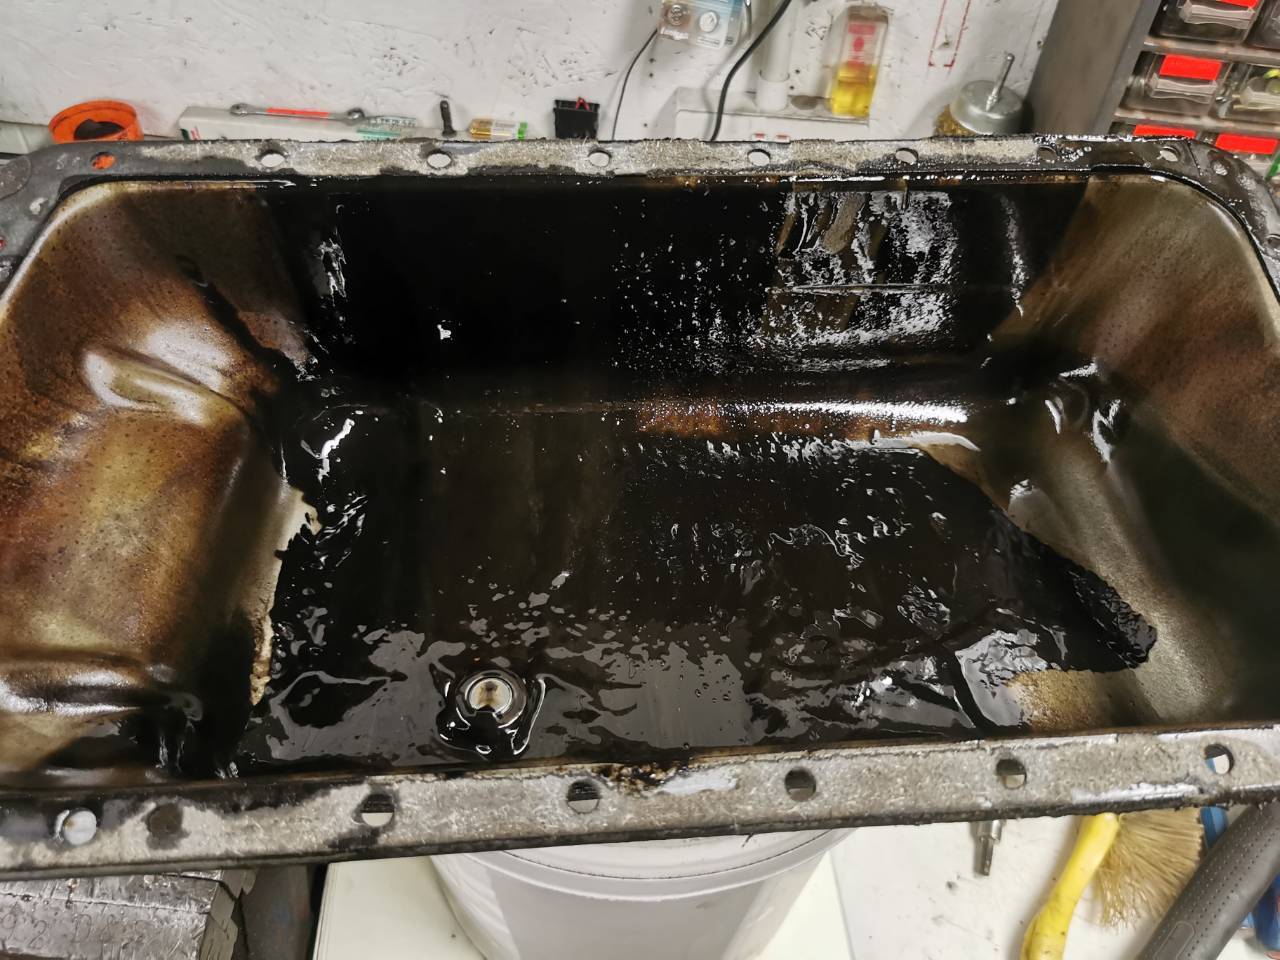
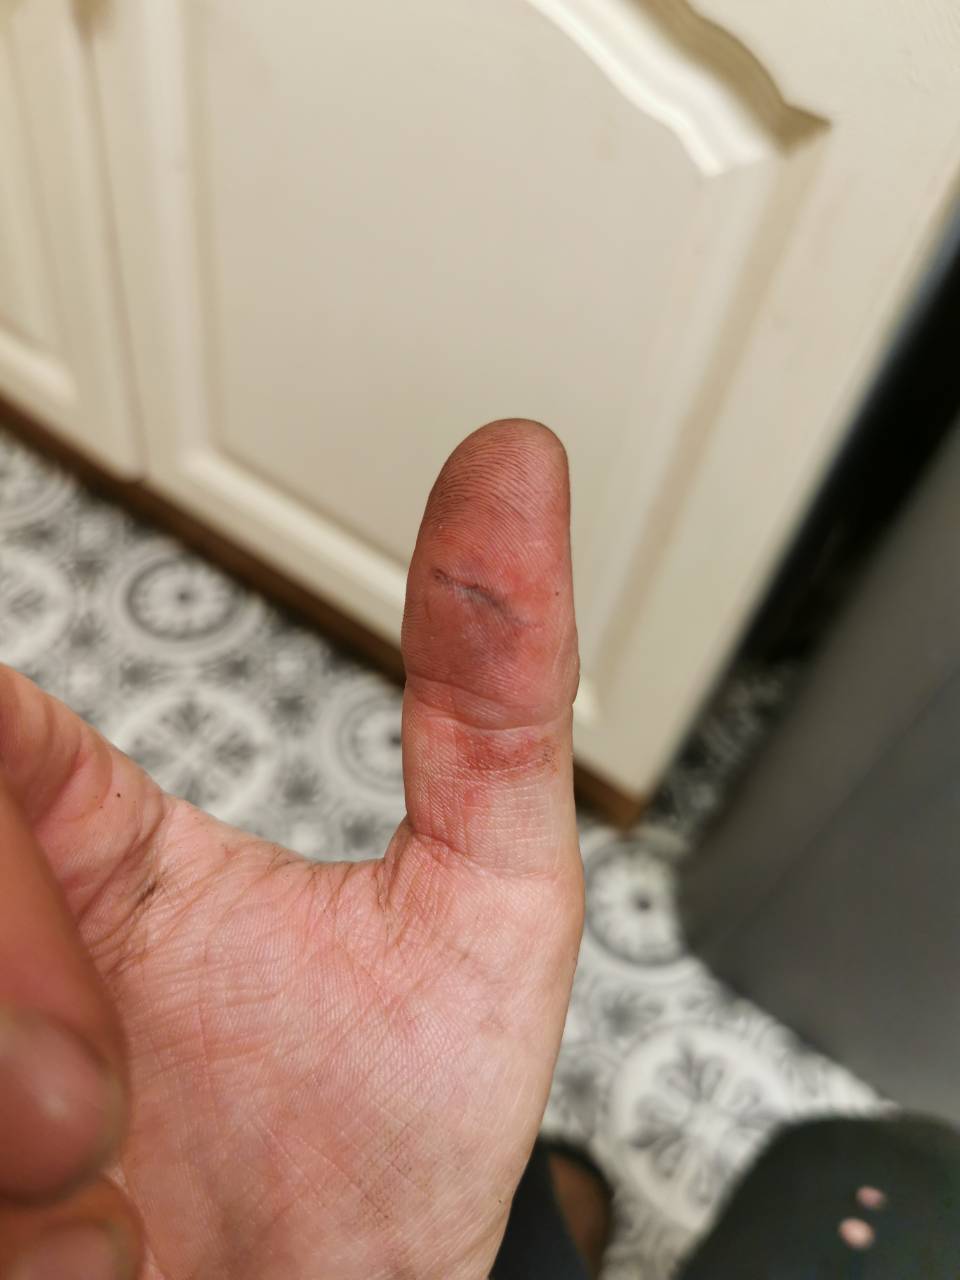
Ah, this has not gone according to plan. Started off well, with Phill letting me know that the engine stand I lent/gave to him many years ago was still with him and available to help me in my endeavours: I popped over after work to collect it and have a chinwag, eventually depositing it in the garage: Whipped the clutch and flywheel out - it's all a bit rusty from being sat, but there friction plate showed the clutch was a Valeo unit with plenty of meat left on it, so that's a few quid saved (Valeo kits were looking to cost around £110) Built the stand up and immediately discovered that none of my bolts were long enough to safely mount the engine. Quick visit to B&Q beckoned as it was past 6pm and everywhere else was shut. Their selection of M10 bolts was pathetic, with only one option available, and at 120mm it was way longer than needed, but that is easily dealt with by adding nuts to act as a spacer behind the bolt head. Thankfully, it has done the trick. This is a real bonus to have and will make life a lot easier for me during the disassembly. A late tea meant there wasn't much done to the engine today. I whipped the sump off: And immediately turned the engine back upright to allow the residual pooled oil to drain out of the block. The sump had an bit of sludge at the bottom, but nothing concerning and nothing sparkly thankfully! I decided I didn't want to strip the engine any further as I wanted my son to see the internals of an engine for himself - good learning opportunity for him! Anyway, I cracked on instead with cleaning the sludge out of the sump which cleaned up nicely: Moved onto the sump gasket, using a Stanley blade to scrape the old one off. Which went well. Yep, the back of the Stanley blade went straight into the thumb, resulting in a tsunami of claret everywhere. Thankfully, it sorted of sealed itself enough to stop bleeding, when MrsH descended on it with steri-strips and tape. Popped back to the garage to lock up and saw the dirt line on the blade, indicating how far it went into my thumb. It's currently rather sore, unsurprisingly. Hopefully tomorrow will be better. Cheers.
-
Cheers, but I've not got much choice - ideally it needs to be MOT'd and on the road in just over a month so I can iron out the last kinks before it goes continental! I'm actually losing 10 days in the middle as we're going to the Netherlands to meet @chatsharris new baby and have our first family holiday. I've been in touch with the engine chap and he's said if I can drop it off before we depart on the 31st, he'll get the work done and ready for collection by the time we get back. Also getting him to face the head, it makes sense at this point to have one person doing all the big jobs for continuity. I won't be resting though, there's plenty to be getting on with whilst they're away! Thank for those kind words, I'm hoping I can get MrsH to take it to shows with our daughter, the boys will be in the Beat! It'll never be a show-winner as the paintwork is really poor, but it'll be an appreciated retro classic that'll get used as it should be! In terms of hours, I get home from work around half 4, get the overalls on for a pair of hours, come in to help MrsH with giving the kids tea/bath/bedtime, then I'm back in the garage for around half 8 for another pair of hours. A lot of the time is spent just staring at something and trying to think of the most logical way to go about it, other people would call it dithering! I'm just pleased the garage is warm and dry, I've got a good stereo system in there, and there's always cold beer in the fridge. Even got a camp bed and sleeping bag in the rafters in case MrsH has really had enough of me being in there all the time 😂
-
Small jobs tonight. Popped the head locating grommet out and pulled the mini gauze filter insert out to inspect. Looked pretty clean, bar one flap of material in there. Cleaned out with brake cleaner and reinserted. Finally, I got the exhaust manifold studs out - these needed replacing as I had to grind two studs down to get the manifold off. Got them all off, which made me right chuffed. Called it a night afterwards.
- 388 replies
-
- 10
-
-
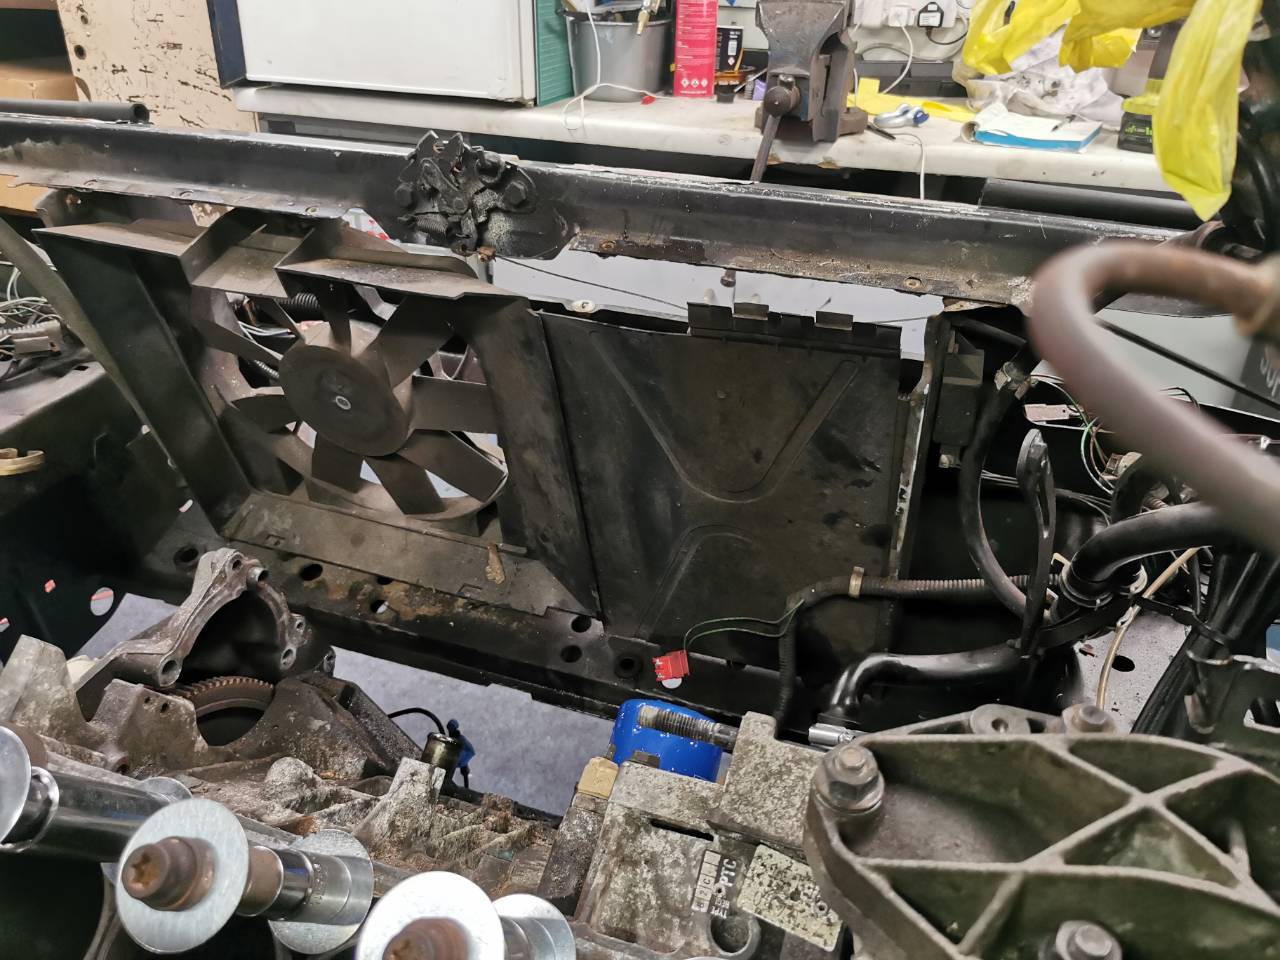
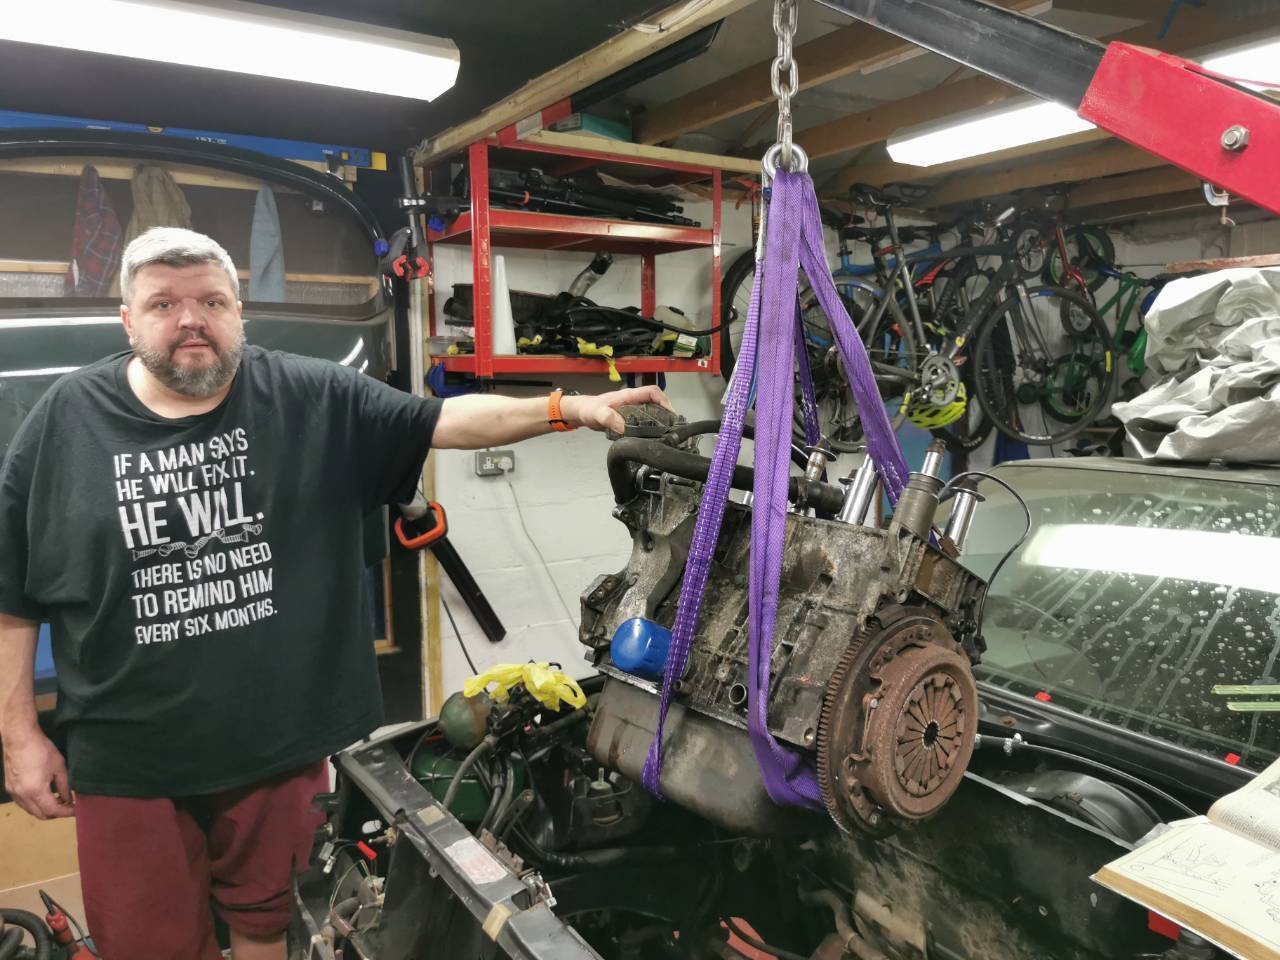
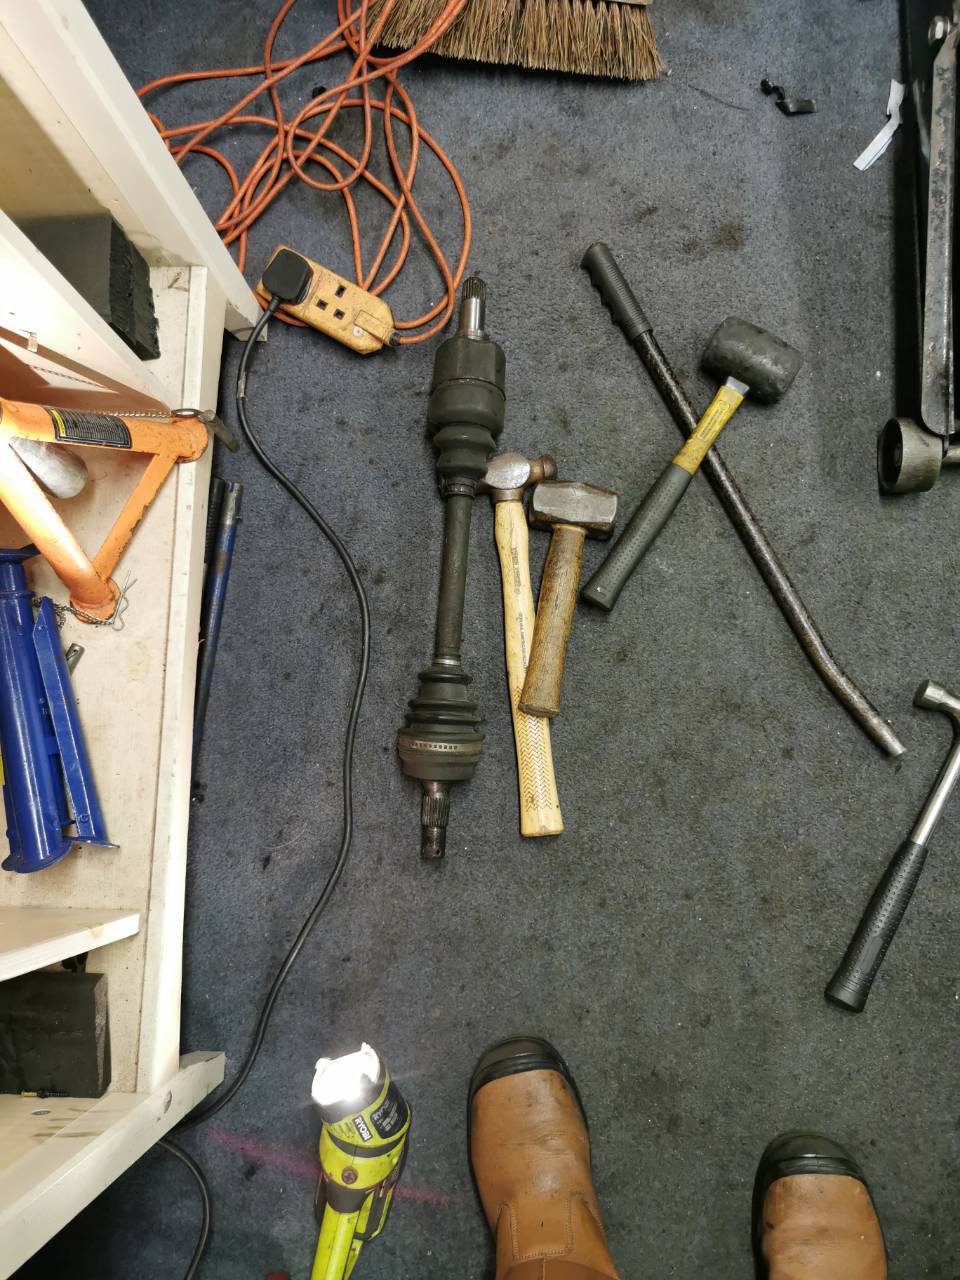
Half-day update. A mate dropped off an engine crane whilst I was at work. With the warnings fully read and digested*: I gave the seized driveshaft bearing a dousing in oil this morning before work - a sharp twatting with a hammer and chisel freed it up. I removed the radiator to remove the risk of damaging it in the ensuing mayhem: And started loosening bolts for the bellhousing, bonus was freeing up a pair of wires that had been trapped in the join of the bellhousing and block since I bought the car! These will get a solder sleeves repair in due course. I roped the father in law to act as safety rating and operate the crane whilst I jiggled the 'box free, and eventually we got our first reward: It's actually light enough to lift myself using the strop so that'll be my method when it comes to lifting it in. Anyway, onto the main event. There was a bit of a faff to get the car to a lower position on the axle stands, exacerbated by the need to support the engine at the same time. There was a bit of an issue with access at times but otherwise it was okay. Both remaining mounts were unbolted and the engine was free to be lifted. And now resting on the deck. Now the awkward jobs begin - stripping the block is going to be a bit of a pain without an engine stand, but hopefully do-able. Going to try and get out for a couple of hours tonight but we'll see. Cheers
- 388 replies
-
- 16
-
-

Rank Taxi Two. The Octavia Returns! Time for a stoat 19/03/24
fatharris replied to 320touring's topic in AutoShite
Looking a lot better than when you found it! -
Very few pictures today. I sent the bolt removal fella the photos he requested of the offending item, and he said that the block will have to come to him for removal. This was a heavy gutpunch to hear, as this was a shitload of work I was ill-equipped and ill-motivated for. First things first though, I bought some penny washers and raided my spare sockets box to make 'packers' to allow me to clamp the wet liners in place with the original head bolts. Speaking to a few people and sorting a lend of an engine crane, I elected to crack on and start getting the engine and gearbox ready for removal. Luckily, my mate Dan (former half-owner of the BX) came over, rolled his sleeves up and mucked in with this task. With Dan gone home, I got the NS driveshaft out, the OSF one is very stuck in position - suspect the bearing has corroded into it's holder. The Haynes manual suggested a 24mm wooden dowel be inserted into the NS driveshaft hole on the gearbox to retain the differential gears, and where was I gonna find something like that? Oh, that'll do nicely. We'll ignore the fact that Haynes doesn't mention that it's no required in anything but the earliest gearboxes. Oh well. Tomorrow the engine crane arrives to get everything
-
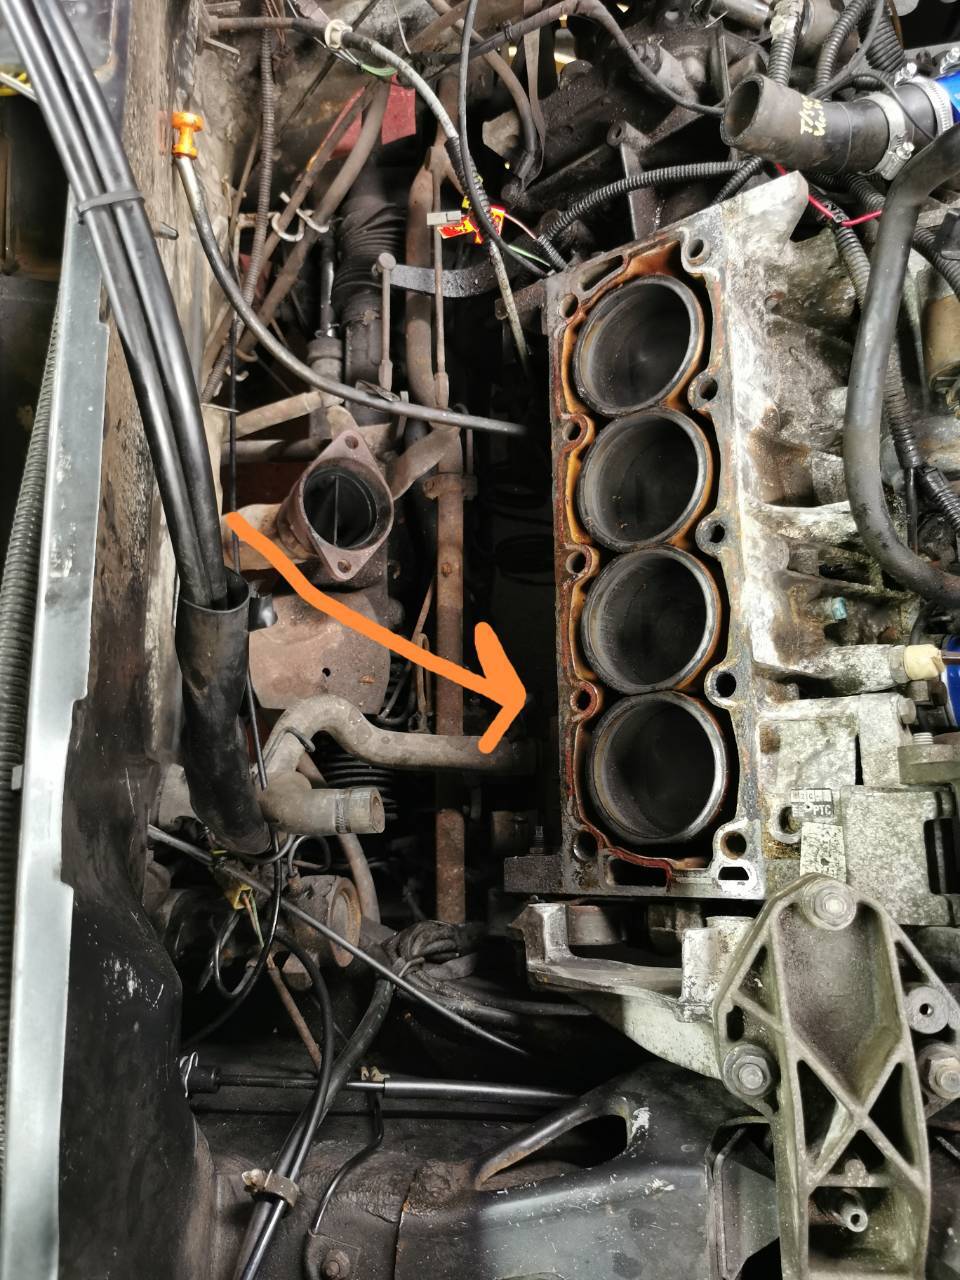
Who's fucked it? This guy's fucked it. Started off strong, with whipping off the inlet manifold and exhaust manifold after a bit of twatting with mallets. After that, I took the OS engine mount off, to get access to the two bolts that screw directly into the head. I refitted the mount after that so I could remove the jack from underneath. Finally, the big moment came to undo the head bolts. Was feeling pretty damn good at the halfway point, until bolt number 6. BOLLOCKS. I cracked on anyway and mercifully the rest of the bolts came out without incident. The head definitely needed to come off based on the state of that gasket, it crumbled away into nothing! Gave me a chance to further survey the issue at hand. The 2" of bolt thread and shank is stuck somewhere in that shitshow - it's very evident that someone has been running this cooling system on just water. I've just left it drowning in GT85 for now. Either way, I've made enquiries with a local fella recommended by Phill, who can deal with issues like this. I have called it a night early, tomorrow I'll look to strip the head and get it ready to be cleaned. An annoying day, but it needed doing.
- 388 replies
-
- 12
-
-
Nice, steady day today. The sealant dried sufficiently last night for me to throw another coat of primer and a coat of paint on last night. The primer got a blast from the IR heater, and the paint was left to dry naturally overnight. Had a lovely lie-in today, and eventually got up and threw another coat of paint on, with the IR heater left on during breakfast. Went with Matt black for the underside areas, not that it'll matter as it'll be stone chipped at some point. Either way, that wasn't today's job. Today was the start of the head gasket change, and I was taking my time with it. First things first, the timing belt has to come off. Some of the covers that came out had different sized nuts etc - I just used a paint pen to identify which nut goes into which hole with a series of dots. I didn't take many photos today because I was focused, but after a bit of trial and error, the timing belt was in my hands. And I was immediately pissed off because I was holding a 113-tooth timing belt, and in my pile of parts, I had a 114-tooth timing belt kit. ARSES. This was because the BX was on a changeover year for timing belts and tensioners - the general rule of thumb was plastic timing belt top covers have 114, metal covers have 113. Naturally, this meant my BX was pre-mod for the timing belt, but with a post-mod timing belt cover. This has pushed me back a bit as I now need to order a new kit. Ah well, I cracked on anyway, removing various bits and pieces in order to get access to the head. As I was popping hoses off, it was a reminder that hoses are lifetime components, and sometimes the damage can be hidden. Fuel hose from pump to filter. This looked fine from the outside. Coolant hoses to and from the carburettor - the split occured during removal, but the cracking rubber has been on my radar whilst I've been working on it. Eventually, I called it a day. Bit miffed at the Haynes manual, it makes no mention of removing the exhaust manifold or inlet, or any of the components attached to them, but most of this is rocket science. I've got the in-laws coming down tomorrow for a few weeks, so I'm going to be in the garage even more 😅 Cheers!
- 388 replies
-
- 15
-

-
-
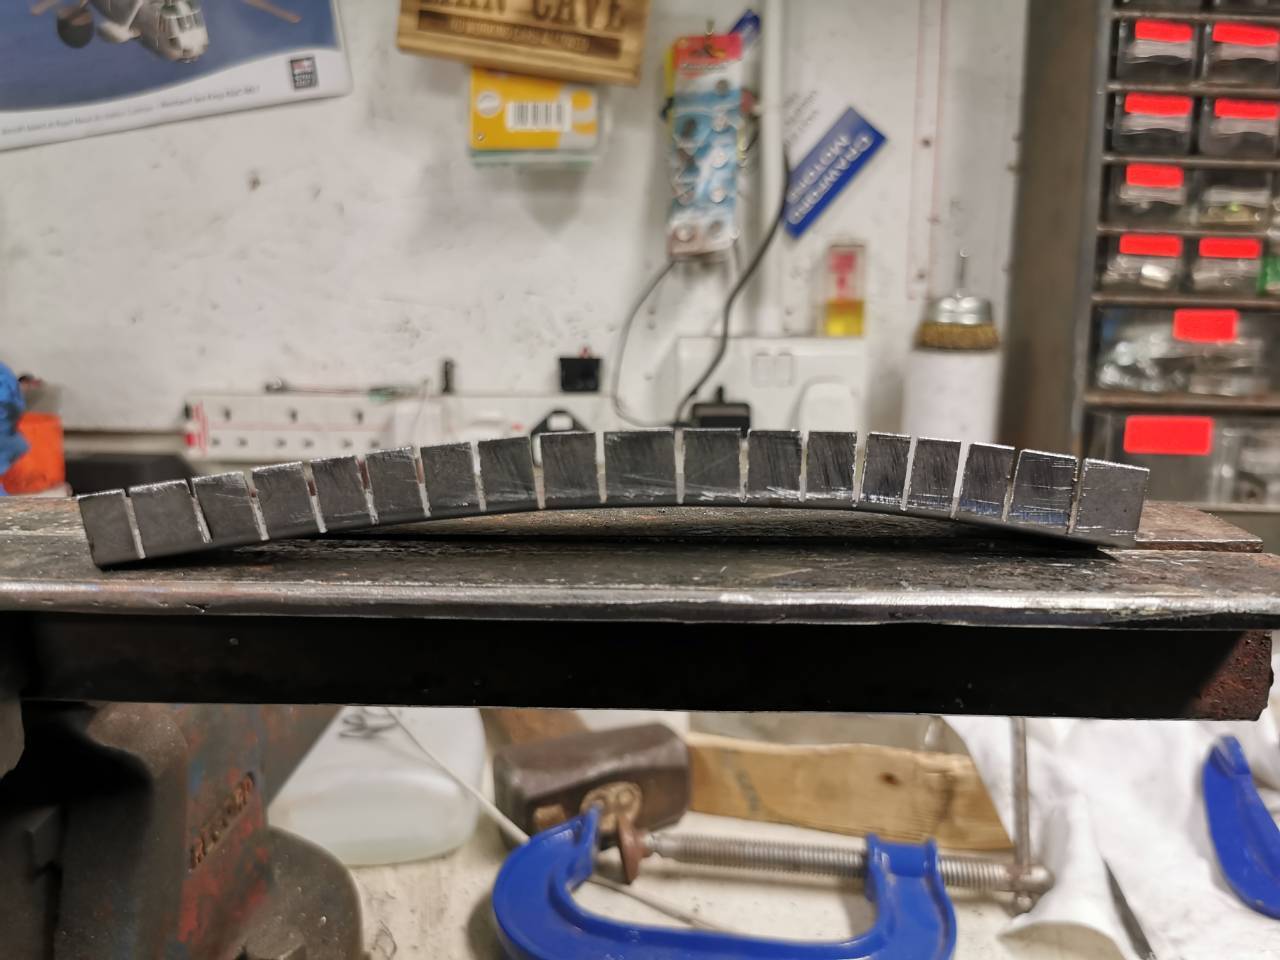
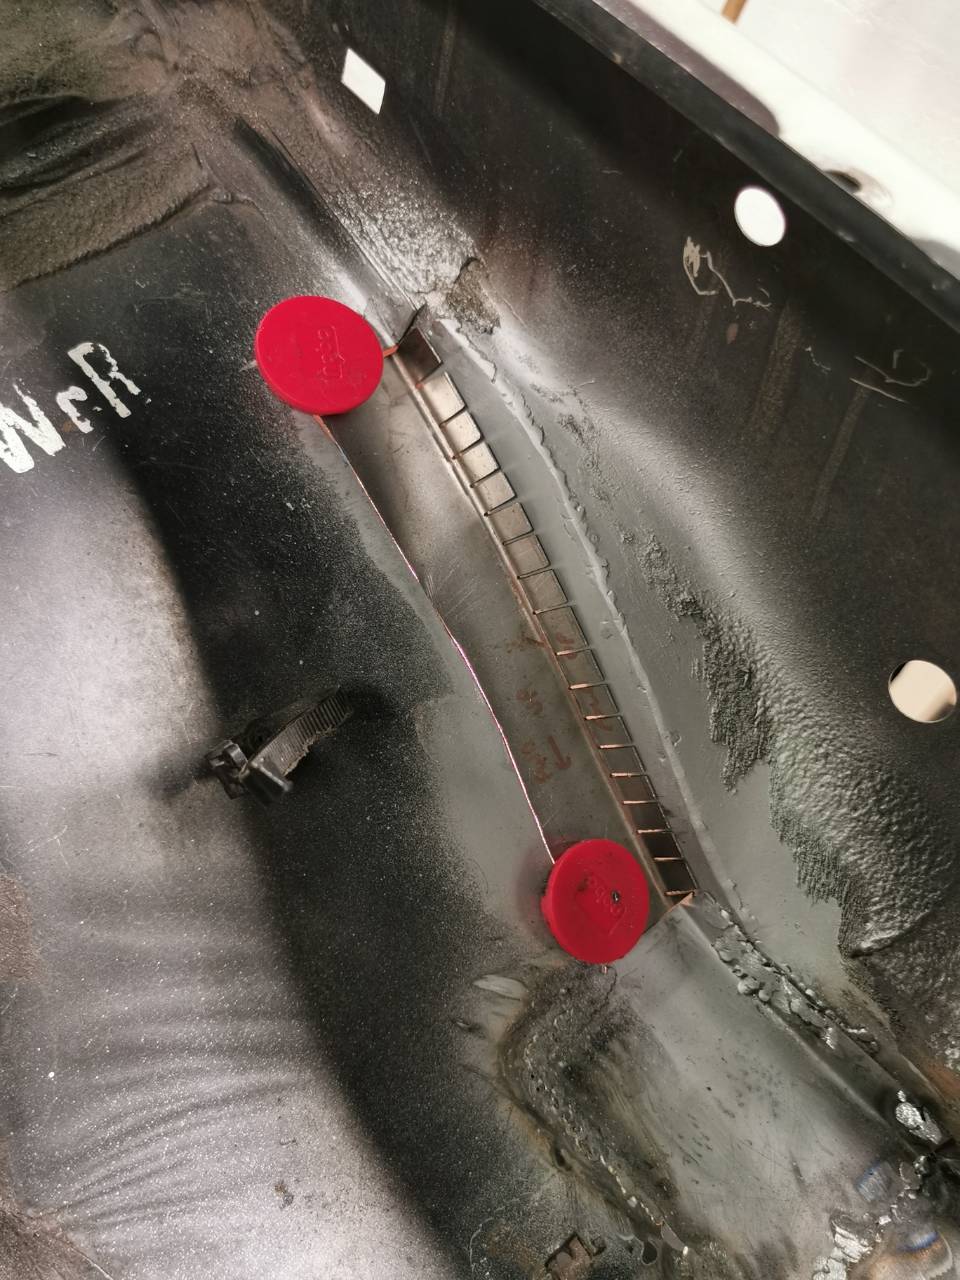
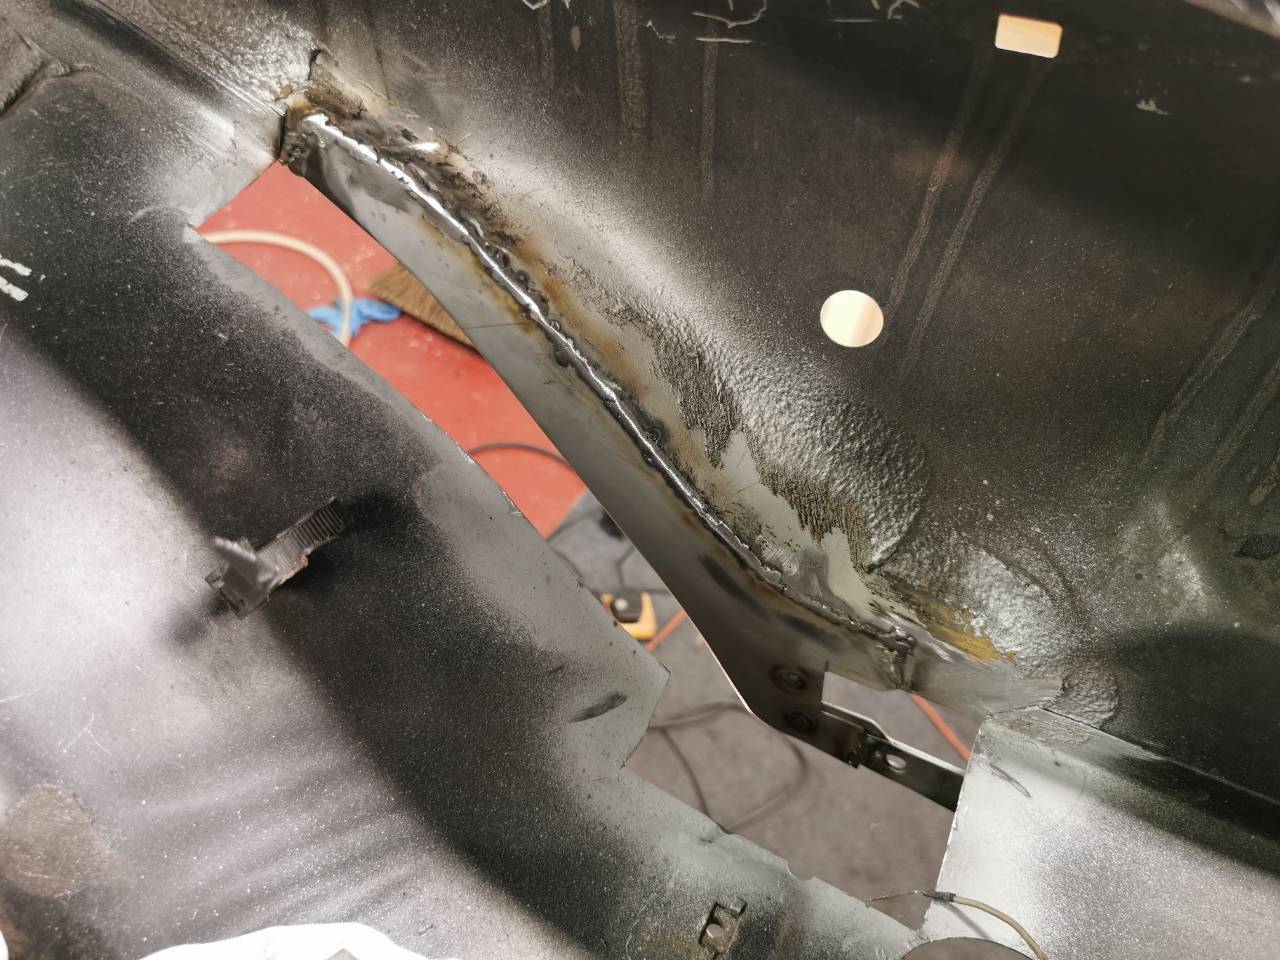
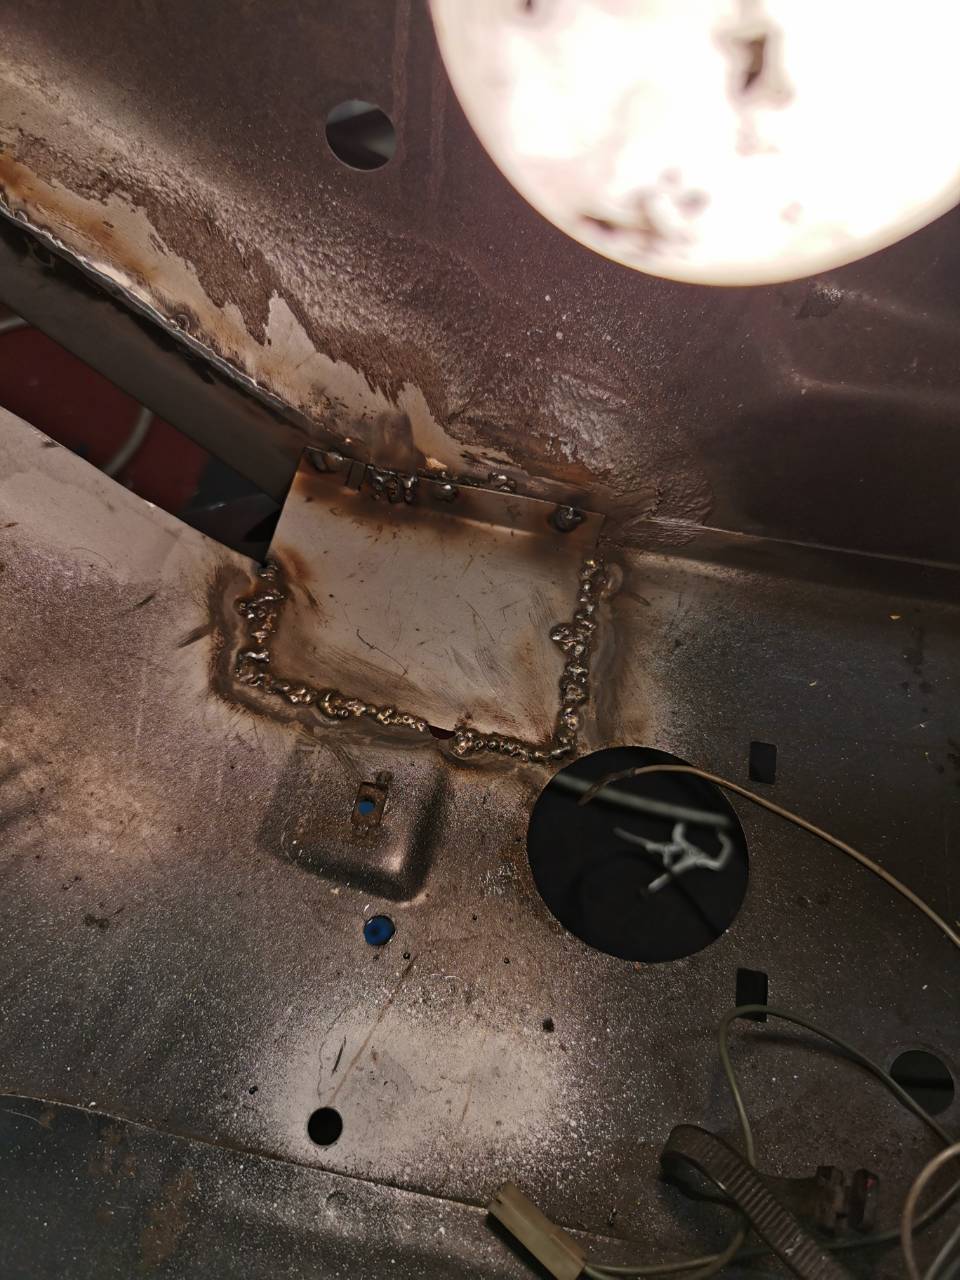
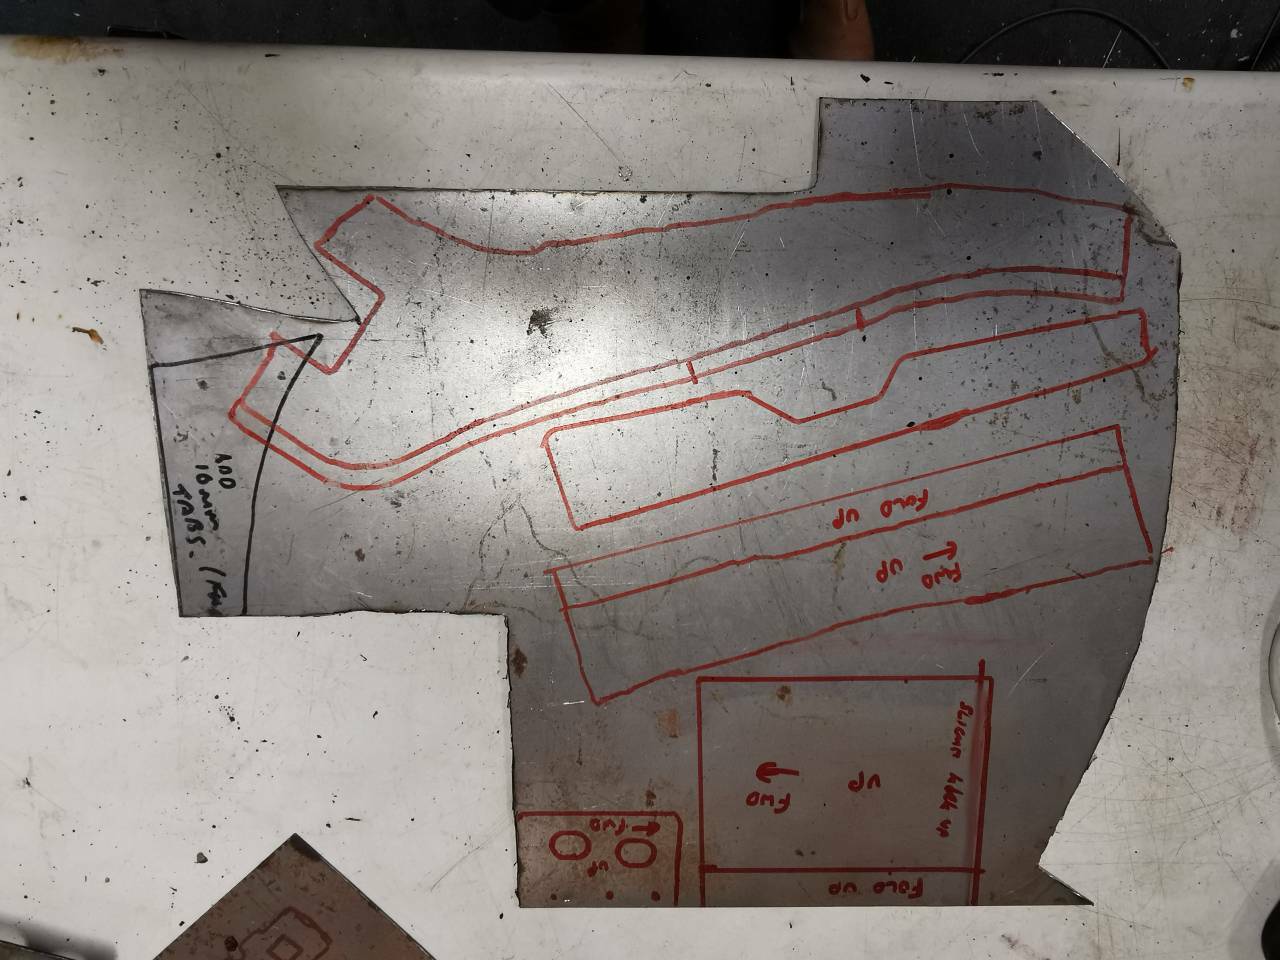
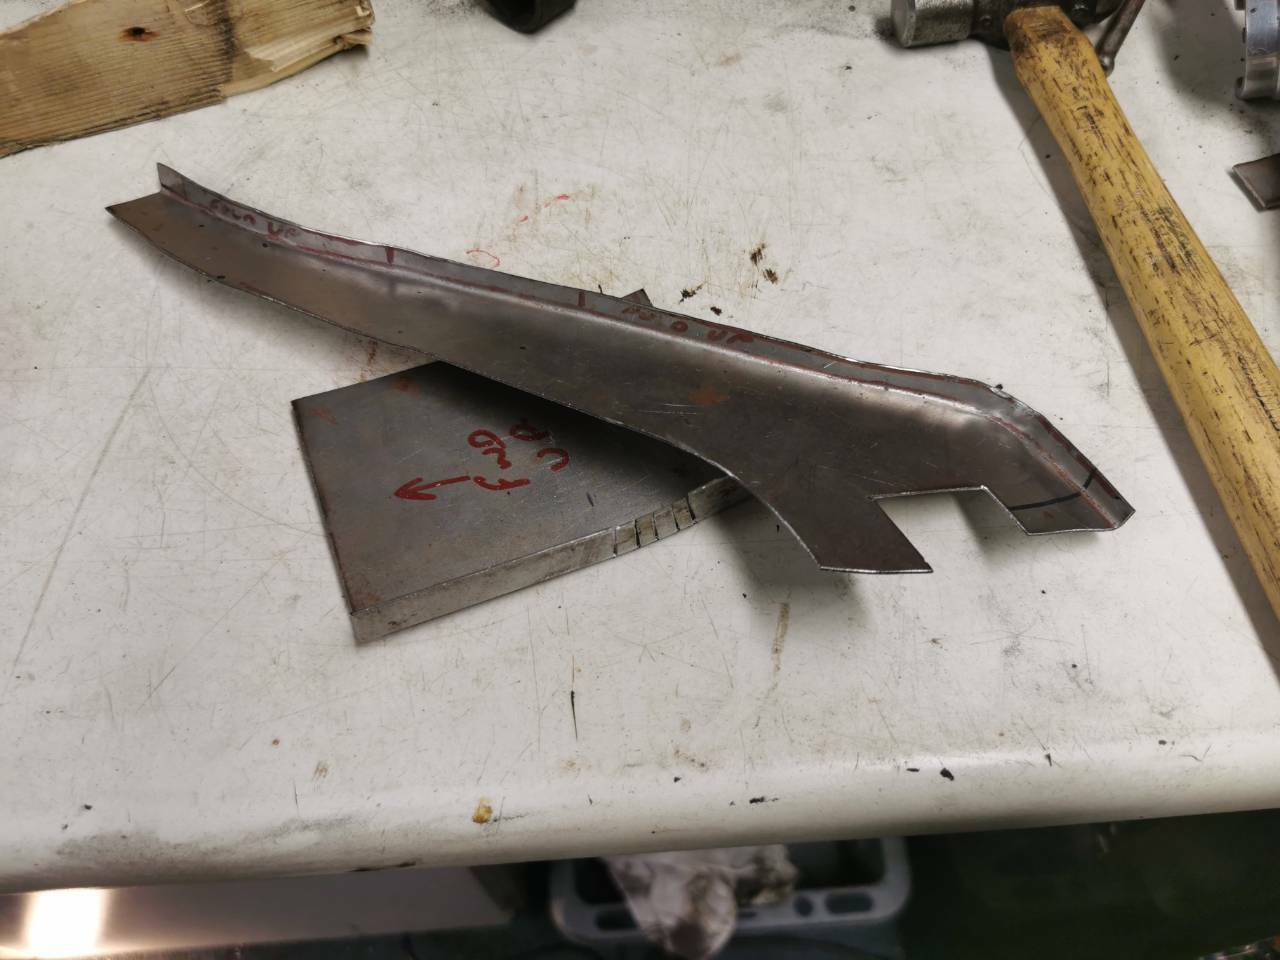
Not gonna lie, I was up early this morning (for a Saturday) to get some welding gas. Halfords turned out to be the cheapest for CO2 at under £14. Got this panel in nice and quick: As I wanted to get onto the remaining complicated panel. This is the last of the wheel arch repair sections, so it needed to follow the curvature of the arch itself. Typically, this requires a stretcher tool if you need a 90 degree lip, but I didn't have a stretcher tool, I had an angle grinder. This kept going back and forth in place to get the curvature right - the more lines chopped into the lip, the finer tweaks you can make to the bends. Eventually, I got it following the existing curve pretty nicely. So it was a case of firing up the welder: And very carefully welding them up - this requires a lot of time to cool in between welding the lines, as rushing it could distortion the gaps and give a different curve to the panel. This bit isn't pretty, because it's welding to fill the gaps of already thin metal, so naturally it blows holes every five seconds. It does grind down pretty nicely to make a solid panel. Next was popping the spot weld holes in the lip, which was not helped by the tool jamming with the panel stuck in it. I then expanded the holes with a drill bit and caught myself getting lazy - the finger of the glove got caught in the drill bit, but I escaped any injury myself, which was a nice wake up call! 🤦♂️ Whilst working this panel, it made sense to prepare the last panel needed for the arch, so I got that sorted too. Doesn't need to be pretty because it's out of sight. Both items got a coat of zinc primer and a blast by the IR heater - this dropped the drying time considerably, and justified the purchase price 😅 Once dry (and cooled down!), it was magnetted into position: And tacked into place. This took a while to get perfect, so the tacks kept getting cut off to make it a flusher fit. Took my time with it and got decent penetration with the welds Didn't picture it, but the lower panel had another go around with the welder as I wasn't content with the penetration when it was on the Argon mix. The repair stiffener bracket was also welded back in place, as was the little bracket that goes on the lip of the inner wing: A coat of zinc primer applied - dry in less than an hour thanks to the IR heater: And Puraflex added to all the joins. Hopefully, this will be dry by the time the kids go to bed, so I'll pop back in, add another coat of primer, stick the IR heater on and put a coat of paint on before bed. Tomorrow will be a good day to apply the stone chip paint and bring a close to all the welding/bodywork jobs! Cheers.
- 388 replies
-
- 18
-
-
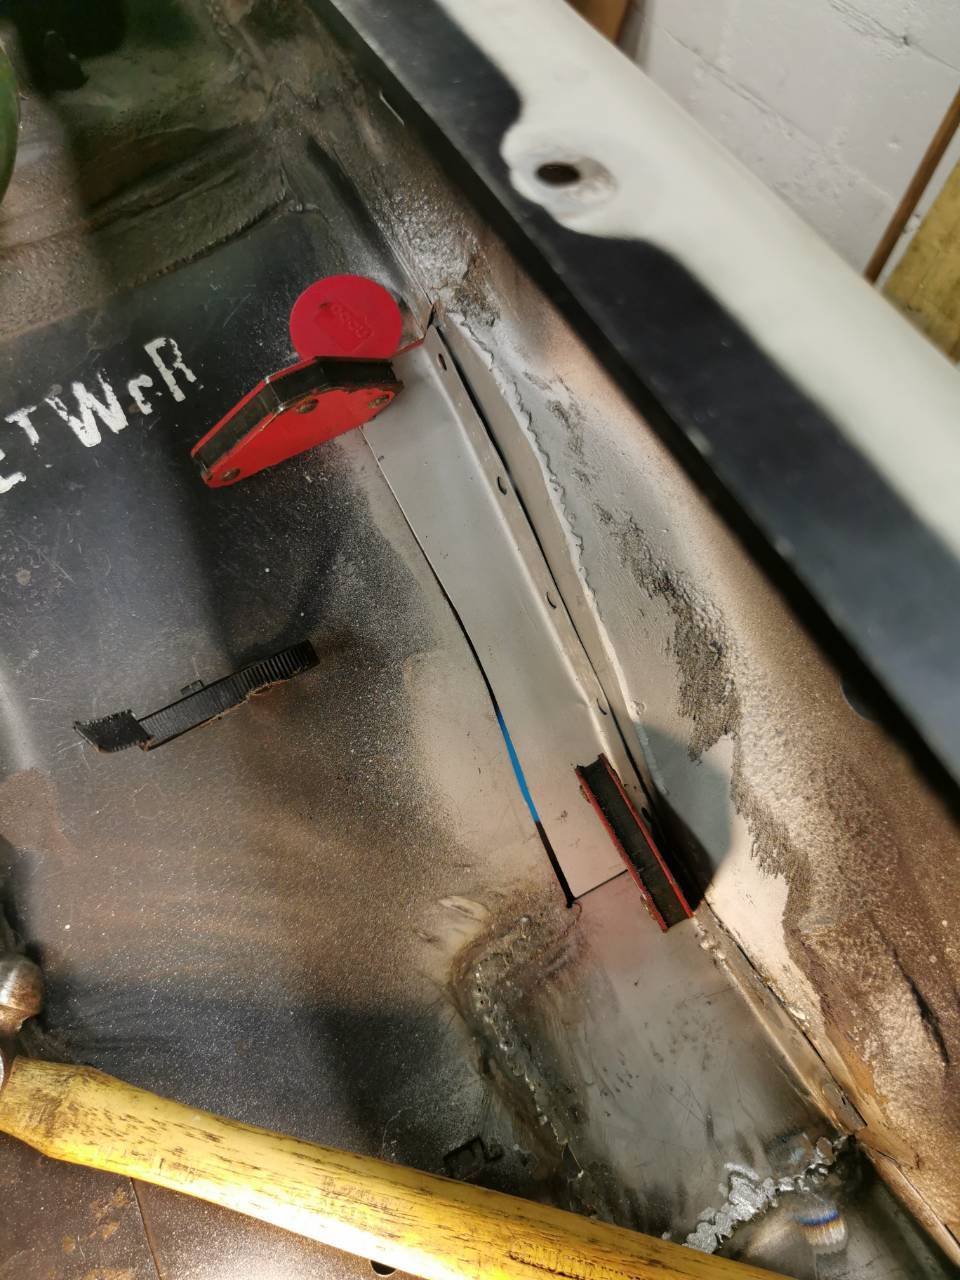
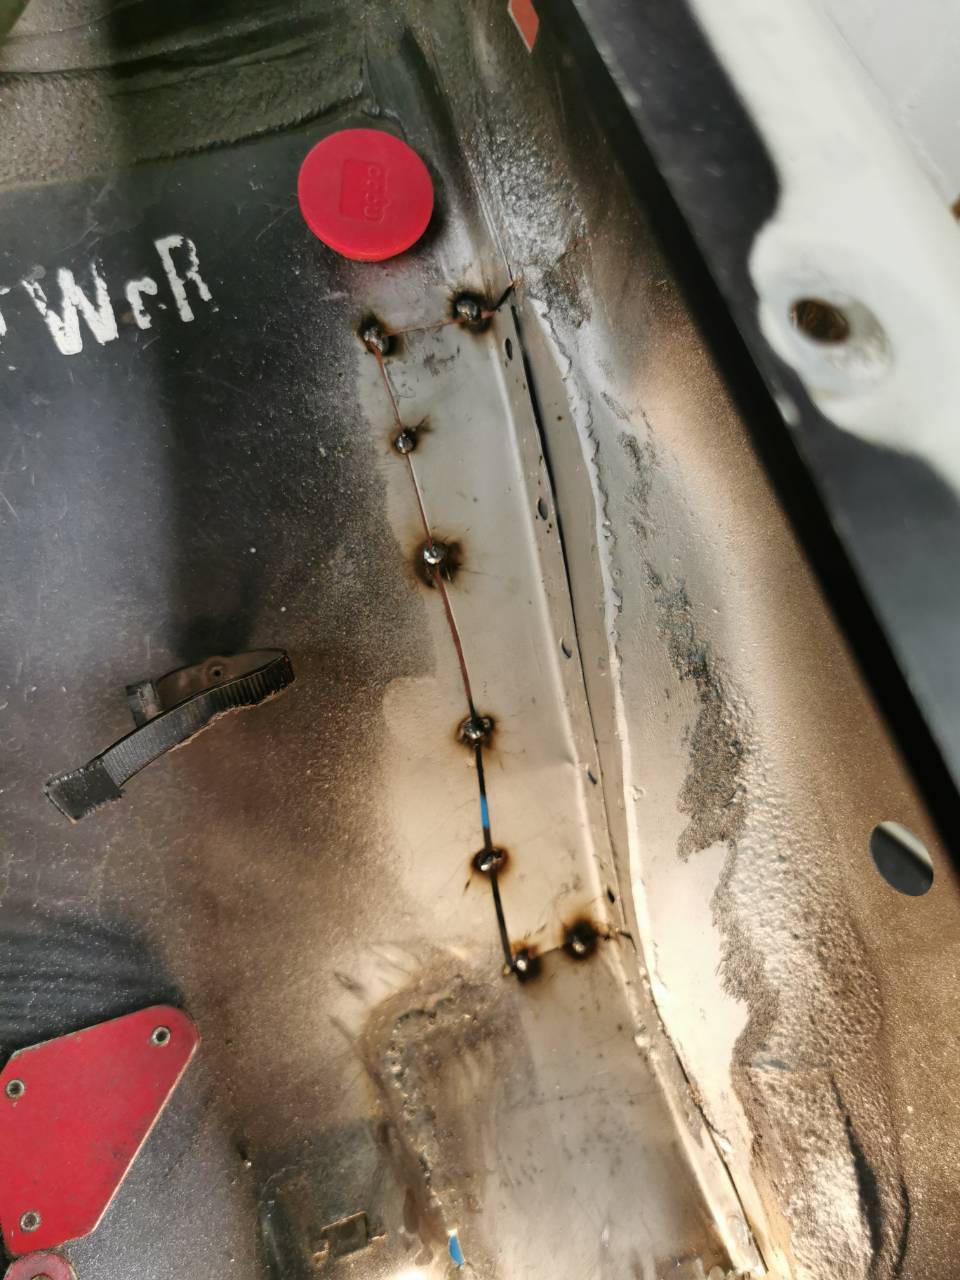
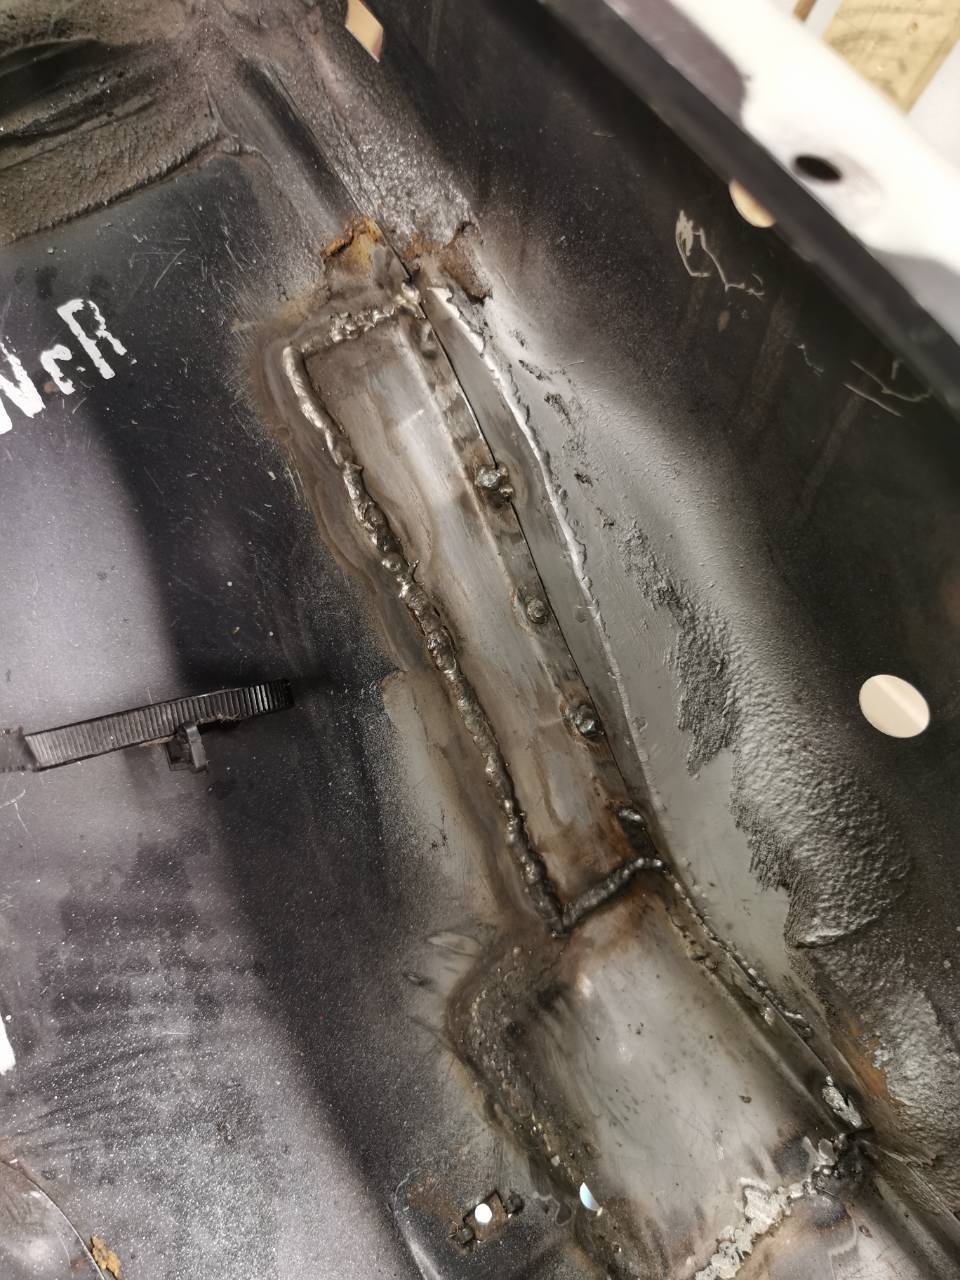
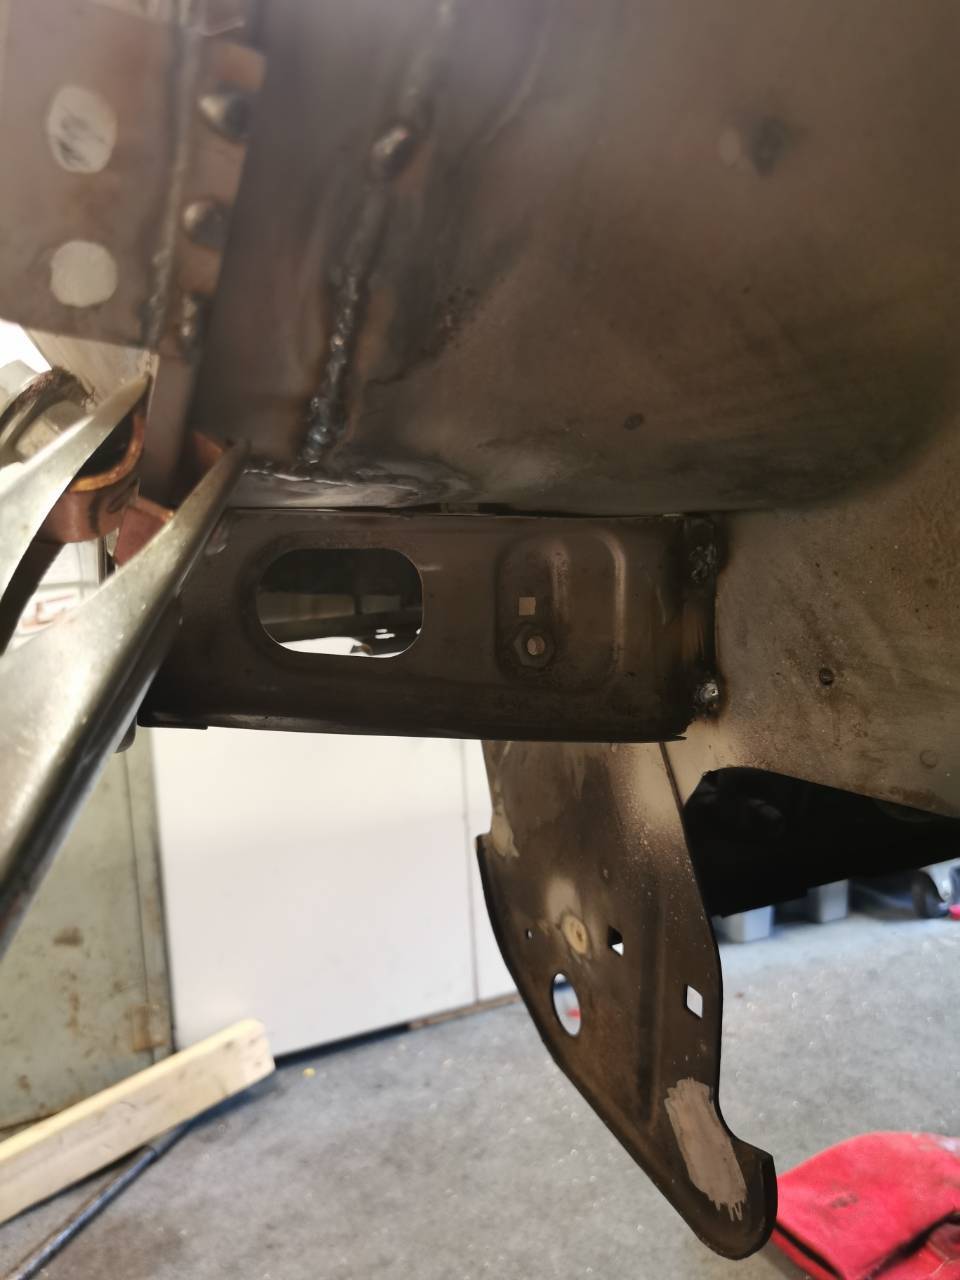
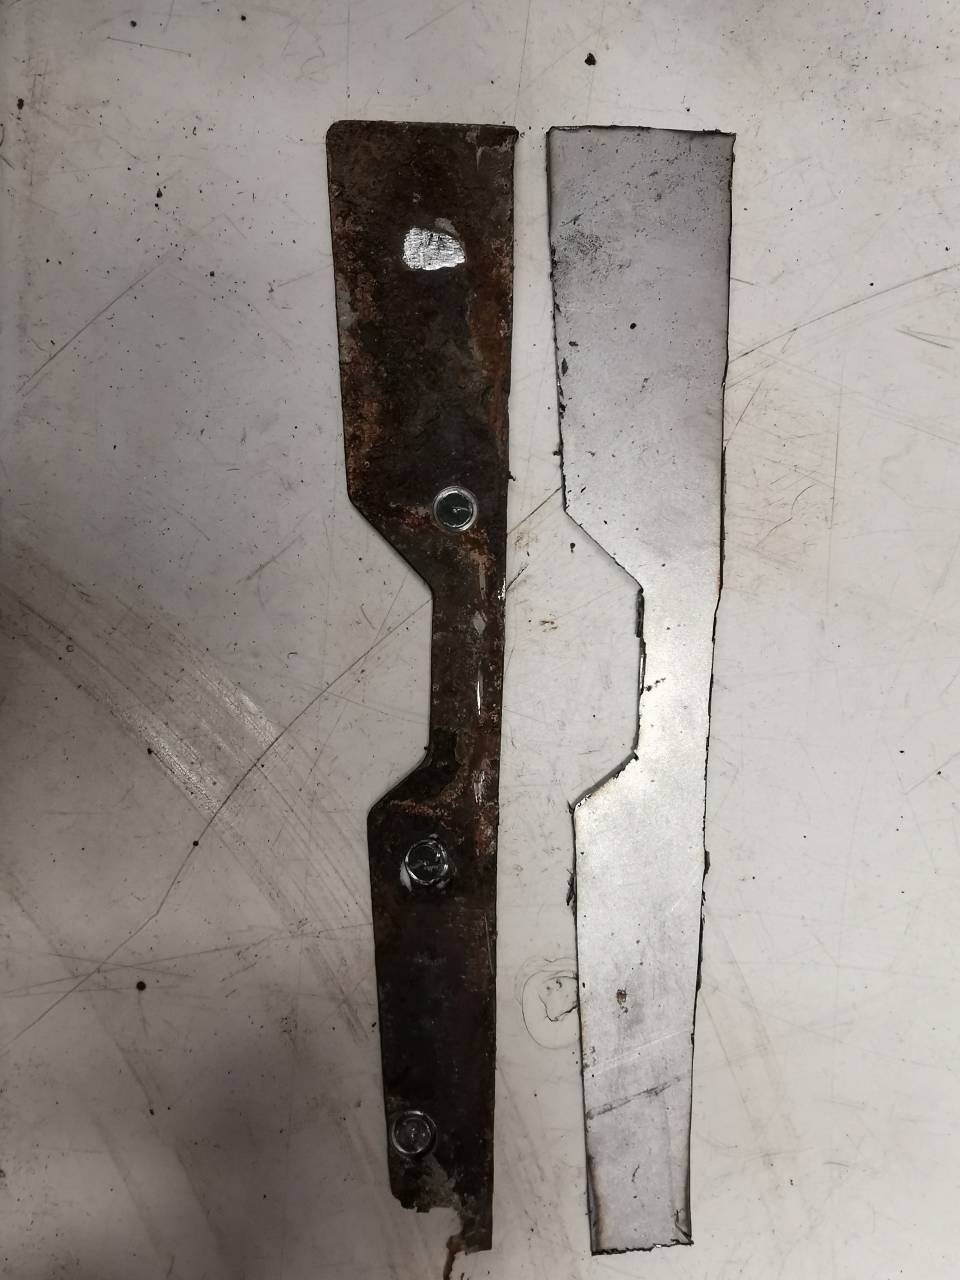
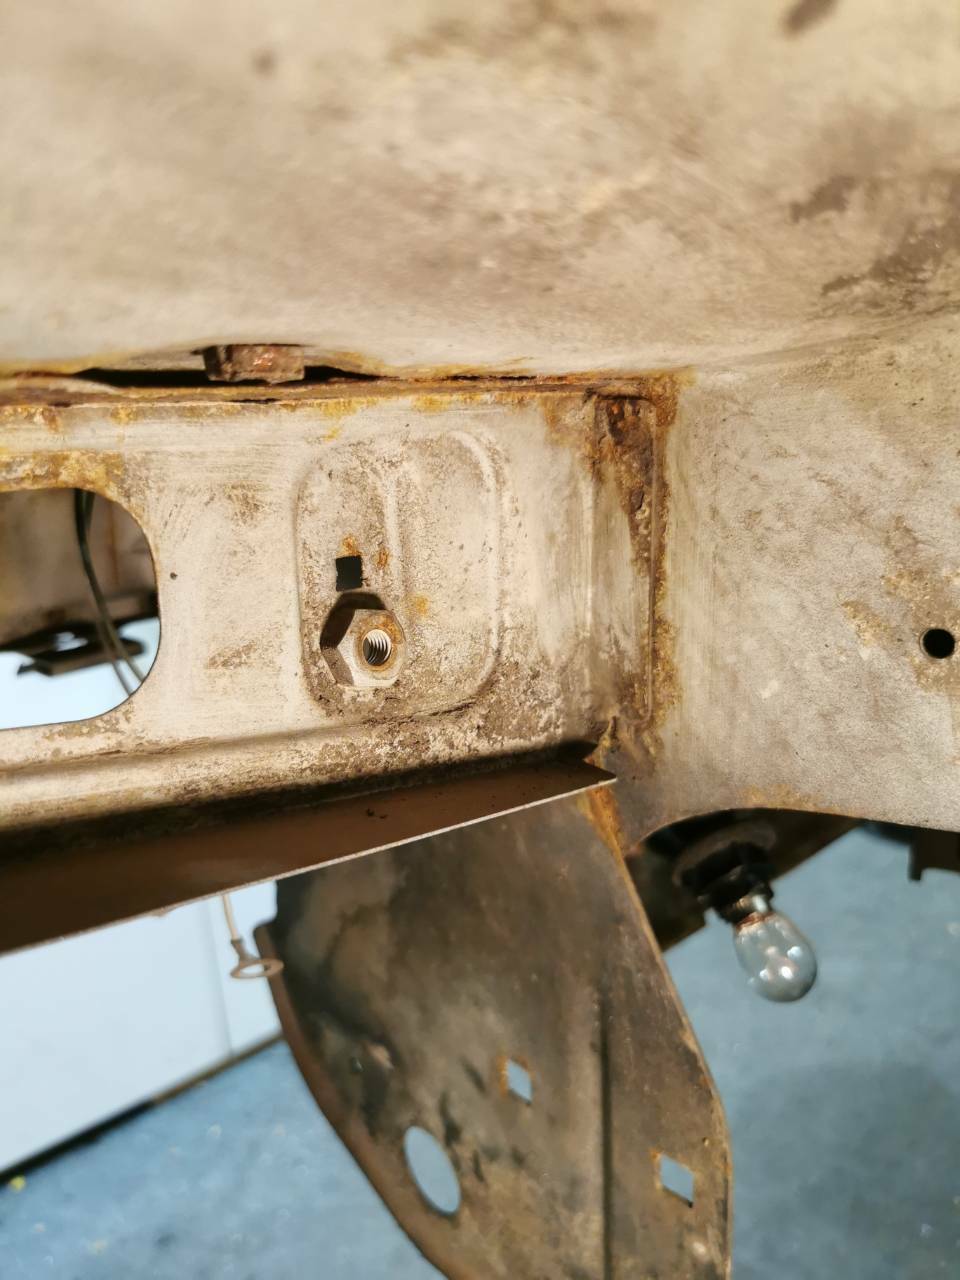
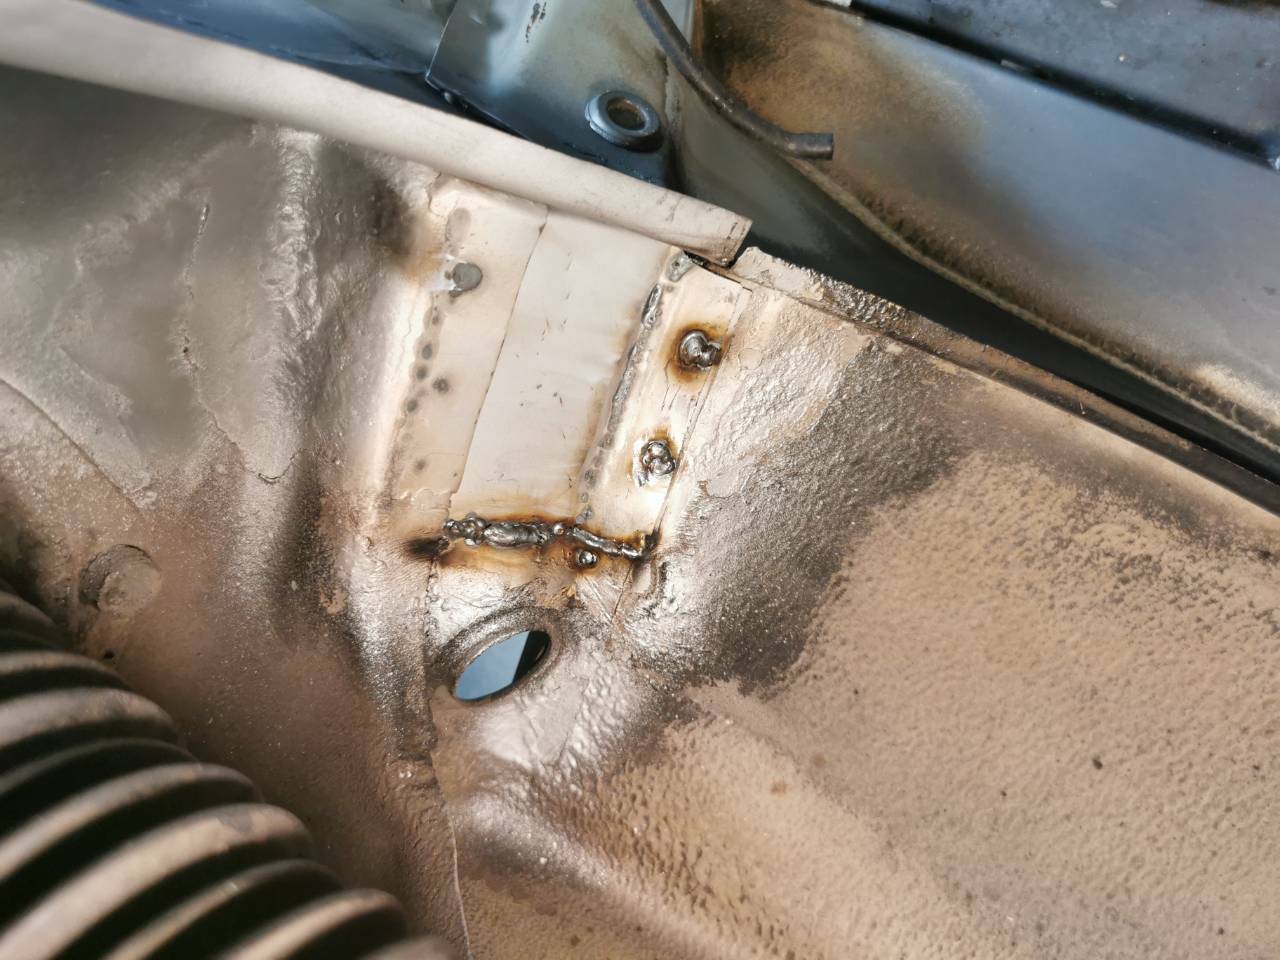
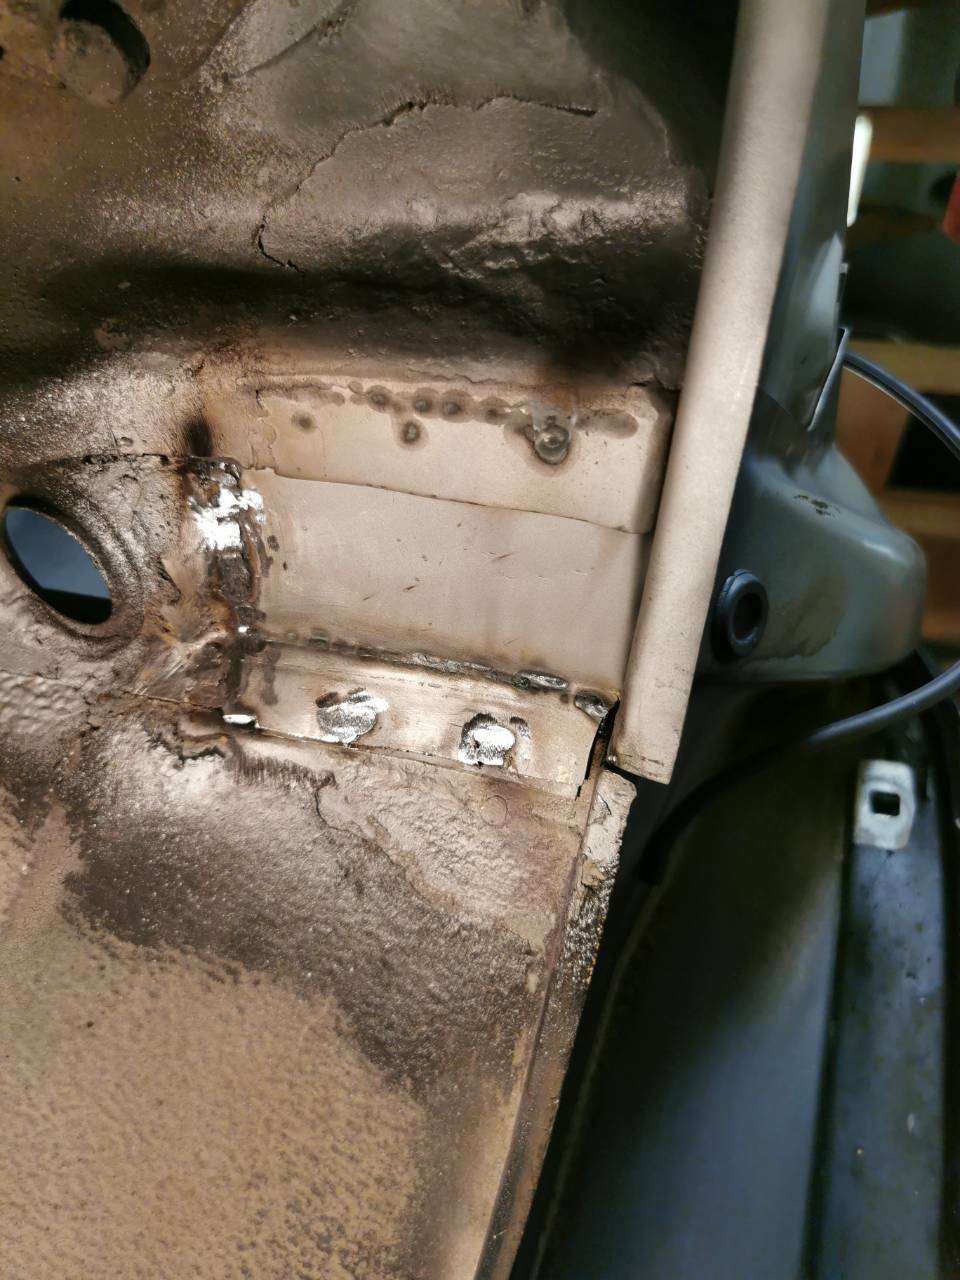
So, onto today's activities then. First off, I lopped off the rotten upper section of the reinforcing bracket between the inner wing and chassis leg. New on was measured up and filed down a bit to make it match. Got the welder set up and cracked on - Ground the welds back and it looked pretty okay after that. With that done, the repair sections were given a coating of weld through primer: And the first panel clamped in place. This one turned out to be a bit of a faff as there were loads of curves that I wasn't immediately aware of, but the hammer got everything in the right place for the welding to happen. Ground down, it even looked all right. With that done, it was onto the next section. Unfortunately, this turned out to be a proper pain in the arse as my CO2 bottle ran out at 9pm. Not a problem as I had an Argon/CO2 bottle that I used for a couple of minutes in the cupboard. What an arseache that ended up being. Not sure if it was the gas making a difference, but the welds weren't going down right and I was blowing holes every other time. Aaaaand annoyingly, the replacement bottle ran out, less than five minutes into the job so I called it a night after grinding down what I could. Looking forward to moving on from the welding! Cheers.
- 388 replies
-
- 13
-
-
Pandamonium! New arrival at new Balljoints towers...
fatharris replied to B4lljoints's topic in AutoShite
Pandas are just such neat little things - they always looked quite large in magazines etc, which made it such a shock when I saw one for the first time in really life 🤣 -
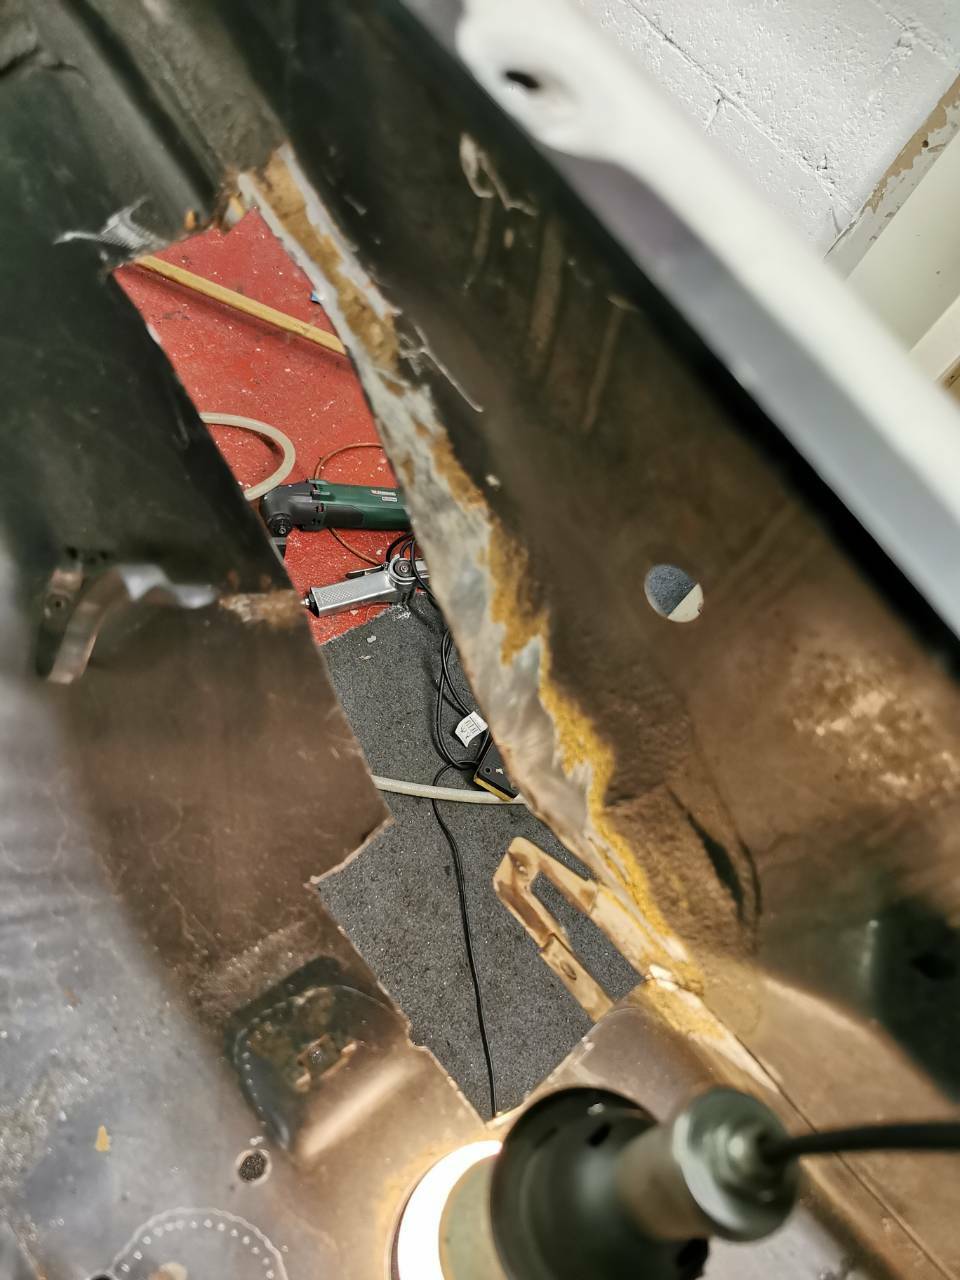
Not much of an update today, it's the slow, boring bits at the moment. Chopping out the afflicted metal is a dull task, with spot welds everywhere that needs drilling out. This bracket was covering some weak metal directly above it. So it was removed. The uppermost mating face is heavily corroded in places too, so that'll need changing. This was hiding behind an equally grotty panel, however it is substantial enough and has survived a wire bush so it'll get cleaned up further. Eventually, I had what I was hoping to be the last grotty bits chopped out of the car. This had left quite a complex hole behind. And I had to be extra careful as I was at the end of this sheet of steel - I bought this back in 2015 to restore the Mini, but that never ended up happening! I got two panels roughly bent into shape before I decided to call it a night - they were the trickiest two to do so I just wanted them to be out of the way. Tomorrow, I'll prep the surfaces for welding and make the last of the repair patches, with ambitions to weld a couple in on Saturday evening. Cheers!
- 388 replies
-
- 10
-
-
Excellent news, looking forward to this!
-
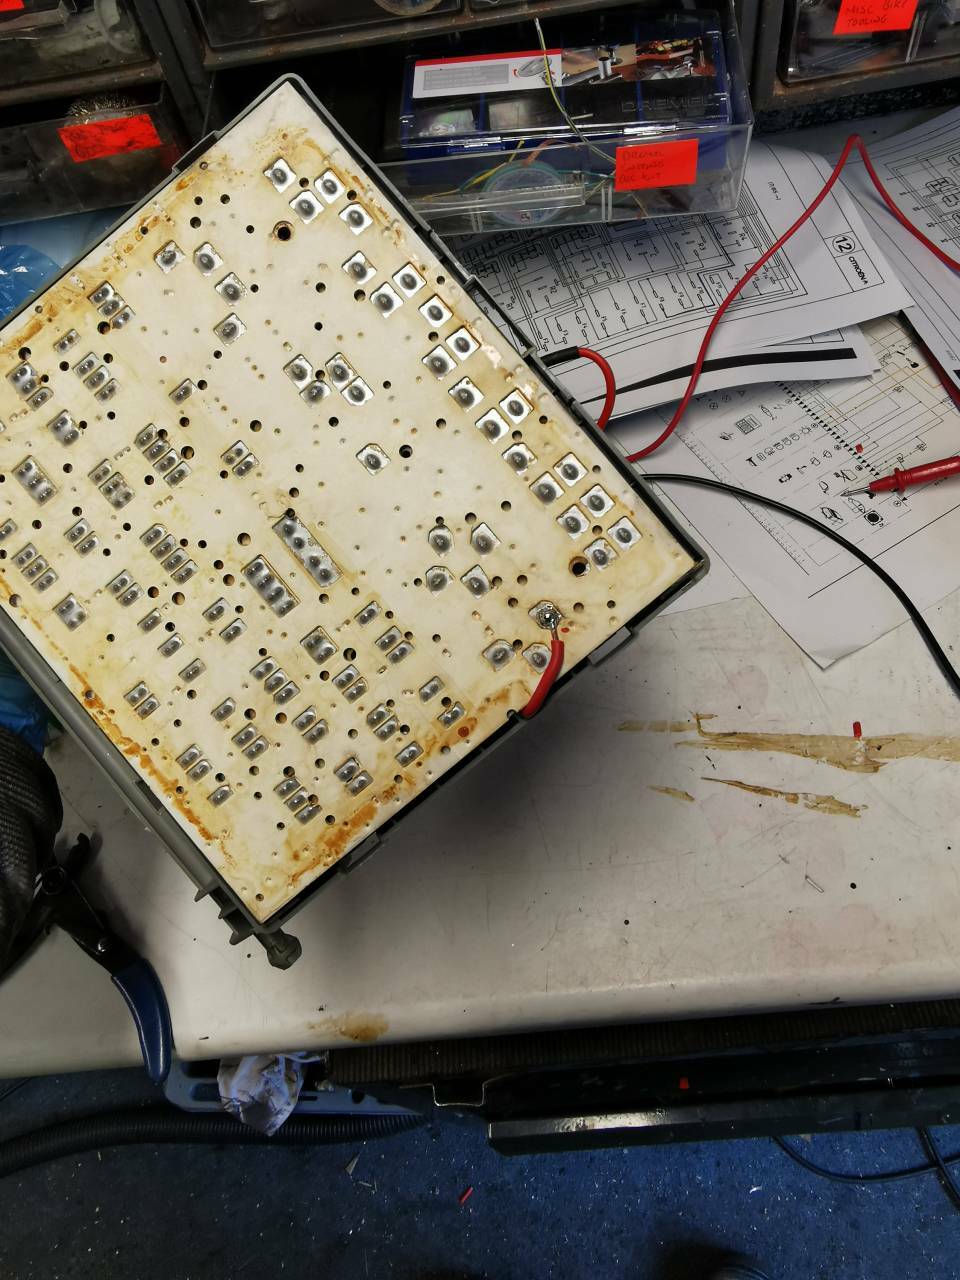
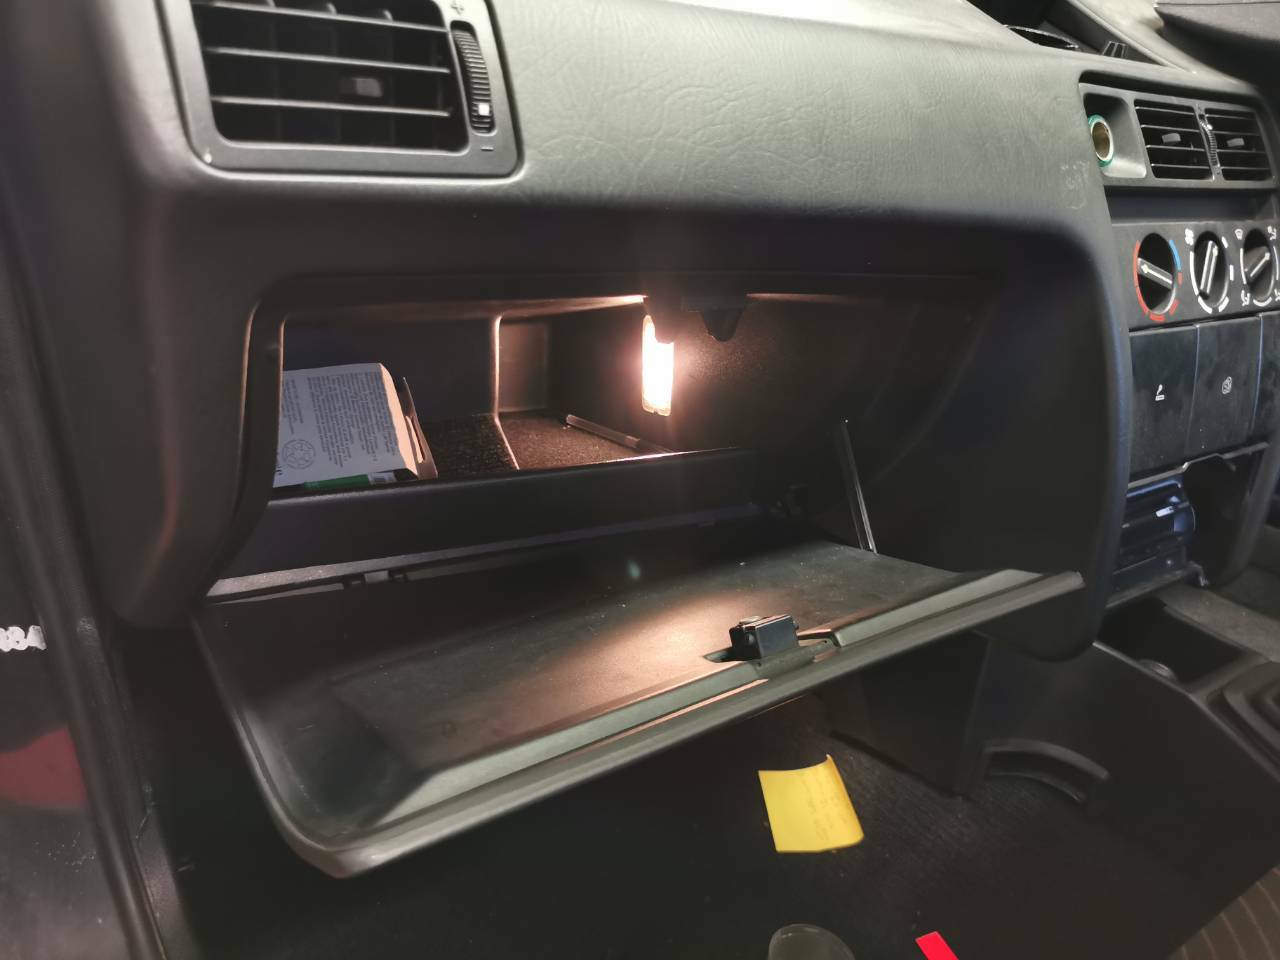
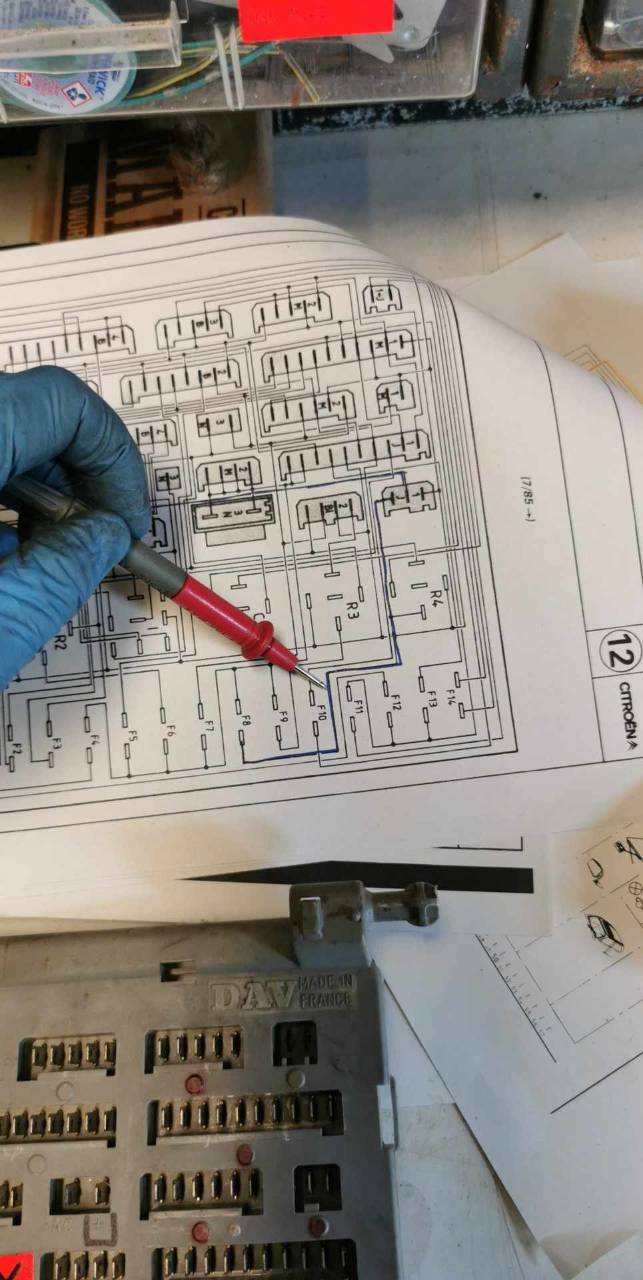
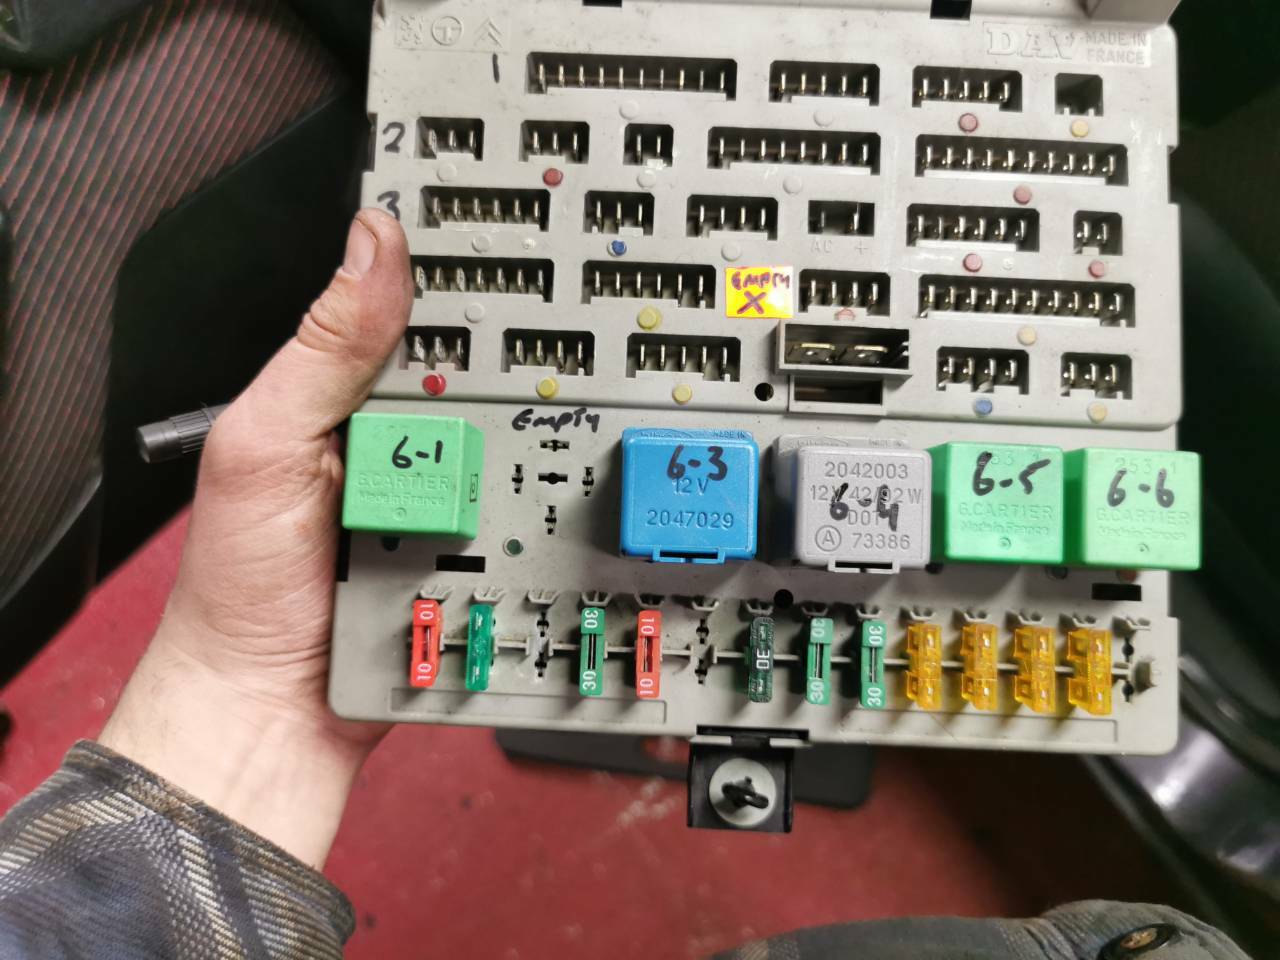
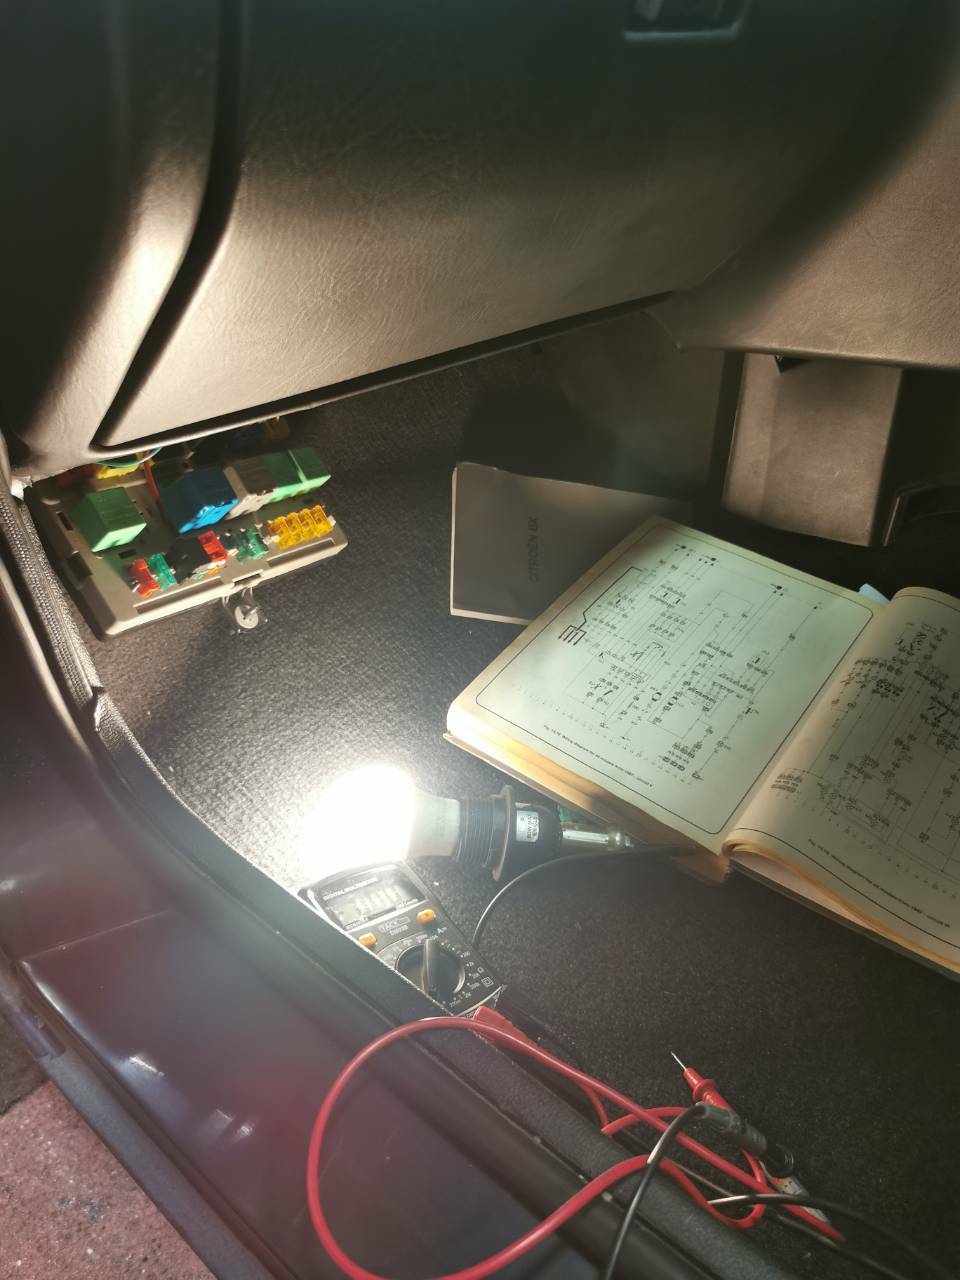
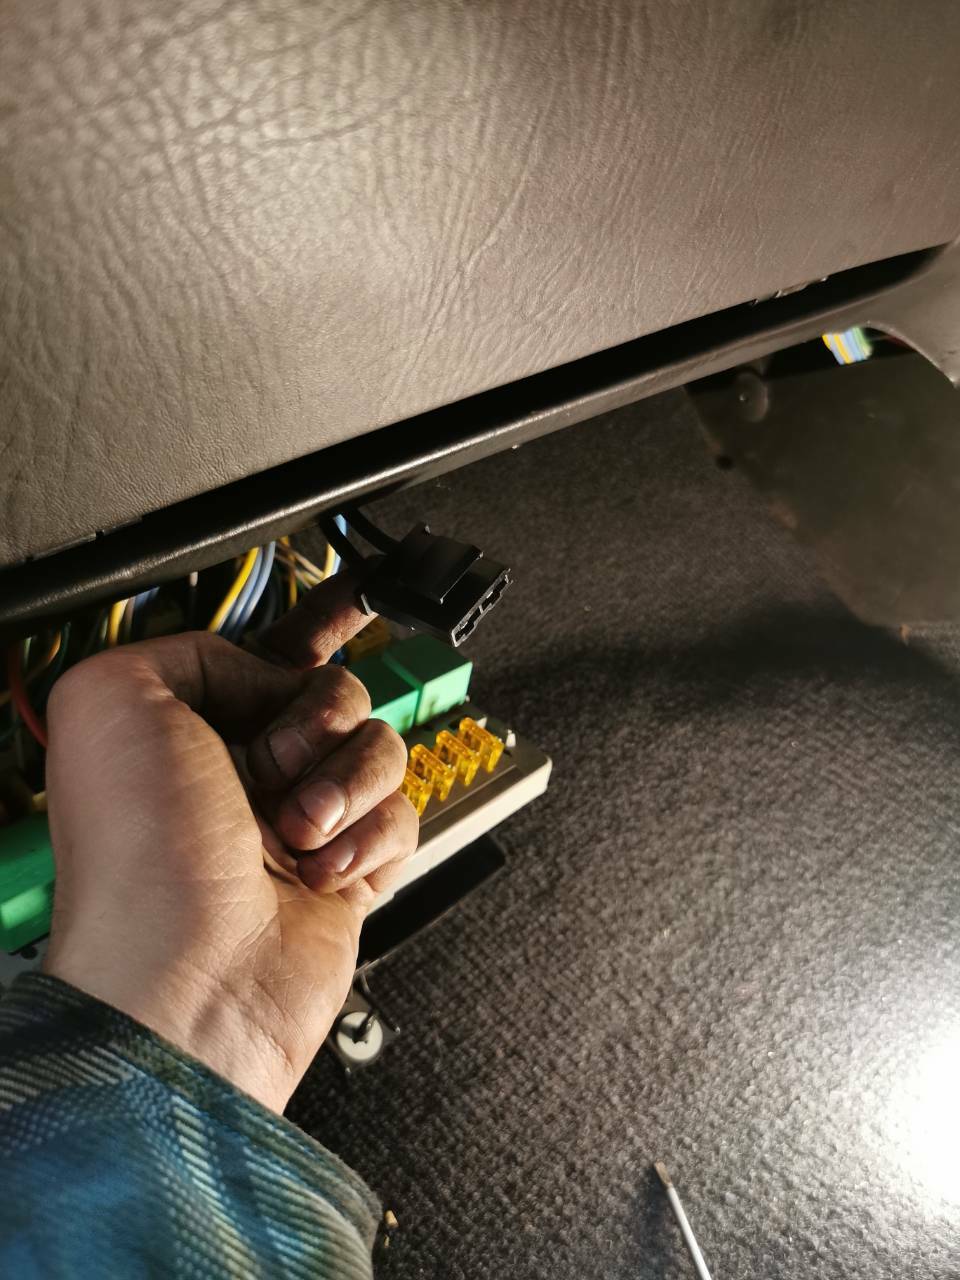
Well bugger me sideways, I've only gone and done it. It's remarkable just how easy it is when you have the correct information to hand - this came in the form of OEM wiring diagrams for the fuse board itself. With that, I tracked the lines and worked out which continuity checks needed doing. Was surprised to note that the fuse board connectors went in reverse order (6,5,4,3,2,1) as you view it. It became evident that the very first continuity check was open circuit which was promising. This meant it had to come out (again) With the board on the bench, it was a lot easier to repeat all the required continuity checks, and we finally had the fault pinpointed. There was an open circuit from the 'cold' side of the fuse socket, to the first junction of the horn/heated screen circuit, namely the high power input for the heated screen relay (this then carries on to the horn side of the circuit) Unfortunately, it's a double-layered board and I was unable to access the actual board. Luckily, I had a surplus piggyback fuse with a flylead, so I elected to add a flylead to the relay terminal. Ended up using solid core wire on the board half as it's quite a high amperage circuit. With that all assembled, the board was re-tested and continuity was restored. The board was reconnected to the car and the horn now works! Also, billy bonus, the HRW works and the switch illuminates, so I must have been talking bollocks about it working beforehand. With that all confirmed to work, the interior was rebuilt (glovebox light fixed) As an aside, I noticed the oil level gauge wasn't working any more - this was traced to the sensor plug coming off for some reason so that's an easy win. So, I'm back to bodywork repairs for the rest of the week, hopefully without any more nasty surprises! Cheers.
- 388 replies
-
- 21
-
-
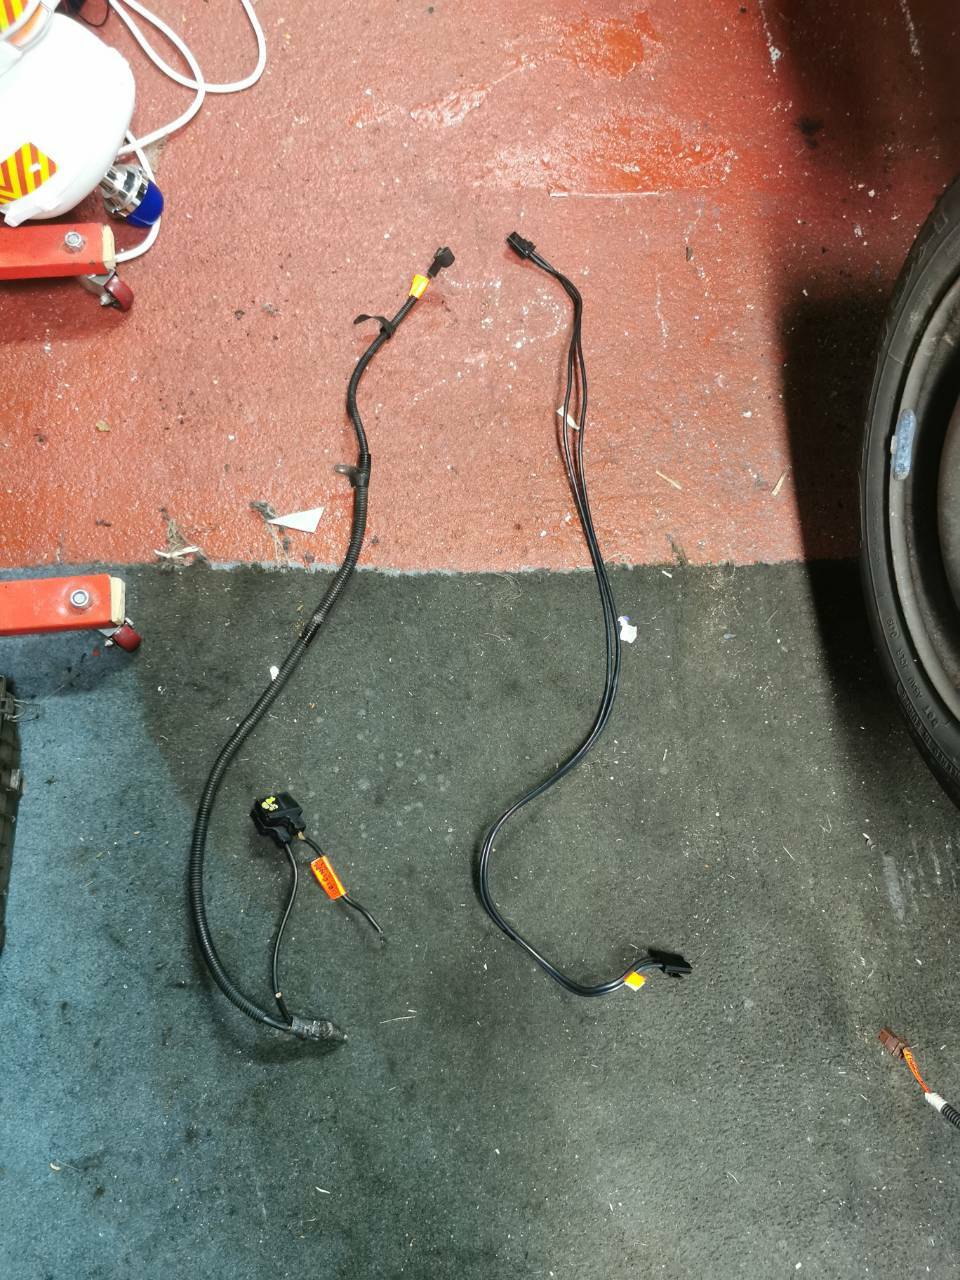
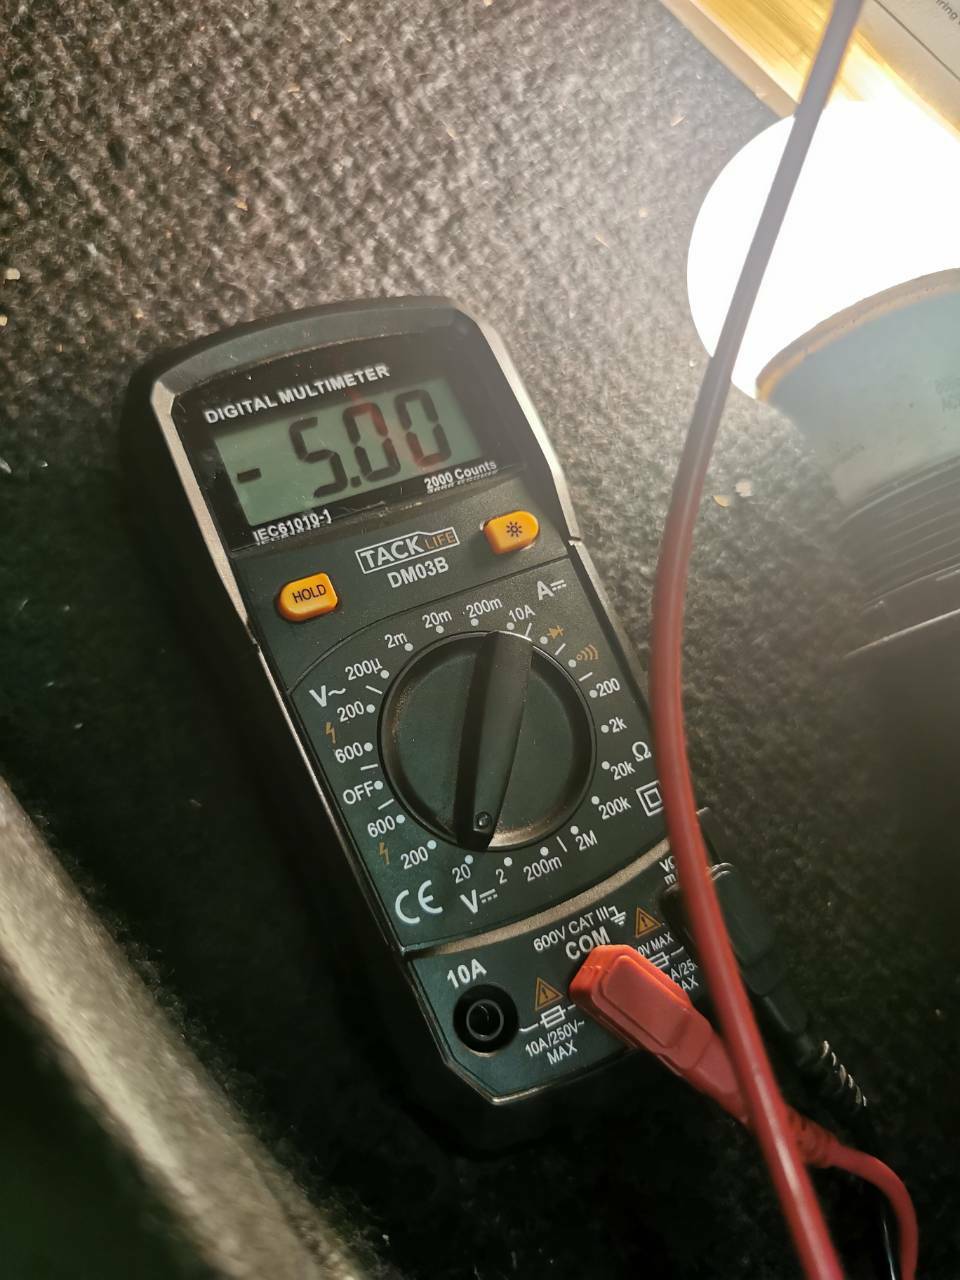
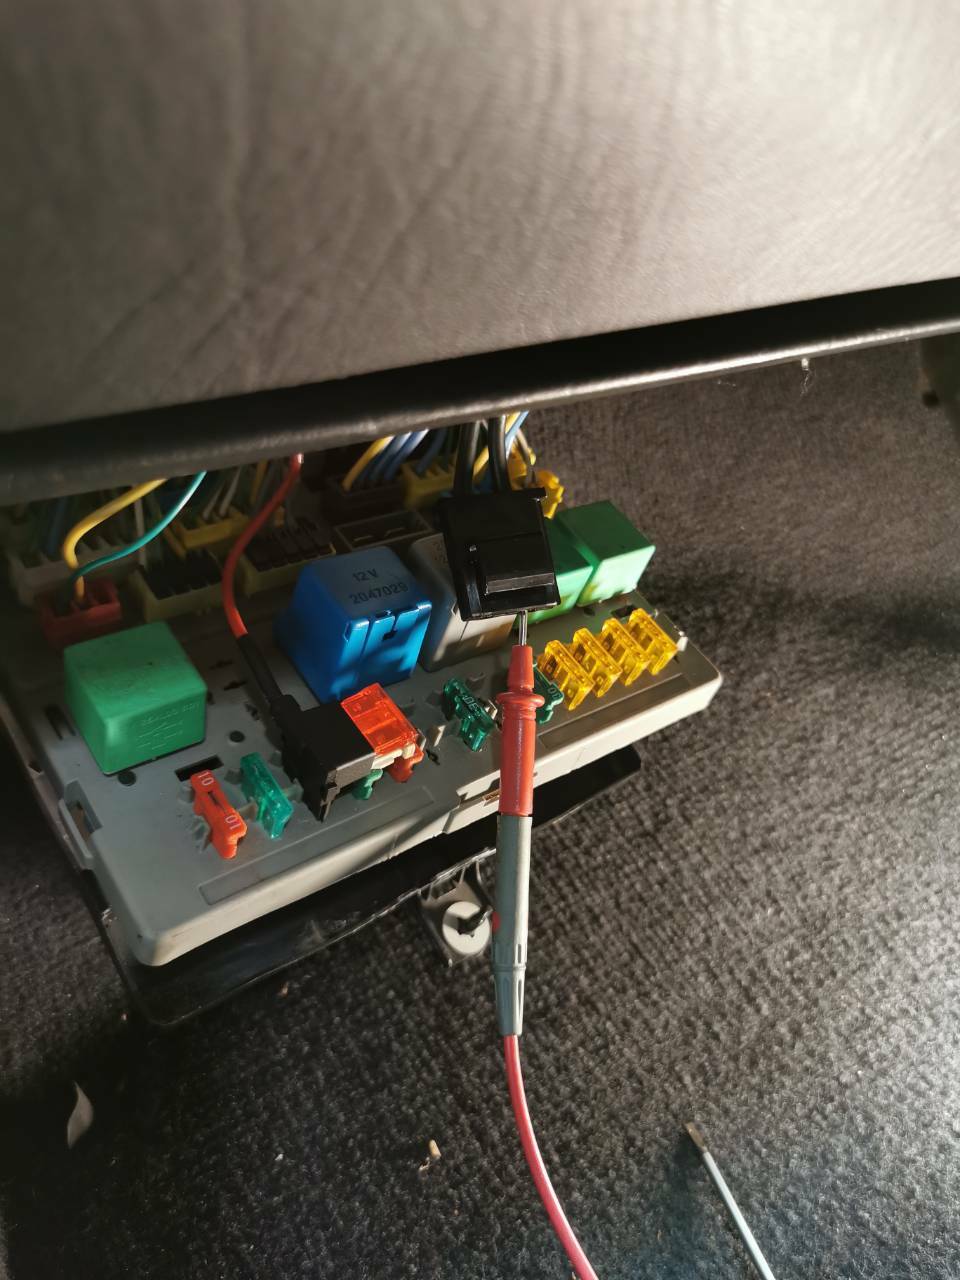
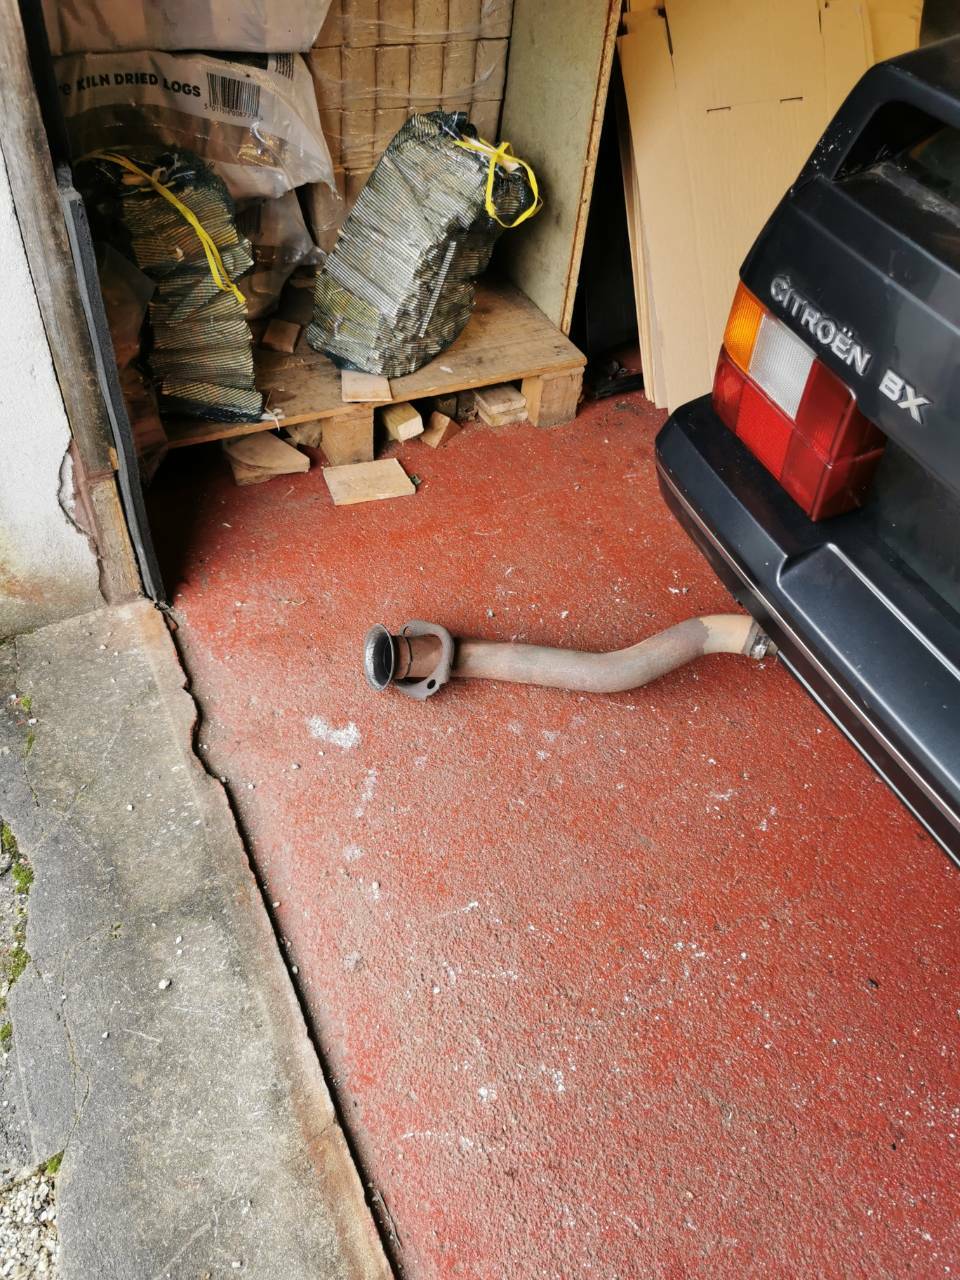
Minimal photos today, because I was incredibly pissed off with the entire day. Firstly though, some good news arrived today: A good used catalytic converter for the Beat - this may still need to go to the exhaust place for a replacement flanges to match the stainless link pipe. So, on with the fault diagnosis. Reinstalled the cabin fan and headlights to aid the digging. Decided the fuse box needed to come out for a clean up, so all the connectors were marked up and disconnected And eventually the fuse box was on the bench, given a stiff bristle brush and some contact cleaner before being blow-dried from the compressor and left on the dehumidifier to dry fully. Yesterday, I came to the conclusion that the fuse feed box and battery positive lead were in need of changing, so more faffing occured and eventually the leads were on the floor. Annoyingly, I had a niggly little voice in the back of my head to check this lead further, as it dawned on me that I hadn't fully tested it in isolation as the alternator and starter had still been connected to the supply. Figured it would be best due diligence to check It with all items out of the circuit, Connected it to the battery, and in all the imaginable combinations of test, they all came back with battery voltage, inexplicably. This meant that everything had to get refitted, which I did not enjoy. The highlight was getting the cables back through the grommet into the cabin, made easier with a bit of steel wire and some tape; Eventually it was all rebullt and the test carried out again... 5V. I had a bit of a tantrum about this, but eventually found out the entire thing was my fault, mainly because I had gone for the 'Use a clean shiny big patch of metal as an earth' and it turned out to be pretty crap as an earth - testing the circuit and using a proper earthing point made all the difference and proves that we were getting battery voltage, but using the crap earth, we were getting just 5v which was a lie. Next fuck up wasn't really my fault - the heated rear window WAS working the entire time - it transpired that a bulb had blown in the switch so I was never going to tell if it was on (EDIT: this turned out to be bollocks, see my next post). Seeing that the horn was still working, I rigged it to the battery which worked. Checked the stalk connector again for power and it was negligible, so it's getting closer. I've now got a BX factory electrical manual and read up on the fuse box, which I reckon is the culprit (again,) Sorry if the spelling is terrible, I'm absolutely exhausted and been doing the ol' nodding dog here which isn't helping so I'm off to bed. Cheers
- 388 replies
-
- 16
-
-
-
I really enjoy reading about the human interest behind projects like this that would almost be considered lost causes by those that don't know. Best of luck!
-
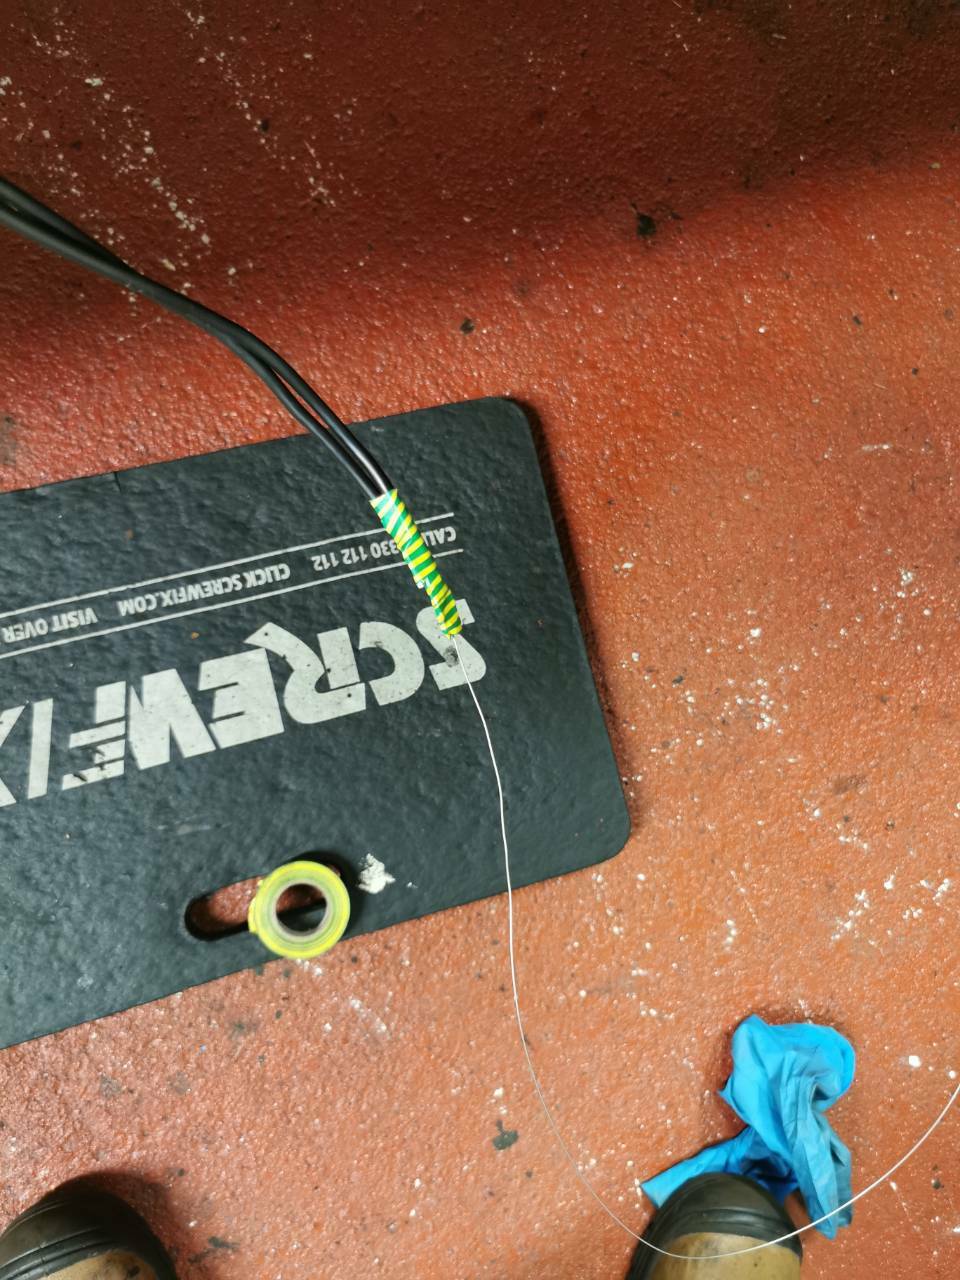
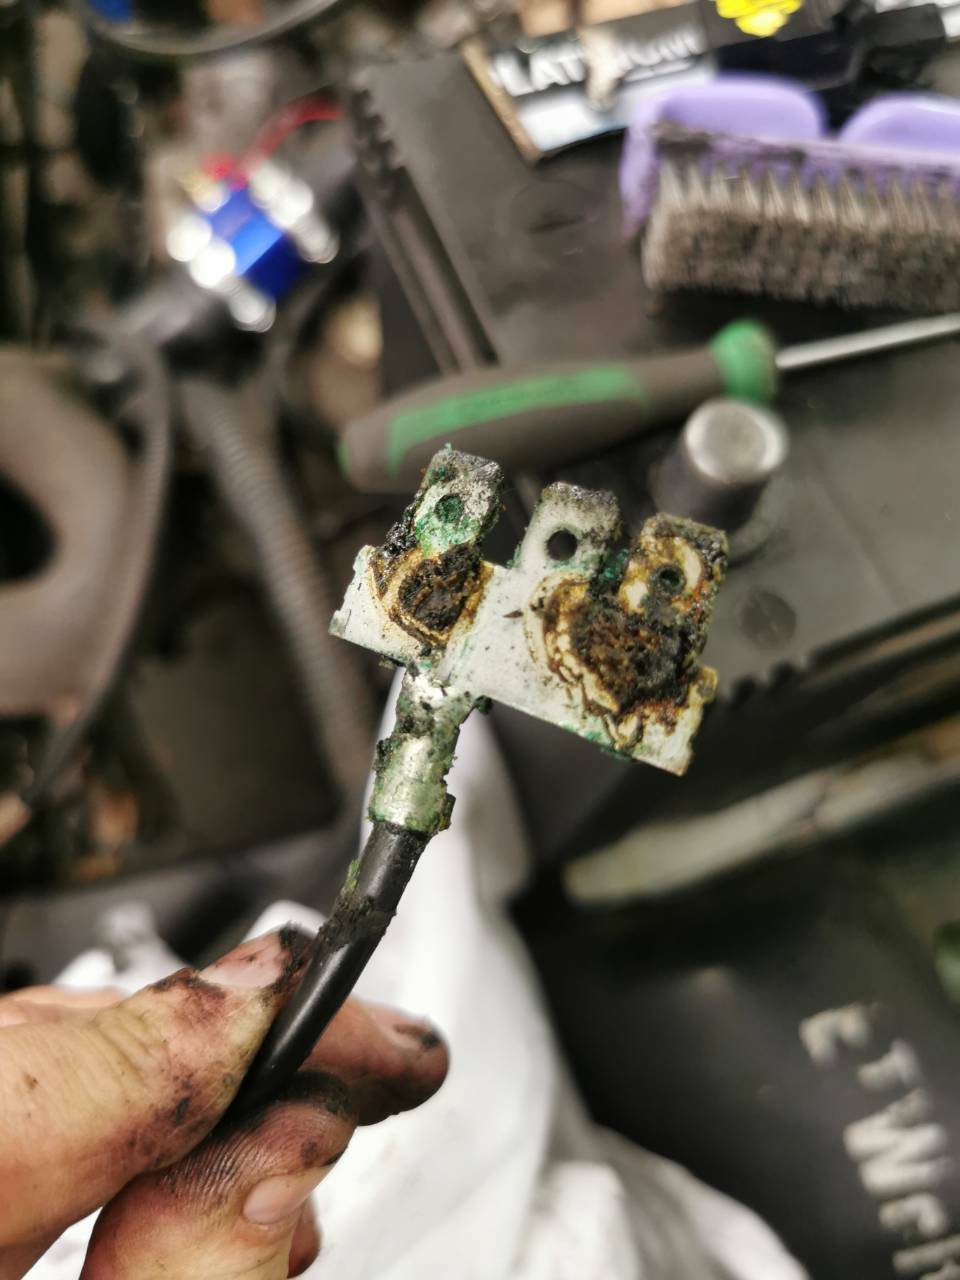
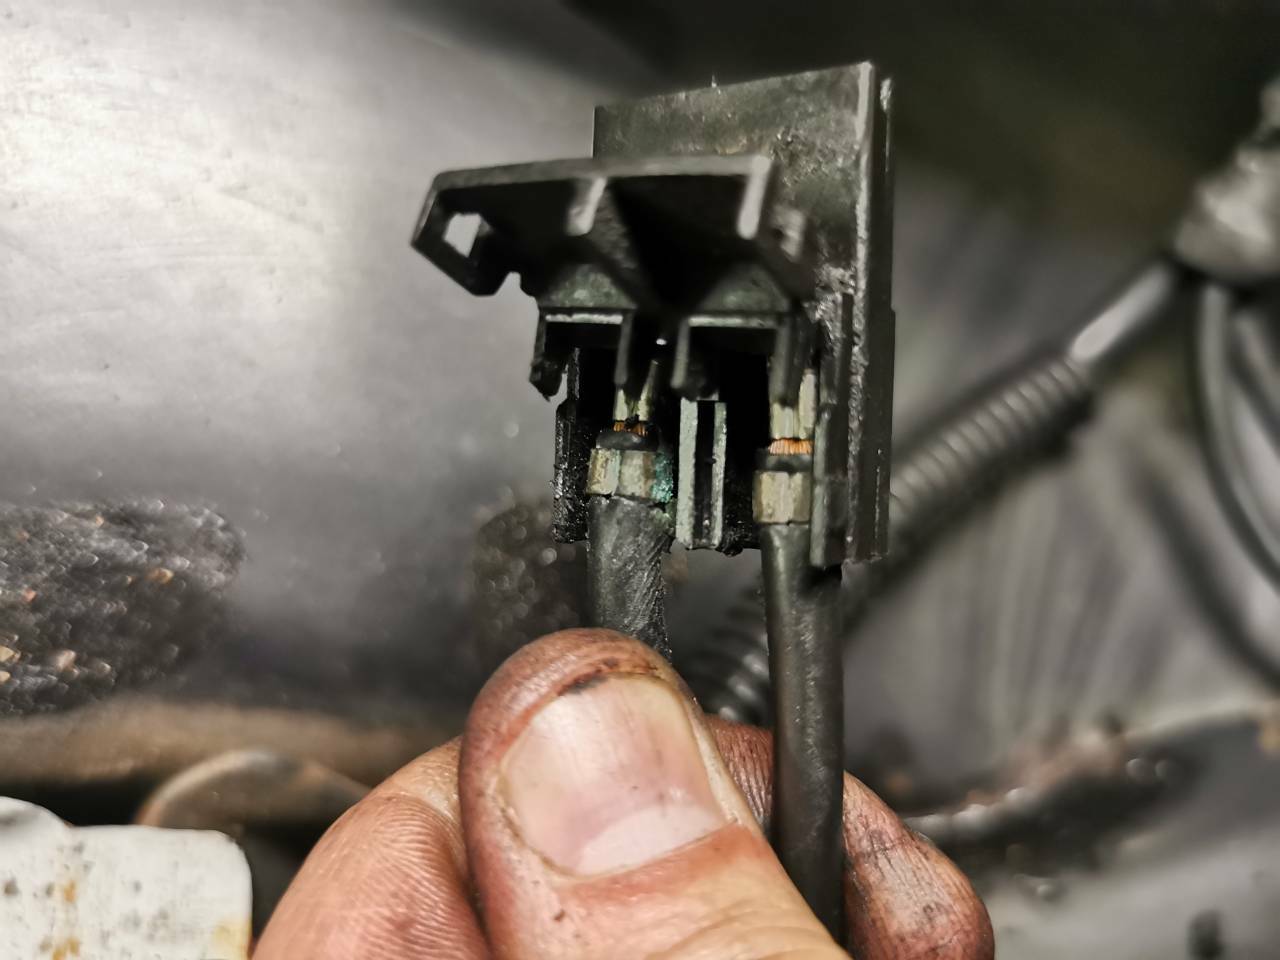
Christ, yesterday was a bit of a ballache. Started off innocently enough, removing the seam sealer from the next area requiring repairs. Whilst in the area, I noticed the horn was there and realised I hadn't tested it in years. Popped the battery back on, pressed the button... And nothing. Balls. First things first, check for voltage at the connector using a test lamp - no lighty no likey. Next job was to check the horn switch as they're prone to failing. This was working as advertised, but it was only showing 5V at the connector. The heated rear screen operates on that circuit as well - and wasn't lighting up. Oh boy, here we go... With the fuse out and the multimeter inserted into the 'hot' side, it still wasn't looking promising. The battery voltage was checked and found to be fine. This is a permanent live circuit and the power feed goes from battery -> fusebox -> fuse, so I figured it was worth checking from the battery onwards. Found this manky mess hiding under the plastic covers, just after the battery positive terminal: And hidden amongst the grim was this little fella: Luckily, Citroen have a dual redundancy here - the twin-spade connector has two positions that it can connect to on the block, as all the other positions are unused. Because that feed wire was corroded, I could simply use the other side which was in much better condition. You know.... underneath all that gunk and dirt. I'm guessing the connector was slathered in something in an attempt to protect it. These all cleaned up all right though. The other side of the connector had mild verdigris and cleaned up okay as well. And the connector re-assembled, and connected in the new, non-chafed position. I tested the voltage at the terminals at the back of the battery end of this loom (which I think is the main feed loom for the fusebox) and found battery voltage. The other end? 5V once again. Resistance checks were carried out end-to-end and found to be 0.1ohms, so that's fine. The wiring diagrams are pretty unhelpful in the Haynes manual but I think there's a fly lead attached to this loom somewhere that may be causing issues. Has anyone else had something like this? I've currently got loads of electrical components disconnected on the car, so I may just reattach everything too and try again. I only had a couple of hours to look into it last night. Cheers
-
I love 504s, never sat in one or anything but the look of them has always appealed to me. Good luck with it?
-
A man in a van dropped this off today - I already feel safer 🤣 Checked the white rags for leaks - none present, and the car stayed at max height for nearly 24 hours, so I'd call that a result. I've also moved the temperature gauge earth return to a proper earth point and ran the engine up to temperature - this time the gauge worked, so that job can be ticked off.
-
Huh. Commute to work this morning in the Rover, sat queuing at a roundabout. Suddenly, enormously loud explosion heard - thought it was a gunshot. Suddenly, Rover has plenty of power and it is running lovely - I'd been suspecting a boost leak somewhere for a while. Guessing the exhaust had a restriction somewhere, but I've not seen anything come out the tailpipe.
-
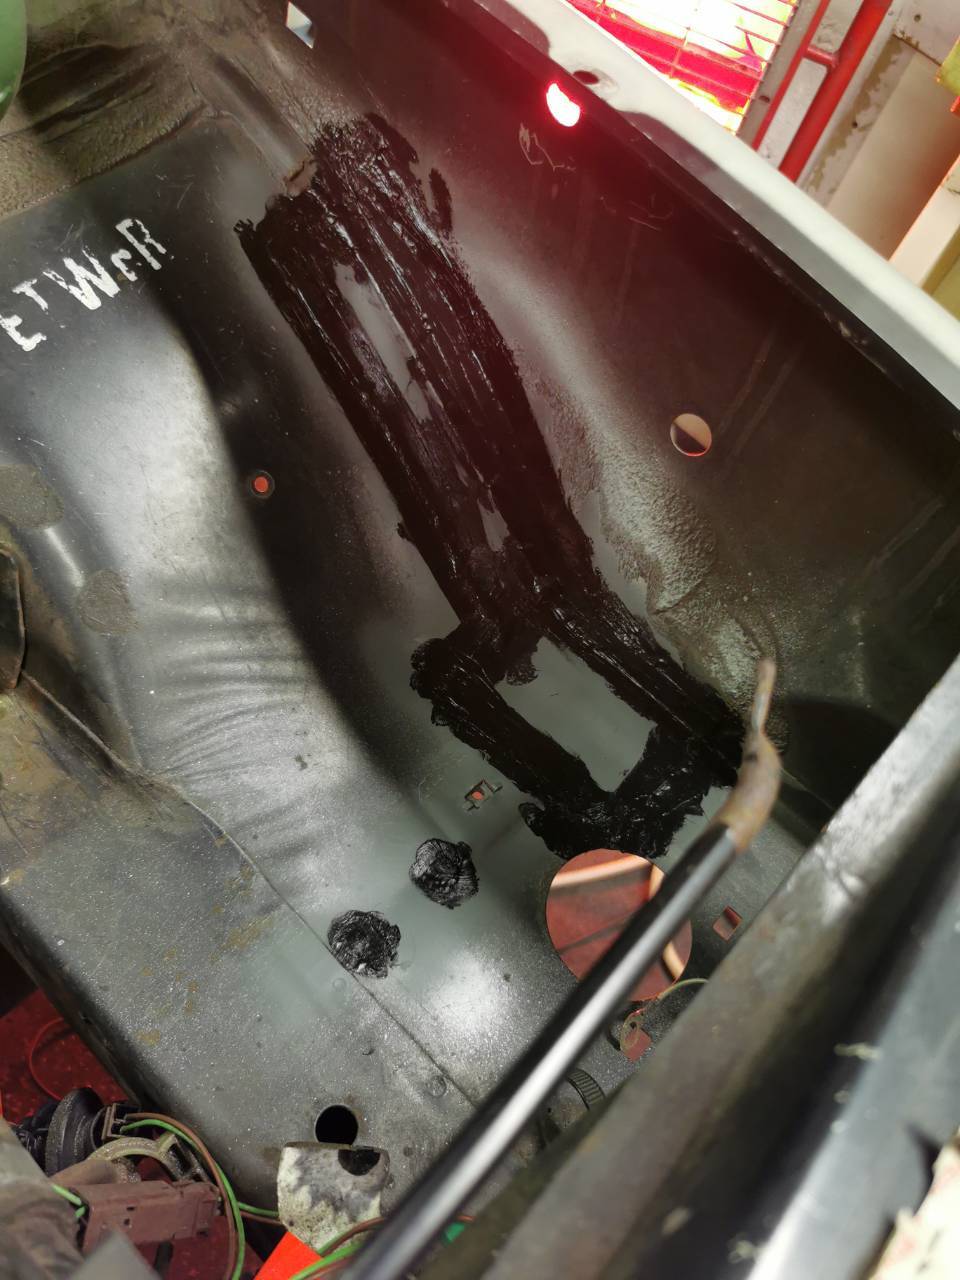
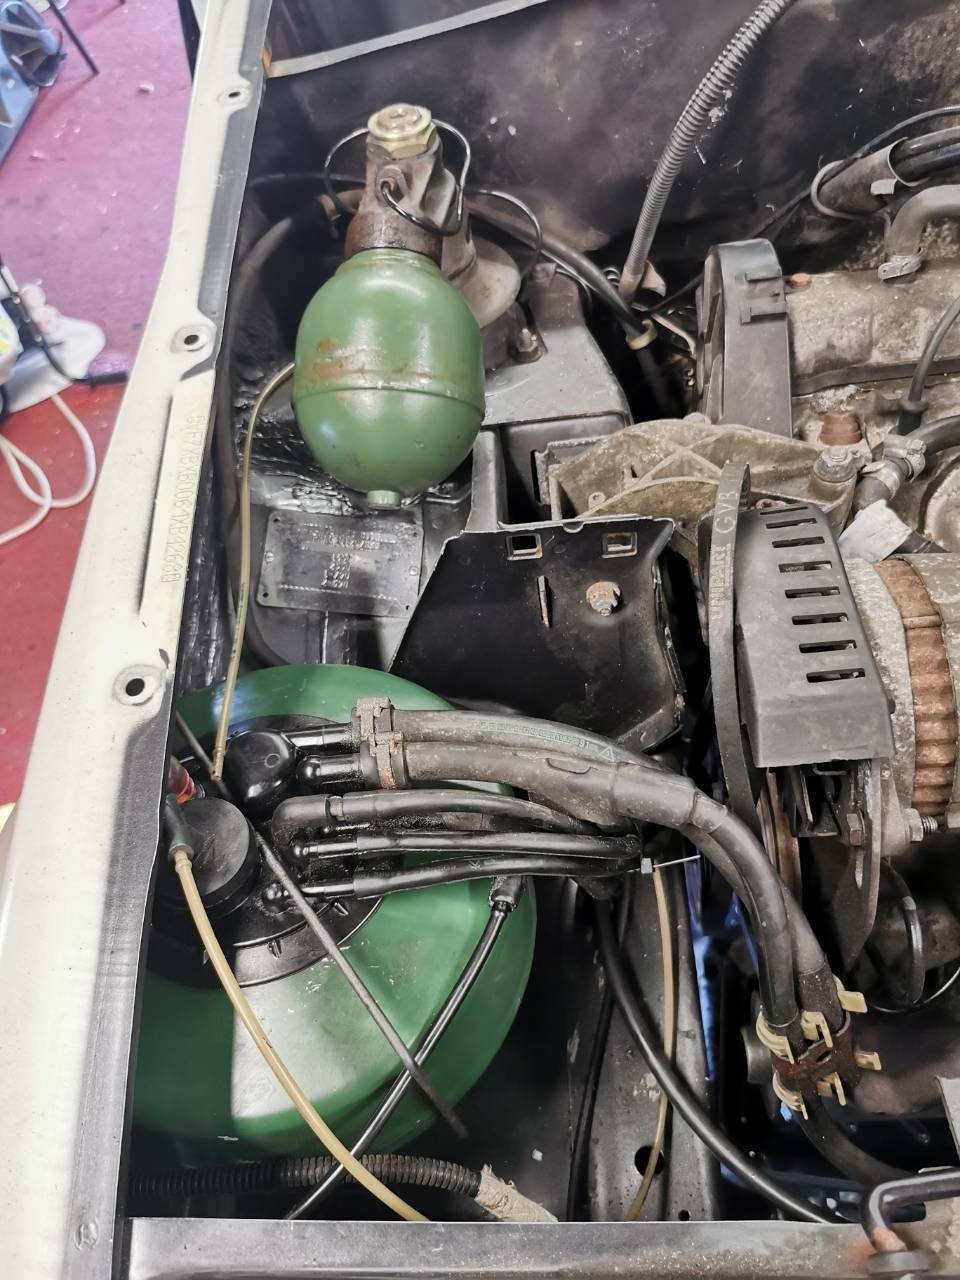
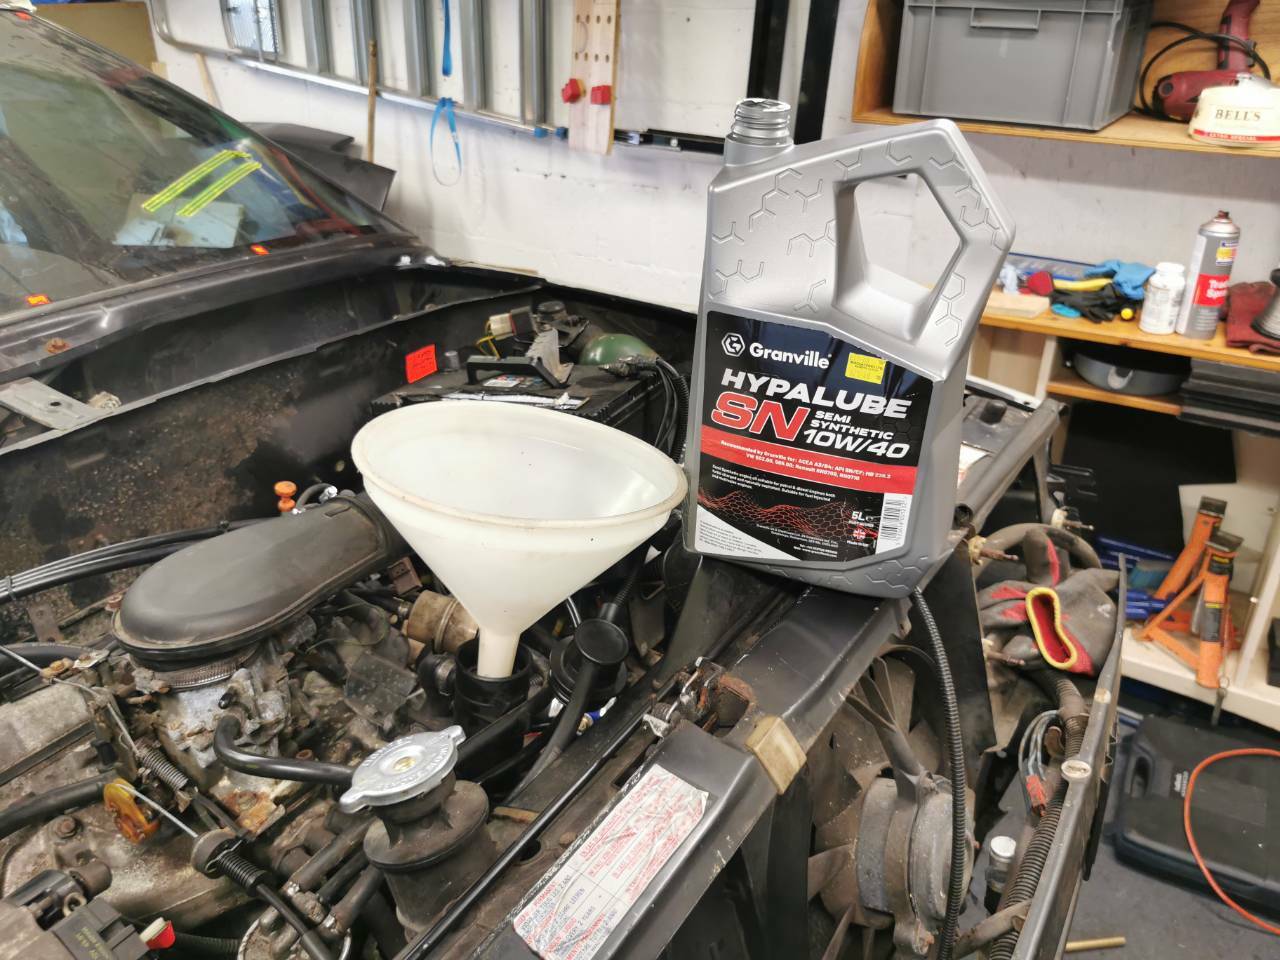
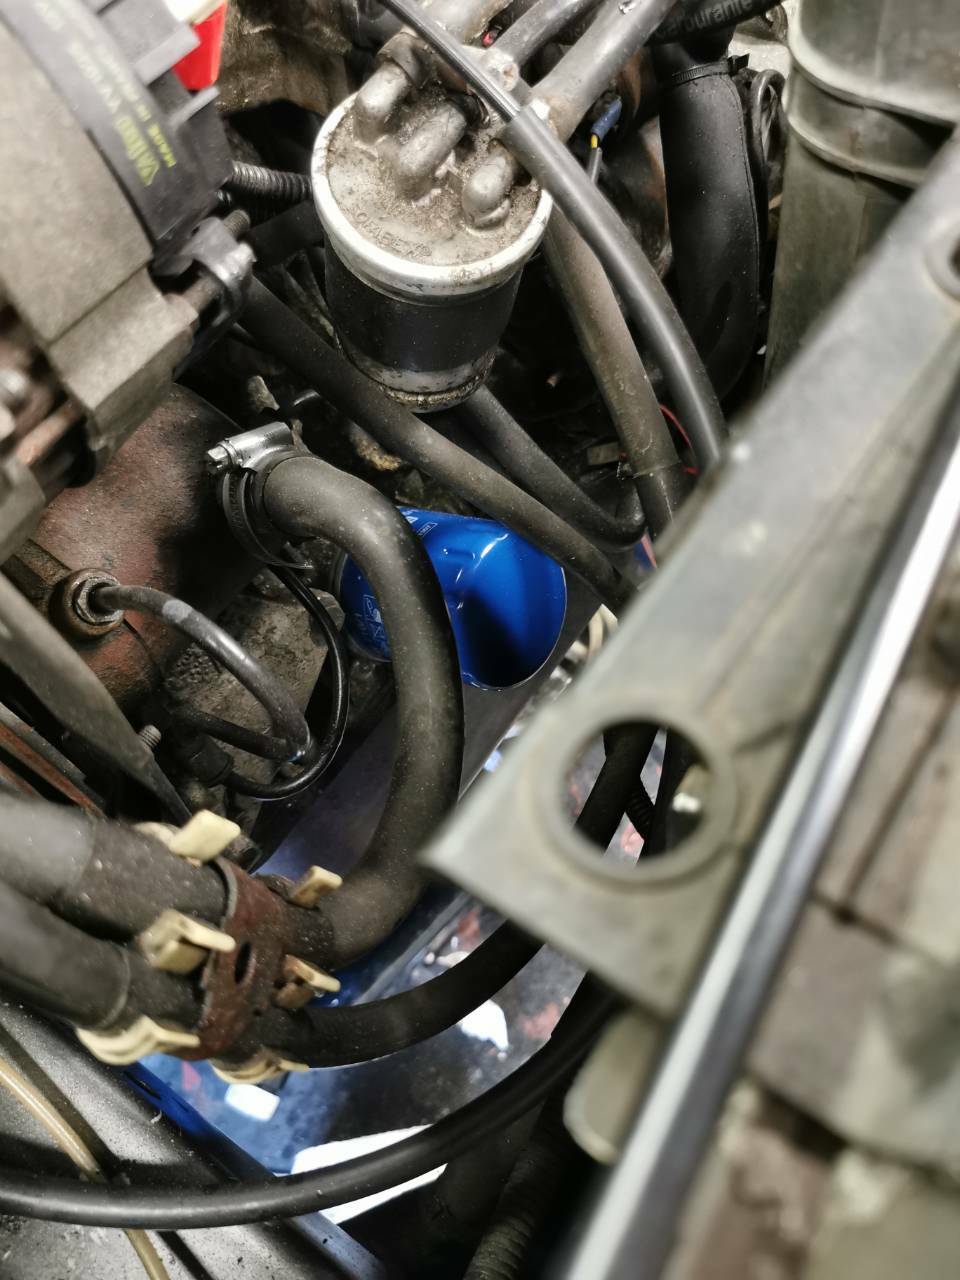
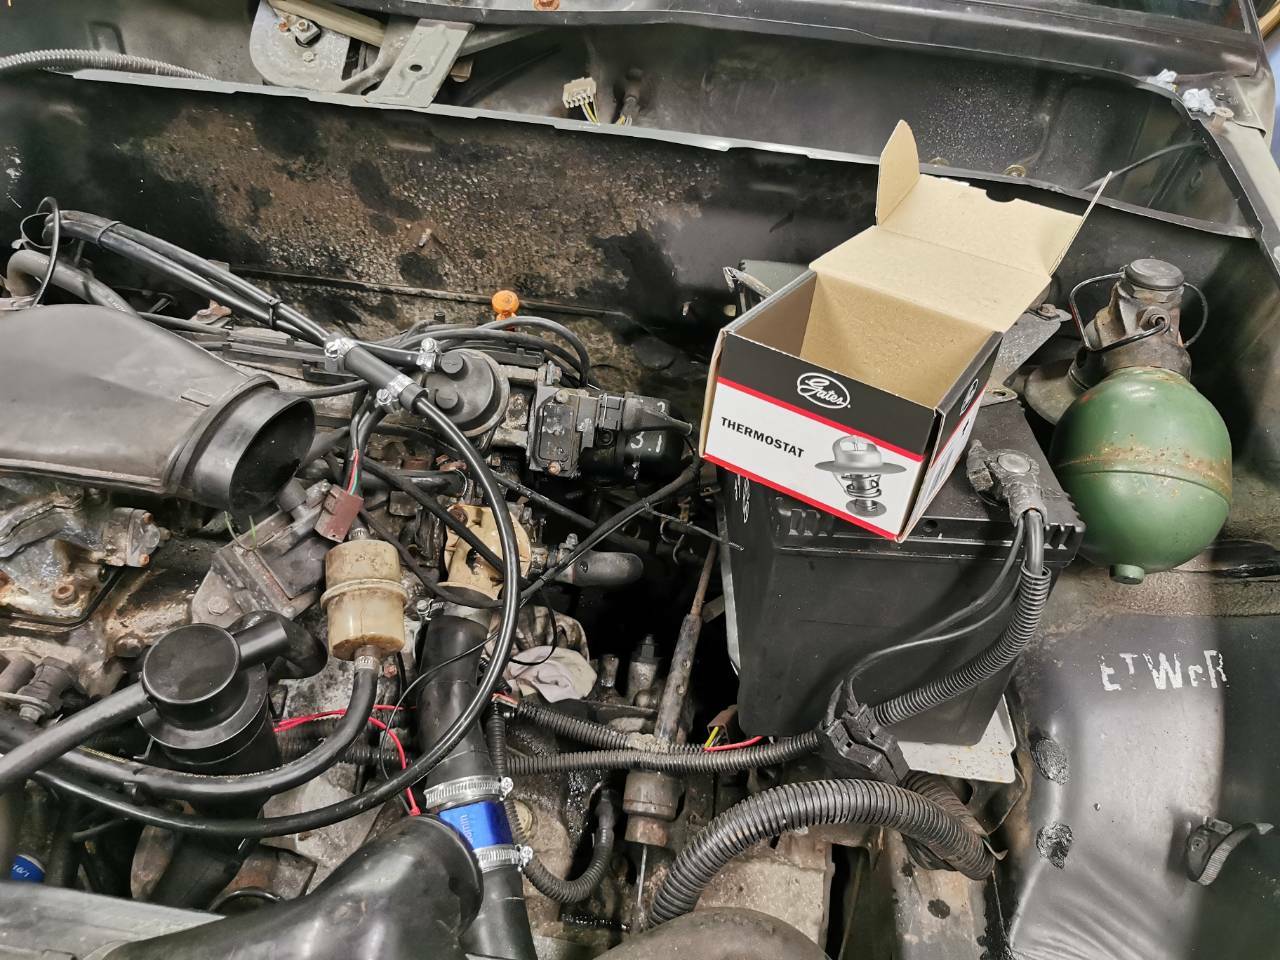
Another productive few hours. Ran the BX for 15 minutes to get the oil/Berryman mix up to temperature before draining. The exhaust fumes fill the garage quite quickly, so I tried helping it along with the spare Laguna pipe 😅 (It did not help.) After fifteen minutes of idling, I cracked open the drain plug and noticed just how thin the oil coming out was. I know I'd added about 800ml of Berryman, but even with that factored in, it was too thin. I slapped another coat of primer onto the areas I'd applied Puraflex to. And left the oil to drain as much as possible. Had another check of the LHM system and started preparing it for a first run. Pleased with how the repairs look now everything is back in place. OSF sphere screwed back on and looking fine! Once the oil fully drained, the sump plug was refitted, a new oil filter attached (old one was stamped 2016, which would tally up with the lack of use it has had since then) And the oil topped up to roughly the correct level. The car wasn't level so I didn't want to overfill it. Next job was to reattach the front wheels, I also slid a set of ramps underneath the wheels to give a bit of clearance. As I was planning on priming the LHM system, I needed the cooling system to work, so I ended up changing the thermostat. Was going to do it at the same time as the timing belt, but there you go. The LHM belt was reattached to the pulleys and the HP pump supply line was disconnected and primed. MrsH was roped in at this point to start the engine whilst I connected the supply line. For some reason, the LHM pump belt lost its tension so this was resecured. And after a few minutes, success! The car was suspended on LHM for the first time in nearly a year. Early indications are promising for the engine smoke too, there seemed to be a lot less clouds on acceleration. Once the engine got warm and the levels were re-established, I started exercising the suspension by alternating between max and minimum extension. The struts are a little bit sticky and creaky but nothing too unexpected for a car that's been sat a while. I bled the cooling system of all air and was dismayed to notice the temperature gauge still wasn't giving a reading, despite the new thermostat proving serviceable and the top hose getting hot. I shut the engine down and suddenly: Ah, everything IS working fine, it's just me being the idiot. I've had a prod with the multimeter and found the 'earth' terminal I was connecting to is a perfect earth in Key position 1, but 12v comes through when set to ignition. Luckily, I added plenty of spare wire to the earth wire so I can simply connect it to a proper earth point instead of being lazy. Anyway, seeing as it's mother's day, I'm knocking it on the head tonight to enjoy some time with MrsH. I'll pop in tonight to put a final coat of paint on the welding repairs before moving onto the next section. Last thing I did was place four clean rags at each corner to check for static LHM leaks. Hopefully they'll still be clean tomorrow! I'm currently debating whether it is even worth doing the head gasket any more. Any advice? Cheers.
- 388 replies
-
- 15
-
-
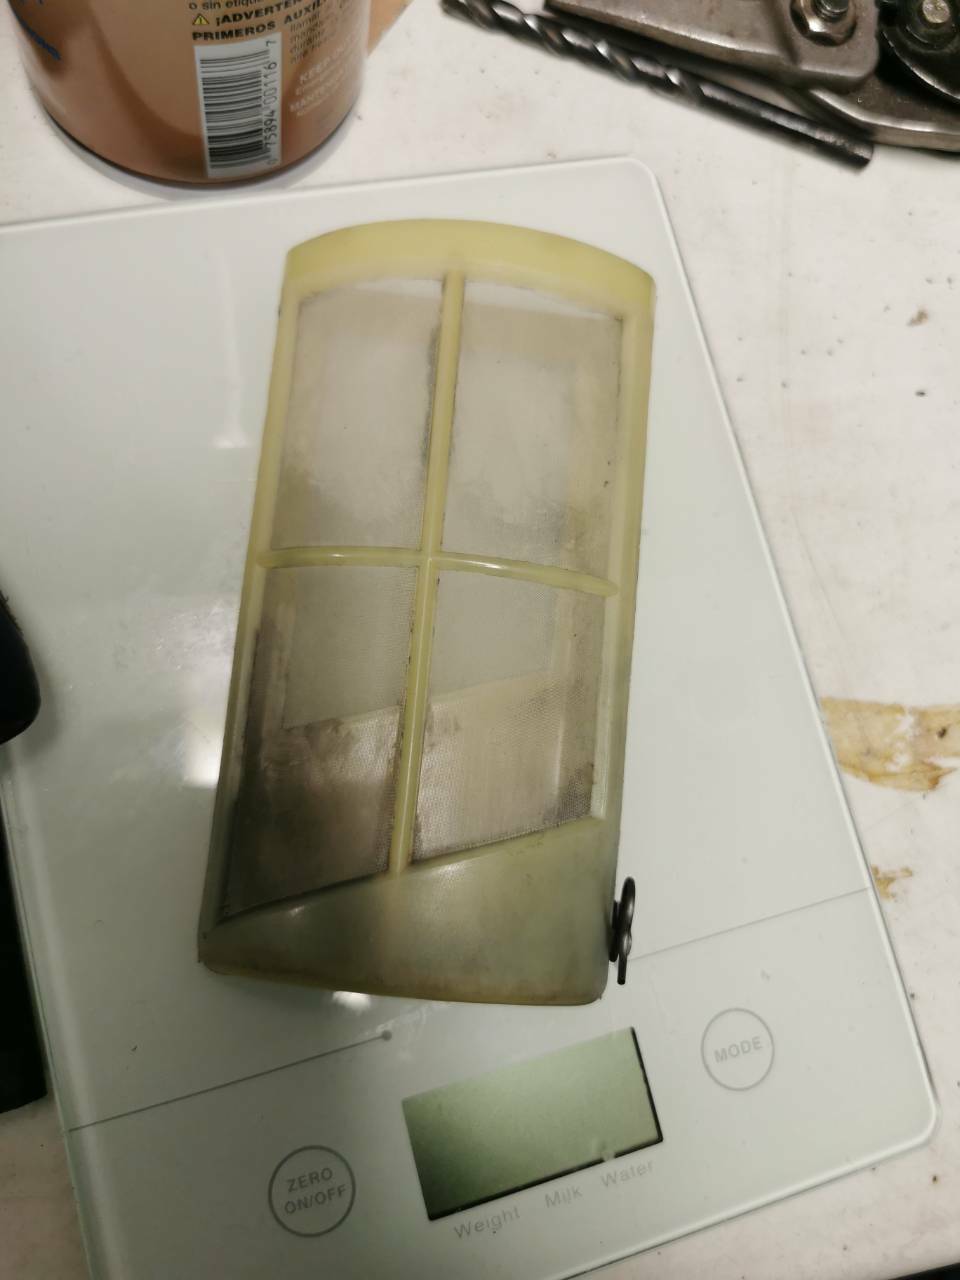
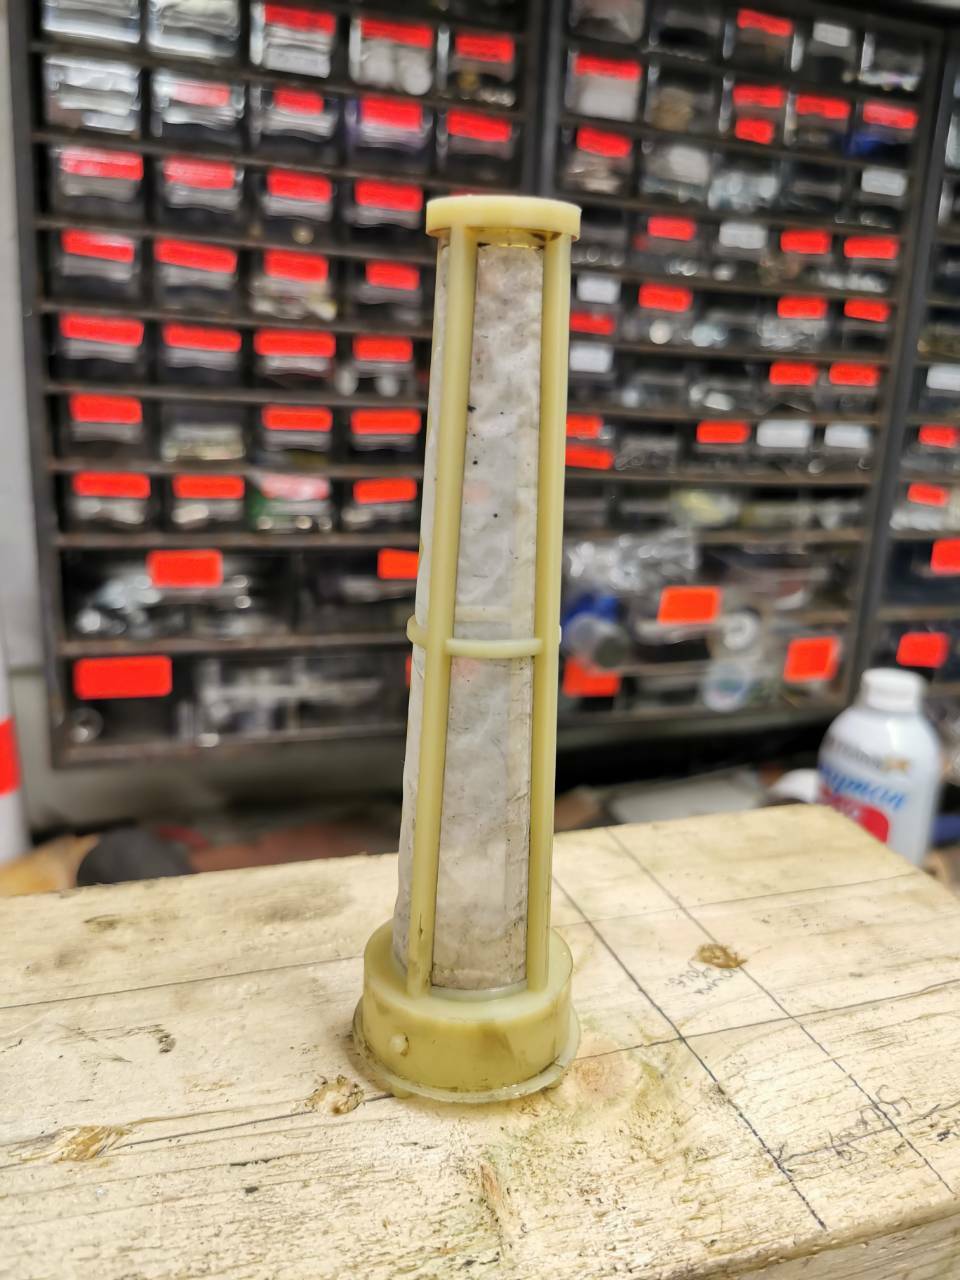
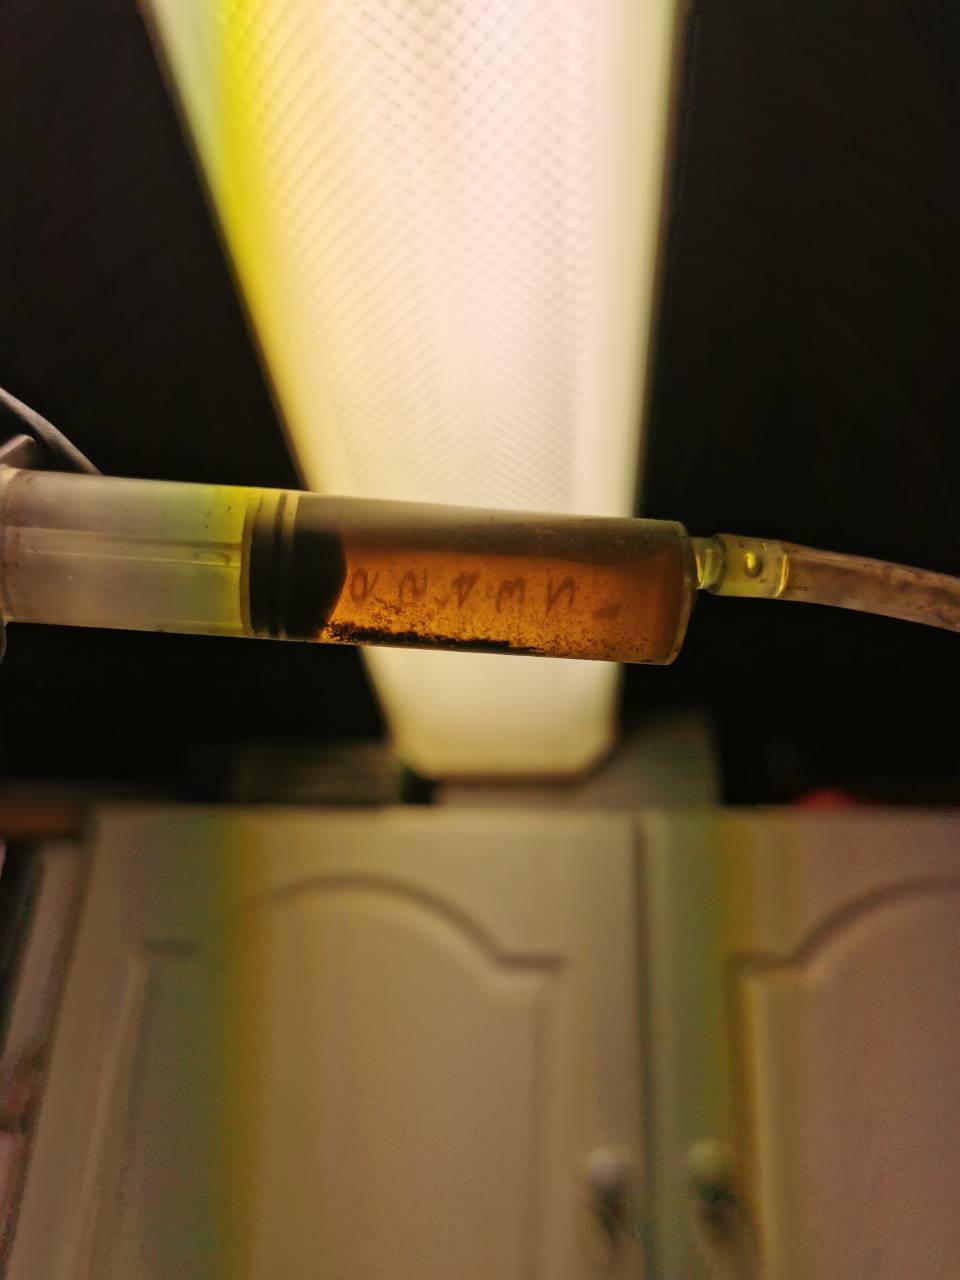
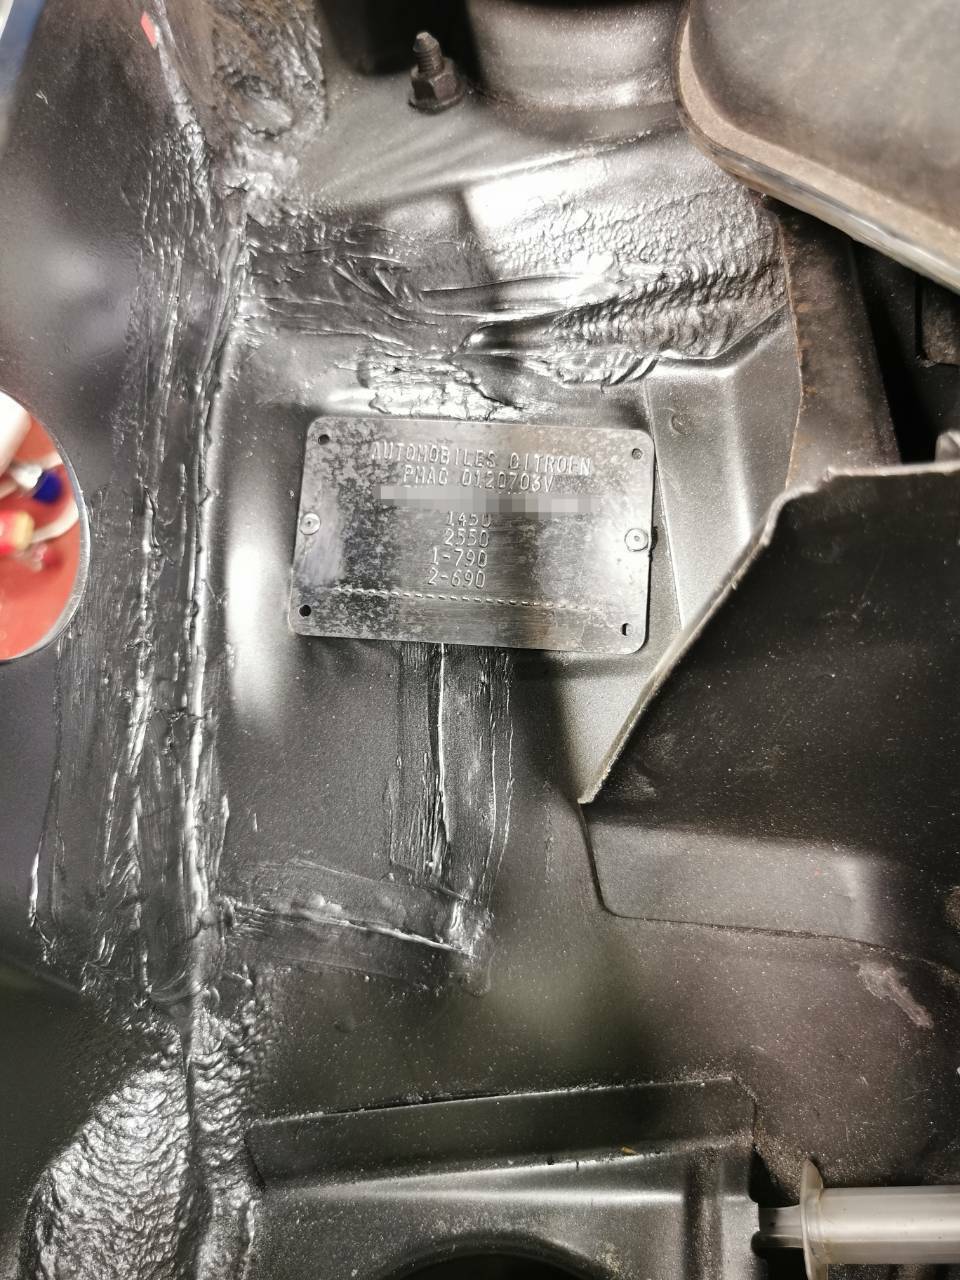
Productive few hours in the garage today, although pictures are sporadic. Prepped the panel for welding in: Squeeeeeze the pigeon real hard, and eventually stopped blowing holes in the metal. And ground down. This has now been primed and Puraflex has been added to the seams. Decided to puty hand in the way of the hammer, because I'm an idiot. Whilst this was ongoing, I decided to try and resolve the burning oil issue with some snake oil. The car had been running fine when in use, but started blowing blue smoke when accelerating the engine. I'm rolling a lot of dice on gummed up piston rings. Luckily, the internet has given a pretty glowing recommendation to this product: I spent a few hours searching around the internet, and it seems to be good for solving oil consumption issues. Decided to try a piston soak, using the procedure recommended by Berryman. Used two bottles, poured them into each spark plug hole, put the plugs back in hand tight and agitated the engine by rotating the crankshaft pulley back and forth every half an hour. Every hour, I took the plugs out and checked the fluid by sucking some out with a syringe. The fluid was clear when poured in. This was the best one a couple of hours in - you can see the carbon deposits in the bottom of the syringe. This was one of the worst ones: Pure black in there, there was another cylinder like this too. I used two bottles in total (it eventually drains into the crankcase) and five hours later, all bar one of the piston crowns was dry - a quick blast of compressed air into the spark plug hole freed it up. The remaining cylinder fluid was pulled out via the syringe, and fired into an old rag, to see how many deposits were in it. This was a 10ml sample. Whilst this was going on, I moved onto reattaching the VIN plate. Using the original remaining drill hole for one side, I drilled out the other hole and applied zinc primer to the exposed metal. Once dried, I applied Puraflex to the hole, as well as the rivet itself, and got that properly attached. With that done, I started looking at the LHM system, which was still untested because of this doozy: Luckily, these are really simple to change, just prize the clip off, and pop the pipes off. The pipeline's were heavily perished and cracked everywhere, so this was definitely worth changing. Onwards then, to the next part - building up the LHM tank. First off, I needed to take the filters out and give them a good clean. Here's where I made major fuck up of the day. Notice how similar these two cans are? ...yeah. It took me a couple of seconds to realise the cleaner wasn't just clearing loads of sludge out. Thankfully, using the right can cleaned all the traces of primer out! The other filter was also removed: And cleaned. The tank is now fitted in place but I forgot to get a photo. Tomorrow, I'll be running the engine for about 15 minutes on idle to cycle the Berryman fluid through the system before carrying out an oil change - hopefully this will be enough to stop the smokescreens when I accelerate. I'll also look to apply primer to the Puraflex and possibly a coat of paint in the evening, then I'll look to move onto the final section requiring rust repairs. Cheers!
- 388 replies
-
- 17
-
-
Fuck it, can't sit around waiting for it to be done. Welded in another portion of the arch repair. Ground the welds and applied weld through primer. Went inside for a bit to celebrate the dog's birthday for a bit - 9 years old today, and still mad as a pair of bollocks. He enjoyed a large dried sausage and some new toys. Then went back in the garage to weld another repair panel in: This was ground back and a coat of zinc primer applied. And made another panel to be welded in tomorrow at some point, gave it a coat of weld through primer and called it a night.
- 388 replies
-
- 14
-
-
Wish I'd remembered to do something similar before I took the steering wheel off 😅